A guide to help you start streaming to Twitch.
Contents
The Gear You Will Need
All credit goes to Fuzzzy!
- PC: If your PC can run PUBG then it can probably stream to twitch.
- Microphone: The best microphone for starters is The Blue Snowball Ice.
- Monitors: You will want 2 monitors if you’re going to stream.
- OBS: Get it here. Click the icon for the OS you have and then click “Download Installer” and run the installer.
Internet Speed
Test your Internet here. Open that link and once it loads press the begin test button. Once it is done look at your upload speed. If it 10 Mbps or greater then you can stream. If it is lower than that you cannot stream.
Setting Up OBS (Open Broadcaster Software)
Get your Stream Key
First go to Twitch.tv. If you’re logged in click on the little drop down arrow, and click on dashboard. If you’re not logged in then log in, and if you don’t have an account then create an account. Once you’re at the click on settings. Once the settings page loads click on the grey text that says stream key. Then press the purple button that says “Show Key”. A little pop up should come up saying not to share your stream key. Click that purple “I understand” button, and then copy the text under “Stream Key”. It should look something like live_111111111_AAAAAAAAAAAAAAAAAAAAAAAAAAAAAA.

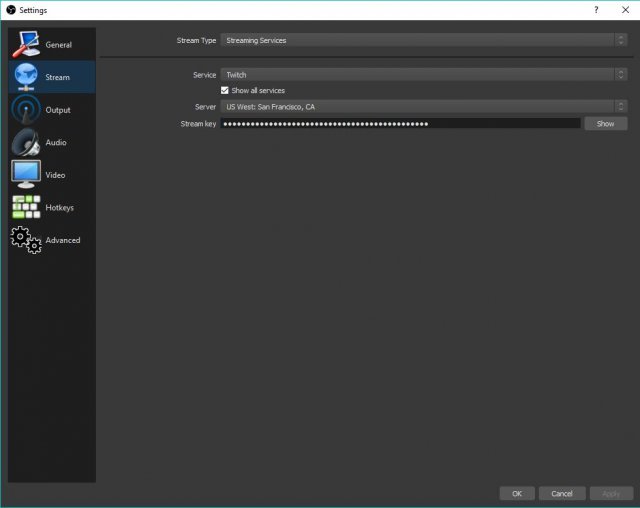
Once you’ve copied your stream key then great! Start OBS, and then click on the “Settings” button. A little settings window should come up. Click the button that says “Stream” with the globe next to it. Set the Stream type to “Streaming Services”, set the service to “Twitch”, set the Server to the one closest to you, and then paste your key into the “Stream Key” Box.

The Output Tab
In the settings window click the output button below stream. Set the output mode to “Advanced”, Set the encoder “x264”, set the rate control to “CBR”, set the bitrate to 2000, and then set the preset to “High Preformence”

The Video Tab
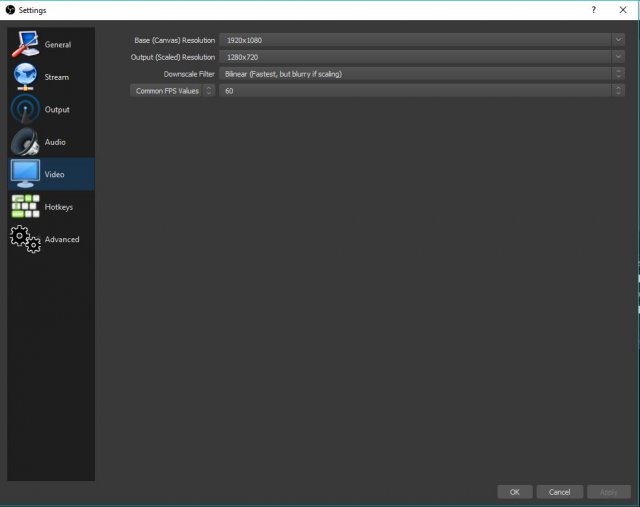
In the settings window click the video button below below audio. Set the base resolution to the resolution of your monitor, set the outputed resolution to “1280×720”, set the downscale filter to “Bilinear”, and then set the FPS to 60.

Setting up the the game source
Once you’re done changing the settings. Click the apply button and then click the ok button. To add the game window. Drag OBS over to your second monitor then start up PUBG and then click the “+” button below “Sources”, after that click the “Game capture” Button

Set the mode to “Capture specific window”, and set the Window to “[TslGame.exe]: PLAYERUNKOWN’S BATTLEGROUNDS”.

Setting up the webcam
Click the “+” button, and then click “Video capture device”. Set the device to your webcam and then click “OK”. Drag the webcam around to the position you would like and then scale the webcam to the size you would like.
Setting Up StreamLabs
Logging in
Go to Streamlabs.com and then click the “Login” button. A tab should apear asking you for authorization and then click the “Authorize” button.
Setting up the Alertbox
Once your dashboard loads click the “ALERTBOX” button under “Widgets”. Mess around until you have what you want. Once you have what you want click the “Click to show widget URL” button, and then copy that link.

Adding the Alertbox to OBS
Open OBS again, and then add a BrowserSource (You should know how to do that by now). Set the URL to the URL of your alertbox, and then click the ok button. Drag the alertbox to where you want it to be and then scale it.

And to Finish Off
Setting up Chat
Go back to twitch, click the little drop down arrow, click “channel”, click the little gear on your chat, and the click pop-out. Then scale that window and OBS like mine on your second monitor. (Of course mine is more complex than yours).

And you’re done!
Start up PUBG if you don’t already have it open, and then click that start streaming button, and you’re done!


Be the first to comment