
A guide to getting all of the achievements related to the Beneath the Stolen Lands DLC, in particular the elusive grind that is the Apocalypse Can Wait achievement.
How to Obtain Apocalypse Can Wait Achievement
Introduction
This guide will explain the Beneath the Stolen Lands DLC with the purpose of getting all of the achievements related to that DLC. This has full spoilers, not that there’s much to spoil.
I’m assuming for the purposes of the guide that you’re playing on a fairly easy difficulty and on Last Azlanti mode. None of the achievements require a specific difficulty setting and this is a long grind so if you’re looking for a punishing dungeon crawl experience this guide doesn’t cover it – it’s focused entirely on getting the achievements. Much of the advice will still apply, of course, and I’ll try and flag things that are specifically advice that assumes a lower difficulty.
Walkthrough
Get 16 rare objects that carry over from run to run, fight the lost heroes for their drops that carry over from run to run, fight the Spawn of Rovagug, talk to the dragon to trigger the final boss fight.
First task
Collect the sets to allow the Lost Heroes to drop their items.
Your first grind is to collect all four sets of items that will allow each Lost Hero boss to drop their special item. These will drop at random from harder enemies and are quite rare. If you run from floor 1-50 you will get a couple each run, so this is a long grind. Each time you reset the run the items will be on the table by the dragon. Assume that this will take at least seven runs to floor 50, probably quite a few more.
These are easy to find in your inventory as they all have no cash value and show up in the “Notable Item” tab. I always kept them in my inventory, unclear if that’s actually required but it doesn’t hurt since they’re not heavy. The only other items that show up in the notable tab are a helmet and an amulet that spawn randomly; these don’t count and won’t carry over from run to run.
The four sets are:
1a – Weary Traveler –
- Interview with the Weary Traveler
- Mug of the Weary Traveler
- Diary of the Weary Traveler
- Scribble of the Weary Traveler
1b – Fallen Priestess –
- Book of the Fallen Magus
- Vials of the Fallen Alchemist
- Map of the Fallen Fighter
- Letter of the Fallen Ranger
1c – Wicked Chanter –
- Rivel’s Unsent Letter
- Bestiary of the Tenebrous Depths: Wicked Chanter
- Ranger’s Diary
- Ranger’s Diary, the Last Page
1d – Captor and Captive –
- Student’s Copybook
- The Captor’s Diary
- Letter of the Captive
- The Captor’s Death Note
You will likely encounter one of these bosses on each run but there’s nothing special about them until you get the four items to allow them to drop their special item.
Second task
Kill all four Lost Heroes with their complete sets.
Only one of these will spawn per run so this will likely take quite a few runs. First run is 100% chance of getting a new boss, second run is only 75%, and so on to the last of the four which is only a one in four chance and will probably take a few tries. Expect about 10 runs to floor 20-30 or so to complete this. Like the sets, these will be on the table when you start a new run.
The Lost Hero items are:
- Shield of the Weary Traveler
- Robe of the Fallen Priestess
- Rivel’s Lullaby
- Ring of the Captive and Ring of the Captor (found together)
Third task
Fight the Spawn of Rovagug.
This can be done earlier if you want, you don’t need the five Lost Hero items you just have to have defeated each of the Lost Heroes at least once which you will probably have done well before you have their complete sets. Make sure to grab the quest from the dragon each run so that you get credit for the kills.
Sometimes when you defeat a mini-boss you’ll see a golden portal. When you’ve defeated all four Lost Heroes (with or without their items) and you’re on a low enough floor in the dungeon you’ll be transported to The Edge of Madness to fight the Spawn – rest up first. Even with the difficulty settings at minimum this can be a hard fight at low level but it will be easy enough at level 20.
Fourth task
Fight the Final Boss.
Once you have all of the Lost Hero items (16+5 for 21 total notable items that carry over from run to run) and have defeated the Spawn once, talk to Xelliren and challenge his version of the story once you’re prepared for the fight. When the battle is won, Apocalypse Can Wait is yours.
Dungeon Mechanics
Randomly generated floors with a lot of things that need perception and trickery, lots of opportunities to rest.
Layout
Each floor is a randomly generated set of rooms, doors, and sometimes hallways.
Taking the stairs up will take you back to the starting area with the merchants. You cannot revisit floors you have left.
Each room has enemies, a lore challenge, or sometimes both. The exception is the first room of each floor which may have a trap but otherwise is empty. The rooms will have traps and may have secret doors (walls) or hidden chests. The secret walls will look like ordinary walls with no clutter in front of them and can be detected by walking close to them. The chests are sometimes visible before they can be looted but only sometimes. The perception roll is hidden unless you succeed.
There are also sometimes hallways between the rooms. These almost always have traps and may have secret walls.
Some doors are smaller than others and can be problematic choke points. Consider running an animal companion in to wake up the enemies and then luring them back through the choke point to your party.
Floors will usually have some type of level effect, such as a fire theme where all the enemies are resistant to fire and have additional fire spells. These tend not to be that important but there is one that can charm your party (you’ll see a lot of golden glow) and that can be awkward.
Enemies
Enemies generally get harder as the floor number increase.
All enemies on the floor will be from the same theme (goblins, undead, etc…). Some types are just harder than others; the late game constructs spam a variant of prismatic spray (including instant death even with death ward) and take effort to bring down while goblins on the next floor down could be a joke.
Charm effects are also a possibility on lower floors. Some of the undead use Slay Living.
There are four types of enemy groups:
- Ordinary enemies.
- “Mini boss” enemies that allow you to rest after the fight and might spawn the portal to Rovagug.
- “Mini boss” enemies that improve store inventory that only appear on floors that are multiples of five. There isn’t anything visually distinctive about these but the first time you fight one you’ll get a tutorial message.
- Lost Hero boss enemies (Weary Traveler, Fallen Priestess, Wicked Chanter, Captor and Captive). All of the bosses come with a substantial pack of escorts.
For Ranger (or equivalent) favored enemies the important recommendations is Magical Beast for the Spawn of Rovagug. Otherwise constructs and fey are good choices as those tend to be the hardest enemy types encountered.
Resting
There are three basic options for resting:
- “Mini boss” enemies will offer an opportunity to rest – it looks like an explosion as they die and a hand icon will appear that lets you rest. These come frequently enough that they’ll be your main resting tool.
- The table below the dragon in the starting area resets every floor. When it is full you can use it to rest to full. This is handy for hiring new companions and memorizing their spells or for retreating and licking your wounds after a rough fight.
- You can camp in the dungeon, using the usual camping skills, but only if you can find a place to do it. Most rooms will have too much clutter to do so. I’ve never been attacked while resting but have always had decent stealth and enough nature lore to hunt quickly on the few times I’ve wanted to camp and succeeded in finding a spot, so it may be possible.
Starting Over
When you die or if you use the retire option by going to the wilderness up the hill from where the dragon sits, you’ll get a bonus on your next run. None of these bonuses are incredible and none of them change any of the general party construction advice. The most profound bonuses are ones that give major effects to your main character as these can substantially change a build – an Arcane Trickster with a +6 general attack bonus, for example, is a beast.
Each time you restart the run talk to the dragon about the Lost Heroes when starting to ensure the quest is in your quest log so that you get credit for it.
You’ll have to restart the run each time you defeat a Lost Hero if you want to try for another Lost Hero. This is important when you have the full sets.
It’s also generally a good idea to restart a run around floor 50 or so as enemies start getting fairly difficult and it’s more efficient to start over with easy enemies than slog through the depths.
Party Construction
Build a party focused on ranged attacks with leopards and make sure you have at least one character with high trickery and as many high perception rolls as possible. For the final run where you’re fighting the final boss see that section of the guide.
Main Character
The main character can’t be swapped out and gets 5 more points on stats as usual. There aren’t any special mechanics if main falls in combat, so use this slot for whatever your most stat-heavy build will be. For more serious runs I tend to have this be a main tank or an archer cleric since those are stat-heavy builds. Since you’re creating this character blind without any idea of what gear you’ll have available a character that will work well without needing a specific weapon is ideal.
The first floors (1-5 or so) are easy and big xp bonuses are given at each floor after the first so late blooming builds such as slashing grace sword saints with minimal strength are more viable than they are in the main campaign.
Since the dungeon is infinite, you’ll hit level 20 if you want to. If you’re just going for one of the Lost Heroes as your objective for a run you may encounter that as low as level 10 or so for a party of six.
Obtaining Companions
Once you start the DLC proper you’ll see a dragon on the cliffside. Before talking to him, head over to the Honest Man on the right side of the area and see what he has for sale. Building your characters around the best weapons and armor you can buy, which are random each run, ensures you have something to look forward to in the late game.
The starting gold is enough to hire three mercenaries to start as well as a fourth if you sell off the torches, potions, etc… from your first few characters. You’ll be able to fill out your party after selling things off from the first floor.
Mercenary cost is based on the level of your main character. If level 1 (including if you’ve gained a level and haven’t claimed it yet) the level 1 mercenaries are 500 gold. At level 20 they’re 200,000.
Party Structure
Difficulty setting doesn’t matter and it’s a long grind, so set things to minimum and play around with goofy builds or party setups to keep it interesting. The only fight that’s challenging is the Spawn of Rovagug and you’ll only fight it twice – once very late in a run when you’ll be able to rebuild your entire party and once manually triggered where you can keep grinding until you like your setup. Ever wondered what a party of six grenadiers would be like? Here’s your chance. It’s very likely you’ll need more than a dozen new parties, so either find a comfortable set and stick with it for maximum efficiency or change it up every run to keep it from getting boring.
There are a lot of tight spaces in the dungeon so a melee-heavy party will often be unable to fully engage the enemies. Large animal companions, shapeshifters, and other characters bigger than an enlarged human may have issues. Characters may rarely get stuck in the walls so a character with group dimension door may be useful to pull them out (or just leave the floor).
Enemies will not spawn behind you so back row characters tend to be fairly safe. They are really only threatened by your own party members if they get charmed or confused.
As usual for the late game in the main campaign saves are often as important as AC in staying alive. The Shake It Off feat is an easy investment and cloaks of resistance are common.
Do not make Sword Saints or other gear-specific characters unless high level versions of that gear are available for sale. The chance of finding a useful weapon of a specific type in the dungeon is extremely low.
Skills
Traps, locks, and secrets are everywhere. Perception on every character is a good choice and a Trickery specialist is basically mandatory for the constant traps and locked chests. Without Perception you will sometimes miss side bosses and other important content.
The lore and knowledge skills are used to interact with dungeon items for small xp and temporary buffs. They’re nice to have but can easily be skipped. Only the highest skill matters so multiple loremasters are irrelevant.
Athletics, Mobility, Persuasion, and Use Magic Device are not checked by any special mechanics. Some spells check Athletics and the others inherently do things so they’re not worthless, they’re just not specifically needed.
Gearing
The Honest Man sells random weapons, armor, and trinkets. You can always buy up to +1 of any weapon or armor from the Honest Man.
The dragon sells consumables, metamagic rods, and reagents, that are the same each game. It also sells random trinkets.
The stores do not reset, though their inventory will increase as you defeat side bosses on every 5th floor of the dungeon.
The gear in the dungeon is inconsistent but you can expect to find belts for the physical stats (str/dex/con), cloaks of saving throw bonus, rings of deflection AC bonus, and amulets of natural armor AC bonus. Helmets with mental stats aren’t as common but will likely drop eventually. Everything else is unpredictable.
Tactics for the Final Fights
Space your party out in turn based mode, use lots of ranged attacks with clustered shots, use guarded hearth and lots of summons and pets, be high level, kill the dragon first.
Party Setup
The ideal party is almost entirely physical ranged attackers with good saves, pets, and spells for summoning, buffing, and hitting a 45 AC (modified by difficulty). Level 20 is highly desirable, of course, even at the easiest difficulties.
The Spawn of Rovagug will absorb the first 20 of each elemental damage attack that hits, so physical damage is best though it’ll absorb 15 of that too. Clustered Shots feat is a very good idea. The Spawn Slayer archetype for Slayer is obviously nice, but the lack of a pet makes it less impressive than it would first appear. With a 34 spell resistance and good saves attack spells are likely to be unimpressive.
The spawn will enrage your party causing them to be unable to cast spells and potentially making them attack the nearest target. Good saving throws help a lot here to avoid this effect and may also help against the constant dispel magic attempts. Shake It Off and other feats, gear, and buffs can help here.
Pets are not particularly effective but many of the classes that get them sacrifice very little to obtain them. There’s more than enough room in the Edge of Madness for pets and summons so you may as well have them. The Spawn’s attack rating is not very high (+17 on first attack by default) but it has True Seeing so mirror images and displacement are pointless. Leopards have a good enough AC that a group of them will very effectively act as tanks.
As with pets summons are really only limited by space and provide decoys that will keep the spawn away from your characters. Even a bunch of low level skeletons are useful as they’ll each absorb a hit and provide flanking opportunities. Undead summons are preferred since they’re immune to being enraged but anything will do – the point of the summons is to soak hits not to actually cause damage.
At least one Cleric or Inquisitor with the Community domain for the Guarded Hearth ability is extremely valuable as that cannot be dispelled and provides saving throws and attack bonuses, both of which are sorely needed for this fight. Since the Spawn casts a mass dispel every turn being able to load down your characters with meaningless or minor buffs is useful. Since only one can be dispelled a turn and if your redundant AC deflection bonus went away that was a wasted dispel. Buffs like Greater Heroism, Mind Blank, and Haste are very valuable for the fight and the only reliable way to keep them up is to protect them with filler.
An ideal party would be something like three rangers, two Erastil clerics (animal/community), a sylvan sorcerer, six leopards, and all the Create Undead minions you can crank out from the three casters. The clerics should be fine hitting once fully buffed, the sorcerer is mostly there to keep Haste up and replenish the wall of minion trash as needed.
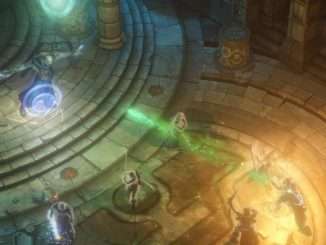
The fight itself
When you arrive in the Edge of Madness you’ll be in a small cave hallway. The boss is a short distance to the northeast. If this is the final fight there will be two of them. The dragon has a few hundred hit points; kill it first as the Spawn has around 1500. Once the dragon is dead the two fights are exactly the same.
Do this fight in turn based mode, but go to options and increase the speed otherwise it’ll be tedious waiting for all the summons to take their turns. Placing your character so that they’re spread out enough that the Spawn’s splash attacks don’t hit multiple people is easier to do in turn based mode and with the huge piles of summons and potentially enraged party members this can be a chaotic fight.
Before starting the fight, cast every buff you can reasonably cast, even if they won’t do anything. Since the dispel will take off one buff there’s a chance it will take one of the trash buffs instead of an important one and redundant morale attack bonuses may cease to be redundant.
Before starting the fight, summon up a horde of whatever you can in the hallway area where you start.
Try and start the fight by summoning something (or multiple somethings) in the open area in front of the boss(es).
Place the Guarded Hearth effect so that it slightly overlaps the bosses and mostly covers the broad open area of the cave. Move your characters to evenly spaced positions on the edge of the effect across from the Spawn – if the Spawn is at 12 on a clock created by the Guarded Hearth circle your characters will be at 4, 5, 6, 7, 8, 9. They should be just close enough to shoot at both bosses even if they’re on the far side of the circle.
If your characters are looking at attack bonuses where they will not consistently hit, consider turning off Rapid Shot and Deadly Aim.
Kill the dragon first. It should die in a few rounds at most (if it doesn’t you may not be strong enough for the fight).
The Spawn will sometimes bring in small side enemies from behind itself. Ignore them and let them play with your summons while you focus fire on the Spawn itself.

Be the first to comment