
This guide contains all the necessary information for creating and operating a zoo. The goal is to maintain the well-being of both the animals and the visitors while also supporting conservation efforts.
Start of The Game
Controls and Other Essentials
- WASD to move
- L for flashlight
- Q and E to rise and sink
- Shift + WASD to speed up movement
- Scroll to Zoom in and out
- Press the Scroll Wheel to pivot (I recommend to switch this to Ctrl)
- Ctrl+D to duplicate an object
- M to move an object
- X to open the trademarked precision widget (allows advanced directional and rotational axis control)
- Ctrl+X to duplicate an object and open the widget
- P to pause the simulation (not open the menu) ((I recommend changing this to Space))
- Z to rotate an object
- Shift to adjust the height of objects
Note: There are lots of other hotkeys and I recommend looking at all of them. You can see and change them in the Settings menu under Controls.
Starting to Build
- If you’re planning to build something large and complex, pause your game.
- Pay attention the lower right corner when in a building tab, there’s usually useful configurations that you can take advantage of (i.e angle snap, path width, length, barrier length, curvature and window).
- When creating a group of objects or building, pay attention to what is grouped and what is not. In case you have placed something and you want it to be apart of the group, then Shift click the two of them and click the icon that looks like a Tree and a plus sign.
- Objects with a grid background adhere to a grid system and cannot be changed that way but items with a white background are decoration objects and can placed with full control.
- To center a décor item on a wall or anything, press F.
Zoo Beginnings
Before you can really do anything regarding a zoo, you have to have some facilities such as:
- Zookeeper Hut (The only place where a keeper can prepare food).
- Animal Trade Center (Acts as a gateway for animals into the zoo).
- Research Center (Used by Vets to further the zoo’s knowledge regarding animals).
- Workshop (Used by mechanics to perform research).
- Staff Room (Buildings where staff can go to rest and regain energy).
- Veterinary Surgery (Only location for vets to treat animal disease and injury).
- Quarantine (Used to safely isolate sick animals before treatment at a vet surgery).
- Power (Stuff like solar panels and transformers).
- Water Treatment (Cleans water – works the same way as power and doesn’t have to be touching water).
To resolve the alerts, you need to place the required buildings. Remember to position keeper huts near animal exhibits for efficient care. Staff rooms should be easily accessible to employees. Be aware that staff dislike long travel distances to facilities, and guests prefer not to be near staff buildings.
Your Zoo Tools
There are two important tools you can use in Planet Zoo: The Zoopedia and The View Modes (or heat map, radar or whatever you wanna call it).
The Zoopedia is your best friend
The Zoopedia has a list of every animal in the game. It displays:
- General Information (stuff like name, endangerment status, and a general bio).
- Natural Habitat (It shows natural habitat info but most importantly the Minimum Habitat Requirements which is important to keeping animal welfare up).
- Species Data (The more nitty-gritty version of General Info – stuff like social needs, gestation period and whether or not guests can enter their habitat).
- Research Status (This displays everything you’ve researched regarding the species which also coincides with exactly what objects that animal likes and needs).
- Interspecies Enrichment (Any animals displayed in this section will benefit from having this animal in their exhibit and vice versa).
- World Records (Displays any world records you make but only in Franchise Mode).
Long story short, the Zoopedia is worth looking at:
View Modes
In the bottom left corner is a radar looking button and clicking that will create a map of your game. At the top middle of the screen, it’ll show the types of data the map will display.
Animal Welfare (Everything will be white except for the animals where red animals are unhappy and green are happy)
Habitat (Click an animal to show its traversable area, escape points, and shelter quality)
Temperature (A literal heat map)
Water (Shows which water is being treated and which isn’t and which water treatment facilities are working)
Power (The radius of electricity as in what is powered and what is not along with which power facilities are functioning correctly)
Building (Displays buildings that are functioning correctly in blue and those that aren’t in red)
Negative Impact on Guests (Displays guest happiness (blue is good) and staff facilities as red and radius surrounding so if a guest is in that radius, they are being negatively affected by the facility.

Guest Education (Shows education devices that are powered, powered and with content, or not powered and it shows the range of education speakers)
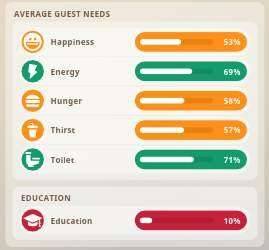
Guest Needs (Displays guest needs in colors from red ((bad)) and green ((good)), needs like Happiness, Energy, Hunger, Thirst, Toilet, and Education).

The Bear Essentials
Here is where I explain the animals and the difference between Animal Trading and Exhibit Trading
Keep in Mind: Planet Zoo refers to the exhibits you build with barriers and animals like a lion as habitats and exhibits where you have glass walls like for the iguana as exhibits or small exhibits.
Animal Trading
These are your typical terrestrial animals: Giant Panda, Aardvark, Saltwater Crocodile. They require a habitat with barriers, food, enrichment and terrain preferences.
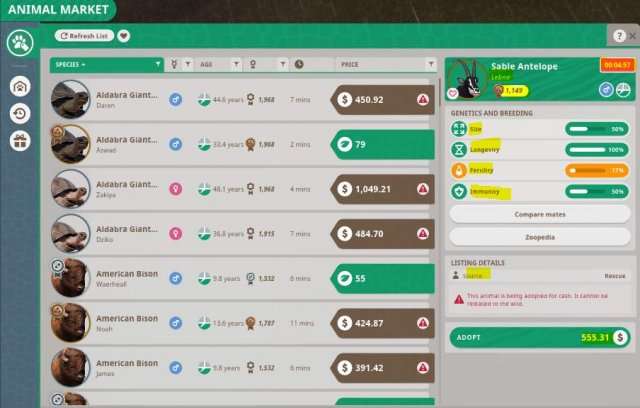
The Animal Market shows animals being sold and from my understanding is entirely random except in Sandbox where it displays every animal. It shows their price in dollars or in those green leaves called Conservation Credits and you get those for releasing animals to the wild (or in offline mode, you have to improve the zoo’s reputation).
When you select an animal, it shows how long that animal is up for gender, name, adoption, size, longevity, fertility, immunity, star rating, and source (like where your buying the animal).
When you adopt an animal, it goes to your Animal Storage and stays in your Animal Trade Centre until you move it and a Vet or Keeper will move it. Other tabs in this menu include your purchase history and rewards where you can access any animals you are rewarded.
Exhibit Trading
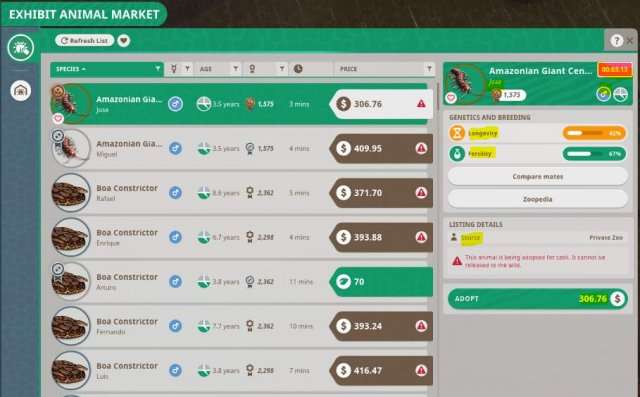
These are the animals that reside in what the game calls an Exhibit. These are located in the Facilities tab and in the Small Animal Exhibits sub-group. The Exhibit Animal Market is similar to the Animal Market except it only shows the animal’s name, star rating, gender, longevity, fertility, and source. These animals don’t need anything in respect to space besides the Exhibit.
When you click the Small Animal Exhibit, you can access the animal’s welfare and provide enrichment in the layout tab where (if you have researched it) you can provide rocks and such for the animal. In the climate tab, you can adjust temperature and humidity and it shows the recommended temperature and humidity. In the windows tab, you can open and close all four windows and even create 2 and 3D facades for the animal. The other tabs are Logs (shows upkeep costs) and Mantainence (shows work zone, and time since last visit)
Animal Welfare
The chief concern of your zoo:
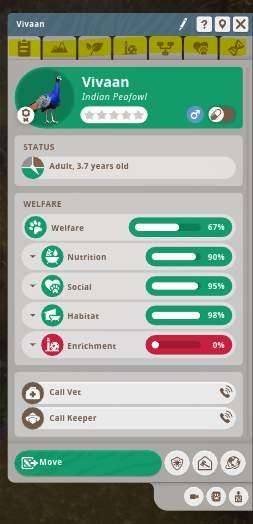
Click on your animal and you’ll see several important info in the tabs:
- Overview (provides an overview of the animal and it’s welfare).
- Terrain (shows it’s terrain, climbable area, water and hard shelter needs in the white area. For example, an Indian Peafowl will want no more than about 30% of its exhibit to be rock but less than that is okay too).
- Environment (shows what percentage of the exhibit the animals wants to be plants and the coverage. It also shows the ideal continent for plants to come from and it’s ideal biomes. Lastly, it shows the plants in the habitat and any plants in red are conflicting plants that will negatively impact welfare).
- Enrichment (shows enrichment welfare and how much each enrichment object contributes to welfare. Placing a million balls for the animals will not improve enrichment. At the very most, it’ll help a little bit but all you really need is one of each object).
- Studbook (shows the source of the animal and it’s timeline).
- Social (shows the social welfare of the animal like how many adults it needs in the exhibit to be happy and its current mate.
- Genetics (shows size, longevity, fertility, immunity, appeal, physical stats, and lifetime stats).
Comparing Mates
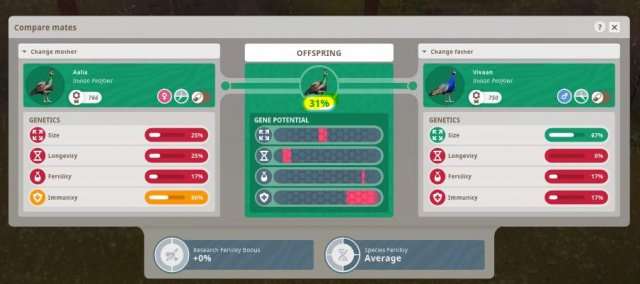
Breeding Programs and Genetics:
In the genetics tab of an animal, you can click the button Compare Mates where the Breeding Outcome menu will open. This supports the comparison of breeding outcomes for two animals, the mother on the left and the prospective father on the right. After selecting them, in the center will be displayed the predicted genetic outcomes. It also shows the percentage of conception based off of fertility data.
How to Successfully Breed Animals
The animals must be in the same exhibit and you improve chances by ensuring good welfare, a lack of distraction from other mating partners and veterinary research.
Note: None of these predictions are exact or guaranteed
Contraception
Contraception can be done by physical separation of animals or actual medical contraception. To give medical contraception, go to the Zoo tab and the animals tab and at the far right end of the row is the contraception switch. (or in the animal’s overview tab)

Releasing to the Wild
Animals cannot be released to the wild if they are: Juvenile, Sterile, Elderly, or Sick.
Releasing an animal to the wild will generate Conservation Credits and boost the Zoo’s reputation. If you, for example, release 8 pea one right after the other, the Conservation Credits generated will decrease so you should space them out.
The Zoo, Barrier, and Habitat Tabs
I’m not gonna explain the Nature, Facilities or Construction because they are the most self-explanatory
The Zoo Tab
The entire overview of your zoo:
The Sub-Groups:
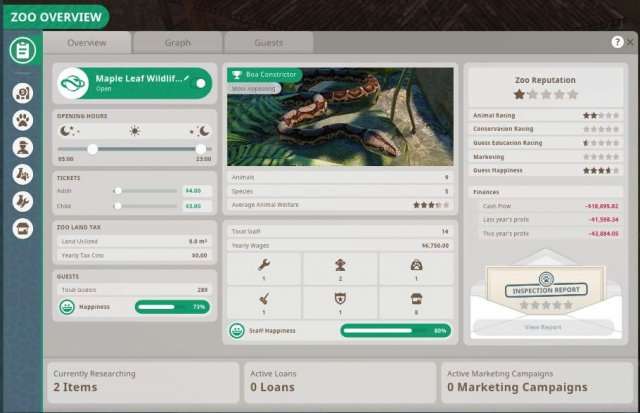
Zoo Overview – Overview
- Shows Zoo status, opening hours, reputation, ratings, finances, tax, ticket prices, active loans, guest, staff, and animal happiness, number and wages. It also shows current research, loans, and marketing.
Zoo Overview – Graph
- Graph data of pretty much everything I just said
Zoo Overview – Guests
- Guest information like thoughts, needs, spending, and yearly data.
Finances – Finances and Graph
- Shows finance data and it’s respective graph tab
Finances – Loans and Marketing
- Apply for loans for your zoo and pay for marketing campaigns for your zoo
Animals
- Shows all the animals in the zoo and their data, all the habitats and exhibits in the zoo and their data, and all the quarantines in the zoo and their data.
Staff – Staff and Staff Room
- Shows all of the staff and staff rooms in the zoo and their data and the place to hire said staff.
Staff – Work Zones
- Work Zones are zones you can create where you can group areas, facilities, exhibits, and habitats and you can assign staff to them so that they remain the area and work there. This menu manages said work zones.
Facilities
- Shows all staff, guest, power, and water facilities in the zoo and their respective data
Research
Research is critical and that’s why its getting its own information.
What is Research?
If you are in Sandbox Mode then you probably don’t have to worry about this.
Research is the most critical column to creating a good zoo. There are two types of research:
Veterinary Research
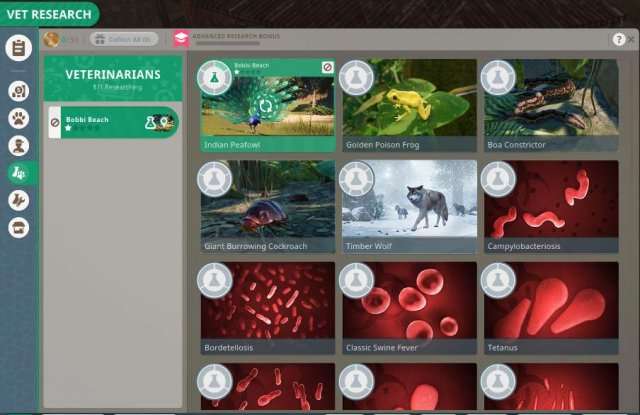
- For every vet you have is every research you can do. Vets can research a specific animal or a specific medical thing like a virus, bacteria, or condition.
- Researching an animal will provide new enrichment, nutrition, and more.
- Researching a medical topic thing will provide better diagnosis, treatment, and pharmacology (it’ll help when your animals get sick).
Mechanic Research

- For every mechanic you have is every research you can do. Mechanics can research a specific theme or a specific construction thing like habitats, barriers, or food shops.
- Researching things like habitats, barriers or food shops will yield blueprints, extra objects, and more.
- Researching themes will yield scenery and blueprints to that respective theme.
The Barrier Tab
This one is new compared to Planet Coaster but it is relatively easy to understand. The most important thing to note with the barrier tab is the bottom right corner where you can change the Angle Snap, Length, Curvature, Height Snap, Window, Labels, and Camera.
Creating a Habitat
- All you have to do to create a habitat is to build a barrier into a complete circuit and then add a gate. Clicking on a habitat.
The Null Barrier
- A lot of times what zoos will do is use natural barriers like cliffs, rocks, or moats instead of fences. The Null Barrier is for this exact purpose. Essentially, it’s an invisible barrier. You can also use Null to let guests enter an exhibit.
The Habitat Tab
New to the Planet Franchise and very important.
Inside you can find:
- Food and Water (You can find the water and food bowls and troughs) ((If you have researched it, you can change the food quality by clicking on the food container).
- Heaters and Coolers (These require power and the temperature can be adjusted by clicking on the objects).
- Beds and Shelters (In order for an animal’s hard shelter welfare to be benefitted you must include the bedding with some sort of shelter or construction).
- Enrichment Items (There are three types: Food, Habitat, and Climbing. Every animal requires food and habitat while other animals like primates require climbing area.
Important Tip:
- Use the filter button (looks like a funnel) to filter by species so that you can see exactly which objects your animal requires.
Education and Health
Education
- Education is very important and, believe it or not, your guests want to learn.
- You can educate your guests via signs, speakers, and tv’s. They must be powered and then you have to select the content to display by clicking the education device, the dropdown menu and then the animal you want.
Types of Education Tools:
- Conservation Education board (This is not exhibit specific and can be placed anywhere but needs power).
- Educational Speaker (Needs power, habitat specific, adjust volume for effect radius, overlapping speaker radius will result in negative effects.
- Habitat Education Board (Habitat specific TV that needs power to display animal info).
- Exhibit Education Board (Exhibit specific monitor that needs power to display animal info).
Notes
- Putting one or two signs or speakers isn’t going to cut it for getting that education benefit.
- You can set speaker volume all the way to 20 and there is no negative effect (at first I thought it would be a negative thing but it literally is just changes radius size).
- Education is based on animal research. So if you only have one research level in Plains Zebra then your education speaker’s content will only be 1/6 as good.
Animal Health
There are two ways an animal can become unwell: Infection and Physical Injury.
Causes of Infection include:
- Contagion from other sick animals in the same habitat.
This can be solved by making sure you put your animals in quarantine instead of immediately in their exhibit. - Dirty habitats caused by dung, rotting food, corpses, guest food, and dirty water.
So make sure your guests don’t litter and your keepers clean the exhibit. - Feeding from the ground.
Solved by Food troughs and “Do not Feed” Signs.
Injuries are caused by fights between species or by predators.
Treatment
Animals with light injuries and infections may be able to recuperate without intervening but this is dependent on welfare and other factors.
Keepers who detect an issue will call vets who deal with the issue. You should note that vets are better at detecting infections than keepers. The vets will take the animal to surgery and attempt to treat it. The duration of this depends on the vet’s training level, the animals immunity, and the severity of the illness. This also applies to physical injuries.
Power and Water
Power
Pretty much everything in Planet Zoo needs Power. Vendor shops, transport rides, and water treatment.
There are three ways to generate power:
- Transformers
- Wind Turbines
- Solar Panels
You begin a zoo (except for Sandbox mode) with only transformers and need Mechanic Research for the next two facilities.
Transformers
Coming in at just 500$, transformers have a huge electricity radius but are non-renewable. Their upkeep cost are based on how many systems they are powering. Guests just hate transformers. They create a negative effect on them.
Wind Turbine
2,000$ for a loud power system that works best in windy and colder environments. They have no running costs and guests only mildly hate them because they are renewable but noisy.
Solar Panel
These are also 2000$ and work best in sunny, warmer environments. They don’t have a running cost and guests don’t mind them in the slightest. They have a very small electricity radius though.
Renewable Energy
You are encouraged to use renewable energy and doing so will also increase the zoo’s conservation rating.
Deterioration
All facilities will deteriorate and lose efficiency over time. Transformers are most resilient to this while solar panels are least resilient.
Once a facility’s efficiency reaches 50%, its electricity radius will shrink and when it reaches 0 it wil fail completely.
Zoo Entrance
The zoo entrance produces power to assist the early stages of a zoo and this source does not deteriorate.
Water
Water treatment facilities clean the bodies of water of your zoo.
Water treatment can benefit you in two ways:
- Reduce chance of animal disease (dirty water can increase the chance of disease in animals who swim and drink in it).
- Improve guest’s viewing underwater (guests can’t see your cool underwater viewing area if the water is all dirty and murky).
Just like the power, the water treatment facility can deteriorate and negatively affect guest.
Planet Zoo Complexities
This marks the end of the part of the guide that is super-essential. Granted, all of the information here is good to know for a successful zoo but if you only wanted or needed to know how to play the Sandbox mode then you can probably stop reading. The rest of this guide is going to get into the real nitty-gritty numbers and individual characteristics of elements in the game.
Zoo Economics
Primary Ways to Obtain Money
- Donations (Probably the biggest income source so make sure to put plenty of donation boxes especially where crowds form to view the animals).
- Admission (Make sure to increase this as you obtain more animals, in case you don’t, Planet Zoo will notify you if guests think they are underpriced or overpriced).
- Shops and Stores (You can also adjust these prices and even specify if you want to sell ice and condiments. ice is usually beneficial with no negative effect but condiments are).
- Loans (Don’t be afraid to use loans, the starting interest rate is pretty good and from my understanding it only changes when you can’t pay off the loans. Remember in real life, most zoos will take out a loan before constructing a new exhibit and I think that’s what the game wants you to do).
Expenses
Your Finance Report:
- Purchases (This will log the price of any animal you move and all of you construction costs with specific details of said construction).
- Ongoing Expenses (It’s all of your upkeep costs and ongoing payments, the biggest ones will be power, wages, and maybe animal food).
- Taxes (Only certain scenarios and whatnot have taxes and there are several types).
- Income (All of the money you’re making and where it’s coming from).
- Cash Flow (This is income – expenses, this will usually be equal to total profit).
- Total Profit (This is your net profit, you want this number to be green).
Recession vs Expansion
You need to keep in mind that zoos, like any business, fluctuate in economics and profit. For a couple months, your profit arrow may be down and red (that’s bad) but if it temporarily switches between red and green/up arrow (that’s good) then that’s okay. However, you have to watch and make sure that you are not losing money for too long.
Zoo Reputation
A zoo’s reputation is determined based off multiple elements:
- The number, variety, and welfare of animals in the zoo (Happy and appealing animals contribute to this)
- Conservation rating (Releasing animals to the wild, animal breeding, recycle bins, and renewable energies all contribute to this)
- Education Rating (This includes education, research, and zoopedia unlock progress)
- Marketing Campaigns (See Marketing)
- Guest Happiness
You can find your Zoo’s reputation in the Zoo Tab under Overview.
Protesters
Protesters are guests who come to the zoo and provide a negative effect on any guests walking through their radius. They can be seen flashing signs on posts and chanting. You can see their exact negative radius in the Negative Impact on Guests view mode. Protesters will only come when an animal’s overall welfare is too low (red) for too long. As far as I know, they will protest any animal’s welfare. I’ve had some come in because one of my Giant Burrowing Roaches was hungry for too long.
You can click on a protester and they will tell you what animal’s welfare they are protesting. As soon as the welfare is restored, they will stop protesting and make their way towards the exit. The protesters cannot be removed from the zoo and will only start protesting when they arrive to the animal they are protesting. In some cases, they can cause guests to leave. Planet Zoo refers to them as a good thing as it promotes animal welfare by impacting profitability.
Zoo Location
Now this isn’t super important. For example, you can create quality zoos if a taiga or desert. However, zoo location/biome does determine a couple things you should keep in mind.
Planet Zoo lets you choose from the 7 continents except it groups Australia with New Zealand and the surrounding areas as Oceania.
There are 7 biomes to choose from:
- Tundra
- Taiga
- Temperate
- Grassland
- Tropical
- Desert
- Aquatic (this biome is only used for animal sustainability (i.e crocodiles) and you cannot choose it as a location)
Your choice of location and biome determine three things:
- Weather (Like if you choose a desert in Africa, you probably won’t get a lot of rain).
- Immediate Suitability for Animal Environment (Like if you choose a desert in Africa, you’re gonna have to place some coolers for Grizzly Bear).
- Animal Market Probability (I’m not sure how this is determined and its not strict. It actually doesn’t affect anything in Sandbox mode).
So this choice doesn’t affect much except weather (which can affect guest happiness). You can still have all of your favorite animals in your Tundra or Desert Zoo.
Staff Specifics
There are six types of staff (I’ll go into depth of each of their responsibilities and tasks further down this section):
- Caretaker (They look after the zoo and help with transportation of animals).
- Keeper (They maintain the welfare of the animals in the zoo).
- Mechanic (They look after the physical infrastructure of the zoo).
- Security (Security Guards protect the zoo).
- Vendor (They are assigned to shops and will serve guests).
- Veterinarian (They maintain the physical well-being of the animals in the zoo).
Notes
- Staff can be hired even if the zoo has negative funds.
- When placing a shop, vendors are automatically hired (Although I think there may be a bug where sometimes they aren’t so be aware of that).
Staff Duties
Each staff type have specific duties, the games calls tasks, and you can even determine which ones a specific staff person can do in the Employment Tab.
Work Zones
It is imperative to learn and use work zones in order to maximize staff efficiency. A work zone is a collection of facilities that can be assigned to one or more staff to limit where they will work. Any and all facilities from ATMs to rides to habitats can be included in a work zone.
Creating a Work Zone
You can create a Work Zone in the Zoo Tab under Staff and then Work Zones. When creating a work zone, you must pay attention to the colors of the facilities.
Essentially, anything green and blue is in the work zone.
Work zones can be assigned in the Zoo Tab under Staff or you can select a staff member and click the Employment Tab.
Note: If all of your staff are assigned to work zones, then they will ignore anything not in the work zone. Be Cautious of this, I’ve had animals nearly starve to death because no matter how many times I called the keeper they just wouldn’t go to the habitat because it wasn’t in a work zone.
Staff Facilties
I listed all of these previously in the guide so I won’t again but I am going to cover more specific things about the facilities.
- All staff facilities have different sizes except Vet Surgery, Workshop, and Animal Trade Center. You start every zoo (except Sandbox) with the smallest size and you can obtain the larger sizes through mechanic research.
- Small Staff Rooms hold 4 staff while Large can hold 12.
- Small Keeper Huts and Research Centers hold 1 Keeper while Large can hold 6.
- Small Quarantine hold 8 animals while Large can hold 24.
Staff Rooms
Staff Rooms are special. They are the only facility that all staff members can enter and the only one with Perks.
Perks
For 300$ (small) or 700$ (large) a year, you can have a passive buff on every staff that rests in a specific staff room.
These perks include:
- Staff Healthcare (Staff will be more resilient to being overworked)
- Social Club (Staff will gain happiness faster)
- Learning Resources (Staff that training and have this perk will have their training date moved forward)
- Security Office (Security will have better detection rates and ranges)
- Staff PR Course (Vendors will make their guests even happier)
- Rec Room (Staff will recover energy slightly faster)
Now can you run a quality zoo without ever using this?
Yes, you can.
I’ve gotten zoos to 200k income without ever using these but its a neat element they’ve added.
Staff Needs
Staff have needs that must be satisfied to keep them efficient.
They have an energy level which declines over time and will drop faster if the staff member has a heavy workload. This is replenished in the staff room.
This is found in the Zoo Tab under Staff. Red means heavy workload (bad) and Green means efficient workload (good).
They also have a happiness level. To keep staff happy, pay them well, keep their facilities covered in scenery, and don’t let them get exhausted. This is how to change a staff’s salary and determine their opinion on their salary and it is found by selecting a Staff member and clicking the Employment tab.
Note: It takes a lot to get a staff member to quit. I’ve kept some very unhappy and very overworked and they never quit on me. The main thing with unhappiness is salary.
Staff Training
Training your staff is a good way of improving their happiness, efficiency, resilience, and work rate. All staff start with a one star rating and can be improved in the Zoo tab under the Staff Tab or by selecting an individual staff member. You can only train a staff member every so often. Meaning you can’t get your mechanic to five stars immediately. The training only takes effect the next time the staff member enters a staff room. There is a price cost to training a staff member. It’s not the same for each staff member but it ranges from 40$-200$ each level.
Note: Staff will expect an increase in salary with each new training level.
Staff Types
The Caretakers
- Transporting boxed animals (This is seen has the highest priority task for this staff).
- Cleaning Paths.
- Emptying Bins.
- Cleaning Toilets.
- Cleaning other facilities (Stuff like benches, tables, and staff rooms).
Maintaining a clean environment can be achieved by placing numerous trash cans throughout the zoo. Alternatively, you can hire a significant number of caretakers. However, caretakers can only be assigned to clean individual restrooms and not broader path areas or groups of trash cans, so litter management requires attention.
The Keepers
- Cleaning habitats and exhibits.
- Feeding animals.
- Watering animals.
- Reporting sickness and injuries.
- Removing skeletons.
After a keeper completes their current task, they will seek out the habitat that has been looked at the least (even if its on the other side of the zoo (which is super inefficient and why work zones are important)).
The Mechanics
- Repairing habitats, barriers, and boundaries.
- Repairing power and water facilities.
- Repairing vandalized items (kicked over bins, broken benches, cracked televisions, etc.).
- Researching new facilities and scenery items.
Don’t overlook mechanics. They don’t just repair stuff. They are the only way to obtain new food, drink, and gift shops, solar panels, shelter and climbing blueprints, and any themed scenery.
The Security
Security guards protect the zoo from:
- Vandals (Those hoodlums who come to a zoo just to kick over its trashcans).
- Thieves (Those hoodlums who pay admission just to steal people’s wallets).
- Guests feeding the animals (I haven’t actually seen this problem happen in game).
- Guests distressing the animals (Nor this one).
Security Guards literally just walk around the zoo staring at your guests. I’ve had zoos with several security guards hired but I would still get trash cans kicked over and pickpocket reports. I’ll go more in-depth on crime, security, and security cameras in a later section.
The Vendors
They sit in a shop and sell whatever that shop sells.
Yeah, they don’t do much but its important to know that when a vendor gets tired, they will leave their shop unattended and go to a staff room. To avoid this, you need to have another vendor waiting to take over. However, this does not mean a vendor will come to the shop and relieve that tired vendor (even though that would be a pretty good and sensical feature).
The Vets
- Treatment of illness and injury.
- Capturing escaped animals.
- Removing dead animals.
- Researching animals and diseases.
- Transporting animals (this is considered a low priority to this staff type).
Your vet should always be researching. It’s not even a joke how much your vets need to research. Vet Research is the only way to increase animal welfare (which I don’t have to remind you is the core element of this game).
With research you can increase food quality, education quality, and add more enrichment for animals. You can’t have 100% welfare without research so literally as soon as an animal is available to research (which is right when an animal is put in a habitat, exhibit, or veterinary surgery.) research them.
Habitat That
A habitat is created, and only created, when there is a complete circuit of barriers with a staff gate attached. It won’t register as a habitat until you placed the gate.
When clicking on a habitat, you will get a menu with 6 tabs:
- Overview
- Terrain
- Environment
- Animals
- Log
- Maintenance
Overview
Displays how clean an exhibit is, how much the barriers have degraded, the species report, the call staff button, and any guest thoughts about the habitat.
Terrain
Displays navigable area and terrain distribution.
Environment
Displays temperature, coverage, and any plants and their respective info.
Animals
Displays all animals in the exhibit grouped by species, food quality, and habitat contents.
Log
Displays finances like repair and feeding costs.
Maintenance
Displays used keeper huts, months since the last staff visit, and frequency of visits.
Notes
- You should make a mechanic’s routine visit more frequent than the default (Every year) because most habitats will break much earlier than a year.
- You should also name your habitats because the game will label then: Habitat 1, Habitat 2… and then any notifications will display this name (including the inspection report) and not, for example, (Gorilla Forest, Antelope, Grasslands, etc.).
- Habitats are the only place where one can change the Food Quality and determine Terrain Area.
Animal Escapes
An animal can escape for or from a variety of reasons:
- The barrier is broken or they have broken it (Solved by frequent check-ups and repairs by mechanics).
- The barrier is too short or climbable (Every animal Zoopedia entry states the length their barriers need to be. For example, a Snow Leopard’s barriers need to be at least 3 meters).
- The barrier meets requirements but they are still escaping (This requires some zoological troubleshooting).
Troubleshooting Your Escapes
The best way to detect and find an escape point is with the Habitat view mode. Activate it and then click an animal and it will show their traversable habitat in blue and any escape point in red circles.
Ways an Animal Can Escape
So you’ve found the escape point. Now what could be causing it?
Planet Zoo deserves a lot of credit. They have coded their animals to be very intuitive.
Most of the time an animal has found a means to escape by climbing up a tree or anything and then jumping from there. I’ve had a Snow Leopard climb to the very top of a pine and make just a super bold leap out of the exhibit. I had paused it just in time to catch him. To resolve an animal climbing onto something and then jumping, all you have to do is remove the tree or object or move it away from the barrier.
Note: Any animal that steps on elevated path is immediately boxed and sent back to their exhibit.
Dealing with the Escape
There are several strategies to retrieving an escaped animal. Some are using game functions and one that is the kinda cheat-y.
Calling a Vet (From what I understand this doesn’t cost money but there is a latency since the vet has to, you know, get to the animal. Once the vet arrives, he will take out some sort of blow gun to tranquilize the animal, box it up, and send it back to its exhibit).
Emergency Capture (This costs 1,000$ regardless of the animal and results in immediate boxing and sending to the exhibit).
I call this the Barrier Method and it’s not really apart of the game; its just something I discovered. (When an animal escapes all you have to do is surround it in barriers again and it no longer shows the warning and menu for an animal escaping so then all you have to do is add a gate to your improvised barrier and move them back).
Guest Needs
Fun Fact: Every single guest in Planet Zoo and Coaster are randomly generated and completely unique.
However, all of them require 6 basic needs to be met:
- Happiness (Every need affects this need – its more of the general vibe of the guests).
- Hunger (Food shops and whatnot).
- Thirst (Drink shops and whatnot).
- Toilet (People need to pee).
- Energy (Benches, places to sit, and transport rides even some drink types).
- Education (See Education).
Happiness
There are other things that affect this besides the 5 other needs such as:
- Protesters
- Litter
- Vandalism
- Overcharging
- Nearby Staff Facilities
- Low Animal Welfare
This photo shows the Zoo tab under Guests
The one non-need thing that affects happiness is the animals. Specifically, their ability to view them. Guests are very particular on the views they have of the animals. A simple glass window seeing into an exhibit 2-3 feet away isn’t going to cut it.
They want to be up close pretty much as close as possible. You can do this with some creative thinking and path placement or careful placement of feeders, toys, and other habitat items. For example, one could place a Grizzly Bear’s food tray right to the window and the bear will be forced to get close to the window to eat. Keep in mind, though, that this will cause stress in most animals and this can be prevented by using 1-way glass (requires mechanic research in barriers).
To find this menu: click on a guest and then the thought bubble tab.
Crime and Security
Planet Zoo calls guests who turn to crime within the zoo as Vandals. These guests turn to vandalism when they are unhappy or unsatisfied.
These vandals can damage the following things:
- Bathrooms
- Bins
- Benches
- ATMs
- Power Systems
- Water Treatment Facilities
- Signs
- TVs
- Speakers
If a guest walks near any of these damaged items they will be unhappy.
All of these items can be repaired by a mechanic but some like (bins, benches, signs, TVs, and speakers) can be replaced by clicking on them and then the replace button (This can cost from 10-300$ depending on the object).
Note: You can replace a damaged item and pay the fee even if you have negative funds (I’m not sure if this is a bug or not though)
Pickpockets are guests who enter a zoo with the intention of robbing guests. (Because that’s where the average pickpocket goes to steal, I guess)
Pickpockets can be prevented by Security Guards or Security Cameras
Security Cameras
They come in two forms:
- A standing pole type version.
- A wall mounted version.
There is no strict way of placing these but I suggest placing them overlooking high traffic areas.
You can use the cameras! — you can select a camera and see its perspective like a security manager guide and cycle through cameras (I think its pretty neat).
Inspection
The inspector (In one scenario, it was a reporter instead) periodically (usually every 24 months) enter zoos to make sure they are being well run and animals are being looked after.
They will choose up to five animals to inspect and will make their way around the zoo attempting to ascertain their well-being. Animals are assumed to have high welfare until proved otherwise. An animal that cannot be inspected is assumed to have zero welfare.
The inspector can issue spot fines for poorly performing habitats, dead or sick animals, any form of escape, and any protesters spotted.
Once the inspection is complete, a report is issued providing details as to the running state of the zoo.
Alerts
When playing Planet Zoo, you will receive A LOT of alerts. Just all the time.
For those who played Zoo Tycoon, they already know.
Planet Zoo has five categories for alerts:
- Visiting Player Alerts
- Animal Alerts
- Zoo Alerts
- Staff Alerts
- Notification Timeline
Most alerts will always be red but they are not always bad.
Visiting Player Alerts
When playing in any mode in Planet Zoo, you can get online visitors to your zoo. They can be your Steam friends or random people or even yourself. (I don’t know what determines it)
However, only in Franchise Mode, you can acquire Conservation Credits by greeting them. All you have to do is click on them and then the subsequent button. This generates 20 Credits and you can only greet 5 avatars every 24 hours. (You can’t greet your own avatar)
Animal Alerts
Anything animal related will be relayed here. They can alert some of the following things:
- Quarantine Passes
- Animal Escapes
- Alpha Disputes
- Low Animal Welfare
If you have a well-operating zoo then these should just pop up and then immediately go away especially if they are low welfare-related.
Zoo Alerts
These are more infrastructure-related. They can alert some of the following things:
- Zoo Pricing
- Disabled Systems
- Pickpocket Reports
- Research Completions
Staff Alerts
These are all about the staff and mainly there to say “hey you need a workshop!” or some of other things:
- Accessible Staff Room
- Staff Happiness
- Staff Vacancy
Notification Timeline
This is the big picture stuff and not really the most important to keep your eye on. It can alert some of the following things:
- Expectant Offspring
- Maturity
- Mortality
Inspector Arrivals
Notes
These alerts will tell you a little bit earlier when an animal dies, matures or anything of the sort than the animal alerts. This timeline will also tell you right before an animal inbreeds while the animal alerts will not.
Transport Rides
Because they just couldn’t let go of Planet Coaster
I’m not gonna explain how to work the Track Building Mode, if you need to learn that then I suggest going to the Help button > Build a Zoo > Transport Rides.
Anyway, transport rides are a fun and efficient way of getting money and getting guests to other places. The guests really think its a hoot.
There are four types of transport rides:
- Boat Ride
- Suspended Gondola
- Steam Train
- 4×4 Adventure Tour
To unlock all of them requires four levels of Mechanic Research
You can change the number of cars, ride mode, and maximum speed.
There are two rides modes:
- Continuous (Trains will move along the track in 1 direction, stopping at each station. Requires a completed loop of track and allows for multiple trains).
- Shuttle (A point-to-point travel mode, where a single train will move forwards and backwards between the first and last station, stopping at any stations along the way).
You can change the price of a ticket on a station to station basis.
Note: Guests are willing to pay 10+ a ticket especially for large zoos.
You can also change the Load Rules such as Minimum rider load, minimum wait time, maximum wait time, and minimum departure interval.


Be the first to comment