
More The Witcher 3 Guides:
- Console Commands (Cheat Codes).
- Complete Achievement / Trophy Guide.
- Guide for Stutter Free Smooth Gameplay.
- Off Map Secret Chest in White Orchard.
- Combat Guide (Some Useful Tips).
- Gwent Card Collector Guide.
- Useful Tips and Tricks.
Here’s a guide to help any witcher on the Path to complete the game in Death March difficulty. This difficulty can be a tough challenge, especially when you play on Death March for your first playthrough, thus starting level one. The Witcher 3’s Death March difficulty is a bit harder than The Witcher 2’s original normal difficulty. For those who do not remember The Witcher 2’s base difficulty, it means this will not be easy at all.
Master of the Path – A Death March
Why Is It Difficult
If you start a playthrough level one in Death March, you will be challenged because you have nothing. No coin, no ingredients, no good stuff whatsoever, not even a swallow potion to begin with. That means the game will be most difficult in the beginning, and the further you go in the game, the easier it will be. You will get skills, of course, but also Witcher gear and formulae for potions, oils and bombs.
And of course, it’s a walk in the park in New Game +.
Which Skills Should You Take
That’s the first step, I guess. For my first playthrough, I went for the signs-oriented build, which is definitely a solid and reliable build in Death March. Plus, it doesn’t need a lot of points to be efficient, so you can take some skills in combat / alchemy trees as well.
You won’t have the possibility to do the exactly same build as I show on the screens. It means that when you take a skill, like Exploding Shield, slide it into your active skills slots if you can. Yes, it’s not in the final build. But it still can be useful until you need to remove it, and well, if you have an empty skill slot, there’s no reason to leave it empty.
During the prologue, you won’t gain much XP, even if you do everything you can. Hopefully, there are six Places of Power on the map, and each one will grant you one skill point when you draw from them (only the first time you do though, of course). So, make sure you get every place of power in white orchard – in other regions, they won’t be as numerous and easy to get.
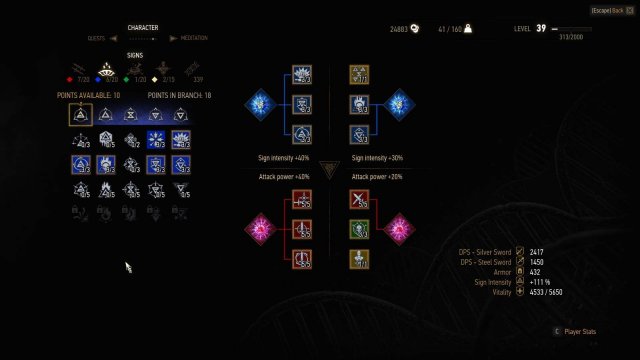
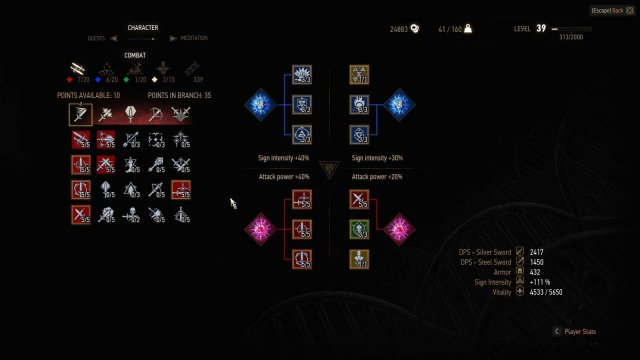
Here are screenshots of my build. I didn’t screen the Alchemy and Passive trees since descriptions will be enough to explain what I took in these.
I’m going to describe the build, writing skills in the order I think you should take them.
Signs – Quen – Exploding Shield – 3/3
Take it as your first skill, and upgrade it completely before thinking of any other skill.
Signs – Axii – Delusion – 3/3
It will be your second skill. Upgrade it fully too. It will unlock the second tier, allowing you to use alternate Signs.
Signs – Quen – Active Shield – 3/3
This will save you from a lot of trouble. Quen becomes a bubble shield around you and damage taken heals you instead, as long as Quen is holding. This skill need to be fully upgraded to really become interesting, as the Quen Shield won’t drain any stamina anymore.
Passive – Rage management
This one is a must have for every build strongly Sign-oriented. Casting Signs with adrenaline can save you from death many times. One thing that you should know about this skill is that it also allows you to cast Alternate Signs without full stamina, but it will still use it. So, if your stamina just started regenerating, don’t go for an alternate sign with Adrenaline – cast a basic Sign.
Signs – Igni – Firestream – 1/3
Isn’t that cool to have a Geralt with a flamethrower in his arm ? I do believe it is. Plus, it’s very useful to apply Burning easily on a lot of enemies, and also, make them drop shield they might hold. It’s not necessary to upgrade it fully right now.
Signs – Aard – Aard sweep – 1/3
Another very useful skill in any situation in which you are surrounded. Sure, it won’t be as effective at first to knock down enemies, but sometimes, you just need peace, not knockdown.
Combat – Fast Attack – Muscle Memory – 2/5
It’s time to get some combat skills! Nothing much to say here, just grab this to increase your swords’ fast attack damage.
Passive – Cat School’s Techniques
By now, you should have acquired some decent light armor pieces (Assassin’s gauntlets / boots / trousers, for instance). So it’s time to take a passive to couple with the kind of armor we will use – light armor.
Signs – Igni – Firestream – 3/3
Nothing to say here, just upgrade the flamethrower.
Alchemy – Mutation – Acquired Tolerance – 3/3
This will allow you to drink a lot of potions without being threatened by Toxicity. It’s the only thing I take in the alchemy tree in the first game, but it’s worth it.
Now, you have all the basics you need. Use your other skill points in what I spent on the screens (Combat abilities, and upgrade alternate signs). You may notice a few things:
- I didn’t take the Alternate Yrden Sign. Why? Does it suck? Not at all. I just took it in my first game, but never used it. So I don’t take it anymore. But it really is a useful skill, so feel free to take it.
- Puppet (Alternate Axii) is very useful in Death March, because enemies will oneshot themselves. But you can choose to ignore it and take something else.
- I took Strong Attack skills even if I didn’t use them. Why? To unlock the Combat tree’s next tiers.
Armors, Swords and Crossbow (How Choose and Manage Them)
Okay. You start with a bad armor, bad swords, and a bad crossbow. What do we do?
Armor
Try to get your chest armor upgrade (Warrior’s leather jacket) crafted as soon as you can. You can keep it until you find another Witcher’s armor, if, like me, you find other armors awfully ugly. It will do.
As for the rest, you should find some Assassin boots, trousers and gauntlets while playing. Or diagrams. Craft them or equip them as soon as you can.
But that’s not our final gear, of course. What are we aiming for? The Cat armor. Extremely powerful light armor, beautiful and classy (it’s important!). Best armor of the game too, being as good as the other witchers’ armor sets.
First step, start the scavenger hunt quest to get the cat armor’s diagrams. Two ways to do it: buy the correct map from the correct merchant, or find one of the diagrams by some luck. If you do the latter, you will find nearby a book or letter that will indicate you the next diagram to get.
You will have to wait until level 17 to craft the armor, so be patient!
Once you get the basic Cat Armor, you will be able to find other diagrams to update it. Don’t craft the upgrades too soon tho: it uses your armor, and if you can’t wear the update because your level is too low… you just lost your armor.
Enhanced Feline Armor is level 23. Superior Feline Armor is level 29, as for the Feline Crossbow which has no upgrades. And the Mastercrafted Feline Armor is level 34.
Swords
Thanks to the free DLCs, there are two powerful swords to get in the prologue, the Viper swords. Easy to craft, and perfect when you start the game. Just make sure to do every question mark on your map, and you will find them.
Keep those two swords until you can craft and use the Feline swords, which you will be able to upgrade just the same as the armor, and with the same level restrictions. If you find a better swords your level allows you to use, then take it. But keep in mind that’s unlikely to happen (two times in 150 hours for me) and you must keep any Feline gear you have, in your stash or in your inventory, in order to be able to upgrade it later.
Crossbow
Don’t mind your crossbow’s stats. It’s only there to pull enemies towards you OR force flying creatures into landing. Once level 29, you will get the Feline Crossbow with good stats. But until then? Don’t waste coin in buying better crossbows or special bolts (useless).
One thing you should know is that the crossbow is basically your only asset under water. When you use it under water, it one shots or two shots almost any enemies. What about the rest? Well, just fire three shots.
What You Can Buy With Coin
- Maps, for the witcher gear diagrams’ locations. You can and should do all the scavenger hunt quests to get every witcher gear diagrams, for it will grand you XP even if you don’t craft the gear.
- Gwent cards. Because Gwent is cool.
- Greater runestones and glyphs. It’s very expensive, but will come in handy to upgrade your feline gear. Plus, the runestones / glyphs remain when you craft the upgrades for your gear!
- Any bomb / oil / potion formula you might see.
How to Play
Save often. F5 will be one of your best friends in this game. Not only to avoid losing a lot of progress when you die, but also to be able to roll back when you don’t like something you did, said or crafted.
If you see a combat coming, activate Quen early. Your stamina should regenerate quickly before the combat starts.
Don’t even think about fighting the guards, for they will stomp you and take all your coin.
Dodge often. Sidestep against humans and humanoid monsters. Combat rolls against large insectoid or elementa enemies, or to get out of the melee. Be careful, as combat rolls prevent your stamina from regenerating – the sidesteps don’t.
Don’t use the parry against monsters. Only dodges.
Parry, on the other hand, is very useful against humans. Do a successful counterattack, and you will be hit your enemy two or three times without problems.
Try to gather ingredients often. And create / upgrade any potion / oil / bomb when you can. Decoctions too, unless you have very few ingredients and want to save them for something else.
Don’t create Alchemy Substances or Alcohol unless it’s necessary for a Superior upgrade.
Remember to craft red and blue mutagens and insert them in the appropriate slots, like on the screenshots. Forget about the green mutagens. Seriously, more vitality? Come on. In Death March? Useless.
Keep in mind that you have to crate potions / oils / bombs / decoctions and their upgrades only one time. After that, you just need a base (some alcohol, fat or powder) to re-craft them.
Don’t be hot tempered or greedy. If you’re in a tough fight, take your time. Use potions if need be – plenty of alcohol out there to replenish them afterwards. Use your crossbow to pull enemies towards you and away from their friends to kill them one by one if you can’t manage them all at the same time.
Use the appropriate oil every time you can. And don’t hesitate to throw some bombs as well – they are here to be used, and you shouldn’t lack bases to re-create them.
Be strong. You will die often, especially at the beginning.




Be the first to comment