Guide to Hard Mode
Switching the game difficulty to hard presents a significant increase in challenge compared to medium. Players who perform well on medium may find themselves facing considerable difficulty on hard. This was my experience, and I am sharing the methods I used to overcome this.
About this Guide
Hard mode squeezes revenue. This means that margins are tighter still. If you’re reading this guide, chances are that you ran out of money, or it trickles in so slow making it tedious to play ‘hard’ – so this guide is looking to fix that for you.
We’ll be finding better margins and to profit more from everything that you build or purchase. We’re not paying off loans instead fund further projects. We will be earning money on the way there and on the way back. We’ll have upsides to every single thing we do.
- Transportation Basics
- Profitability: Ships
- Profitability: Utilisation – speed, gradients and empties matter
- More Loans
- Investments with benefits
- Are ‘upgrades’ upgrades?
Using the methods described in this section will make playing on hard mode more enjoyable. Additionally, you will observe that the development of your transport company will more closely reflect the actual historical progression of transportation. The game Transport Fever deserves recognition for its accurate portrayal of this historical aspect.
Transportation Basics
A lot of this guide follows from this section. It may seem all too obvious but let it sink in as much possible. The dictionary says:
‘Transport’ – the movement of goods and persons from place to place
Funnily enough, the earnings model in Transport Fever 2 reflects this – we get income for:
- Goods: distance covered.
- Passengers: distance covered multiplied by speed factor (more on that later).
From this we can establish we don’t want to be standing around with goods or loading/unloading:
We want things covering distances at all times – the only thing that we get paid for.
The passenger premium for speed seems to be influenced most by the maximum speed of the slowest vehicle on a line. In other words: if you upgrade the last locomotive or carriage from 80km/h to 100km/h, that’s when the premium for speed goes up (it’s a faster service then).
In summary
Goods want to be in the right location, humans want to get there quickly as well. Oh yes and it must have windows? This also means that in the very early game where everything crawls, transporting goods will do best for you.
Profitability: Ships
Profitability is key, especially when starting out. Your first choices set the speed of growth.
Why? Well there’s a massive difference in getting 100K per year back on your first 5 million investment, or 500K per year. This effect compounds: after 10 years you’ll respectively have 6.1 or 13 million through reinvestment of profits.
Now let’s contrast 4 types of transport in the earlier years of game. Watch this screenshot of a 1880 hard game and the ratio between revenue and costs (profitability):
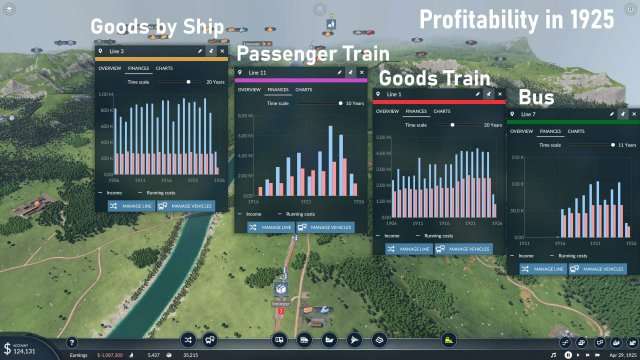
As you can see the ship route produces extremely regular revenue at about 2.5 times its cost. No other transport type approaches this. The investment is also pretty low: rivers and seas are free, small harbours and ships are relatively cheap, have long life spans and are cheap to run.
The passenger services do fine in this example, but I would not start those until your cities have grown from goods supplies and when trains run at about 100km/h.
Note that all 4 lines carry a (paying) load for at least 75% of their (back and forth) journey which helps them being profitable. More on this in the next chapter on utilisation.
In conclusion
Try to find a most profitable shipping route first. An example is in the next section. It’s worth starting out with a favourable map and take time to scout for profitable lines, especially where you can supply and grow 2-3 cities that you can later connect with passenger services.
If harbours need to be connected to cities,plants and resources through horse & cart or early truck services – that’s fine: the investment for the road part is low and road transport is at least profitable, unlike short-distance rail transport.
Profitability: Utilisation – Why Speed, Empties and Gradients Matter
While the first chapter on profitability looked at types of transport, equally important is to utilise the vehicle or infrastructure that you invested in for maximum return. This means:
- Run as quickly as possible, you only get paid for loads covering distances.
- Run with full loads – empties do not earn income.
- For rail and road, run as many lines over the same infrastructure (without affecting point 1).
- Upgrade only towards vehicle end of life or when substantially better vehicle types arrives.
1. Run Quick, Take the Easy Road
A train running up a gradient at 10km/h earns 1/3rd of a train running 30km/h. That’s 67% of capacity gone already! So tailor your train lengths for both not having to wait at stations to fill up and the speed at which the wagon will run.
In general but particularly in the steam era and at the start of the game, simply avoid taking loads up steep gradients. Focus on the low hanging fruit. Keep in the valleys and near water, just as the industrial age did.
2. Run with full loads – all the time
If you are used to deliveries where you run back empty, it means you’re only using your investment for 50% of the time – at best. So what we want is to have a paying load at all times. This is easy for any transport over water but trickier for (rail) services which require specialised wagons.
But first and to illustrate, a great way to start your game and get a 2.5x revenue-to-cost factor. What you need is a farm near a city and a food processing plant at a distance like this:
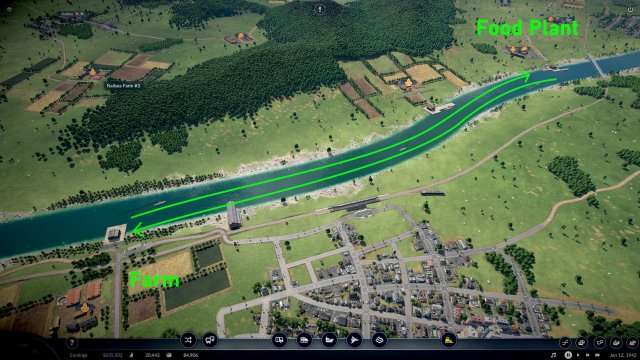
Here 2 or 3 small, affordable boats take full loads of grain and return with half loads of food back to the starting point, which is good for utilisation and profit. If there’s another farm nearby the processing plant, you could run a road service into it so the food-run back is also full. That’s about as profitable as you’ll get it in the early game. By the way, horses or trucks distribute the returned food into the city.
3. Rail Stock Utilisation – 2 Supply Chains
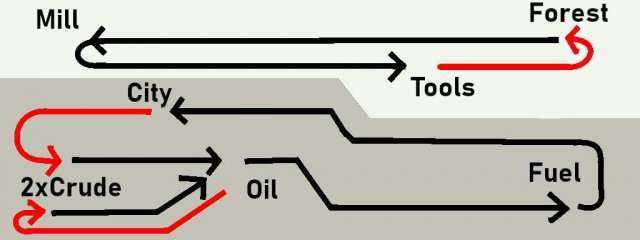
These are 2 well known supply chains that offer high wagon utilisation:
- Wood with mostly flat cars and couple of box cars for tool delivery.
- Crude Oil which can entirely done with tankers.
Other guides have mentioned this, but what’s important is (a) to minimise the section without load and (b) use minimal tracks. The unpaid parts of the journey are in red in this diagram:
To illustrate an efficient ‘wood’ supply line, look at this in-game example with ‘paying loads’ in green ‘and ’empty loads’ in red. We’re only using 1 double track (cost-efficient) line:
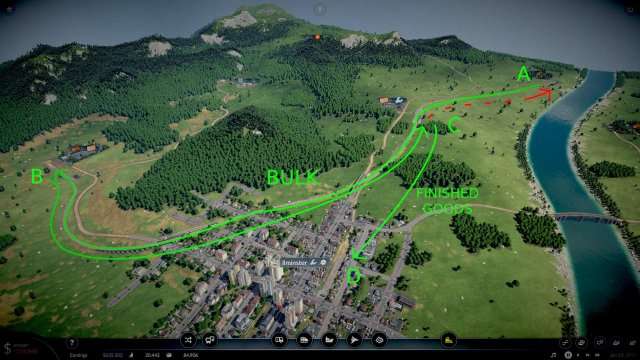
Here, the tool plant is in the middle and not too far off a city either. First we have the fully loaded A>B bulk-wood run to the other end. Then we return with planks and only the final C>A bit lacks a paying load. For keen observers, the tools-to-city does return with empty wagons, but it is with just a few wagons – so it doesn’t dampen profits all that much.
Conclusions
Apart from the type of the transport, our 2nd focus is high stock utilisation: reduce empty runs, reduce loading times and optimise running speeds. Again boats, with low running cost, can take all types of goods which enables having loads in all parts of their journey – maybe even serving different supply lines.
Take your time identifying the best options at the start – there usually a couple of stand-outs in each map, including the wood and oil supply chain opportunities for rail. Note that rail is pretty hard to get profitable in 1850, so you may want to hold off some decades for that.
More Loans
Every 1 in 2 guides seems to focus on paying of the loans. We’ll stay well away from any such notions.
To clear this up let’s distinguish 2 types of credit.
- A personal loan whether or not secured by your home to purchase something. This type of credit generally only increase your liabilities (things that cost you) and typically does not increase your assets (things that generate money for you). GDP rises with this, but productivity does not.
- Credit created to get metal and oil out of the ground to create machines and fund the industrial revolution such as Transport Fever models. Here the credit unlocks productivity and brings profits and efficiency benefits forward.
Number 1 is the loan you’d best pay off. Number 2 you’ll have more of and that is the type you are taking on in Transport Fever 2. A further look tells us we’re charged a fixed 1% interest per annum in TF2 and there’s no risk of rate changes or say, repossession :-).
Our sole task then is to have every loan yield more in profits than the additional interest charged. That is actually not too hard with the tips from the previous 2 ‘profitability’ sections.
What is hard in ‘hard’ mode is to have the revenue growth go up exponentially quickly like it did in ‘easy’ or ‘medium’, so for that purpose we’ll take any credit that we can put to good use. We’re only paying off to have enough credit to fund our next project. Paying off the loan to grow slower – no thanks.
That’s about all.
Investments with Benefits
Ok. This section is pretty straight forward by itself, but may be more difficult to plan ahead for to get maximum benefits. It’s a dodgy example, but it’s like investing in candy companies for dentists: we have an investment, but it drives your other business too.
The reason why we look for this is that in hard mode we run on much smaller margins, so any upside we get as a bonus makes a larger difference. So let’s put on that strategic hat and look at an example.
Let say two cities have a passenger train running between them, one small, one big. The train is fully occupied one way but only 2/3rds from the smaller city, owing to its smaller population.
If our next investment would supply, say bricks, to the small city, its population would grow and the train can fill up both ways. That’s a clear win-win and an example of ‘investments with benefits’. In fact you’ll see the profit of that train line go up a lot.
Another effect you may well be aware of comes from the ‘connections %’ factor in city growth. So when connecting cities by rail, the ‘connections’ factor of all cities goes up, not just the one you just joined up. This will see demand and eventual overall revenue climb across all passenger services.
So it’s clear that train and bus passenger traffic are the prime target getting upside from investments in creating supply routes into cities. Other opportunities are to route new train traffic over your existing rail network. Even just putting a goods line next to a passenger-only line can save nicely (up to 50%) in terrain levelling, bridging and tunnelling costs.
Conclusion
New investments that improve older ones or can make use of earlier investments – all help. Plan ahead to string these benefits together over time. Since margins are tight in hard mode, any upside has a noticeable impact and will see your TF2 game take off much earlier.
Are ‘Upgrades’ Upgrades?
In ‘medium’ games, cash tends to roll in so fast that upgrading can be done without too much thought. In hard games your first wave of vehicle replacements will come lurking well before you are rolling in cash and – as we’ll see later – not every upgrade is an upgrade.
I will illustrate this with 2 upgrades I did in a recent game, one worked very well, the 2nd not so much so you can draw your conclusions from that.
Initial situation – Upgrade choices in 1918
What I was looking to upgrade is a wood > planks > tools supply chain, run by 6 trains – with 4 being over the end of life age. Each train consist of a BR53 with 8 small flat cars. So in 1918 I had three replacement options:
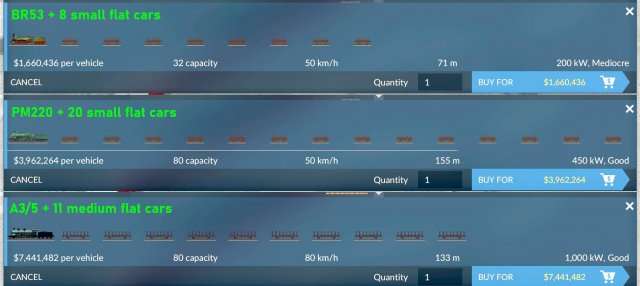
I could stick with BR53’s, while PM220s take far more cars and the A3/5s would run at 80km/h instead of 50km/h – but at a price. So what to do?
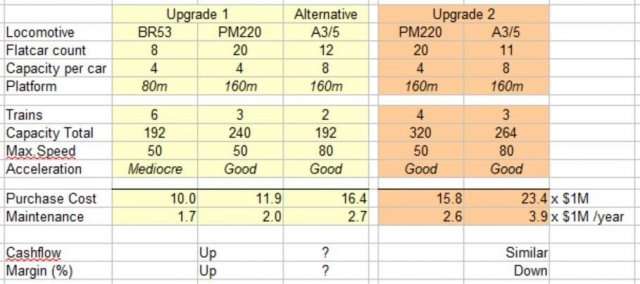
Here’s the quick maths for upgrade in yellow:
The First Upgrade + Secondary Benefits
The A3/5 option fell off mainly because I could not even afford 2 of those. That would have meant buying 1 and running it in between 50km/h BR53’s – which would hamper profits and saving up for the 2nd one.
I settled on the PM220 and extended the platforms from 120 to 160m.
3 PM220’s costed somewhat (+20%) more than the 6xBR53 but they drove slightly faster and with +25% more capacity. Additionally since the line freed up, I could run a 4th PM220 to pickup the last capacity of the wood supply- this happened soon after.
Tip: On heavily used lines, sometimes the pay-off comes in freeing up capacity of your infrastructure by upgrading to higher density rolling stock.
The second upgrade in 1938
The second update was less considered. It was done with the PM220 only 20 years old and the maths don’t look good in hindsight (orange section in the spreadsheet above). Without going into details, we’ll look in 1942 how we did financially.
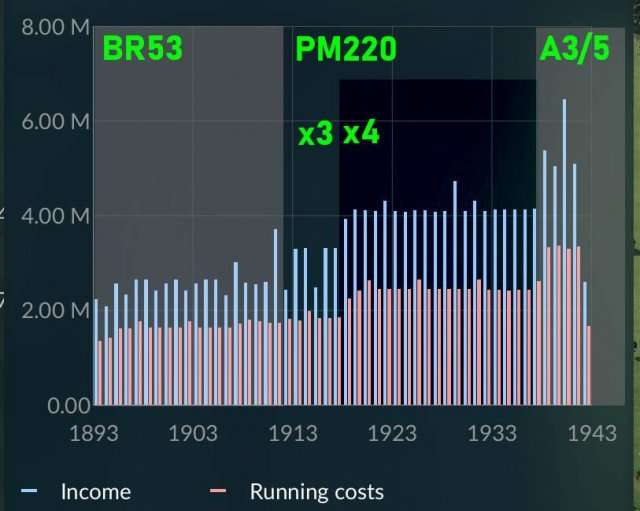
50 Years of profits over 2 upgrades
So here are the financial results over 50 years, using 3 consist types. Little consistent jumps in revenue & costs are additions of an extra locomotive/consist.
Looking back – learnings
Looking back, you can see above that the move to PM220’s was very successful. As the line capacity was freed up by moving from 6 BR53 to 3 PM220’s, I could add a 4th PM220 within a short few years. This nearly doubled cashflow from the BR53 era.
The jump to the 80km/h A3/5 was a lot less spectacular – the money was probably spend better on opening a new line somewhere else and run the PM220’s for another 10 years. The total cashflow did marginally improve, but that’s a poor return for spending 23.4 million.
Conclusions
As you can see ‘upgrades’ can be very good or a downright poor use of cash. To me, it is worth to do some quick math to calculate the total capacity and costs to tell you whether it’s an ‘upgrade’ or not.
It remains hard to guess the effect of using faster locomotives: in the spreadsheet you can see that the 264 capacity at 80km/h equated to about 320 capacity at 50km/h, so that relation is not as clear and gradients make it even harder to guess. You’ll have to ‘ballpark’ that one.
Closing Words
That, dear reader, concludes this guide. I hope you’ve developed some new strategies and ideas to tackle TF2 in hard mode and that you enjoy extra cashflow in your next game.
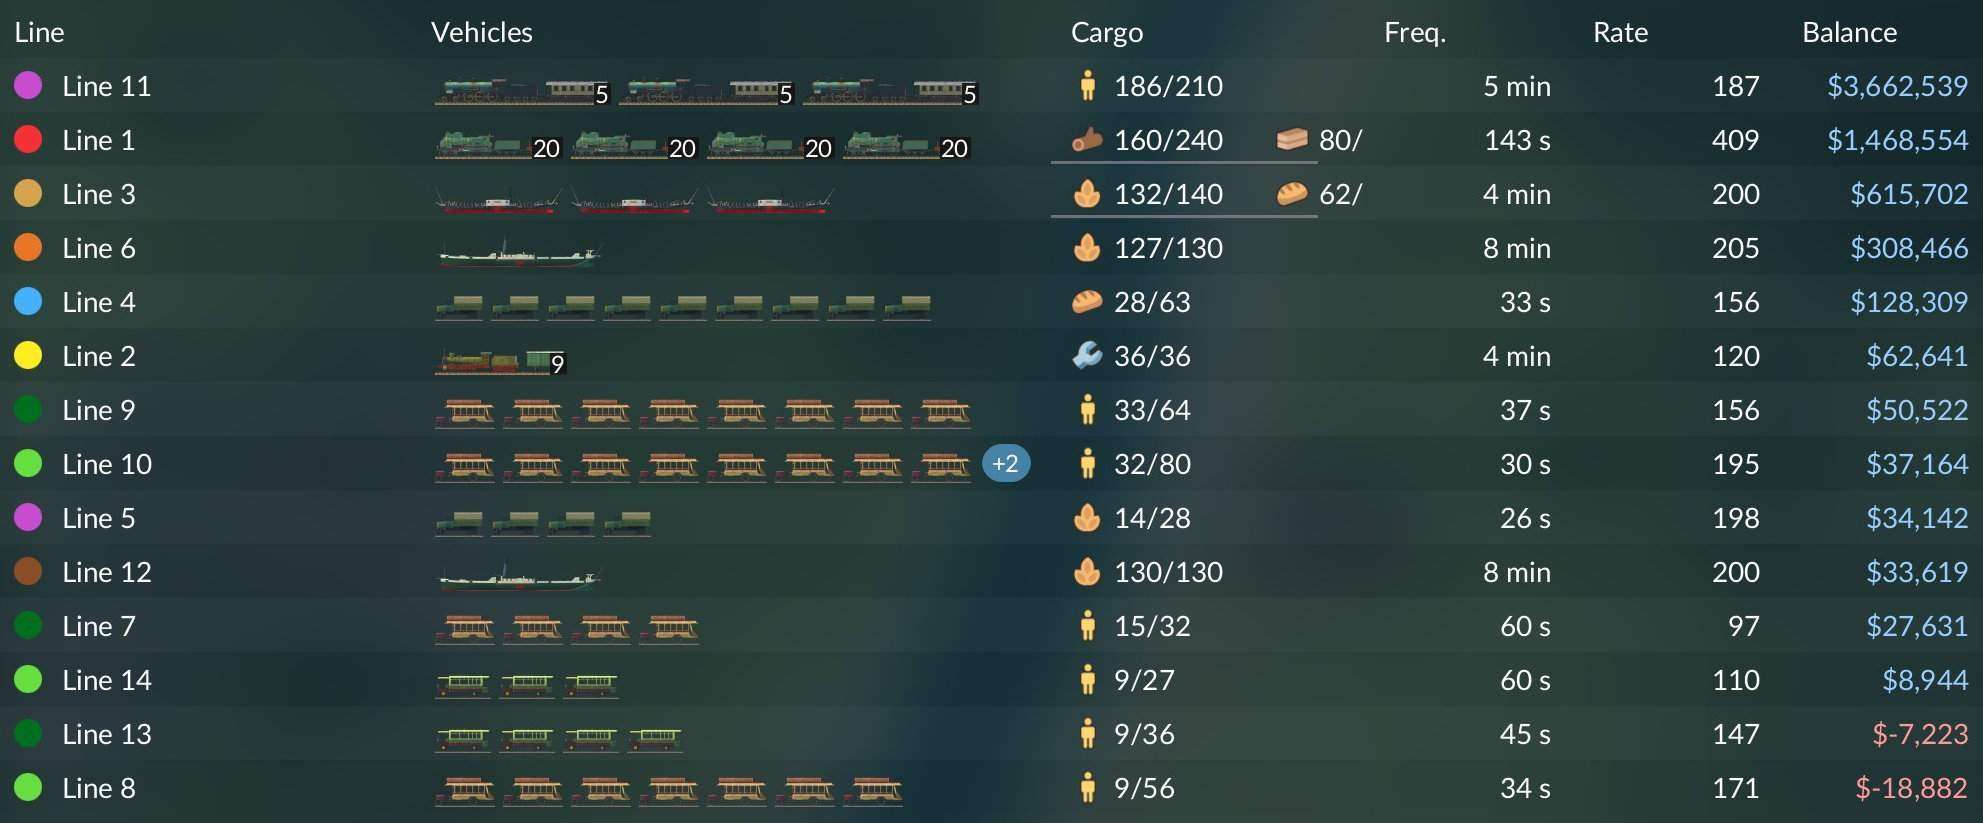
Note the cargo utilisation ratios and corresponding profit levels in this hard game.
Be the first to comment