
Hello fellow DBD players. This guide will describe to you what glyphs are and help you to understand better the use of them depending on their color and also how you commune with them in order to complete the glyph challenges in your game.
Contents
What are Glyphs?
All credit goes to Helen!
Glyphs are special props featured in Dead by Daylight. They appear as a part of tome challenges available for both Survivors and Killers.
There are several glyph challenges that can show up in a tome, and they come in different colors. Some glyphs are easier than others, but all require a Survivor or a Killer to interact with the glyph during a game.
Glyphs have the appearance of a plumb-bob-shaped crystal that floats in mid-air.

They spawn in random locations in the map and they are invisible to players who have the associated Glyph Challenge selected. Once those players approach the Glyph’s location and come close enough, the Glyph reveals itself and plays an audio cue.

Some Glyphs, given specific circumstances, reveal their auras to the player, making it easier to find them.
How Many Glyph Colors there are in DBD?
Currently there are 8 different glyph colors in the game so far (in order of release):
- Red Glyph
- Blue Glyph
- Yellow Glyph
- Purple Glyph
- White Glyph
- Green Glyph
- Orange Glyph
- Pink Glyph
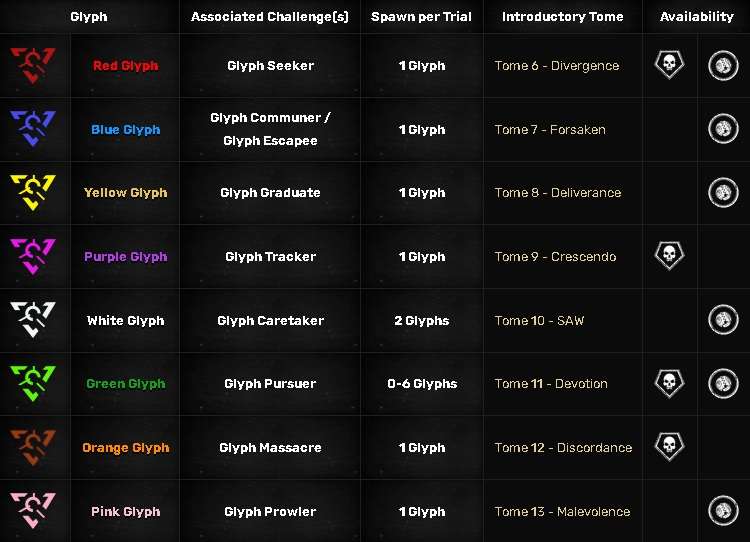
The game firstly introduced the Red Glyph with Tome 6. Since then, nearly every new tome introduces a new glyph color with new effects.
Red Glyph
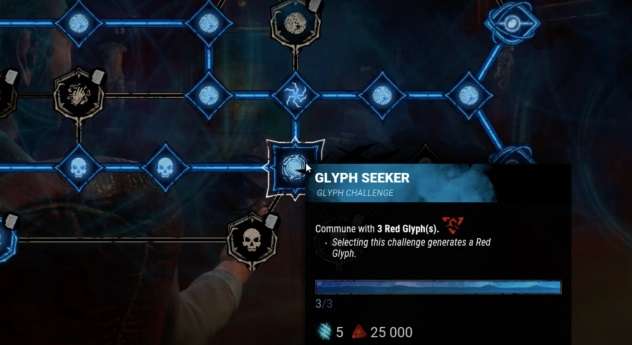
The Red Glyph Seeker Challenge is available to all Players. In other words, this challenge can be completed by either Killers or Survivors.
The red glyph in Dead By Daylight can be made to appear in the game by selecting the correct challenge in the tome. Depending on the tome, the players are required to find either 3, 4, 5 or 6 red glyphs. Each match contains only one glyph to try to discover and interact with.

When entering the game, you must search the map to find a red diamond-like shape. When you get close enough, the shape appears and a small noise can be heard. You can then ‘commune’ with the glyph by using the interaction button. Once the challenge is complete, you get rewarded with Rift Fragments and Bloodpoints.
- Interaction time for Survivors: 3 seconds
- Interaction time for Killers: 1.5 seconds
- Visibility range: 8 metres


You just need to commune with the glyph to complete it; nothing else needs to happen. It is the simplest glyph challenge to complete!
Blue Glyph
The Blue Glyph Communer and Glyph Escapee Challenges are only available for Survivors.
- Interaction time: 3 seconds
- Visibility range: 10 metres
- Penalty duration: 60 seconds
After communing with a blue glyph, the Survivor suffers from either the Blindness vision or the Oblivious Status Effect.
Note: If the Challenge is Glyph Escapee, the Survivor must escape the Trial and commune with the Blue Glyph to complete it.
Yellow Glyph
The Yellow Glyph Graduate Challenge is only available for Survivors.
As you walk around the trial and repair generators or unhook other Survivors, you’ll eventually find a bright yellow rip in the air. That’s the yellow glyph you’re looking for! Once you interact with it, fast Skills Checks will start in quick succession to one another.
The yellow glyph requires Survivors to succeed all of them. If you fail a skill check at any point, the glyph will disappear and relocate itself somewhere else on the trial.
- Interaction time: 5 seconds
- Visibility range: 16 metres
Note: It is possible failing the skill check task to alert the Killer to the Survivor’s location.

Purple Glyph
The Purple Glyph Tracker Challenge is only available for Killers.
The first thing a Killer must do in order to commune with a Purple Glyph, is to hook a Survivor. Once a Survivor is hooked, the Killer will see a purple glyph spawning.
The purple glyph reveals itself to the Killer and randomly moves around the map, leaving only a trail of purple ooze behind it, with which the Killer will not have time to commune with it at first sight.

The Killer will see the aura of the Purple Glyph for 4 seconds after hooking a Survivor.
If The Killer approaches within this range, the Purple Glyph stops moving.
- Interaction time: 2 seconds
- Visibility range: 4 metres
- Movement speed: 1.5 m/s
- Movement range: 2 metres
- Redirect range: 10 metres
If The Killer approaches within this range, the purple glyph starts choosing its next location:
- Minimum distance to new spawn point: 1 metre
- Maximum distance to new spawn point: 25 metres
- Movement Acceptance radius: 2 metres

Note: Purple Glyphs do not give a negative status effect to the Killers.
White Glyph
The Glyph Caretaker Challenge is only available for Survivors.
At the beginning of the trial, the Survivor will see the aura of the white glyph somewhere in the map. The first step is to reach the glyph and interact with it. In theory, this step is the simplest of the challenge as it only requires the Survivor to travel across the map. In practice though, the difficulty depends on whether the Killer has seen and is chasing the Survivor.
An important tip for this challenge is to avoid detection by the Killer until the challenge is completed as the white glyph challenge is effectively impossible to complete if the Killer is chasing the Survivor.
Interacting with a white glyph it will spawn a fragile pocket mirror in the Survivor’s hand, causing them to drop any item they may have been holding (medkit, toolbox, flashlight etc). For this reason, it’s advisable to either not bring an item into the trial while doing the White Glyph challenge or only bring an inexpensive item that can be lost with little consequence.
Note: It is not possible to return to the dropped item later and pick it back up after you interact with the white glyph.
The Survivor then, will need to be carry the mirror to “a dangerous place” without breaking it. Although the challenge text doesn’t specify, that place is the basement. On many maps the basement can spawn in either the Killer Shack or in the main building, so the Survivor will need to find the basement and then bring the glyph into it.
- Interaction time: 3 seconds
- Visibility range: 8 metres
- Respawn duration (after breaking the pocket mirror): 10 seconds
- Minimum Spawn distance from the Basement: 30 metres
- Maximum Spawn distance from the Basement: 50 metres
However, the white glyph has unique criteria for completion. The journey to the basement isn’t so simple. Performing any rushed action such as fast vaulting a window or a pallet, jumping in or out of lockers, falling from a great height or even being hit by the Killer, it will break the white glyph. It is for this reason that being chased by the Killer makes the challenge almost impossible! Escaping the Killer and making it into the basement without performing any of the actions listed above is extremely difficult in most circumstances.
Note: After interacting with the glyph aura in the basement, the mirror in the Survivor’s hand will be repaired and will no longer be broken by rushed actions or other activities.
Near the rear hook in the basement, another white aura will spawn, and interacting with this aura completes the challenge. The player doesn’t need to escape the Trial; even if they die to receive their 25k bloodpoints reward. But completing the challenge there’s a good reason to try to escape. If the Survivor escapes the trial with the mirror in hand, they will receive a reward of an additional 25k bloodpoints, for a total of 50k bloodpoints!

Green Glyph
The Glyph Pursuer Challenge is available to both Survivors and Killers.
Multiple Green glyphs appear in areas where totems are normally found, as a distinct sound can be heard when you approach the right spot. A small green diamond appears when you get close enough to them.
Survivors and Killers must progress their main objectives for a green glyphs to spawn, such as repairing a generators or hooking a Survivors for the first time.
Note: They do not spawn right in the beginning of a Trial.
During the Endgame Collapse, when both gates have been opened, the auras of any left over glyph will appear briefly. You can decide either to try and find the glyph or leave the match and try again next game!
- Interaction time for Killers: 2 seconds
- Interaction time for Survivors: 8 seconds
- Visibility range: 8 metres
- Maximum Spawn number: 6 Glyphs
Note: Due to green glyphs sharing their spawn locations with totems, it is possible that a Trial will spawn fewer than 6 Glyphs, if there are not enough spawn locations available on the Map. Shelter Woods, for example, only has 10 spawn locations available in total, as 5 are always reserved for Totems. In other words, Shelter Woods can only spawn up to 5 glyphs.
You just need to commune with the required number of glyphs in the challenge in order to complete it; nothing else needs to happen. It is one of the simplest glyph challenges to complete along with the red glyph challenge.


Orange Glyph
The Glyph Massacre Challenge is only available for Killers.
The orange glyph spawns right next to the Killer when the game starts and therefor it does not require to be searched for first.
The orange glyph causes the Killer to suffer from several afflictions at the same time while they are tasked to hook 6 Survivors in order to close the Glyph.
- Interaction time: 2 seconds
- Visibility range: 16 metres
Afflictions:
- Increases the cool-down duration of missed basic attacks by +0.5 seconds.
- Reduces the recovery speed from pallet stuns by -50 %.
- Reduces the action speed of breaking breakable walls and pallets, and damaging generators by -30 %.


Pink Glyph
The Glyph Prowler Challenge is only available for Survivors.
Survivors must be cautious in approaching the pink glyph as it will inflict them with the Exposed Status Effect and disappear, if the glyph has line-of-sight for too long. So in order to interact with the pink glyph, the Survivor must sneak up on it without being seen for too long. If stalking the pink glyph was unsuccessful or if the Survivor moves too far away from it, the pink glyph will reappear in a different location on the trial.

- Interaction time: 3 seconds
- Visibility range: 30 metres
Within this range, the pink glyph is able to detect the Survivor approaching it and potentially causing the Exposed status effect on the player. An audible sound cue will play as soon as the Survivor has entered its range and the glyph becomes visible.
- Marking time: 4 seconds
This uses the same mechanic that The Ghost Face Killer uses when he approaches and marks the Survivor.
- Grace timer: 1 second
The glyph has line-of-sight on the approaching Survivor before its starts the Marking process.
- Movement range: 32 metres
Once a Survivor enters the visibility range of the glyph, they must stay within the movement range, otherwise it will re-spawn and teleport to a different location.
- Marked Timer duration: 30 seconds
- Teleportation delay: 10 seconds
- Marking Progress Reset delay: 1 second

Note: It is possible for a Survivor to spawn into the trial within both range and line-of-sight of their pink glyph, causing them to become Exposed immediately after gaining control over their character.


Be the first to comment