
This guide showcases some of my favorite builds for Gunner. Don’t feel as if you need to copy these builds 1-1 either! Experiment and see which fits better for you than what I present here.
Generalist Build (“Lead Storm” Minigun + Armskore Coilgun)
This is my go-to build for your average mission on Hoxxes such as Mining Expeditions, Point Extractions, and On-Site Refining. It works like a charm no matter the biome.
“Lead Storm” Powered Minigun Build
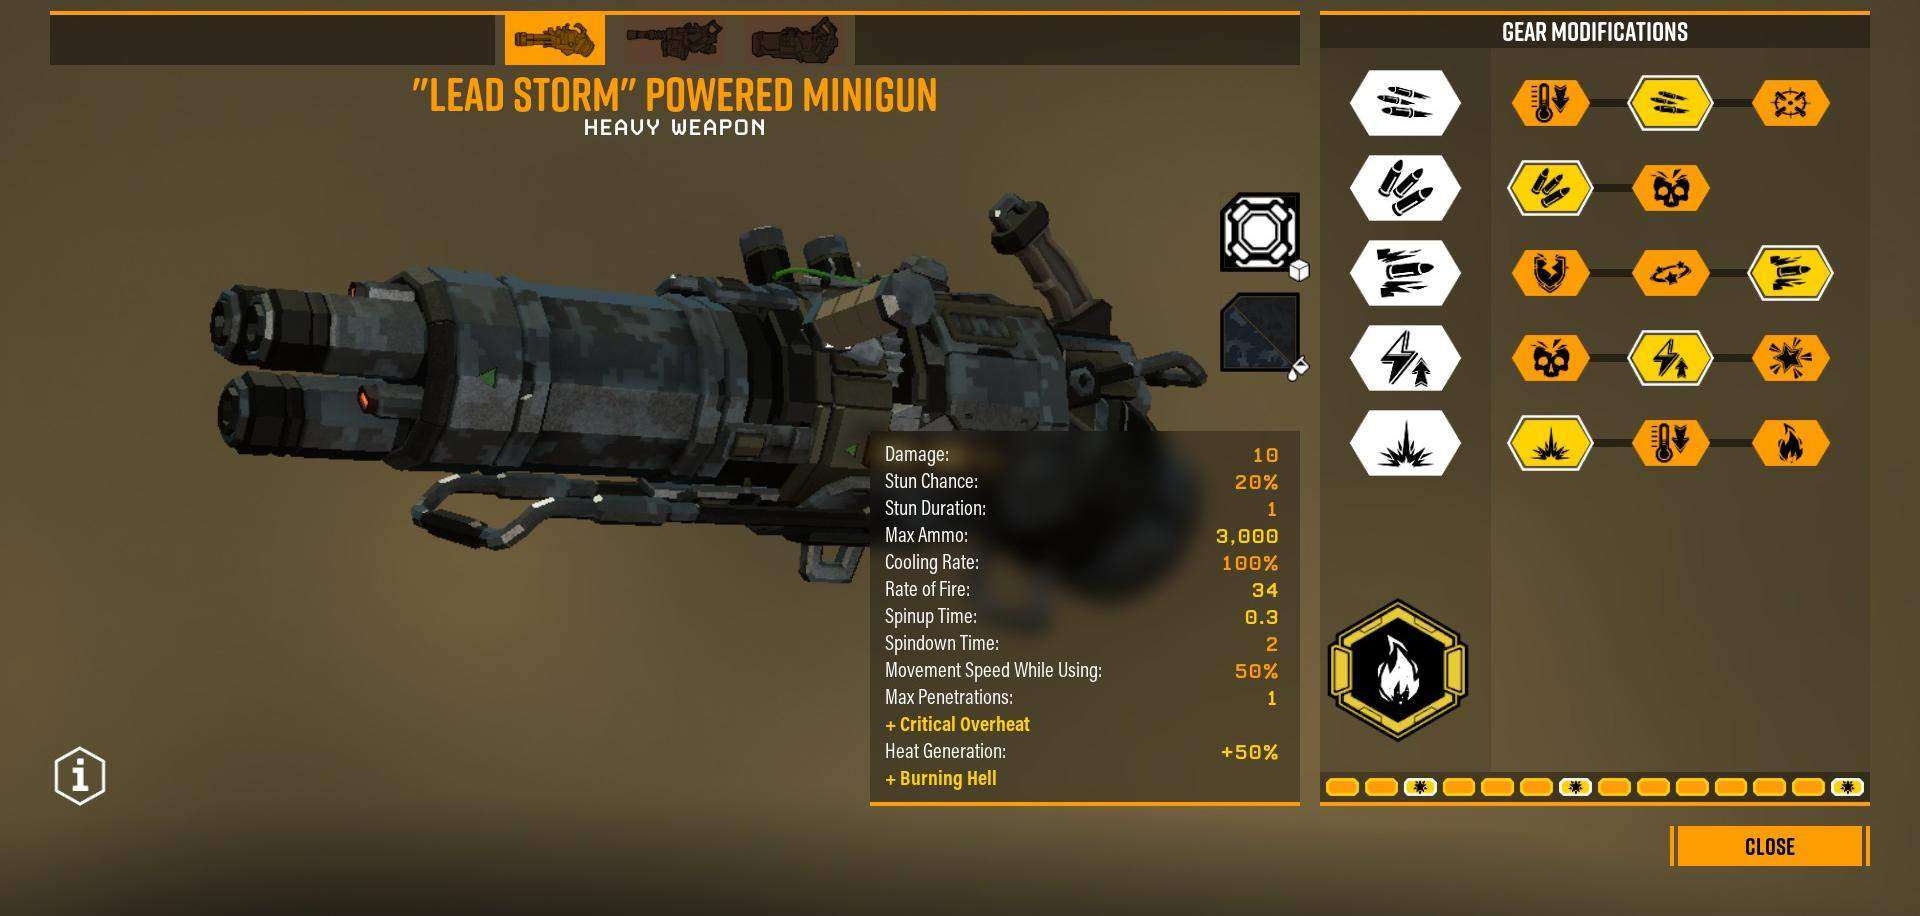
The Minigun here is designed to handle single-targets and groups of bugs alike while being able to preserve ammo and go the long haul without a resupply.
Improved Motor in Tier 1 is a given for most Minigun Builds. Who doesn’t want to shred bugs faster?
Oversized Drum is chosen on Tier 2 to help keep you in more fights for longer. High Velocity Rounds sounds very tempting with that succulent +2 damage, but it’s actually counter-productive to how you’ll be using this gun. Just take my word for it and take the extra ammo.
Blowthrough Rounds are taken on Tier 3 to further assist shredding bugs, but you can also take Improved Stun if you want better Crowd Control. Blowthrough helps with your ammo economy by giving you more bang for your buck when tearing through those ugly arachnids.
Lighter Barrel Assembly on Tier 4 allows you to respond to sudden threats much faster. Nothing fancy here.
Aggressive Venting in Tier 5 will be our ace in the hole when you sense that there might be too many bugs around you. Only use this when you know you can overheat in time before the bugs run you over and/or your bubble shield is recharging.
And to top it all off; This Minigun is overclocked with Burning Hell! Not only will this Overclock’s downside of faster heat build-up allow for more frequent use of Aggressive Venting, but the upside will help with even more ammo preservation!
Armskore Coilgun Build

Next up for this build is the Armskore Coilgun! This delightful little war-crime will be taking on multiple roles as your pocket sniper, crowd control tool, and Mactera eviscerator!
Extra Coil on Tier 1 allows you to eliminate crucial targets sooner, but Larger Battery is also up for consideration if you desire more spam.
Controlled Magnetic Flow on Tier 2 is what make this Coilgun as flexible as it is! Without it, you’d be spending 40 ammo for every single shot! Wasteful!
Concussive Shockwave is nabbed on Tier 3 more out of personal preference than anything else. Fear Trajectory can give you and your drinking pals just as much or more breathing room thanks to the handy-dandy fear effect. Tier 3 boasts two different flavors of Crowd Control here.
Shockwave will be taken on Tier 4 purely for the extra oomph in damage at close range. If Defence Enhancement is more your speed, then go for it.
Electric Trail in Tier 5 will be our final mod. Extra DoT (Damage over Time) AND slowdown is exactly what you’ll want for this Coilgun because…
For this baby, we’re taking the unstable Triple Tech Chamber overclock! This’ll allow you to fire off two extra trails in quick succession after the initial shot.
Playstyle
During those quiet periods when hundreds of toothy bugs aren’t barreling towards you, you’ll want to be using the Minigun as your self-defense tool like in any other mission. Use it to clean up trash and let the fire DoT from Burning Hell finish them off as to preserve ammo. The Coilgun can also be used as the occasional sniping tool so as to not waste Minigun ammo on far-off chumps.
When a swarm IS announced, you’ll be leading the charge with this build’s Coilgun first. Identify the path that the swarm is taking to reach you, then fire off two to three semi-charged shots in a sort-of V shape to catch as many of those nasty buggers as possible. Then follow right up with a hail of bullets and fire at close range with your Minigun.
Don’t forget about Controlled Magnetic Flow either! Use it your advantage when quickly deciding whether to quickly lay down an electric trail for a group of grunts or taking the time to delete a particular threat with a charged shot. (AKA Mactera Spawn, Tri-Jaws, Acid Spitters, etc.)
Remember to use keep raining down bullets while hopping around to trigger Aggressive Venting if you feel that the pressure’s too much for you to handle. If you know you can’t pull it off in time, then don’t be afraid to use your trusty bubble shield!
Pros & Cons
Pros:
- Fairly good ammo economy on both weapons as long as they’re played to their strengths.
- Both weapons are flexible enough to be brought for a variety of mission types and biomes.
Cons:
- Beefy targets like Oppressors, Dreadnoughts, and most other boss enemies may take longer to kill with this compared to most other Minigun builds.
- Despite Burning Hell, this build is average at best at dealing with those accursed Rival Tech enemies. Not even Shredders go down immediately when greeted with your Minigun’s cone of fire, so you’re better off utilizing the Coilgun or your trusty pickaxe.
Nonstop Firepower (“Lead Storm” Minigun + Armskore Coilgun)
You want fire? You want power? You want BOTH!? Well this build’s got both in spades and it’s pulling no punches! Boasting both incredibly high single-target damage AND brain-dead easy swarm clearing, this one is a favorite of mine on Elimination missions for a reason.
“Lead Storm” Powered Minigun Build
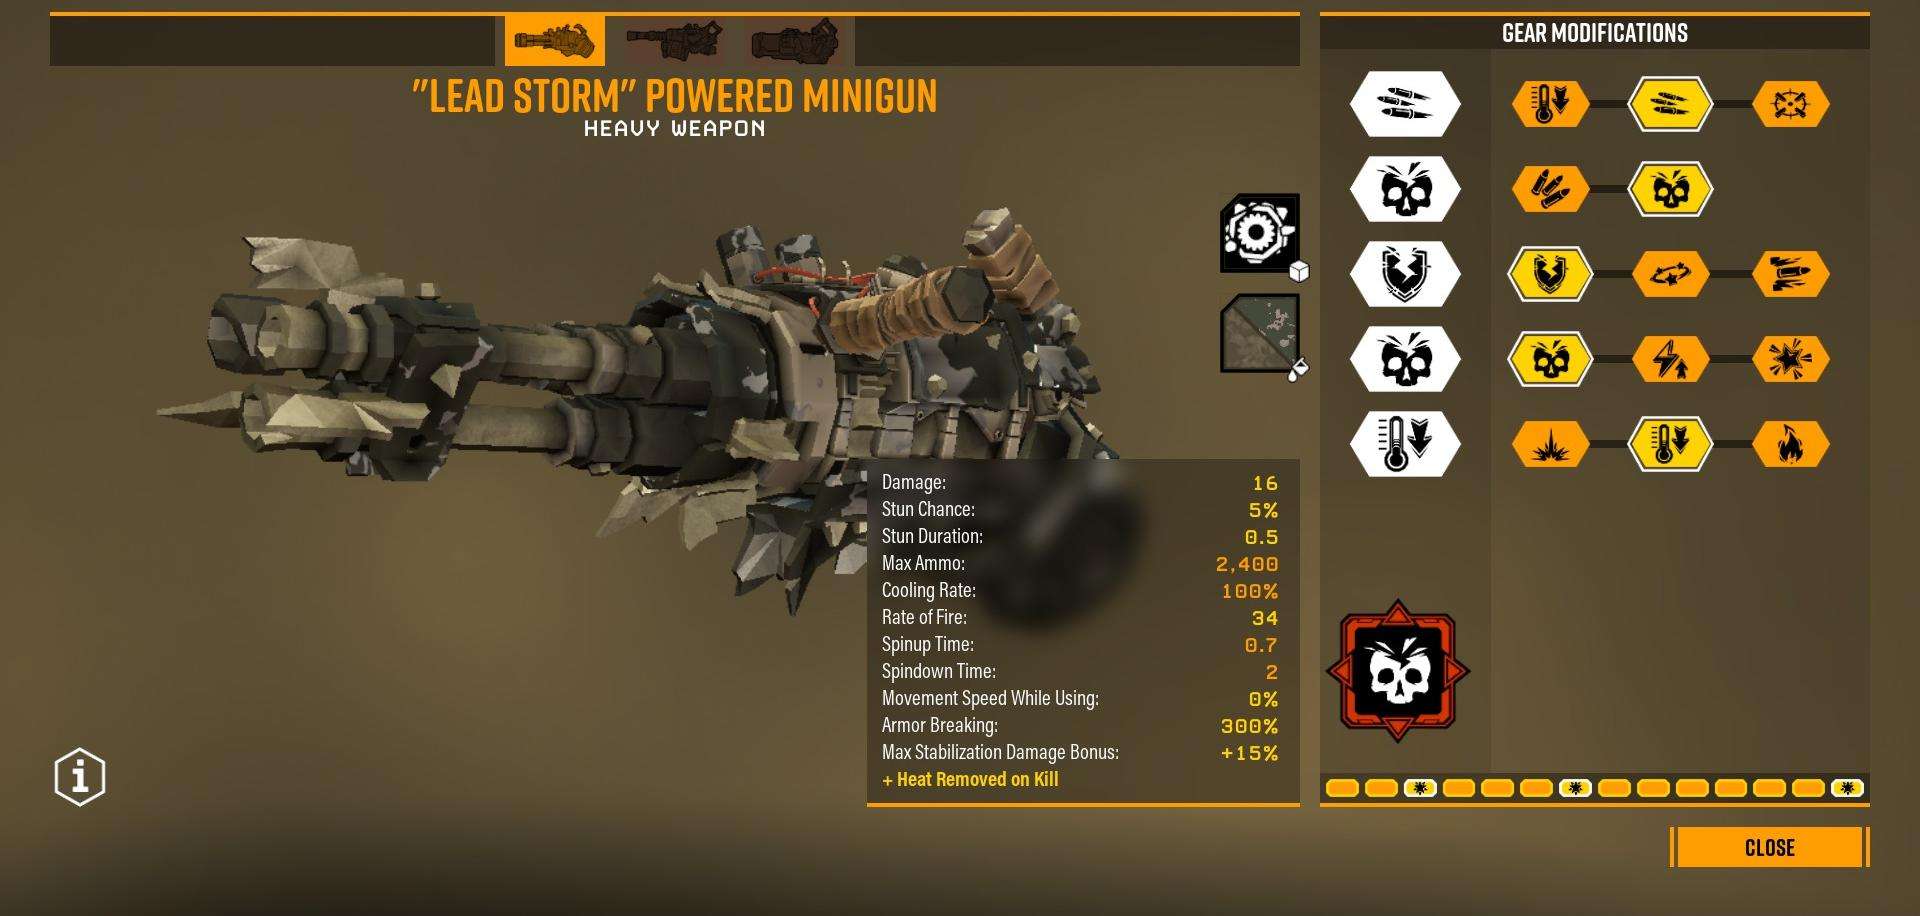
Right off the bat, this Minigun is toting some serious damage. Ain’t no bug, robot, or bumbling idiot that you call a “teammate” will be standing up for long when caught in the rain of bullets this thing will be pumping out.
Improved Motor for Tier 1. More Bullets? Of course more bullets! We’re here to shred, not to snipe!
High Velocity Rounds for Tier 2. Damage, damage, damage, damage, damage!
Hardened Rounds for Tier 3. Here’s where there’s actual decision-making to be had. Hardened Rounds is chosen here to make wiping the floor with Grunt Guards, Praetorians, and Mactera Brundles much easier. Blowthrough Rounds grants better ammo economy when it comes to the softer bugs, but this build’s secondary already has that front covered. In the end, just don’t take Improved Stun since the stunning capabilities on this particular Minigun is already buggered to begin with.
Variable Chamber Pressure at Tier 4. You can make an argument here for Lighter Barrel Assembly and even Magnetic Bearings since you’ll likely be doing a lot of bunny-hopping with this Minigun and a faster response time is nothing to scoff at either. I just can’t help myself when it comes to damage. Who doesn’t want more damage?
Cold as the Grave for Tier 5. You want to be killing things for a longer period of time before overheating? This mod lets you do just that. More dead bugs means less dead dwarfs. Less dead dwarfs means easier mission. Easier mission means sooner getting flat-on-your-face drunk at the Abyss Bar.
And finally, the shining jewel of the build! The main star! The big cheese! Lead Storm! …no, not the weapon itself, that’s what this Unstable Overclock is called. Confusing, I know. Anyways, this Overclock jacks up the damage of this weapon even further at the cost of its innate stun potential and being able to move at all. That won’t matter because whatever’s in front of you is either dead long before it’s needed to be stunned…or is mouthing off at you from the floor for friendly fire. That last one is more often than not on your teammates for not keeping your position in mind.
Armskore Coilgun Build
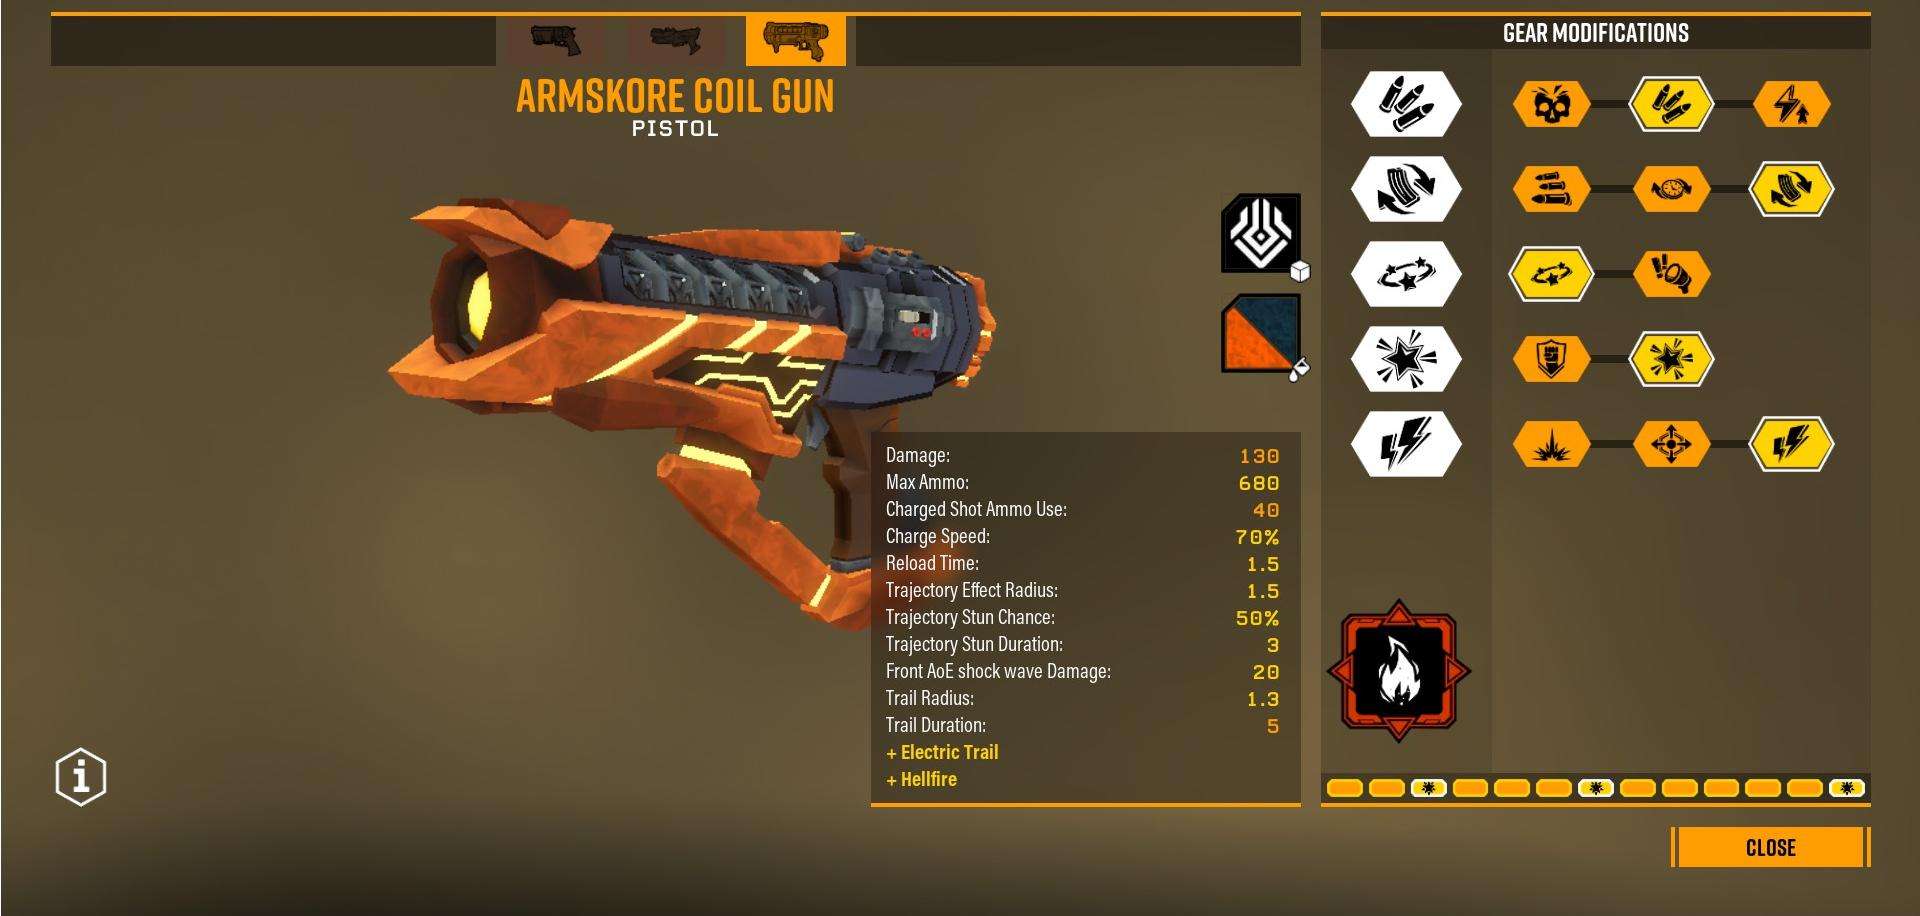
This is where your real swarm-clearing comes in. What’s better than shredding hundreds of annoying bugs with an oversized Minigun? Watching them all crumble to dust before you with just a single pull of the trigger on this bad boy.
Larger Battery for Tier 1. This is a no-brainer for this particular Coilgun given the Overclock’s downside of less ammo. Optimized Charge Speed sounds tempting given the slower charge time as well, but from my experience you won’t be needing that even in the heat (heheh) of the moment.
Improved Feeding System for Tier 2. You simply don’t need Overcharger in order to use this gun’s Overclock and Controlled Magnetic Flow is counter-productive. Just take the faster reload speed and move on.
Concussive Shockwave for Tier 3. Stunning bugs means they’re sitting in the lingering trail for longer and that’s exactly what you’ll want in order to maximize the damage output.
Shockwave for Tier 4. Again, this or Defense Enhancement depending on your style.
Electric Trail for Tier 5. More damage? AND slowdown? Yes please!
And to top it all off, it’s the cornerstone of this Coilgun. Hellfire! This Unstable Overclock will light any poor sap caught in the gun’s lingering trail on fire! Sounds underwhelming, but when you take into account the trail’s own DoT AND the electricity DoT from Tier 5, you essentially have a gun that shoots lingering death trails for the bugs to walk into. Fries ’em up faster than your Driller can apologize for “accidentally” blowing you up with his C4!
Playstyle
Elimination missions are where this build absolutely thrives. Any Dreadnought with its abdomen exposed that’s caught in your line of fire is gonna regret it. Twins are a special case since the Armor Breaking capabilities on this Minigun will make short work of their breakable armor, making it easier for your team to dish out the damage as well.
See a line of bugs heading your way? Hit ’em in the face with your Coilgun. See a group crawling down from the wall? Fire alongside the wall and now you’ve got a bucket’s worth of crispy Glyphids on your hands. A big, mean Praetorian is approaching? Give ’em a taste of Karl’s wrath with your trusty Minigun. Not even their armor will save them.
Of course, since it’ll take a bit for your Minigun to spin up or your Coilgun to charge, positioning is key with this build. Don’t forget about your grenades either. They can help a lot with cleaning up or softening an oncoming swarm for your Minigun to sweep away. You can also use your shields to give yourself some breathing room, but don’t be wasteful with them either. Be smart and stick with your team.
Pros & Cons
Pros:
- High single target damage wipes the floor with large bugs.
- Coilgun is more than capable of handling swaths of regular grunts.
Cons:
- No reliable way of sniping far distance targets without wasting ammo
- Positioning is crucial due to the lack of maneuverability from the Lead Storm Overclock
Nonstop Firepower V2 (“Hurricane” Guided Rocket System + “Bulldog” Heavy Revolver)
This build is an alternate flavor of Dreadnought Hunting compared to the first “Nonstop Firepower” build. What it lacks in reliable crowd clearing, it makes up for in being specialized specifically for the biggest of big boys. Dreadnoughts. Korlok Tyrant Weeds. Bulk Detonators. Even the almighty Caretaker is no match for the sheer, unrelenting DPS this build will put out. If you’re planning to go big game hunting, then this is the build for you!
“Hurricane” Guided Rocket System Build
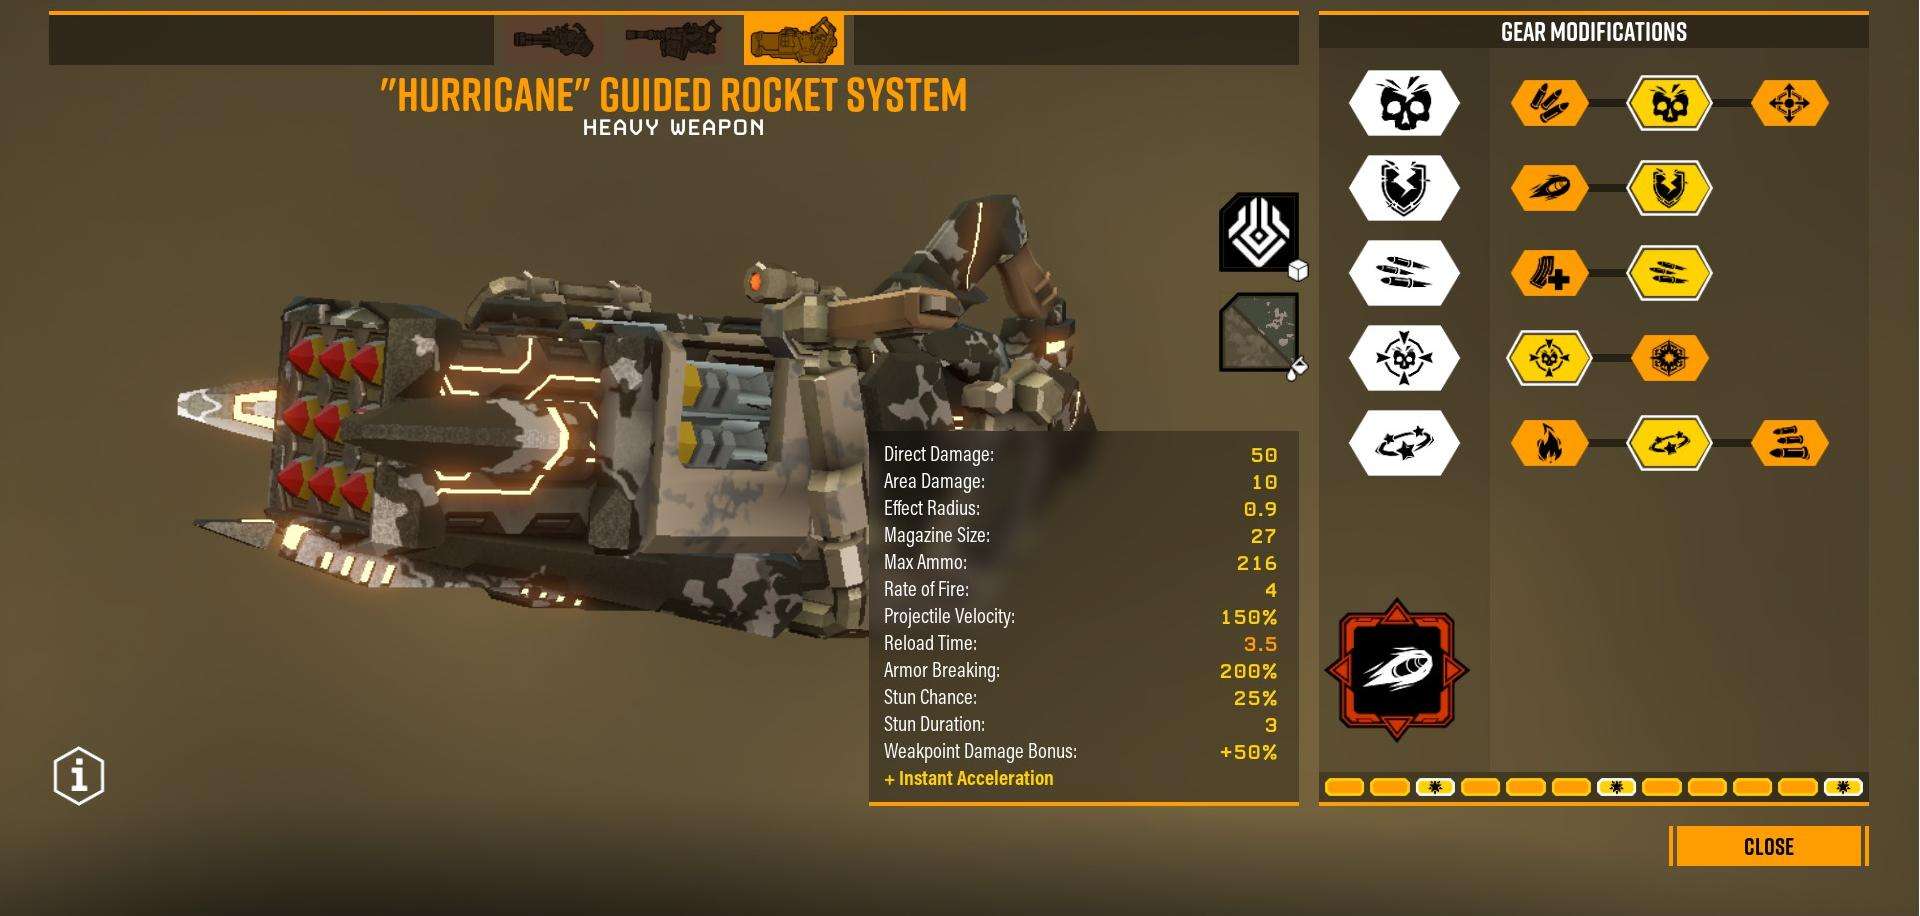
If this weapon were a comedian, then it’d be awful at it. ‘Cause it ain’t jokin’. (It should also probably consider a career change.) Rocking all the bells and whistles it needs to be a force of nature, this Hurricane is destined to slay anything with a sizable HP bar. Karl help them if they thought armor would give them a chance.
Pressurized Gas Cylinders for Tier 1. You may be tempted to bring Missile Belt to give yourself two extra magazines-worth of ammo, but I find the eight you’re given at base to be enough to handle the occasional harassment swarm alongside whatever big bad is on your hit list.
Anti-Tank Missiles for Tier 2. I’ve heard rumors spread around the Rig that this mod for the Hurricane is actually bugged and doesn’t work. I argue that it’d be a waste to take Bigger Jet Engine unless you want some REALLY fast rockets. Whether or not it’s true, this mod fits the build’s goal of being an end-all-be-all for shredding big bugs. Armor just delays the inevitable for them.
Improved Feed Mechanism for Tier 3. Decisions, decisions. Do you take Nano Missiles for longer, sustained fire, or Improved Feed Mechanism for more DPS? Obviously I chose the latter, but no one’s stopping you from taking Nano Missiles. As long as you’re slaying big boys, you’re doing your job.
Shrapnel Load for Tier 4. 50% Weakpoint Damage bonus. On a single target-oriented build. Need I say more?
Uncontrolled Decompression for Tier 5. According to the handy-dandy DRG wiki (not sponsored), Nitroglycerin Rounds boost your area damage, not direct damage, so that’s a hard pass. Napalm-Infused Rounds just won’t get any use on boss enemies since they can’t be set on fire. Not to mention anything smaller will die before the flames kick in, so just take the free stun. Helps a lot with Praetorians.
And the shiny bow to put on this Hurricane Build is…Jet Fuel Homebrew! This nasty Unstable Overclock pumps up the direct damage even further, boosts the base speed of the rockets further, and shoots them at top speed immediately! It shouldn’t take a degree in rocket science to figure out how good this Overclock is.
“Bulldog” Heavy Revolver Build
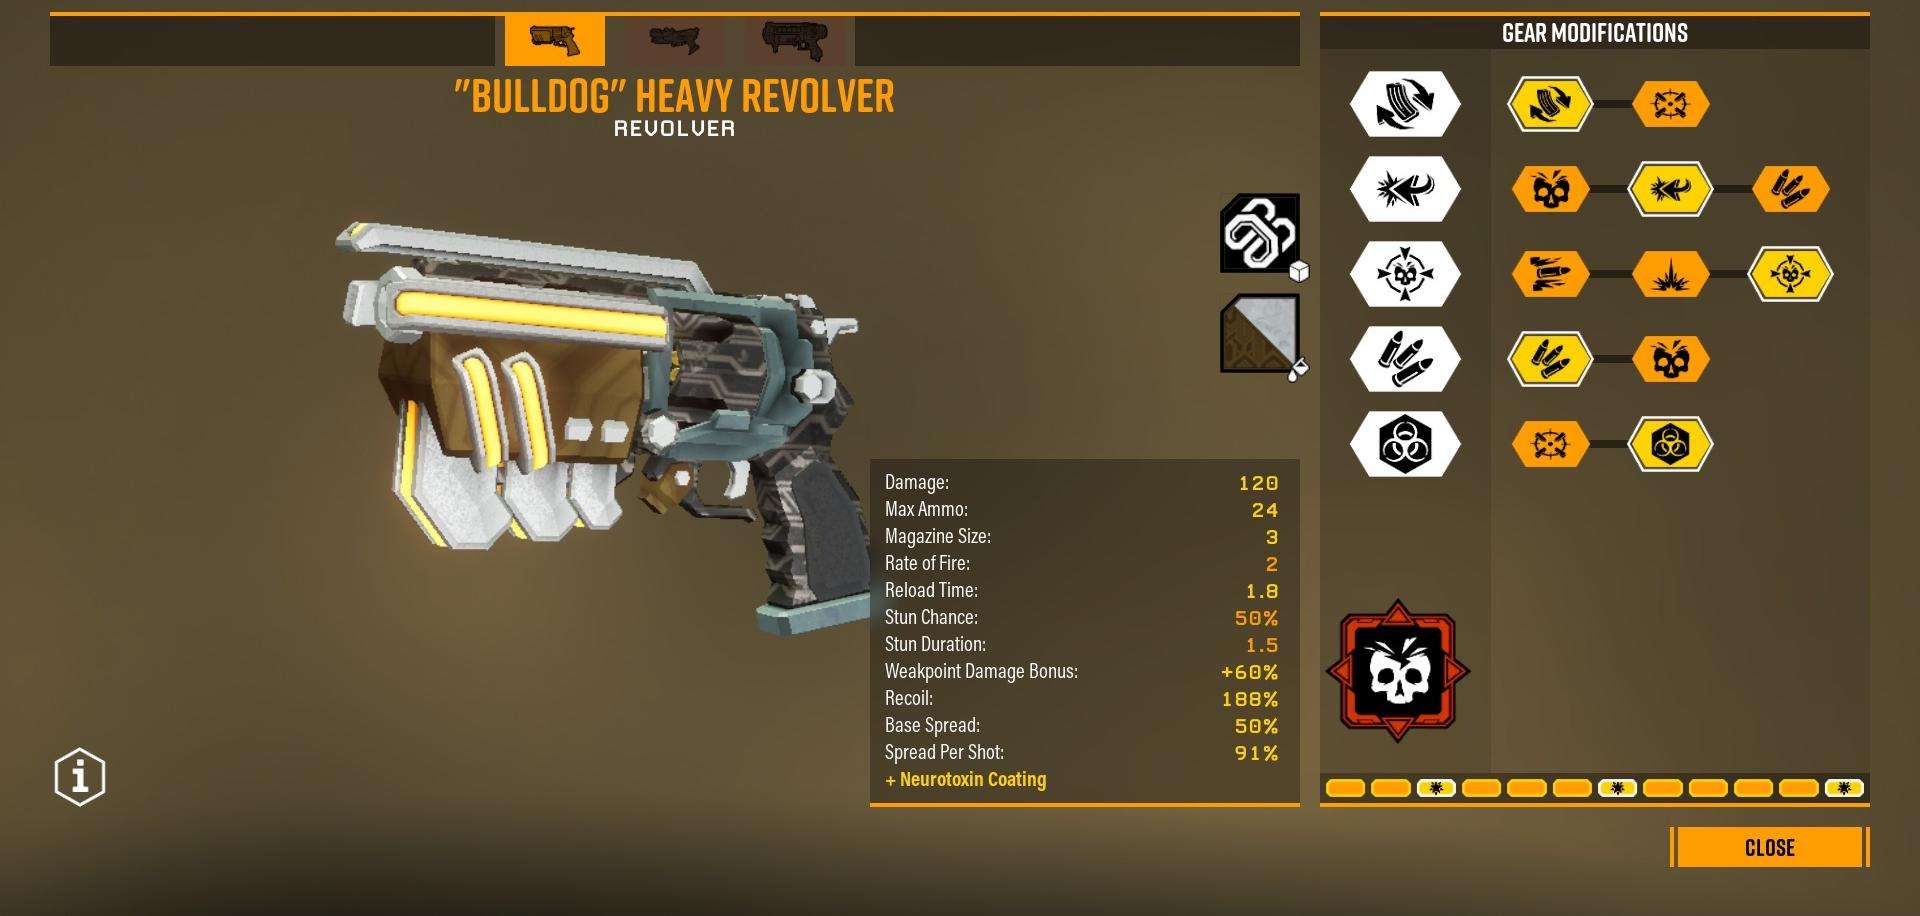
Accurate, powerful, and reliable. It’s no wonder why the Bulldog is considered “Dwarf’s Best Friend” amongst many Gunners. For this build however, we’re taking this Bulldog’s bite to the max. While it may be small, anything unlucky enough to be in its cross-hairs will quickly become dog chow.
Quickfire Ejector for Tier 1. The reload time on this Bulldog is a bi- I mean hassle. Save yourself the trouble and take this mod.
Floating Barrel for Tier 2. While I’m aware that the running theme of this build so far has been raw unfiltered damage, the recoil on this Bulldog is something fierce. More time spent lining up consecutive shots is less time spent actually shooting. I’m sure that’s basic enough maths for you Dwarves to understand, right?
Hollow-Point Bullets for Tier 3. Once again, a complete no-brainer pick here.
Expanded Ammo Bags for Tier 4. Gasp, an ammo mod instead of more damage!? It’s more likely than you think. 24 rounds ain’t a lot, I’ll admit, so taking extra ammo is warranted if we don’t want our killing spree coming to a premature end.
Neurotoxin Coating for Tier 5. Honestly, you can take either mod on this tier. Neurotoxin Coating is chosen to add insult to injury. Plus the slowdown can prove quite handy against Dreadnoughts!
Of course, this Bulldog wouldn’t be complete without an Overclock. And what better Unstable Overclock to accentuate this bad boy’s bite than Elephant Rounds? At the cost of having only 3 rounds in a single chamber, a longer reload time, and recoil so bad it’d wreck a human’s wrist in one shot, the damage is sky-high!
Playstyle
This goes without saying, but this build is reserved specifically for Elimination and Industrial Sabotage missions. Without any reliable methods of crowd clearing outside of grenades, you’ll need to rely on precise aim, good positioning, and the help of your teammates to wipe out groups of bugs. No, your objective is the big bugs. You wipe those ugly abominations out before they even come close to your team. Boss enemies especially.
The flow of this build is all dependent on one passive perk: Born Ready. Fire away with the Hurricane. Once the magazine is depleted, swap to the Bulldog and let loose until Born Ready procs and your Hurricane is ready to go once more. Rinse and repeat until your target is dead.
Don’t forget your shields! I know this is sounds redundant, but any Gunner worth their salt should be proactive with their bubble shields so as to prevent downs. Especially during Boss encounters. While it’s true that it makes picking up fallen Dwarves easier, it’s a less ideal scenario to begin with. Be aware, be proactive.
Pros & Cons
Pros:
- Incredibly high direct damage makes killing bigger targets a cinch.
- Your DPS gets quite high once you have the pattern of swapping weapons with Born Ready down.
Cons:
- Reliant on a passive perk in order to achieve maximum effectiveness.
- No reliable way of managing swarms without assistance making it easy to be overwhelmed.
Mactera Hunter (“Hurricane” Guided Rocket System + BRT7 Burst Fire Gun)
A highly specialized build, and that’s saying a lot given the previous build beforehand. But this one isn’t for ugly big bugs but rather ugly flying bugs. I’m talking Mactera. I hate ’em. You hate ’em. We all hate ’em. I’ve seen those flying terrors end more missions than I’d like to recall…or even be able to recall. My point is that they’re dangerous and this build is designed specifically to give them the Dwarven equivalent of the middle finger (aside from an actual middle finger.)
“Hurricane” Guided Rocket System Build

Yep, it’s the Hurricane again, but with a twist! We’re giving those flying buggers a taste of their own medicine with Plasma Buster Missiles, and believe you me: they won’t like it. I will warn you though: I’ve yet to truly understand how this particular Hurricane actually works and most of what I’ll say here comes more from experience alongside guesswork. If you’re any wiser than me on how this thing works, let me know. Karl knows we’d all appreciate the advice.
Missile Belt for Tier 1. The hit you take to your ammo total is massive this time. No denying it this time: we need the extra ammo.
Anti-Tank Missiles for Tier 2. This is more to (maybe?) help deal with those pesky Brundles. Helps expose their soft underbellies for your teammates to capitalize on.
Improved Feed Mechanism on Tier 3. I was really stumped on this tier for the longest time, but I’ve eventually settled with the extra RoF (Rate of Fire) just so I can get more missiles out in the air faster. More missiles, more damage. That’s basic enough for me to understand.
Zip Fuel for Tier 4. For the longest time, I believed that these fickle missiles used direct damage, but a rumor surfaced sometime ago that it actually utilized area damage instead! I’ll come clean, I haven’t tested this. I’d ask R&D but they’d probably report me for using “unauthorized and illegal modifications” on my weapons, so I’ll just cross my fingers that one of you chaps know. If you do, please share it with all of us.
Nitroglycerin Rounds for Tier 5. If that rumor ever happens to be true, then this mod is a no-brainer. Otherwise, Uncontrolled Decompression is the better choice. The less chances those bugs get to spit at you, the better.
And finally…the cause of all my confusion and newfound love for Smart Stout: the Balanced Overclock “Plasma Burster Missiles.” On paper they sound awesome. In practice? Mediocre. Good luck trying to use this against a group of Glyphids given the missiles tendency to land face-first into the ground before it gets to deal a lot of damage. Thankfully it’s more reliable with larger bugs and flying bugs (hence why I tuned this Hurricane specifically for Mactera.) I even heard it’s quite nasty against Dreadnoughts, but you won’t ever find me drunk enough to consider bringing this along for an Elimination mission.
BRT7 Burst Fire Gun Build
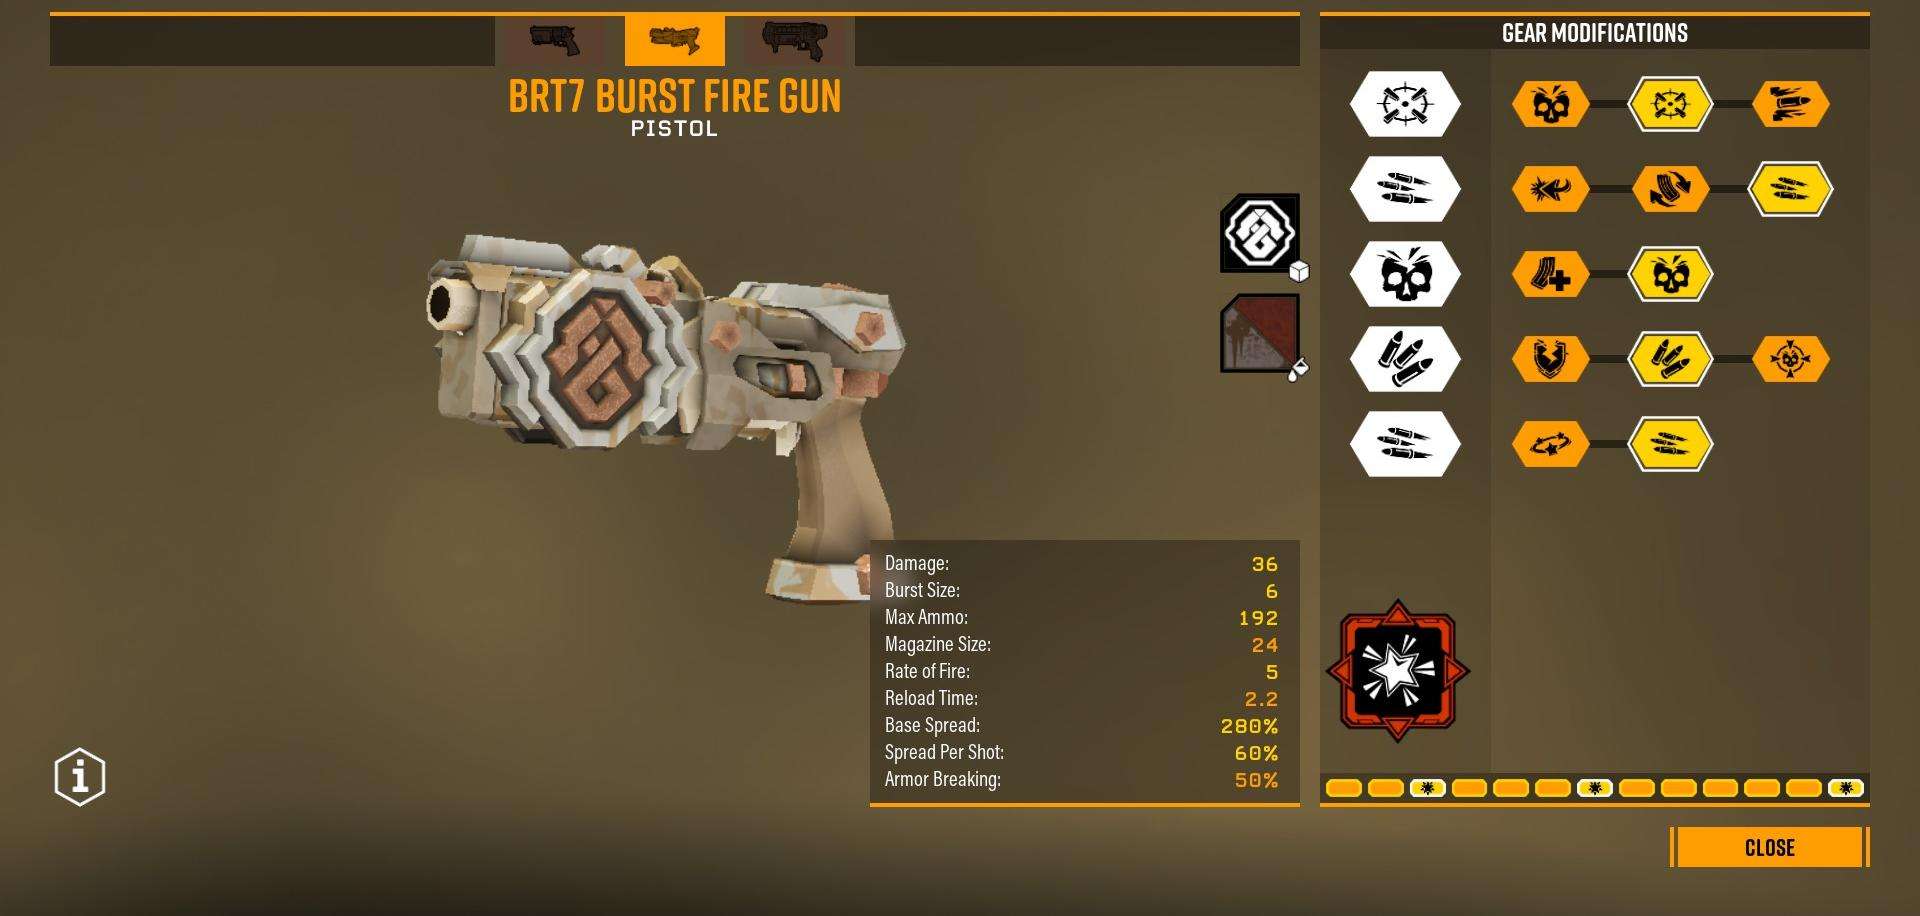
Finally, a gun that’s actually trusty! BRT here may not be as popular as the Bulldog or the fancy new Coilgun, but it’s more than capable of handling bugs like the rest of them. This one in particular is also built to deal with Mactera. Specifically in close-to-medium range.
Floating Barrel for Tier 1. The spread on this BRT will be a little…wild. Yeah. Wild.
Disabled Safety for Tier 2. Don’t give those Mactera any quarter. Wipe ’em out fast and with extreme prejudice.
Increased Caliber Rounds for Tier 3. High Capacity Magazine is also up for consideration if you want more sustain. Personally I just want those bugs dead faster.
Expanded Ammo Bags for Tier 4. I’m probably insane for choosing this mod instead of Hollow-Point Bullets, but from experience this BRT has run out of ammo on me plenty of times and I do NOT want an empty gun when face-to-face with a swarm of Mactera.
Longer Burst for Tier 5. This ensures that when you shoot at a Mactera, it WILL die.
Finally, we’re using the Unstable Overclock Lead Spray for this BRT. This turns our little friend into a pocket-sized shotgun which can quickly dispatch any enemy, Mactera or otherwise. The reduced spread on Tier 1 was taken so as to make killing Mactera at medium range more reliable. Otherwise, there’s nothing fancy about this BRT. You need a bug dead ASAP? This guy’s your answer.
Playstyle
The idea with this build is to shoot a swarm of plasma missiles at a swarm of Mactera and watch the fireworks fly while the bugs drop dead. The BRT is to be used for singular Mactera or any other bug that happens to get in your face. You’ll want to keep moving so as to not get hit in the face by hundreds of angry Mactera all spitting at you at the same time.
Of course, your bubble shield is a god-send during these kinds of missions, so don’t be afraid of being liberal with them if you have to. They’ll give you the perfect opportunity to wipe the skies clear of all those nasty bugs.
Pros & Cons
Pros:
- (Supposedly) Excellent for dealing with Mactera.
Cons:
- Confusing as hell to understand how the stats work (for me at least.)
- Specialized purely for Mactera Plague missions.
Be the first to comment