
Salvage Gamemode Specific
Using the Driller class to create a bunker is a very effective strategy for salvage missions. In my opinion, it makes the Driller a valuable class for these missions. However, I have noticed this strategy is not used often. Like many strategies in Deep Rock Galactic, this one relies on teamwork.
Without coordinated effort, its effectiveness is reduced. If you play the Driller class, or if you are unfamiliar with this strategy, research it to help your team. Even if you do not play the Driller, assist the Driller in using this strategy to improve both the mission’s success and the overall experience for everyone involved.
The Bunker Strat: What Is This Nonsense?
This nonsense is what’s gonna keep you alive, lad!
After you and your team have salvaged all of the mini mules and have found the pod, the Driller may do something that will make your defense so, so much better.
He may drill out a bunker underneath the objectives in such a way that allows movement but makes it to where the bugs have to go into a very easy-to-shoot-at chokepoint, while allowing all the dwarves to sit in the objective’s area to easily fill the progress bar. This is the titular bunker that will make your defense a lot, lot less dangerous and tiresome. This allows you to just shoot in that hallway whenever you see anything that breathes until the pod activates.

With 4 or even 2 dwarves shooting at the one place bugs can come from, your defense will be practically impenetrable (Sentries very recommended!).
Below you can find more in-depth info regarding how to best use these bunkers, including classes other than the Driller.
Driller: How to Actually Make the Damned Thing
It is actually very simple. Locate the objective (Either the Uplink or the Fuel Cells)


Pick a place to make the entrance of your bunker. This doesn’t matter too much, but it is where your dwarves AND the sorry saps they want to kill have to enter through, so I recommend putting it in the open and not obstructed. For maximum efficiency, have the entrance be a little bit away from the objective to have an even longer chokepoint to have more chances to kill anything that tries it’s luck in getting in.

Drill the entrance, and lead it to right under the objective. Utilize your lazer pointer to see where the objective is even when you are underground. This is important throughout the entire process, but make sure not to accidentally make any openings besides your entrance, as that will lead to multiple places bugs can show up from, and that kind of defeats the purpose of making one specific chokepoint.

Once you are right underneath the objective, drill in a small circle to give you and your team some room to stand beside each other. This allows for more area to temporarily retreat to if your shield goes down and gives plenty of space to get rid of the problem of shooting at each other in a small tunnel.
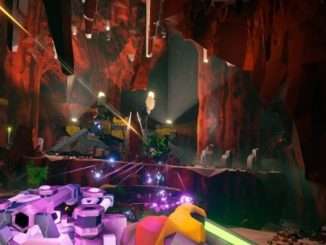
It should generally look like this, though a bit bigger is fine. As long as it encompasses the objective’s activation area.

A picture of the entrance of the bunker after completion.

Activate the objective, and have you along with the rest of your team get in the bunker and assume defense positions!
You should all pay attention to the tunnel leading in, as that is where the fun part begins!

Now, shoot everything that looks at you funny!

After the first objective is complete, rinse and repeat for the next objective!
Whenever both objectives are done, I highly recommend staying inside the bunker while the pod takes it’s sweet time to activate. This is another thing to wait for, and guess what the strat we just discussed is damn good at?
Once the pod finally boots up, to minimize the risk of unfortunate and disappointing death, drill you and your team out of the bunker out of the opposite side of the bunker, and dash to the pod!
Here is an example of an exit tunnel (only make an exit tunnel when the pod is active).


Aaand… You did it! You didn’t disappoint your peers! Good on you, slugger! Now go out there and prove your worth as some guy on the internet who read a guide!

But What if This Thing Happened?
But what if the objective is near an edge?
Uh… Just don’t drill anywhere that isn’t underground, as that would make an opening for more bugs to come through.
But how do I avoid air pockets?
Dude, you have a map. The map in this game is very useful in the fact that, similar to DOOM 2016, it is a rotatable 3D map that shows any surface. you can bring up the map to see how close you are to an air pocket to make sure you don’t expose your bunker to the bugs.
Well, I made an oopsie and dug outside. What now?
Right, if you have an engineer, ask him (nicely of course) to plug up the hole with his platform gun. you can then mine out the excess platform to make your bunker a nice defendable, sealed up chokepoint.
I somehow managed to get past all of these solutions and happen to NOT have an engineer. What now, genius?
Sigh… Well, I guess you will have to defend TWO chokepoints now. Have fun, still better than them being able to come all around you, I suppose.
Uh, I’m not a Driller. I guess I can just not do anything with this info, right?
No! This game is about teamwork, and the more the whole team helps out with any task, the better! Here are some ways to help out your fellow Drillers!
I prefer my guns the size of my house, thank you very much.

To be honest, the best way for a Gunner to help is to defend the Driller while he is making his bunker, and of course to participate almost wholly on defending the chokepoint of the bunker. Besides that and a good use of your shields when things get a bit dicey, theres not much complicated you need to do for the bunker.
Try to avoid bursting a whole in the bunker, this could put your entire team in jeopardy! Throw explosives only if you are damn sure it wont compromise the safe area!
Yeah, my class is kind of the opposite of defense… Should I go out and explore?
No… The point of the bunker is that everyone is shooting one area, guaranteeing that the bugs cant do anything but mindlessly walk into the bullets. Screwing off to god knows where will be doing a huge disservice to your team! The more bullets, the better! Besides, you have a very useful tool…
The IFG (Inhibitor Field Generator) is great in open combat, but phenomenal on chokepoints! And this strat is all about chokepoints! Throw that sucker in that chokepoint and watch those creeps suffer in slow motion!
Right, so there’s obviously the whole placing a sentry thing, do that. But you also have a godsend of a gun that will seriously help out the effectiveness of your team’s bunker!
The Platform Gun!
You can use this to not only fix the screwups of any bunker, but to have a freaking resupply pod in the bunker!

You can call a resupply pod inside the bunker, and cover up the hole it will leave behind to have a safe chokepoint with no way to run out of ammo!

This is by far the best synergy with the bunker that I can think of. Use it!
Make sure to cover up the hole the resupply pod will make!
Ahh, yes! There is a great way for you bugs to help out! Just walk riiiight into the dwarve’s gunfire, and you will be making Hoxxes IV a better place! Heh, they have no idea what’s in for them!
Oh God.

Serious Danger
If a bulk detonator is seen, exit the bunker and fight it outside! You can handle the regular explodies very well with the chokepoint, but the bulk detonator is the ONLY bug you should NEVER be in the bunker while fighting!
If the detonator is in your bunker already when it is spotted, drill out of the bunker. The loss of the bunker is a less harmful loss than all of you dying a painful, embarrassing, gunpowdery death.


Be the first to comment