
This guide is only for demonstrating the behavior of signals, not where you should place them. The reasoning for this is that almost all places give wishy-washy descriptions of signal behavior and often just give rules about where to place signals that are really just guidelines.
Railway Signals Explanatory Guide
Purpose of Signals
The only purpose of signals is to prevent collisions between trains. Want to know more about basics of the game then read our beginners train guide.
The exact placement of signals can have various impacts on your rail design, such as causing deadlocks or decreasing throughput of your train network. However, these are problems caused by signals (which can be remedied by good signal placement).
The only purpose of signals is to prevent collisions.

A train collision
Blocks
Signals divide your rail line into “blocks”, and they only allow one train into a block at a time. This naturally prevents any collisions, since a collision involves two trains being in the same rail segment, but each rail segment only belongs to one block, so that would involve two trains in the same block. You don’t have to worry about how the game paths the trains so that only one is in a block at a time in order to do signals.
A block is any section of rails between some number of signals. Normally, you can’t see the blocks in your network, but if you hold a signal in your hand you can.


In the top picture, I am holding a rail signal.
Make sure you are holding a rail signal to see the blocks.
It may seem like there is special meaning to the colors. There is no special meaning!
Instead, a block is just a connected section with the same color. If another connected section happens to have the same color, but is not connected, it is a different block. The game just has an algorithm that tries to use only a few colors so that it’s easy to tell the blocks apart.

This image has 6 blocks, not 3
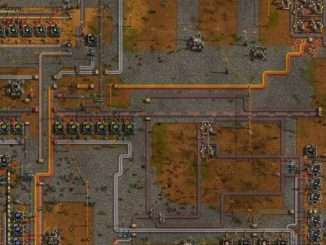
Blocks can also come about by rails crossing. They don’t have to be “on the same line”. The next image shows this.

There are 5 blocks in this image. The purple is all one block.
Trains will never enter a block that has another train in it. Therefore, even though the forward train is out of fuel and stopped, the back one will stop and wait.

The signal is red here, which means that the next block is occupied and the train must wait.
We’ll cover these sorts of signals, which are called rail signals in the next section.
As a final aside: signals have a directionality to them. Placing a signal on one side of the rail will only allow trains passing by the signal so that the signal is on the right. For example, the following train would get confused and tell you “No Path”, since the signal is on its left.

Just always imagine yourself as a train moving down the rail. Signals should always go on your right. And don’t use train networks where one rail has two different directions that trains can travel unless you want endless headaches or know what you’re doing.
Rail Signals
Rails signals are the ones without “chain” in their name. They are less confusing.

These have a simple rule: The train will pass them if the next block has no train. Otherwise, the train will wait.
Make sure you drill this into your head. All the other “rules”, like “use rail signals at exits” (if you’ve heard that one), are actually just guidelines. They are good guidelines if you can’t logically deduce what you should do in a situation from the rule above, but remember to always reference the above rule if you’re confused by how the signals are working. It’s that simple.
Unfortunately, rail signals are not enough. Using only rail signals can cause “deadlocks”, which is a situation where multiple trains are all waiting on each other. I am going to use a two-way track here, but only to demonstrate a deadlock in its simplest form. (The fact you can get such simple deadlocks is one reason not to use two-way tracks).

Both trains are waiting on each other.
Deadlocks can be much more complicated, but generally speaking you will never have a deadlock as long as trains don’t block intersections. An intersection for our purposes is any place where a rail crosses another rail (not via merging or splitting). Here is a basic example of deadlocking with intersections.

The basic problem here, and with almost all deadlocks, is that the second horizontal train has its butt sticking out in the intersection. But it can’t move forward until the train ahead of it clears its block, and that train can’t move until the next one does, and that one can’t move until the train’s butt moves. It’s an unsolvable circular dependency!
This would have all been fine if that train only proceeded when it could clear the intersection rather than stopping when it was essentially still there. If only there were a signal that told trains “only continue if you can completely clear this block”.
Chain Signals
This is a chain signal.

Okay, well it’s 50 of them, but you get the idea.
Chain signals also have a simple rule: The train will pass the chain signal only if the block after it is empty and it can pass through the block after that one.
Similarly, many places will try to give you “rules” for where to place your chains. If any of them confuse you, instead just ask, “do I want a train stopping in the next section?” Sometimes, you will not account for certain cases, but reducing it to this question will always at least allow you to “debug” where you went wrong.
This rule has a “chaining” effect. If you have two chain signals in a row, the train will have to check the second one the same way. It asks, “can I go through the first chain signal? Well, the route is clear, but can I go through the chain signal after that?” and then it continues “asking” these questions until it reaches a rail signal. If a block is occupied at any point, it will wait at the first signal.

The train on the left is waiting until the very last block is clear.
Note that the train is asking the question, not the chain signal, so it will only ask questions about its path. For example, the following train had no problems getting to its destination because it is not asking about the signal that is red. This is why chain signals are sometimes blue: this means it depends on the path the train is going.


If the train wanted to go to the bottom block, it would have waited on the far left instead.
Chain signals are most often used where you need to break up an intersection into blocks, but don’t want trains thinking those are blocks that they should be stopping in. For example, this intersection isn’t fully signaled, because the left train thinks it can’t go while the right train is clearing the central purple block. Remember that only one train can be in a block at a time, so the right train is actually still blocking the left one.

A single extra chain signal fixes everything…

Of course, this is getting a bit more into “where do you place signals” than this is meant to teach. Just remember:
- Rail signals only allow a train into the next block if it is unoccupied
- Chain signals only allow a train into the next block if it is unoccupied and it is allowed into the block after that one
That is, quite literally, the complete behavior to signals. The rest is just implementation.


I honestly had no clue about the “Shift+Right click” or the “Shift+Left click” I’ve just been “Control+C” and “Control+V” everything 🙁
Is there a shortcut to store items from the inventory in factories?
Try “Ctrl” + “Right Click” or “Shift” + “Left Click”
Shift+drag while holding a deconstruction planner or upgrade planner (the very last “hotkey” listed) will cancel current orders for deconstruction or upgrade. Useful sometimes if you want to keep a few power poles around but deconstruct everything else.
You also didn’t mention how you can right-click-drag while holding an upgrade planner to “upgrade” in the reverse order, so as to actually downgrade instead. You talk a bit about downgrade planners, but there isn’t really a reason for a separate upgrade planner to exist for downgrading if you just use the original upgrade planner in reverse order (by right-click-drag instead of left-click-drag).
Notes: for the third row, the incorrect “your” was used.
Ctrl+Click or Ctrl+RClick also works when hovering your mouse over a “container” (or station) without the inventory open.
Additionally, Ctrl+RClick is marked here as only “take half of all the items” when it also works for giving. Easy to figure out, though.
Increasing the “brush size” (third row on construction tips) also works with Numpad’s + and -.
(You have brought up RClick for Blueprints to modify them, but not Upgrade and Deconstruction planners. If that’s because it’s written in the tooltips of the planners to RClick on them, but not on Blueprints, then that’s fine, just wanted to bring that up.)
Also, something that adds content here:
You can filter train cargo slots by Middle Click.Works just like request slots on logistic chests, but with MClick instead of Click.
How do I copy / Paste sections of layouts? Is that blueprints?
Yes it is blueprints you use to copy sections of your factory and paste them elsewhere.
If you press F5 it will show the in game grid without pausing the game, works in multiplayer as well as single player
BTW pressing `Q` while hovering an item is _not_ specific to only blueprints. It functions just like pressing middle-mouse in Satisfactory. It’s useful when adjusting power poles etc to copy+paste really quickly
I think he meant shift + space to pause can only be used in single player as in you can only see the in-game grid in single player, but he didn’t really clarify that. Shift + space to pause can also be used in multiplayer, but I think only the person hosting can do it
If you ctrl + click on a chest for example, it will empty it into youre inventory. works on anything with an inventory
Q can deselect blueprints and if they are temporary like CRTL c or x, It will not save it in the inventory
ctrl right click takes half of all items in a chest ( or of that item if clicked on an item)
>Hold down “Q” over a placed blueprint with that item in your inventory — Bring that item out of your inventory on top of the blueprint.
Goddamnit, I’ve been manually placing stuff from my inventory like a shmuck.
i just learned another noteable thing. it’s use z to put one coal in a furnace with out opening the UI. only usefull for early game