
Skills
Cagliostro has skills that reach out to most areas of the game, from mobility to buffs, from debuff traps to healing, even an AoE revive.
That said, she does lack a form of hard CC, which isn’t a huge deal but is something that at least I wished she had, though that’s just me being greedy with the fun I have building all sorts of loadouts.
(Also note most of this was tested with Maxed Masteries.)
Pain Train
Charges into foes while riding Ouroboros.
Does Not Quick Charge Collapse (Y)
- [Great Skill Damage (More in Melee Range)]
- [High Cap]
- [Gap Closer]
- [15s CD]
While commonly known and used as a gap closer, and rightfully so, it is also Cagliostro’s hardest hitting skill and does even more damage while in melee range (Doesn’t have to be right point blank). Cagliostro gets onto Ouroboros and rides/charges to the foe you have locked onto.
However if you aren’t locked onto a target, it will follow your directional input whilst having a 90° assist range from the closest target. What that means is if you have no target locked onto, and you move in any direction more than 90° from your target, it will use Pain Train in said direction instead of towards the target. (This applies to most(all?) other skills too but isn’t as much of variable for them).
Pain Train can also be dodged out of (Dodge Cancel), and Ouroboros will continue to rush forward a slight distance, potentially lightly hitting foes even while ‘cancelling/dodging’ out of Pain Train.
Alexandria
Summons Ouroboros to launch foes in front of Cagliostro into the air.
Does Quick Charge Collapse (Y)
- [Decent Skill Damage]
- [Caps easily]
- [Mid Range]
- [30s CD]
While not a major issue in most actual fights, Alexandria’s launch will only work on small enemies, and will also cause the first attack to miss on the training dummy if used right after the timing allows. On large enemies, it will usually hit everything however.
Alexandria allows for Collapse to quick charge after use. If there are no inputs after Alexandria, it has a decently long post skill animation where you cannot move, but can cancelled out of by dodging, attacking, or charging Collapse. Waiting (without doing the options listed before) until the animation is over will not allow Collapse to be quick charged. You can still quick charge Collapse if you dodged.
Mimic Doll
Dodge backward after placing an explosive replica of Cagliostro where she used to be standing.
Does Quick Charge Collapse (Y)
- [Decent Skill Damage]
- [Caps easily]
- [Short Range]
- [AoE]
- [30s CD]
It’s a little harder to test Mimic Doll due to most of the features that I’d like to test not easily being in the training area, such as dodging invulnerability, max targets, hostility.
Mimic Doll grants invulnerability immediately after input, barring animation delays from other moves, attacks, skills and ends right as Cagliostro finishes her pose
The range of Mimic Doll is slightly less than the attack range of Cagliostro’s basic normal attack. Generally a non issue if you’re using it out of a normal combo. It does a single big hit of damage after about 2(?) seconds when the doll explodes.
While it may seem intuitive to use Pain Train to gap close after using Mimic Doll, it’s usually better to dodge or simply walk back towards the target and charge Collapse while walking towards the target and continuing as to make use of the free quick charge for Collapse.
Mimic Doll also allows for Collapse to quick charge after use. Mimic Doll however, can potentially whiff your Y input hold if you press it right after a dodge cancel. Refer to Alexandria’s note for more information.
Mehen
Lays a spear trap that gets stronger and inflicts ATK down when stabilized.
- [Decent Skill Damage]
- [Caps easily]
- [Long Range]
- [AoE]
- [20% ATK Down Debuff]
- [15s CD/Charge]
- [3 Charges]
Also a little hard to test due to the nature of the skill, however through testing I’ve found that the explosion range of the time out is an extremely little bit larger than the trigger range.
Mehen by default does not apply ATK down, only after charging and stabilizing will it inflict 20% ATK down to all foes hit by its explosion, even if not the foe that originally triggered Mehen. While the description says that Mehen gets stronger when stabilized, this seems to only increase its damage modifier and not the cap, which can easily be hit even without being stabilized.
Note that Mehen is dark damage, and will not do extra elemental damage against water foes unlike the rest of Cagliostro’s kit.
Disruption
Cast a spell that deals damage and removes 1 buff from foes in the blast radius.
- [Low Skill Damage]
- [High Stun]
- [Caps easily]
- [Long Range]
- [AoE]
- [Dispel]
- [60s CD]
Disruption is essentially almost just a dispel, the damage caps extremely easily and extremely low. It does however have higher stun than her other skills. She is able to fill the stun of the dummy solely with a single cast of Disruption.
Currently, primarily only Nihila Managarmr as well as Radis have buffs to dispel, and the latter has orbs that dispel when thrown. Still, it will probably have more use once future raids are introduced and dispel gains more usage.
Good Skill Synergies
- Pain Train – To gap close in case target foes are further than the range of the skill
Phantasmagoria
Grants the Phantasmagoria Buff to the entire party.
- [30% ATK Buff]
- [30% Def Buff]
- [30% Crit Buff]
- [~32s Duration]
- [80s CD]
Phantasmagoria is a unique buff that can stack alongside normal ATK and DEF up buffs. While it seems to have an original uptime of around 40%, Cagliosto is able to cycle cooldowns really well so it’ll usually have a higher uptime than that.
While cap is indeed easily reached for most of the cast in most forms of damage, there tends to be either skills or certain attacks that have either a lower damage modifier or higher cap than normal. Phantasmagoria allows for the whole team to achieve extremely consistent burst, especially when paired up with Cagliostro’s Unique Sigil [Founder’s Strategy] for 30% def down.
An example of almost guaranteed value for the whole cast is SBA. SBAs tend to have a higher cap than the actual damage modifiers which lead to easily capping everything else but not coming close to capping SBAs. In testing, a normally 590k SBA, hit for 1.05m with the buff and collapse def down.
The defense buff is also substantial as most endgame content currently is balanced around the player having about 40k hp, having this defense buff allows breathing room as well as possibly being the difference of being one shot/preventing possible guts/auto revive triggers and giving time to pot.
As an extra note, Phantasmagoria is an extremely good tool for testing damage caps in the training area, simply just testing your damage whilst having the buff on or off and comparing the damage.
Reinforce
Casts a circle that restores allies’ HP.
- [Long Range]
- [AoE]
- [24k Heal with masteries]
- [40s CD]
Reinforce is a great tool for sustain, while pots are definitely a thing, Reinforce stands to gain as an infinite source of consistent healing that can easily see more use in different scenarios. From solos, to random fights, or just misplays in general, Reinforce allows Cagliostro to keep the team less in the down state while preserving pots for emergency use. The circle indicator is pretty accurate so keep that in mind if manually aiming to heal most or all of your team.
Good Skill Synergies
- Pain Train – To gap close in case target allies are further than the range of the skill
- Phantasmagoria – Defense Buff allows for HP healed to be worth more Effective HP
Rhizomata
Casts a circle that rescues allies from critical condition.
- [Long Range]
- [AoE]
- [Revive]
- [165s CD]
Rhizomata is similar to Reinforce, only substituting the heal for an instant revive. The cooldown for Rhizomata is extremely long however Cagliostro is also one of the best cooldown cyclers in the game with the unique sigil [Founder’s Truth] and [Cascade]. I can’t fully remember but I believe Rhizomata revives and sets resurrected allies at 50% HP
Good Skill Synergies
- Pain Train – To gap close in case fallen allies are further than the range of the skill
Combos
Cagliostro’s support skill, Founder of Alchemy, allows her to have different Power strikes and Combo Finishers depending on how many attacks she does before using her Power Strike.
She also has a Charged Attack, Collapse, that starts by holding Y. Her second support skill, Adrenaline Rush (Which I personally think they could have named better and more thematically), greatly increases Collapse’s charge speed when charged immediately after a Combo Finisher. Ideally you want to be ending with collapse whenever you get to activate Adrenaline Rush.
Collapse is part of X/Y so it’s considered a normal attack.
Collapse Combo Note
After performing a Power Strike you can choose how you’d like to perform your Collapse Charge.
- Tap Y to activate the Combo Finisher and then hold Y to charge Collapse
- Tap Y to activate the Combo Finisher, Dodge to reposition, then hold Y to charge Collapse
- Hold Y to activate the Combo Finisher and Collapse will immediately start charging automatically
For the sake of simplicity I’ll be listing combos with (1) in mind but all 3 work for any normal attack combo.
Dodge Weaving
You can weave in dodges between every single attack and still maintain the combos. However, the dodge limit will still be there, so without improved dodge, you will rest on your third dodge. This doesn’t break combo but is something to keep in mind.
Link Time
When Link Time activates, your combo definitely depends on your skills. There are a couple rules of thumbs that come to play regarding this.
- As a general rule, you want to be cycling damage skills
- While Pain Train is equipped, you want to prioritise this
- Alexandria and Mimic Doll can follow up with a collapse if DEF down has not been applied or there are no other damage skills off cooldown
- Potentially you can cycle between Pain Train, either Alexandria or Mimic Doll and Collapse++ then back to Pain Train and then the other
Ranged / Spam Strikes
X -> Y -> Y -> Y (Hold)
This combo has the most range as well as height between her 4 sets of combos. This is the combo that focuses on collapse the most so sigils boosting charged attacks work extra well here.
Scissors Stun
X -> X -> Y -> Y -> Y (Hold)
This combo is most used for creating quick stun. It does the least damage between her 4 combos but is very consistent.
Saw Blades
X -> X -> X -> Y -> Y -> Y (Hold)
The 3rd X will do 2 hits and then Saw blades will appear for her power strikes and combo finishers. This is usually the last combo cagliostro gets to perform in whole for a big chunk of timing windows. Good Damage and Decent Stun.
Mystic Axes
X -> X -> X -> X -> Y -> Y -> Y (Hold)
This is the combo that does the most damage, stun, and dps, assuming you get to land all the hits. Stun meter almost always fills with this combo even while solo. Due to how long this full combo can take, general timing windows do not give time for the full combo to land. This can be mitigated by Dodge Weaving however, as you can dodge and move between attacks to try to ensure all hits land
So, When to Use What?
Generally, you can rarely go wrong with Ranged/Spam Strikes. It’s not the most DPS but it’s reliable, with the longest range not to mention the height of her combo finishers, you can even hit flying enemies.
Scissors stun is used most commonly when you want to rush towards clearing the stun meter while not being sure whether there’s enough time for Mystic Axes.
Saw blades does have many hits but this doesn’t actually lead to better cascade or dps with supplementary as it’s all based on each attacks weights. Still, this is commonly the last of the 4 combos that land on most timing windows.
Finally, the one I am admittedly biased to, Mystic Axes. I simply like the pure fun this combo exudes, please excuse me. It still is the most dps if you can land all the hits and charge collapse after but you’re not missing out on millions of damage by using your favourite of the 4 (With maybe the exception of scissors stun).
Weapons
Although this probably applies to every other character, I’ll be leaving this is just for any Cag Mains that haven’t seen it and that might want some quick information.
The Weapons
- Magnum Opus – Defender
- Transmigration Tome – Ascension
- Arshivelle – Executioner
- Sacred Codex – Stinger
- Dream Atlas – Stunner
- Zosimos – Terminus
General Weapon Progression
Sacred Codex / Arshvielle –> Maxed Transmigration Tome Ascended –> Zosimos
Weapon FAQ
Q: Should I save materials for the better weapons?
A: Prioritise whatever is your current main weapon. In the weapon progression listed above, you will probably get more usage out of whatever is assessible to you at the moment.
Q: So can I ignore the other weapons?
A: No, you’ll want to max everything for the Collection Mastery Bonuses anyways
Q: Even if I’m not using those weapons?
A: Collection Mastery Bonuses work as permanent passives no matter which is your current weapon
Q: Do the other weapons have no use as actives?
A: They do, contrary to what might be the common thing now, DPS isn’t actually nearly as important as it might initially seem. Most Raids fail due to deaths, not slightly less DPS. And weapons such as the Defender can help you get used to certain fights easier since you spend less time on the ground. While the Stunner can be really useful for well, creating link opportunities, as DPS does not contribute to that.
Q: What are Munitions?
A: Extra base stats that can be added to weapons, each munition give +10 HP and +2 ATK up to +990 HP and +198 ATK
Note: Do you want to always win or be practically immortal? Then this guide to immortal build in Granblue Fantasy: Relink will help you with that. It will tell you in detail how to achieve god mode!
Loadout Examples
Loadouts will tend to have a lot of similar parts simply due to the nature of how core certain sigils can be and how some just tend to be mandatory. That said, there’s always room for your own flair. These are some examples you can take as reference, while also having the Sigils section for additional information.
Prinz
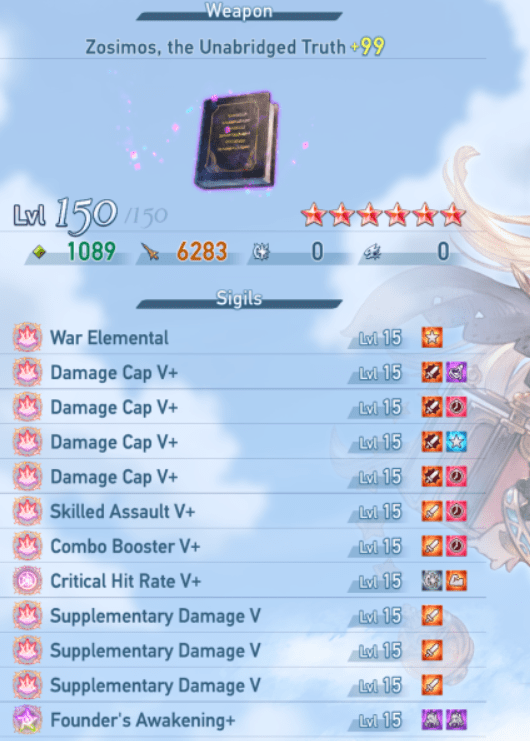
The idea is that it caps Pain Train under either Phantasma or or Collapse. Crit rate is there to hit 100% to maintain uptime on crit since everything else will always cap without phantasma uptime. and If you want to try and fit in an extra orange sigil of your choice you can easily swap to double founders + 2 orange by giving up 1 defensive utility.
Alternatively, you can also cut strategy instead, since at end game the defense down isn’t as useful and you can use that to fit in an extra orange of choice without giving up extra utility.
Zebra – Glass Cannon

Zebra – Improved Dodge

Jerea Doesn’t Have Maxed Sigils
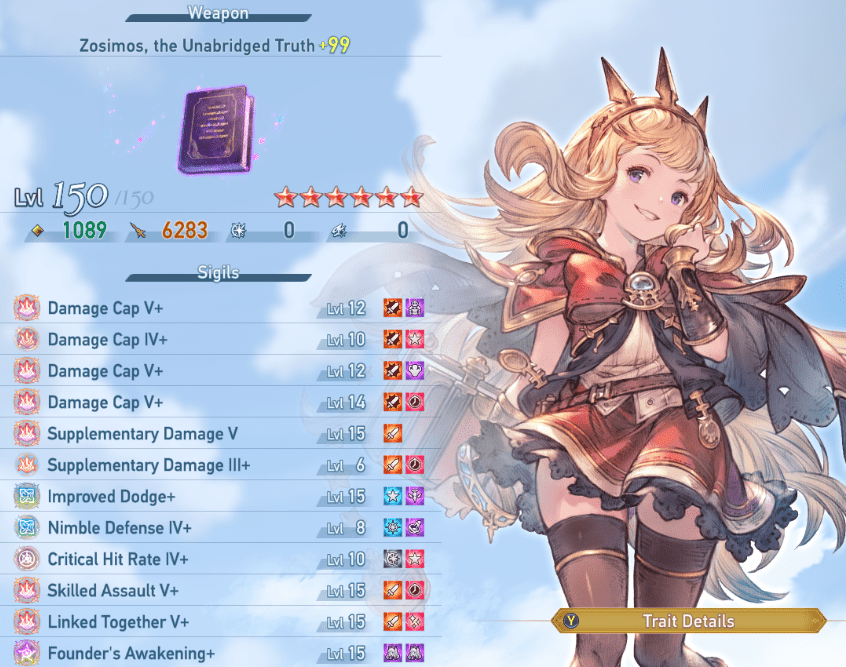
Not having maxed sigils nor War Elemental aside, this is just a general safe loadout I was using while playing with friends that were relatively new.
Improved Dodge and Nimble Defense just makes survivability easy, since I have a tendency to dodge into enemy attacks.
Example 30s Score Attack
Thanks to zebraquake for sharing this!
Example End Game Fight
Spoiler Warning!
FAQ
Q: What type of damage is Collapse?
A: Normal Attack
Q: Is Phantasmagoria useless endgame?
A: It’s not useless, unless you have way too many damage boosting sigils, you aren’t capping everything. Phantasmagoria allows you to cap, or at reach closer to cap for all of these things, including Pain Train, Collapse, and SBA.
Q: I thought you mentioned those already?
A: I thought it would be a good idea to leave it in an FAQ area too.
Q: What Sigils should I use?
A: I’ll be adding to the sigils section soon but for now you can use this as reference (For late game)
Priorities:
- DMG Cap > Founder’s Strategy > Linked Together > Supplementary DMG > Potion Hoarder > Crit up to 70% > Founder’s Truth/Cascade > Skilled Assault/Quick Charge
Pick your potions between utility [Guts/Autorevive/Steady Focus]
Uplift is nice in general and even more so for the last fight in the game Proto Bahamut.


Be the first to comment