
Scoring Guide for New Players
By Miriitode.
Scoring Basics
To get started with scoring, you may start with easier charts, running auto fever and the optimal combination for a chart. Focus on getting close to or getting All Perfects in those charts. Usually accuracy close to this range can get you to the top 100 of a leaderboard, and All Perfects getting into the top 30 to top 10. Once you get a hang of maintaining good accuracy, then you can start working on manual fever. Once again working on easier charts with manual fever in order to get the hang of managing an extra button in the game.
Scoring takes a lot of your knowledge of the game and making use of it in order for you to find the highest amount of points possible, as well as the skills needed in order to execute the routes. Paying attention to detail in what makes up a specific chart can help with planning routes and its execution.
The main thing to keep in mind with scoring is to use fever in the best way possible. That means trying to activate fever in areas which are very dense, and are full of enemies that would give a lot of points as base value (most of the time).
Optimal Muse + Elfin Combinations
This part covers the usual combinations viable for scoring in a particular chart. Each combination describes in what way it is used and why it is viable in a given situation, as well as how common or rare this combination is used.
| Little Devil + Lilith | One of the common combinations. Mostly used in hard charts (usually 8+), where the note density is high enough for her to survive. In rare cases she can survive even down to easy charts with the help of holds and mashers, or if the difficulty / note density is high enough for her to (barely) clear. |
| Bunny Girl + Dragon | One of the common combinations. Used when there are a lot of sawblades, notes, ghosts and if there are an abundance of boss notes in the chart. Also used in very easy charts where the score bonus of Bunny Girl gives more than what the note density of the chart has to offer |
| Joker + Dragon | One of the common combinations. Used when there are not enough notes to fit the needs for Devil and Bunny Girl. Mostly used in easy and hard charts, especially with an abundance of boss notes. |
| Bunny Girl + Lillith | One of the uncommon combinations. Used when there are a lot of sawblades, notes and ghosts, but not enough boss notes in the chart. |
| Joker + Lillith | One of the uncommon combinations. Used when there are less boss notes for a Joker + Dragon combination. |
| Bunny Girl + Witch | A rare combination. Used when the note density is huge enough for fever to cover a lot of notes and the chart fitting for Bunny Girl. Notable examples of use are in very hard charts such as Kyouki Ranbu Master and Xodus Hidden. |
| Joker + Witch | A rare combination. Used in easier charts when having Little Witch can give more score when activating fever, compared to using Lilith due to good note density on fever segments. |
| Little Devil + Dragon | A very rare combination. Used when the majority of the chart are hold notes. An example of this is Notice Easy. |
| Little Devil + Witch | A very rare combination. Used when the majority of the chart are hold notes. An example of this is Strawberry Godzilla Master. |
| Bunny Girl + Mio Sir | A very rare combination. Found in charts such as Pixel Galaxy and Cyaegha Master. Most likely used when increased fever times are optimal for an Auto Fever play. |
| Black-white Magician + Dragon Girl | A very rare combination. Found in Bad Apple easy. This is possible when a route is optimal with Bunny Girl + Dragon, but the chart has no ghosts and sawblades. |
Basic Manual Fever Activation
As mentioned before, Manual Fever is activated with the use of an extra button on the keyboard / controller. For newer players playing, it may be hard to handle the extra button on their keyboards / controllers / screen. This part will talk about how to get used to this extra button in the game.
Keyboard Manual Fever
The manual fever keybind for PC has the space bar as the default keybind. With this, the manual fever key is meant to be activated with thumbs. With the default DFJK binds, the hand position for a manual fever play is as follows:

Both thumbs can allow for manual fever to be activated in different situations. Such as if manual fever were to be activated from a ground note, then the left thumb can be used to hit the spacebar (as the ground notes are being pressed by the right hand), and vice versa for air notes.
This method of activating manual fever is similar to hitting FX buttons in SOUND VOLTEX, or hitting side tracks for DJMAX in 4B mode, or hitting extra keys in 8B mode. If you have any experience with any of these two games, it can be a bit easier to get used to.
It is recommended to get used to the hand placement for manual fever by keeping your thumbs by the spacebar as much as possible, even if manual fever is off, in order to get the hang of knowing where the thumbs would hit the keyboard even if they aren’t looking at the keyboard. Trying manual fever on very easy charts can help as well since the note density is very much little so one can have time to look at the keyboard to get their thumbs on the right place to activate fever.
Controller Manual Fever
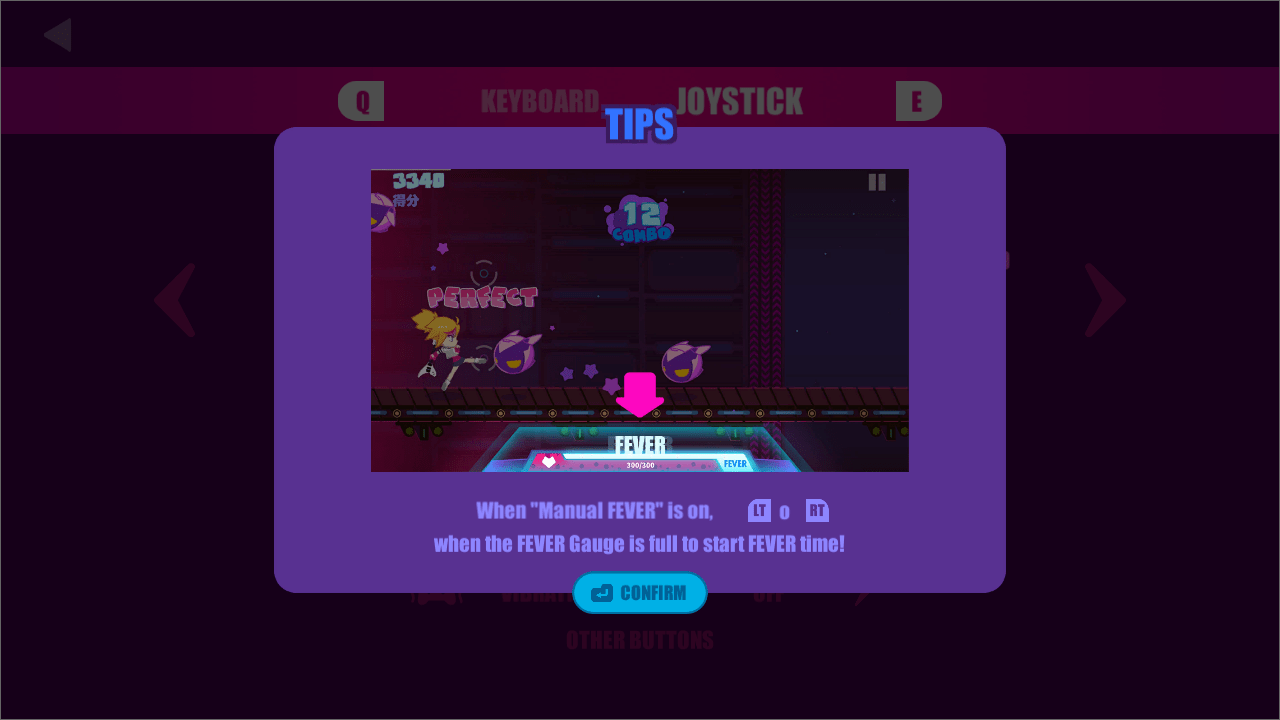
Since activating manual fever is only bound to the left and right triggers of a controller, it could make executing certain patterns be a bit difficult, as those buttons will not work for hitting enemies anymore once manual fever is on. Most likely one might have to use the different buttons from the controller to manage hitting certain patterns while managing and activating fever.
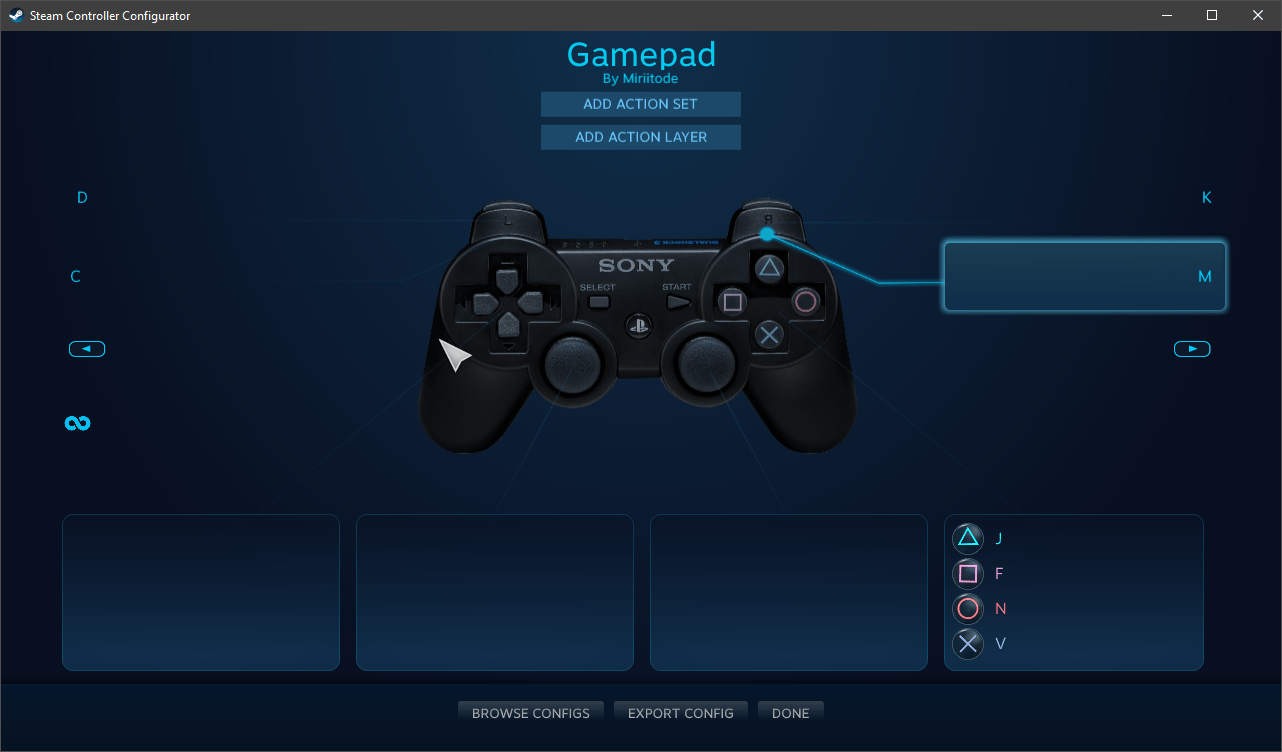
While the controller binds for manual fever cannot be changed by default, it can be changed with the use of the controller settings from steam, by changing the triggers to act as a different button, or a keyboard input, and using another button from the controller to act as a manual fever button.
Touch Manual Fever
Since manual fever has to be activated by touching the manual fever area (where the fever bar and HP bar is also located), it can be very flexible to activate fever with this method, as you can easily see and quickly touch the manual fever area while playing a chart.
Other Ways to Bind Manual Fever
While most people tend to use the default binds for manual fever on keyboard, the manual fever key can be re-binded to another key to fit your preference, or you may make use of different ideas or keys to activate manual fever as long as it is comfortable for you to use consistently.
Fever Button Inputs
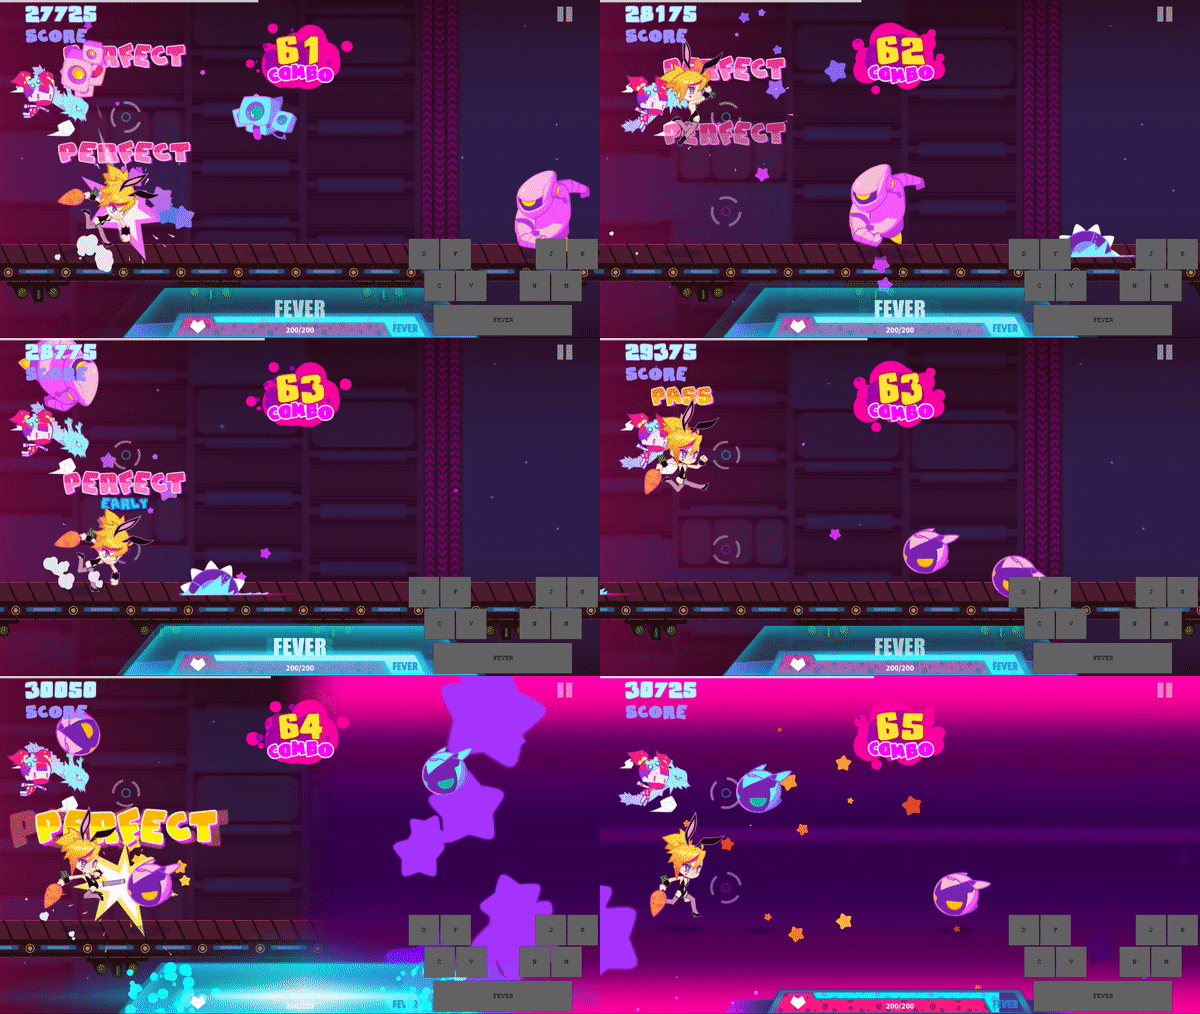
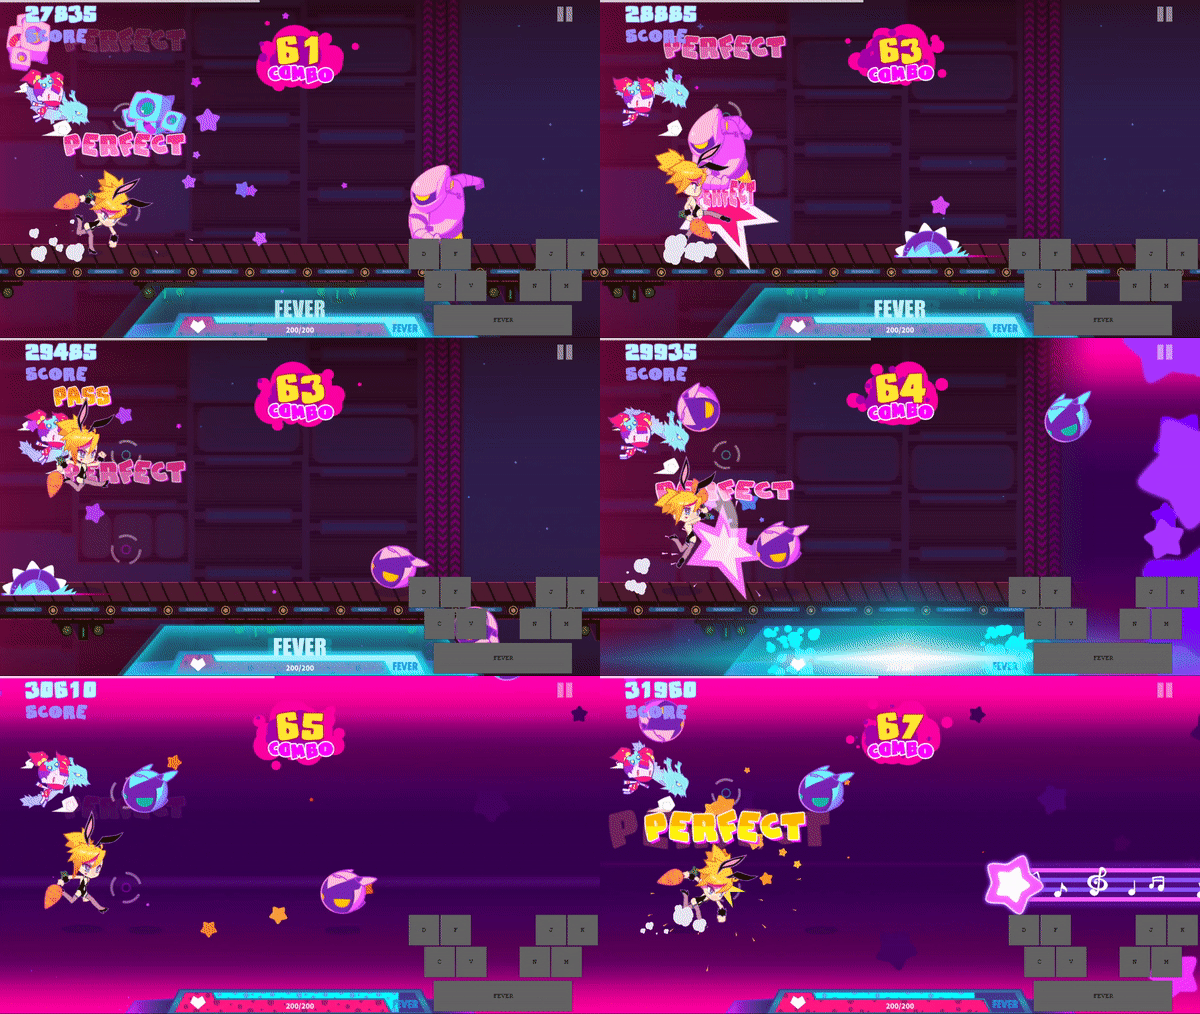
It is recommended to activate fever a bit earlier before you hit the note it has to be activated on. If not done correctly, the first note of the fever would sometimes not be counted for the fever, as sometimes it would be the gameplay input being recorded first before the fever input.
Notice in the example gameplay (slowed down), the fever is being activated at 64 combo. The gameplay shown on the left activated fever just before hitting the note, while the right was activated when both keys (the air key and the fever activation key) were seemingly pressed at the same time in real time, yet the note did not receive the fever bonus.
Basic Auto Fever Scoring
When charts have Auto Fever as their optimal scoring, it’s usually because the fever activations are in very ideal spots already (i.e manual fever cannot be used since moving fever activation times will result in less fever activations to give more score). Most Auto Fever routes require close to or AP accuracy because if one gets a great in the song, it can cause the subsequent fevers to be activated later than if there were no greats, therefore points can be lost. There are some cases however where deliberately getting a great or manipulating certain things are much more optimal for auto fever routes. These will be discussed in the Advanced Scoring chapter.
Here is a simple diagram of what an auto fever route would look like. The red lines at each end of the chart represent the start and end of a chart, while the magenta and yellow lines represent the segments where the fever bar is being gained and fever mode being activated, respectively.
We can see here that the fevers are in such a way that they are perfectly lined up, from start to end. The third red line on the second diagram indicates that a great was hit in that segment, which caused the fever to activate later and, as a result, caused it to miss potential notes to have the fever bonuses, as the fever is still activated even after the song is finished.
Note that this is just a simple example of a situation in an auto fever chart. Not all auto fever routes are exactly in this way.
Searching for Optimal Combinations (for New Songs)
When a new update drops for the game, this is a good opportunity to grab the highest places for the leaderboards. The problem now is: how? We do not know what the optimal combination for the song is yet (since the update is new, and will take time for lists of optimal combinations to be shown), so we have to look for those ourselves.
If you are early enough into the update, you can find the optimal combinations by doing the following:
- Taking a look at the chart for the first time, observing the chart is the key to get a good guess to find the correct combination. If the chart is fast and dense enough, Devil might be the combination. If it is full of Rin Notes, it’s probably Bunny Girl, and such.
- The difficulty may also give you inferences to what combination to use. Easy and Hard charts tend to use Joker, Bunny Girl and Dragon Girl since Devil usually has no chance to pass those difficulties. If you’re playing charts in those difficulties, try using Bunny Girl first, and if it doesn’t have that many Rin notes in it, go for Joker next. If the chart is Master or a high rated Hard chart (8* or more), then it’s most likely Little Devil and Lilith.
- If you have the time, try with another combination. Trial and Error is key.
Tips and Tricks
These are tips and tricks in order to help you in your scoring journey:
Start With Easy Things
- Sure it might be boring to play easier charts, but it’s just like playing rhythm games the first time. Someone needs to start somewhere.
Practice getting used to activating manual fever
- Getting used to activating manual fever without issues should be a necessary skill as you go on to score harder charts.
Study the scoring system
- Understanding how the scoring system of the game is key to becoming an effective and good scorer.
Practice makes perfect
- Don’t worry about not being able to be as good as other people yet. It just takes time and dedication to become good.
I appreciate your time and hope this little tutorial was helpful.


Be the first to comment