
Contents
List of Hunter Abilities (Upgrades by Level)
Rieve
It’s cool to be the villain sometimes! Rieve is a dangerous assassin who dresses like a Sith Lord. Her look is based on scary Sith stories that parents use to get their kids to behave. Rieve is quick in both mind and body. She can take you down with a clever insult or her red lightsaber.

Ruthless Pursuit
- Level 1: 65dmg/ 4s CD
- Level 2: 65/ 4s CD / -1s on elimination
- Level 3: 70/ 4s CD / -1s on elimination
- Level 4: 70/ 4s CD/ -2s on elimination
- Level 5: 75/ 4s CD/ -2s on elimination
- Level 6: 75/ 4s CD/ -4s on elimination (reset)
Wild Defense
- Level 1: 5s CD/ 150 Stam/ 60stam sec / stam regen delay 2.5s
- Level 2: 5s CD/ 150 Stam/ 60stam sec / stam regen delay 2.5s/ +10% deflect dmg
- Level 3: 5s CD/ 150 Stam/ 80stam sec / stam regen delay 2.5s/ +10% deflect dmg
- Level 4: 5s CD/ 150 Stam/ 80stam sec / stam regen delay 2.5s/ +20% deflect dmg
- Level 5: 5s CD/ 150 Stam/ 80stam sec / stam regen delay 2.0s/ +20% deflect dmg
- Level 6: 5s CD/ 150 Stam/ 80stam sec / stam regen delay 2.0s/ +30% deflect dmg
Lightsaber Throw
- Level 1: 60dmg/ 7s CD/ 10m distance/ 33m/s
- Level 2: 60/ 7s CD/ 11m distance/ 35m/s
- Level 3: 65/ 7s CD/ 11m distance/ 35m/s
- Level 4: 70/ 7s CD/ 11m distance/ 35m/s
- Level 5: 75/ 7s CD/ 11m distance/ 35m/s
- Level 6: 75/ 7s CD/ 12m distance/ 41m/s
Diago
Diago is the smoothest guy around and has the best aim you’ll ever see. Even though he was born blind as a Miraluka, he can make shots that amaze the crowd and confuse the other team. People think he might be using magic, cheating, or the Force. But no matter what, he looks like a miracle when he fights in the Arena.

Heightened Senses
- Level 1: 17s CD/ 6s reveal duration/ 1.75s channel/ 35m range
- Level 2: 17s CD/ 8s reveal duration/ 1.75s channel/ 35m range
- Level 3: 17s CD/ 8s reveal duration/ 1.75s channel/ 38.5m range
- Level 4: 17s CD/ 8s reveal duration/ 1.25s channel/ 38.5m range
- Level 5: 17s CD/ 10s reveal duration/ 1.75s channel/ 38.5m range
- Level 6: 17s CD/ 10s reveal duration/ 1.75s channel/ 43.75m range
Proximity Mine
- Level 1: 60dmg/ 6s CD/2m radius/1650 knockback force (KBF)
- Level 2: 65/ 6s CD/2m radius/1650 KBF
- Level 3: 65/ 6s CD/2.2m radius/1650 KBF
- Level 4: 70/ 6s CD/2.2m radius/1650 KBF
- Level 5: 70/ 6s CD/2.2m radius/2050 KBF
- Level 6: 70/ 6s CD/2.2m radius/2050 KBF/2s concussion*
Grappling Hook
- Level 1: 3s CD/15m range
- Level 2: 3s CD/17m
- Level 3: 2.5s CD/17m
- Level 4: 2.5s CD/19m
- Level 5: 2s CD/19m
- Level 6: 2s CD/21m
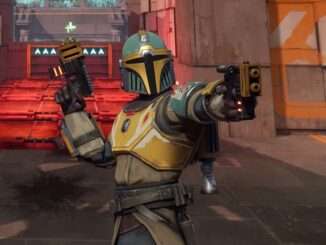
Imara Vex
Imara Vex is a bounty hunter who has been doing her job for a long time. She has learned that having close relationships makes things harder, especially when you don’t know who you might have to hunt next. Imara is a tough and skilled bounty hunter. She fights in the Arena to show off her skills and get more bounty jobs when she’s not busy.

Grapple
- Level 1: 4.5s CD/30m range
- Level 2: 4.5s CD/30m/ +20% movespeed/ 1s buff duration
- Level 3: 4.5s CD/30m/ +20% movespeed/ 1.25s buff duration
- Level 4: 4.5s CD/30m/ +25% movespeed/ 1.25s buff duration
- Level 5: 4.5s CD/30m/ +25% movespeed/ 1.5s buff duration
- Level 6: 4.5s CD/30m/ +30% movespeed/ 1.5s buff duration
Missile Launcher
- Level 1: 70dmg/ 6s CD/ 3m radius
- Level 2: 70dmg/ 6s CD/ 4m radius
- Level 3: 75dmg/ 6s CD/ 4m radius
- Level 4: 80dmg/ 6s CD/ 4m radius
- Level 5: 80dmg/ 6s CD/ 4m radius/1s knockback charge duration/1536 knockback force
- Level 6: 80dmg/ 6s CD/ 4m radius/1s knockback charge duration/1920 knockback force
Tracking Scan
- Level 1: 30% low HP amount/ 20m range
- Level 2: 32.5%% low HP amount/ 20m range
- Level 3: 32.5% low HP amount/ 21m range
- Level 4: 35% low HP amount/ 21m range
- Level 5: 35% low HP amount/ 23m range
- Level 6: 40% low HP amount/ 21m range
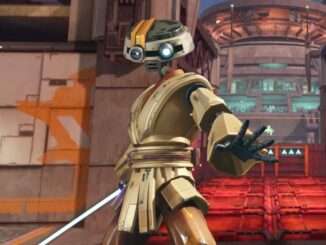
J-3DI
J-3DI is a droid made to act like a real Jedi. He has a famous blue lightsaber, knows a lot of Jedi teachings, and can use the Force, but not for real. People who don’t think a droid can be a Jedi might change their minds when they watch J-3DI fight in the Arena.

Faux Pull
- Level 1: 15dmg/ 7s CD/ 13m range/ 1.3s stun
- Level 2: 15/ 7s CD/ 13m range/ 1.3s stun/ 1 spare part
- Level 3: 20/ 7s CD/ 13m range/ 1.3s stun/ 1 spare part
- Level 4: 20/ 7s CD/ 14m range/ 1.3s stun/ 1 spare part
- Level 5: 25/ 7s CD/ 14m range/ 1.3s stun/ 1 spare part
- Level 6: 25/ 7s CD/ 14m range/ 1.3s stun/ 2 spare parts
Deflecting Stance
- Level 1: 5s CD/ 175 stamina/ 60 stam per sec/ 3s stam regen delay
- Level 2: 5s CD/ 190 stamina/ 60 stam per sec/ 3s stam regen delay
- Level 3: 5s CD/ 190 stamina/ 60 stam per sec/ 3s stam regen delay/ +10% deflect dmg
- Level 4: 5s CD/ 205 stamina/ 60 stam per sec/ 3s stam regen delay/ +10% deflect dmg
- Level 5: 5s CD/ 205 stamina/ 60 stam per sec/ 3s stam regen delay/ +20% deflect dmg
- Level 6: 5s CD/ 230 stamina/ 60 stam per sec/ 3s stam regen delay/ +30% deflect dmg
Spare Parts
- Level 1: 60 damage per part/25 healing
- Level 2: 60 damage per part/28 healing
- Level 3: 55 damage per part/28 healing
- Level 4: 55 damage per part/31 healing
- Level 5: 50 damage per part/31 healing
- Level 6: 50 damage per part/40 healing
Utooni
The Jawa brothers are known for being tough and resourceful. They like to “borrow” things from other Hunters without asking. They can also turn junk that seems useless into powerful weapons. The Jawa brothers will definitely win a fight, but first they need to stop arguing about which one of them gets to be the leader that day.

Switcheroo
- Level 1: 0.5s CD
- Level 2: 0.5s CD/+10% damage/ 2s buff duration
- Level 3: 0.5s CD/+10% damage/ 2.25s buff duration
- Level 4: 0.5s CD/+12% damage/ 2.25s buff duration
- Level 5: 0.5s CD/+12% damage/ 2.5s buff duration
- Level 6: 0.5s CD/+17% damage/ 2.25s buff duration
Hands Off
- Level 1: 65 dmg/ 7s CD/ 1700 KBF/ 1000 self KBF/ 6.8m radius
- Level 2: 70 dmg/ 7s CD/ 1700 KBF/ 1000 self KBF/ 6.8m
- Level 3: 70 dmg/ 7s CD/ 1700 KBF/ 1000 self KBF/ 7.15m
- Level 4: 75 dmg/ 7s CD/ 1700 KBF/ 1000 self KBF/ 7.15m
- Level 5: 75 dmg/ 7s CD/ 1700 KBF/ 1000 self KBF/ 7.85m
- Level 6: 75 dmg/ 7s CD/ 2040 KBF/ 1000 self KBF/ 7.85m
Imploder
- Level 1: 30 dmg/ 9s CD/ 4.5m radius/ 1.5s pull duration
- Level 2: 30 dmg/ 9s CD/ 4.95m radius/ 1.5s pull duration
- Level 3: 35 dmg/ 9s CD/ 4.95m radius/ 1.5s pull duration
- Level 4: 35 dmg/ 9s CD/ 5.4m radius/ 1.5s pull duration
- Level 5: 40 dmg/ 9s CD/ 5.4m radius/ 1.5s pull duration
- Level 6: 40 dmg/ 9s CD/ 5.4m radius/ 1.5s pull duration/ +20% slow + 2.5s duration
Skora
Skora is really smart when it comes to chemistry. She makes helpful stims for friends and dangerous poisons for enemies. This talent helped her a lot when she used to be a doctor for the Hutt Cartel. Not only does she have connections to criminals, which is pretty scary, but she also loves to play jokes that sometimes cause things to blow up in the Arena.

Adrenal Boost
- Level 1: +80% movespeed/ 1.5s duration/ 7s CD
- Level 2: +85% movespeed/ 1.5s duration/ 7s CD
- Level 3: +90% movespeed/ 1.5s duration/ 7s CD
- Level 4: +95% movespeed/ 1.5s duration/ 7s CD
- Level 5: +100% movespeed/ 1.5s duration/ 7s CD
- Level 6: +100% movespeed/ 2.0s duration/ 7s CD
Stim-Shot
- Level 1: 150 temp HP/ 6s CD
- Level 2: 150 temp HP/ +20 temp HP to low life/6s CD
- Level 3: 150 temp HP/ +30 temp HP to low life/6s CD
- Level 4: 150 temp HP/ +40 temp HP to low life/6s CD
- Level 5: 150 temp HP/ +40 temp HP to low life/6s CD/ +30% DMG reduction 2s duration
- Level 6: 150 temp HP/ +40 temp HP to low life/6s CD/ +30% DMG reduction 2.5s duration
Self-Heal
- Level 1: 16 healing per second (HPS)/ 2.5s out of combat delay (OOC delay)
- Level 2: 17 HPS/ 2.5s OOC delay
- Level 3: 17 HPS/ 2.25s OOC delay
- Level 4: 18 HPS/ 2.25s OOC delay
- Level 5: 18 HPS/ 2.0s OOC delay
- Level 6: 20 HPS/ 2.0s OOC delay
Sprocket
Sprocket is a smart, excited kid who can fix any tech problem. In the Arena, he makes up for not being super strong by thinking fast, moving quick, and using cool gadgets. Sprocket really loves Hunters of the Outer Rim. His excitement and joy can make even the most serious people in the crowd smile.

Targeting Drone
- Level 1: 12s CD/ 4.5s duration/ +25% damage
- Level 2: 12s CD/ 4.5s duration/ +27.5% damage
- Level 3: 12s CD/ 5.0s duration/ +27.5% damage
- Level 4: 12s CD/ 5.0s duration/ +30% damage
- Level 5: 12s CD/ 5.5s duration/ +30% damage
- Level 6: 12s CD/ 5.5s duration/ +30% damage/ +20% slow
Medical Droid
- Level 1: 14s CD/ 7.5s duration/ 5m radius/ 35 HPS
- Level 2: 14s CD/ 8.0s duration/ 5m radius/ 35 HPS
- Level 3: 14s CD/ 8.0s duration/ 5.25m radius/ 35 HPS
- Level 4: 14s CD/ 8.0s duration/ 5.25m radius/ 40 HPS
- Level 5: 14s CD/ 8.0s duration/ 5.5m radius/ 40 HPS
- Level 6: 14s CD/ 8.0s duration/ 5.5m radius/ 50 HPS
Drone Defense
- Level 1: 12s CD/ 4s duration/ +30% damage reduction
- Level 2: 12s CD/ 4s duration/ +30% damage reduction/ +10% healing
- Level 3: 12s CD/ 4.5s duration/ +30% damage reduction/ +10% healing
- Level 4: 12s CD/ 4.5s duration/ +35% damage reduction/ +10% healing
- Level 5: 12s CD/ 5s duration/ +35% damage reduction/ +10% healing
- Level 6: 12s CD/ 5s duration/ +30% damage reduction/ +20% healing
Zaina
Zaina used to fight for the Rebel Alliance. She represents the brave spirit of heroes who fight against the odds. Zaina is a natural leader who can change the direction of a battle, even when it seems like her team is going to lose. She jumps into action to heal her teammates and inspire them to keep fighting until they win.

Bacta Bomb
- Level 1: 80 healing/ 4s CD/ 7m radius
- Level 2: 80 healing/ 4s CD/ 7.35m radius
- Level 3: 85 healing/ 4s CD/ 7.35m radius
- Level 4: 85 healing/ 4s CD/ 8.05m radius
- Level 5: 90 healing/ 4s CD/ 8.05m radius
- Level 6: 90 healing/ 4s CD/ 8.05m radius/ +10% damage reduction 2s duration
Dodge Roll
- Level 1: 4s CD/ 4m distance
- Level 2: 4s CD/ 4.2m distance
- Level 3: 4s CD/ 4.4m distance
- Level 4: 4s CD/ 4.8m distance
- Level 5: 4s CD/ 4.8m distance/ +15% damage 1.5s duration
- Level 6: 4s CD/ 4.8m distance/ +15% damage 2.0s duration
Combat Medic
- Level 1: +10% increased healing/ 22.5% low health amount
- Level 2: +10% increased healing/ 25% low health amount
- Level 3: +12.5% increased healing/ 25% low health amount
- Level 4: +12.5% increased healing/ 27.5% low health amount
- Level 5: +15% increased healing/ 27.5% low health amount
- Level 6: +15% increased healing/ 35% low health amount
Charr
Charr is really good at hunting, trapping, and tracking. He respects wildlife and big animals. Charr loves excitement and enjoys the risks of fighting in the Arena!

Regen Booster
- Level 1: 90 HP self-heal/ 200 converted healing/ 2s duration
- Level 2: 95 HP self-heal/ 200 converted healing/ 2s duration
- Level 3: 95 HP self-heal/ 200 converted healing/ 2.25s duration
- Level 4: 100 HP self-heal/ 200 converted healing/ 2.25 duration
- Level 5: 100 HP self-heal/ 200 converted healing/ 2.5s duration
- Level 6: 100 HP self-heal/ 225 converted healing/ 2.5s duration
Snare Trap
- Level 1: 10 damage/ 14s CD/ 2s trap duration/ 2.2m radius
- Level 2: 10 damage/ 14s CD/ 2.25s trap duration/ 2.2m radius
- Level 3: 10 damage/ 14s CD/ 2.5s trap duration/ 2.2m radius
- Level 4: 10 damage/ 14s CD/ 2.75s trap duration/ 2.2m radius
- Level 5: 10 damage/ 14s CD/ 3s trap duration/ 2.2m radius
- Level 6: 10 damage/ 14s CD/ 3s trap duration/ 2.2m radius/ +10% increase damage to trapped enemies
Laser Tether
- Level 1: 12s CD/ 2.5s duration
- Level 2: 12s CD/ 2.50s duration/ +10% damage against tanks
- Level 3: 12s CD/ 2.75s duration/ +10% damage against tanks
- Level 4: 12s CD/ 2.75s duration/ +15% damage against tanks
- Level 5: 12s CD/ 3s duration/ +15% damage against tanks
- Level 6: 12s CD/ 3s duration/ +20% damage against tanks
Grozz
Grozz is a huge Wookiee who is much taller than the other Hunters. He is a powerful and angry fighter. Many people in the galaxy already know him from when he played Huttball as a pro. But now, Grozz wants to become even more famous by winning in the Arena. He is known for being super strong, but he also has a nicer side. Grozz always takes time for his fans, whether it’s signing autographs or giving big Wookiee hugs that might crush you.

Stampede
- Level 1: 10 grab damage/ 70 wall damage/ 9s CD/ 1.75s duration
- Level 2: 10 grab damage/ 70 wall damage/ 9s CD/ 1.83s duration
- Level 3: 15 grab damage/ 70 wall damage/ 9s CD/ 1.83s duration
- Level 4: 15 grab damage/ 75 wall damage/ 9s CD/ 1.75s duration
- Level 5: 10 grab damage/ 75 wall damage/ 9s CD/ 1.92s duration
- Level 6: 10 grab damage/ 70 wall damage/ 9s CD/ 1.92s duration/ -3s CD on elimination
War Cry
- Level 1: 200 healing/ 14s CD
- Level 2: 200 healing/ 14s CD/ +10% damage reduction
- Level 3: 210 healing/ 14s CD/ +10% damage reduction
- Level 4: 210 healing/ 14s CD/ +15% damage reduction
- Level 5: 220 healing/ 14s CD/ +15% damage reduction
- Level 6: 220 healing/ 14s CD/ +25% damage reduction
Upheaval
- Level 1: 30 damage/ 50 final segment damage/ 9s CD/ 13.2m range/ 18.9ms speed
- Level 2: 30 damage/ 55 final segment damage/ 9s CD/ 13.2m range/ 18.9ms speed
- Level 3: 30 damage/ 55 final segment damage/ 9s CD/ 13.2m range/ 21ms speed
- Level 4: 30 damage/ 60 final segment damage/ 9s CD/ 13.2m range/ 21ms speed
- Level 5: 30 damage/ 60 final segment damage/ 9s CD/ 13.2m range/ 23.6ms speed
- Level 6: 30 damage/ 60 final segment damage/ 9s CD/ 13.2m range/ 23.6ms speed/ launches towards Grozz
Sentinel
Sentinel is a bossy, talkative trooper who used to fight for the Empire. Don’t say anything about the broken part of his helmet, or he might point his big E-Web heavy repeater gun at you.

Combat Shield
- Level 1: 275 shield health/ 12s CD/ 6 shield regen/ 2s shield regen delay
- Level 2: 300 shield health/ 12s CD/ 6 shield regen/ 2s shield regen delay
- Level 3: 300 shield health/ 12s CD/ 8 shield regen/ 2s shield regen delay
- Level 4: 300 shield health/ 12s CD/ 8 shield regen/ 1.5s shield regen delay
- Level 5: 300 shield health/ 12s CD/ 10 shield regen/ 1.5s shield regen delay
- Level 6: 325 shield health/ 12s CD/ 10 shield regen/ 2s shield regen delay
Suppressing Shot
- Level 1: 40 damage/ 10s CD/ 2.2s knockdown duration/ 25 heat generation
- Level 2: 45 damage/ 10s CD/ 2.2s knockdown duration/ 25 heat generation
- Level 3: 45 damage/ 10s CD/ 2.2s knockdown duration/ 20 heat generation
- Level 4: 50 damage/ 10s CD/ 2.2s knockdown duration/ 20 heat generation
- Level 5: 50 damage/ 10s CD/ 2.2s knockdown duration/ 15 heat generation
- Level 6: 50 damage/ 10s CD/ 2.7s knockdown duration/ 15 heat generation
Barrel Slam
- Level 1: 40 damage/ 1740 knockback force (KBF)/ 2s CD
- Level 2: 40 damage/ 1914 KB/ 2s CD
- Level 3: 45 damage/ 1914 KBF/ 2s CD
- Level 4: 45 damage/ 2105 KBF/ 2s CD
- Level 5: 50 damage/ 2105 KBF/ 2s CD
- Level 6: 50 damage/ 30 wall impact damage/2105 KBF/ 2s CD
Slingshot
Slingshot is a wild and chaotic fighter that fans love to watch because of the playful way they compete. Slingshot is actually an Ugnaught named Dizzy and his droid partner, who are always together. No Ugnaught and droideka have ever been as close as these two. They fully accept being known as one character called Slingshot, both when they’re fighting and when they’re not.

Unstable Shield
- Level 1: 50 damage/ 10s CD/ 300 shield health/4m explosion radius
- Level 2: 50 damage/ 10s CD/ 325 shield health/4m explosion radius
- Level 3: 55 damage/ 10s CD/ 325 shield health/4m explosion radius
- Level 4: 55 damage/ 10s CD/ 350 shield health/4m explosion radius
- Level 5: 60 damage/ 10s CD/ 350 shield health/4m explosion radius
- Level 6: 60 damage/ 10s CD/ 350 shield health/4m explosion radius/ 1600 knockback force
Trickshot
- Level 1: 60 damage/ 95 max charge damage/ 6s CD/ 23m max distance/ 1.5s charge duration
- Level 2: 65 damage/ 100 max charge damage/ 6s CD/ 23m max distance/ 1.5s charge duration
- Level 3: 65 damage/ 100 max charge damage/ 6s CD/ 24m max distance/ 1.5s charge duration
- Level 4: 65 damage/ 100 max charge damage/ 6s CD/ 25m max distance/ 1.5s charge duration
- Level 5: 70 damage/ 105 max charge damage/ 6s CD/ 25m max distance/ 1.5s charge duration
- Level 6: 70 damage/ 105 max charge damage/ 6s CD/ 25m max distance/ 1s charge duration
Scatterboom
- Level 1: 15 damage per rocket/ 8 rockets/ 7s CD/ 0.1s rate of fire/ 2.2m explosion radius
- Level 2: 15 damage per rocket/ 8 rockets/ 7s CD/ 0.08s rate of fire/ 2.2m explosion radius
- Level 3: 16 damage per rocket/ 8 rockets/ 7s CD/ 0.08s rate of fire/ 2.2m explosion radius
- Level 4: 16 damage per rocket/ 8 rockets/ 7s CD/ 0.06s rate of fire/ 2.2m explosion radius
- Level 5: 17 damage per rocket/ 8 rockets/ 7s CD/ 0.06s rate of fire/ 2.2m explosion radius
- Level 6: 17 damage per rocket/ 8 rockets/ 7s CD/ 0.06s rate of fire/ 2.5m explosion radius
I appreciate your time and hope this little tutorial was helpful.
Be the first to comment