
The entire process outlined, as well as what you need to finish a run in the fewest amount of steps.
Contents
Step 1: Spawn the Kuva Lich
All credit goes to Holy Zen! !
The easiest place to do this is Cassini on Saturn, but you can technically spawn one on any Level 20+ Grineer mission pretty consistently, aside from Uranus missions and Dark Sector missions. Of note, special mission types like Void Fissure missions, Invasion missions and Syndicate missions will not help spawn a Kuva Lich.
What Warframe you choose to spawn it is important, because it influences the native damage type of the weapon you’ll end up with.

The most popular elements in Overframe builds are Magnetic, Toxin and Heat. Radiation is also good if your weapon is intended to be used against Eidolons or Archons.
In Cassini, you do the Capture mission as normal. Once you have captured the target, the lights will flicker as they always do when something has teleported in from outside the area, but you will not yet get a message from the “invader”. This is your cue to kill as many enemies as possible in a short time, at least 10 in under a minute.
If you do it right, you will get a transmission from a Kuva Guardian talking about finding a “subject” or something similar.

If you do not see this after a minute, you likely took too long to kill the Grineer enemies. Extract and try again.
After you get the Kuva Guardian transmission, a marker will appear on your map. Head towards the marker and fight the Kuva Larvaling. The Larvaling is no tougher than a normal enemy and will be easily subdued. You’ll be able to tell once they are subdued because you’ll receive a token amount of Kuva when you’ve done so (around 100-300 units). Once the Larvaling is down, approach them. You’ll see a weapon above their head which indicates what weapon the Kuva Lich will spawn with. If you want this weapon, hold down the interact button to finish off the Larvaling and begin the Kuva Lich encounter. If you do not, ignore them and extract.
- Extracting after ignoring a Kuva Larvaling will remove that weapon from the pool. Only after all weapons have been removed from the pool, or a full Kuva Lich cycle has been played out, will that weapon appear again.
- A downed Kuva Larvaling will die in 30 seconds. If for some reason you made a mistake, such as bringing the wrong warframe into the mission to get the damage bonus you wanted, or letting the Larvaling die before you are able to do the finishing move for a weapon you wanted, abort the mission by quitting instead of extracting. This does not remove the weapon from the pool and will allow you to (eventually) get another go at getting that weapon without needing to cycle through all the weapons.
Step 2: Hunt the Kuva Lich
Once you have completed Step 1, a Kuva Lich will spawn with a random name and a few different personality sets. They will taunt you in a transmission, usually remarking on the element of the weapon you used to kill them in Larvaling form, and now the true hunt begins.
The Kuva Lich will take over the nodes on Earth. You’ll see a red haze over the majority of the Earth nodes, and when you bring up Earth, your Kuva Lich will usually make a quip that the sector is theirs. When you click on a mission node, you’ll have the option of either doing the Kuva Lich territory mission or any other mission that happens to exist at that node. Kuva Lich-controlled territory may not populate on all nodes; In particular, it will never populate Assassination nodes, Open World-centric nodes, or any nodes that deviate from one of the standard mission types (i.e. something like Mirror Defense on Mars). Of note, ANY mission done on Earth, even if it is not a Kuva Lich Territory mission, will have the Kuva Lich tax your rewards during extraction. Don’t worry if the Lich steals something you want; You’ll get it back later.
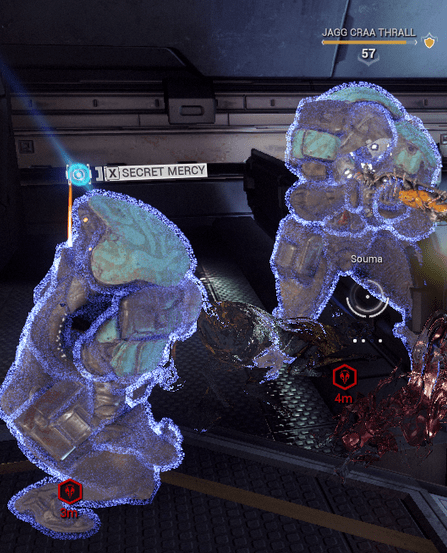
A lich-controlled territory mission will have much-higher-level enemies than usual, Levels 55-75 on Earth, so plan your loadout accordingly. Inside the mission, you will see Thralls, represented by having a blue aura and a special enemy description. They will also be marked by unique map markers. Seek these out ASAP. These enemies will not die normally, but instead will be downed when their health is depleted, and you then perform a “Secret Mercy” to finish them off. After doing so, you’ll see a “Requiem Whisper” prompt with a circle that fills up slightly. Your goal is to completely fill in the circle by executing thralls. Doing so will reveal one of the runes necessary to kill the lich. Executing thralls will also steadily enrage the Lich, increasing the likelihood of them entering your mission instance as a mini-boss and giving you a chance to attempt to kill them.
Of note, while Requiems will reveal the runes needed to kill the lich, it will not reveal the exact order the runes should go in. Requiem runes are obtained by doing Void Fissures on the Kuva Fortress, cracking special Requiem relics that will occasionally drop from executing the thralls. You will need the right runes in the right order equipped to your parazon in order to force the lich to flee, and thus move onto the next step.
If you have all three runes in the correct configuration when attempting to slay the lich, the game will announce your lich fled to Saturn Proxima, and you proceed to step 3. If one of your runes is incorrect, it will show a slash through that rune, and your Lich will escape to the next planet on the chain. If you run out of Lich Territory missions, the Lich will proceed to the next planet and get stronger the same as if you made an error with the rune configuration. As this will keep you from ruling out a bad rune configuration, avoid this scenario at all cost.
- Start: Earth (Lich Lv 1, Enemies Lv 55-75)
- Earth -> Mars (Lich Lv 2, Enemies Lv 50-60)
- Mars -> Ceres (Lich Lv 3, Enemies Lv 55-75)
- Ceres -> Sedna (Lich Lv 4, Enemies Lv 75-90)
- Sedna -> Kuva Fortress (Lich Lv 5, Enemies Lv 90-110)
- Kuva Fortress repeats!
There are certain tips and tricks in this stage that will optimize your Kuva Lich hunt. Please see “Kuva Lich Speedrunning Tips” to learn more, or you’re free to figure it out on your own.
Step 3: Finish off the Kuva Lich
Once the Lich has fled, you must use your railjack to pursue them. There will be a special mission available at Saturn Proxima for your railjack. This mission will be selectable regardless as to whether you have Saturn Proxima missions unlocked or not. This will be a standard Grineer skirmish mission, which will have you boarding a Grineer galleon to assassinate its captain, which in this case will be the Kuva Lich.
You must destroy the required number of fighters and crewships to be allowed to board the Galleon. The assassination part is straight-forward from here, with no need to worry about requiem runes and the like. Thralls will still populate as part of the Galleon mission, but killing them serves no purpose other than removing them as enemies.
Once you have downed the Lich, you have the option to either convert or vanquish them. Vanquishing them will give you their weapon, and occasionally an Ephemera (visual aura thing). Converting them will allow you to trade the Lich to other players, or use them as defenders on your railjack crew. In most cases, you’ll want to vanquish.
After you have vanquished the lich and made your way back to your railjack, the game will tell you your skirmish is complete. Of note, you will not get any rewards just yet. Choose to abort the mission from here (yes, it will say “abort”, and give you a scary message about forfeiting rewards, don’t worry about it).
When you are back aboard your orbiter, you’ll get everything the Lich stole back. You’ll also get a message in your inbox stating the weapon the lich used is waiting for you in the foundry. Go to your foundry and claim the weapon.
You’re finally done! Enjoy your new Kuva weapon.
Kuva Lich Speedrunning Tips
If you are careful with your Kuva Lich hunt, you will never reach a Level 5 Kuva Lich running around the Kuva fortress.
Planning Your Hunt
You may be tempted to go for the Extermination or the Capture nodes first. Don’t. Save these for later. I recommend doing more-complicated mission types first. I usually choose the Spy node first, but any non-Extermination or non-Capture nodes work. Do 2-3 of these before taking on one of the easier missions. This will allow you to save the Kuva Lich encounter for when your mission is not tasking you with either being stealthy, defending something or keeping up with life support levels.
Face The Lich On Your Own Terms
The most important thing to know about the Lich Hunt is that, no matter what, you are always in control with how things proceed. The game will give the illusion of RNG trying to screw you over, but that’s just it: It’s an illusion, and you can redirect things back to where they need to be.
For the first three planets, Earth, Mars and Ceres, you should be able to kill enough thralls over the course of the missions to reveal your first, second and third runes respectively. Whether or not there are enough thralls for the purpose is not in question: There are definitely enough. If you are finding there are not enough, you are ending missions earlier than you are supposed to, when there are still thralls to kill.
If the Kuva Lich arrives before a rune is revealed and equipped
It may seem like a confrontation needs to happen right then, but that’s the illusion; You can actually turn this scenario into an advantage.
- The arrival of the Kuva Lich means they will start turning normal enemies around them into thralls. Ignore the Lich at first, keeping away from his gun fire and melee range, and focus on the thralls that appear, mercy-killing them and advancing your requiem circle to expedite getting that next rune, and possibly some of the one after as well.
- Once the Kuva Lich stops converting thralls (they can convert up to 10 of them depending on the availability of the surrounding enemies), fire on the Lich until you’ve subdued them, but do not attempt to use your parazon. Wait for the Kuva Lich to heal and get back up.
- Repeat two more times. After you’ve knocked them down the third time, but do not try to use your parazon before they get back up, they will flee the mission, but not the planet. You’ll be able to continue the current planet’s process.
Alternatively, you can also just extract without fighting the Kuva Lich, and the same thing happens. This may be easier than fighting if the Kuva Lich is not in a place that will interfere with you finishing the mission.
Guessing the Correct Rune Sequence
The Oull Factor – The Oull rune is your friend. Oull can act as a wildcard for any of the other runes, and thus, having one means you only have to reveal the first two runes. There is only one scenario in which you’ll end up on Sedna if you’re using an Oull rune, versus two scenarios if you are not. There is even a decent chance you’d be able to end the hunt on Mars.
The Oull rune has a 1 in 4 chance of dropping after a Lich flees from a successful rune sequence. You likely will not have one on your first few Liches, but the good news is that they are player-tradable, so you may wish to secure one from The Warframe Market. One Oull is usable three times. If you do not have the platinum for it, no worries, it just makes things a bit easier. Of note, if you are using an Oull and get enough Requiem Whispers to reveal the third rune, save a use of your Oull rune and just slot in the third rune.
Progression Without an Oull rune
First attempt
- First revealed rune
- Random Rune #1
- Random Rune #2
You have a 0.8% chance of the above actually being correct. If you do get it correct, you should probably enter your local lottery. The real goal is just to figure out if the first rune belongs in the first slot. If it does, congrats, that cuts down on your possible combinations, guaranteeing you’ll finish on Ceres
Second attempt, if First Rune confirmed:
- First revealed rune (confirmed)
- Second revealed rune
- Random rune
If the above doesn’t work, slot the second revealed rune in the last slot, then fill in the third rune into the middle slot once it’s revealed, and you’re finished on Ceres. If the second revealed rune is correct, but the random rune fails, you know where the third revealed rune will go, and you’re still finished on Ceres.
Second attempt, First Rune failed:
- Second revealed rune
- First revealed rune
- Random rune
Third attempt, Second rune confirmed in first slot:
- Second revealed rune (confirmed)
- First revealed rune
- Third revealed rune
Third attempt, Second rune failed in first slot:
- Third revealed rune (guaranteed correct)
- First revealed rune
- Second revealed rune
In either scenario, if the configuration does not work, swap the remaining non-confirmed runes and you’ll be finished on Sedna.
Progression Using an Oull rune
First attempt:
- First revealed rune
- Oull Rune
- Random Rune
You have a 3.3% chance of the above actually being correct. I’ve gotten it to work just once before. The real goal is just to figure out if the first rune belongs in the first slot. If it does, congrats, that drastically cuts down on your possible combinations, and ensures you’ll be done on Ceres.
Second attempt, if First Rune confirmed:
- First revealed rune (confirmed)
- Oull Rune
- Second revealed rune
You have a 50/50 chance of the above working. If the above doesn’t work, swap the Oull and Second revealed rune, and you’ve got your correct combination for Ceres.
Second attempt, if First Rune failed:
- Second revealed rune
- Oull Rune
- First revealed rune.
If the second revealed rune works but the first still fails in the last slot, swap it with your Oull rune and you’ll have the correct combination for Ceres.
Third attempt, if Second Rune failed in first position:
- Oull Rune, or Third revealed rune (guaranteed correct)
- First revealed rune
- Second revealed rune
If the above doesn’t work, swap the first revealed rune with the second revealed rune, and you’ve got your correct combination for Sedna.
Conclusion
As you can see, you will only end up at the Kuva Fortress with a Level 5 Lich if you are being impatient and confronting the Kuva Lich too early. Pick your battles, and wait until you are ready, and you will save yourself significant hassle in the long-run.


Be the first to comment