
This guide will present the concept I use for most of my builds lately – aura-based, shock enrage. I’m explaining the core mechanics (as I understand them), and present one (possibly two) crusader and one tech adept as ‘case studies’.
Introduction
I used the TA build for the ladder race in season five (and placed 4th). I’m currently favoring the Crusader variant, after discovering that teleport doesn’t break the channel, which solves almost all of the issues I had in past seasons with spin2win builds.
There are probably Berserk-variants that work equally well, or better. But I don’t enjoy having to worry about token generation. Don’t ask about it, i’m not going to respond.
Both the TA and the Crusader have the damage and sustain to do missions at +50 difficulty, where the player’s damage is reduced by 99%, and monsters deal 90 times as much damage.
The Build Concept
The ‘auras’ in Martyr tick very fast, so they are the ideal means to apply debuffs to enemies.
The following discusses how I build a spin2win crusader, but the general principle stays the same. I’ll be adding sections for other classes and variants.
- We run shock aura.
- We run fear aura.
- We run heat aura.
- Our crits inflict bleed.
- Bleeding enemies are slowed.
With the two shock-related psalm-doctrines equipped, anything we touch gets shocked and explodes, and shocks in the area, and debuffs and applies vulnerabilities.
This is what an elite looks like a split second after the auras start touching them. Also note the insane amount of overlapping ‘shock resisted’ messages that showcase just how fast the game tries to apply the debuffs:
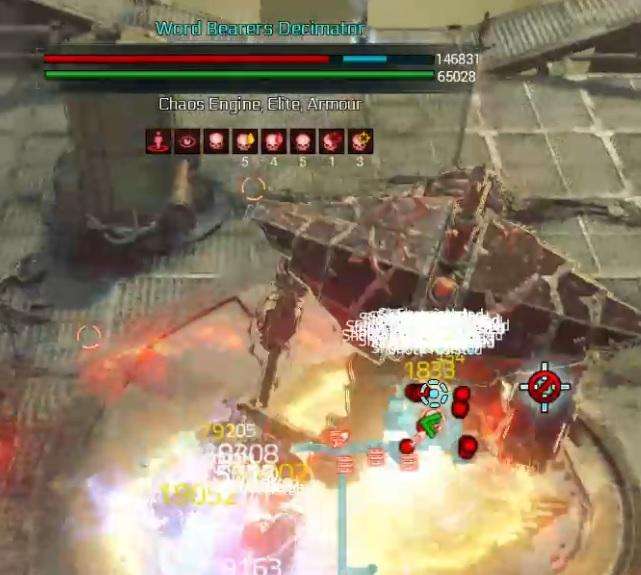
Of course we use a mix of perks and passives and item stats to apply the vulnerabilities even faster, and then we roll vulnerability effectiveness wherever possible.
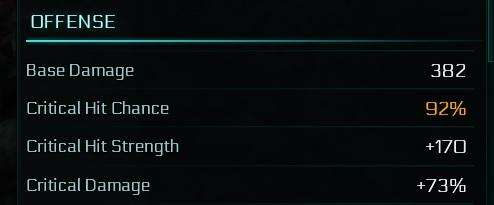
The next building block in ramping up the damage considerably is critical strikes, critical hit strength and critical damage.
We are soft-capped (50%) on crit chance through items and passives. Then we have “+5% Supreme Critical Hit Chance and +10 Critical Hit Strength against Slowed, Shocked, Stunned targets” rolled on three gear pieces, and the cherry on top is a four yellow component inoculator that is set to four Frenzon (10 Supreme crit chance and 40 crit strength). So when the inoculator is active, we are sitting at 100% crit chance and about 200 crit strength (above the magic 150 for the strongest crits).
(The ‘supreme crit against’ is not shown in the char screen, since it’s applied conditionally).
Now, you’d think that the inoculator lasts only five seconds but has a 60 second cooldown, what good is that? Inoculators have two ‘magic’ secondaries, and we intentionally used the ‘reroll all’ feature on our gear to get the desired amount of primaries and secondaries:
6.0% to 10.0% chance to reset Inoculator Cooldown on Kill
Champion and Elite enemies have a +15% chance to drop a Supply Charge
The first one allows us to use the inoculator (with inoculator charges dropping from destructible quite often) quite liberally – at the very least we always have it available as a damage boost when fighting elites – and the latter helps us replenish teleporter charges. Just watch the cooldown refresh in my videos.
Since we are maxed out on crit chance and crit strength, ‘Critical Damage’ becomes the next multiplier for our damage output, that’s why that is rolled on gear pieces instead of crit strength.
The next multiplicative (most damage increases in Martyr are only additive) damage boost comes from ‘damage against X’.
We have:
- 10% against bleeding (Physical passive tree)
- 10% against slowed (Debuff tree)
- 19% against bleeding (secondary on the neural)
- 16% against slowed, stunned, shocked (secondary on the eye)
- 17% against slowed, stunned, shocked (secondary on the main)
- 19% against bleeding (purity seal)
- 18% against slowed, stunned, shocked (secondary on the armor)
And on top of that, we have several hundred percent additive damage bonus, with a big chunk from the enrage tokens (440% there) and from various passives, mainly the ‘center’ points of the crit tree, the DoT tree and the Debuff tree.
Movement Speed and Clearing Obstacles
We want MS everywhere.
Unless I’m doing -99% missions in coop, I always have Stride of the Blessed active. On missions where damage could be and issue, and the missing damage reduction a liability, I switch it out for Persistent Attrition.
Morality weapons are not an option for spin2win, since red greatswords with enhanced Spinning Blow not only benefit from cooldown reduction (very important for ‘spinning up’ again, after stopping to use shrines or cogitators), but also lose the MS penalty that non-enhanced spinning blow has.
While in combat, we generate extra MS via perks, and get the biggest boost from triggering Thunderbolt of Authority, which grants a big supreme movement speed bonus. This is what I get during missions:

Apart from regular movement, we have assault jump from the armor, and teleport from the belt. Teleport can be used while channeling, but has some issues clearing height differences, and does not give us the ‘impact’ splash damage of Assault jump. A perfect example when I use the ‘stomp’ is after triggering Judgement Shrines.
Both abilities can be used to clear gaps in levels, the ‘outcrops’ on island maps and the silly inclined walkways on the big platform maps.
Defense
The best defense is of course a good offense, that’s why we play super aggressively, actively teleporting or assault jumping into the biggest clusters of enemies, and life and shield draining like a mad lad.
However, we have to survive random one-shots, and that’s why we actually build quite defensively.
Note: I completed the Puritan Morality bar very recently and switched to a ‘Invulnerability on Kill for 2 seconds (8 seconds cooldown)’ armor. I still have to test the limits of that, until I know them, I’m sticking with the defense that has been working well for me:
Completed defense passive tree, with just a couple of useless side branches left out.
A couple of points in the health tree, namely the ones that generate suppression and health, and the passive the provides suppression damage reduction.
The latter is a key part of our defenses, you need to roll it on a couple of items. It makes a huge difference. The TA with 20% of that constantly gets CCed, with 55% the suppression bar never ever moves out of the green.
Gameplay Videos
Early version, pre-morality gear: +18 supreme in 22 seconds.
Ordos intel at +17 from today.


Be the first to comment