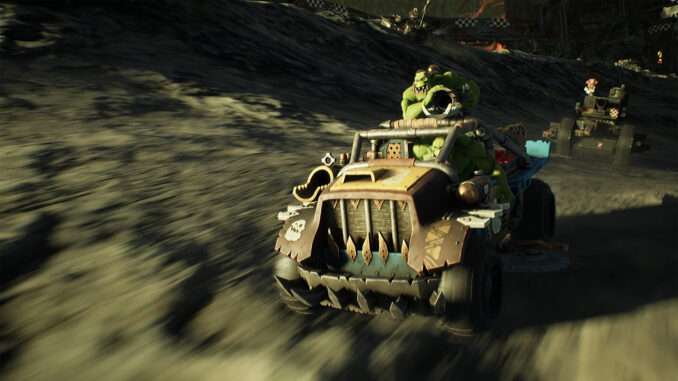
The MegaTrakk Skrapjet (MTSJ from now on) is a fast, hard hitting but fragile vehicle. One of the fastest in the game when treated right.
Guide to MegaTrakk Skrapjet
By Shiro Is Kuro
In this guide I will go over what I know and have learnt as well as what I believe to be its strengths and weaknesses. As well as the matchups and ways of using it.
Basics
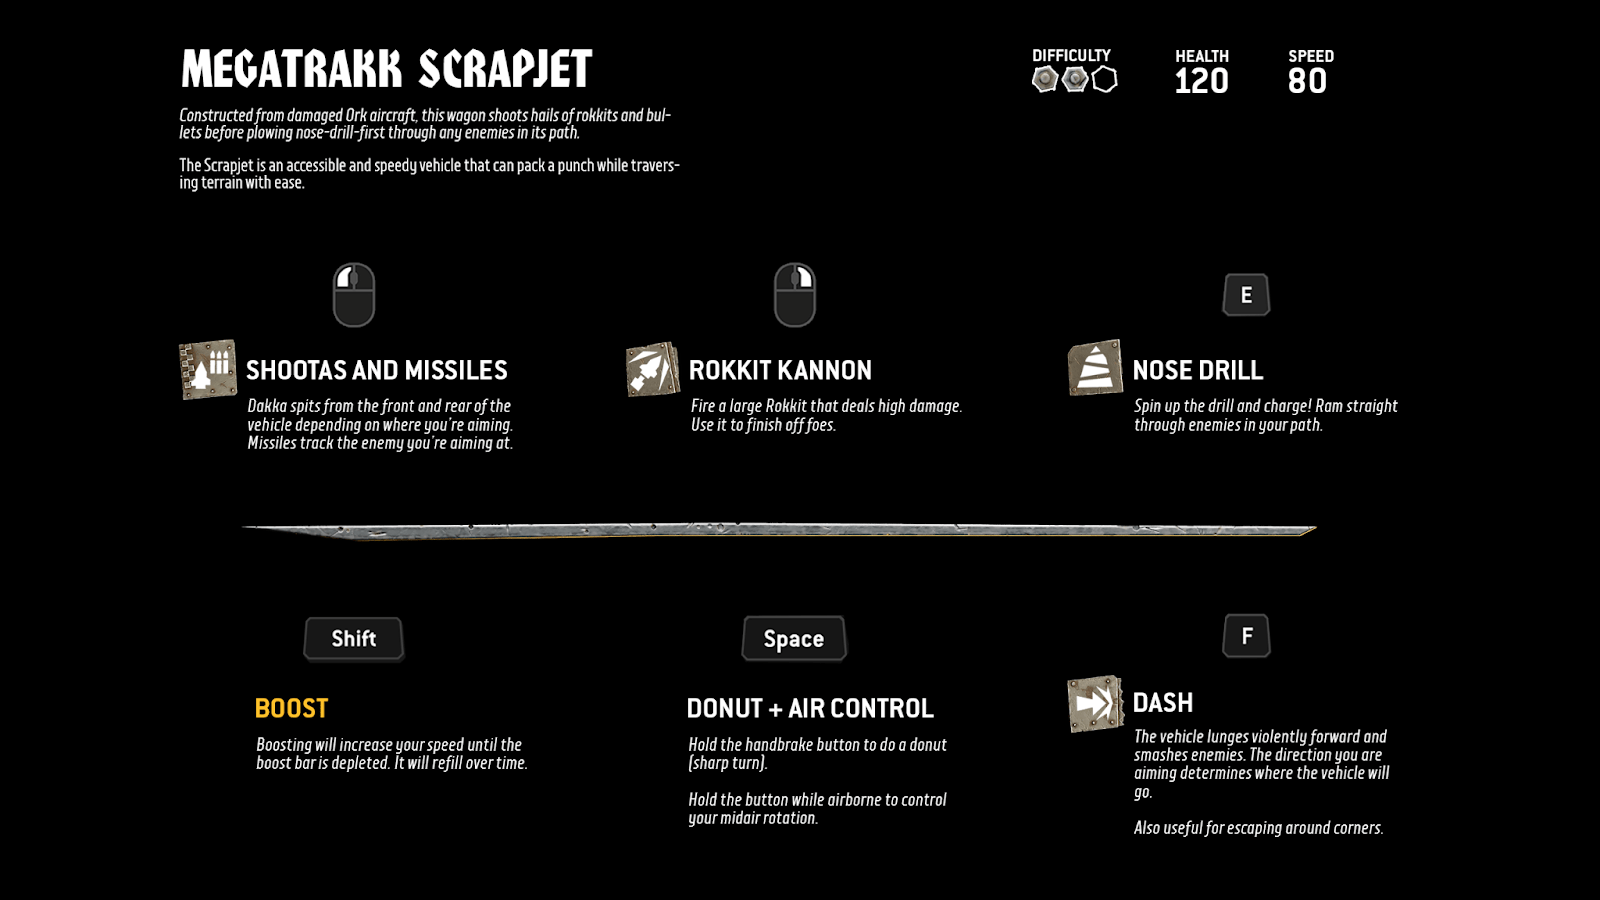
Lets start with the primary weapon. It’s got a machine gun on the front with a narrow arc. The front 20 degrees or so, It does decent damage and has a range equal to the snazzwagons main gun. It is best used when chasing an enemy or in close quarters. There is no need to be focusing on getting the machine gun on target all the time. And we’ll come to why soon enough.
The rear gun is a tail gun with a much wider arc and similar damage and range to your front weapon. Rarely do you want to be using it as the primary damage source. More often it’ll be using it to deter those who are chasing or to finish a foe off after they’ve gotten behind the MTSJ or it’s have spun out.
The missiles: This is the MTSJ’s main weapon Auto lock, homing missiles. These will chase people across the map and from the grave. They do significant damage, chase people round corners and are the bane of snazz and shock jump dragsta’s everywhere. Keeping that lock through smoke and warp jump. They only fire when an enemy is within your front 90 degrees, and are within range of your machine gun, if not a little closer. The machine gun does not need to hit to trigger the rockets, only be roughly aiming at the foe. They will fire if you are targeting a foe even if they are using smoke, or in warp, and will home in.
Overall the MTSJ is most dangerous from the front, and has some firepower from the rear, but has nothing from the sides. The MTSJ never want to be the top of a T with an enemy involved. Keeping your foes in front of you is a key skill.
Abilities
Lets move on to the abilities. You’ve got two of them.
Rokkit kannon (RMB)
Rokkit kannon or ‘big missile’ as it often gets called. High damage (about the same as a Looted Wagons cannon shot) and a lot of recoil. Enough to flip the MTSJ 180 if its at a standstill. This is your close combat option. Flying straight out the front of the MTSJ it is hard to aim at a distance. Having good splash it can be used as a ‘hail mary’ attempt to kill an escaping foe, or as a finishing blow.
When face to face with a foe combining the F-boost and the big missile can send both parties flying in opposite directions with the foe coming out of the engagement worse off.
Other uses for the Big missile is to reorient yourself in a pinch. When in the air, combined with using the space to aim at an enemy below you it is possible to deliver an alpha strike before landing to continue the fight. When aimed straight down during a jump it can be used to increase your jump distance by a small margin.
It is worth noting that the missile does have travel time so using it at a distance requires some lead though not a lot.
The drill (E)
This one is a little complicated. Boosting your speed upon using it, reducing your ability to turn, giving you some minimum speed, and does a small amount of damage upon ramming an enemy. On top of all of this it knocks enemies (and allies) aside when you ram in to them. When you use it in the air it extends your airtime. All this is fantastic, however when it runs out, you slow down significantly, with an exception which we’ll get to soon.
It is best used in combination with the dash (F) to maximize jump distance, escape a fight, or engage a foe. The duration is fixed and can be canceled by using the handbrake.
When wanting to maximise a jump, using the the drill to maximise your speed, combined with shift to maintain that speed, then pressing F right before you leave the jump will give you the maximum distance for the jump.
When wanting to extend a jump, reverse the order above, dash (F), with shift pressed followed by the drill as you leave the edge of the platform. You will go a shorter distance, but will spend more time in the air. Falling straight down once the drill runs out. This can be used to perform jumps of a precise distance, or to give you enough airtime to aim the Rokkit cannon.
When using it as part of a speed boost, The same combination as maximizing a jump is best used the drill to increase speed, followed by Dash (F) to maximize that speed, shift being pressed between the drill and Dash (F) and at the end of the Dash (F) to maintain that speed.
If you plan to use it for damage, be aware that it is not a damage on impact but rather a damage over time effect based on ticks when the drill is in contact with an enemy. To put this simply, the longer your drill is in contact with someone, the more damage you deal. Because of the knock away effect this is best used against big vehicles like the GMT or the Looted Wagon.
Boost (Shift)
A simple button, Press to go fast right? Wrong. This is the MTSJ. we’re always going fast, the question is how fast. In the MTSJ your speed is determined more by the use of the Dash (F) and the Drill. The boost is your tool for maintaining that speed. The only time you should be using the Shift boost without using the Drill or Dash is when you’re delivering the bomb and have no other option, or are going downhill and are using it to maintain/pick up speed.
When you are airborn you maintain your speed so you never need to press Shift in the air, this is your time to regenerate boost. Pressing shift just before you land a jump lets you keep most of the speed from the jump, combined with Dash lets you maximise your landing speed.
When just starting with the MTSJ you’re going to feel like you’re pressing shift a lot (if not holding it down) and rarely have any boost left. It’s important to remember you don’t need to hold it during airtime, during the drill or often during a fight. It’s best used when charging in to, or out of a fight. Or when hunting a target or racing to a objective.
Dash (F)
An omnidirectional boost that can be used for a plethora of tricks or tactics, Honestly deserving of its own guide. I will run through the basics here. Dashing follows the direction you are aiming. This means it can be used to accelerate, decelerate, or even get around obstacles. The most basic tactics involve combining it with your boost to gain a massive speed increase. Firing it behind you right after using the handbrake to turn to recover speed in another direction. Or using it to shoot round corners but maintain your main direction letting you slip through gaps or gates with ease.
Several other options and tactics for jumping were covered in the Drill section
Handbrake (Space)
This is your ultimate ‘turn fast’ tool. Tap space and a direction at the same time to swing rapidly in a given direction, hold forward at the same to perform a sharp turn in the chosen direction. Hold for a little longer to spin in a 180 degree ark. This needs to be done with care as it is very easy to spin out and turn yourself in to a spinning top and also an easy target. The faster you are going, the sharper your turn, so at your top speeds even the lightest tap makes it possible for you to spin out. The solution to this is tap the space bar once before initiating the ‘drift turn’ to reduce your speed.
Atop this it can be used to gain air control, letting you redirect yourself to fire your weapons while in mid air to deliver pain and krumpins on those below you.
Strengths
Now we have an overview there’s already a general plan forming. The MTSJ is a high speed, high damage vehicle that performs best at medium ranges. The various boost options allow to reach speeds that will out-perform even the shockjump dragsta (the supposed ‘fastest’ vehicle) as well as spend more time in the air than the KBB if played well. The powerful front firing weapons make it an excellent chaser and hunter vehicle. And the speed lets it escape from all but the most determined foes.
While primarily a mid range vehicle, the combination of drill and rokkit kannon does mean you have some lethal burst in close quarters.
Overall the strengths of the MTSJ are chasing down foes, dealing constant, consistent damage at midrange and its high speed potential. The places that the MTSJ sees the best use is on the fringes of combat, hurling missiles at any foe that is either at low health, trying to escape the fight, or trying to engage in it.
In Deff Rally you’re going to feel at your best in the races between the points where the high speed can shine and the lock on missiles reduce the need to aim. When the fight its on the point you want to be zipping around the edges spraying missiles in to the fight and then moving on before the enemy gets a chance to pin you down.
In Kill Konvoy you want to always be chasing the bomb. Either to pick it up and deliver it, or to krump whoever on the enemy team has it. Or to krump the git that’s chasing your bomb carrier. You’ve got the speed and firepower to make a lethal package in the high speed death races that bomb deliveries become. Never get tied up in a protracted fight, You lack the arks and the utility that the other vehicles have.
Weaknesses
With such narrow strengths the weaknesses are equally narrow. This doesn’t mean they are negligible however.
it’s not built for scrapping and brawling in the thick of it. Limited arcs mean that in the typical circle duels that develop you will be unable to hit your targets. The low profile and light weight of the vehicle mean it is very easy to be ‘popped up’ by any of the knockback abilities. And if you are not ready for it, getting tossed in to the air can be a death sentence.
It’s limited arks mean that the MTSJ is susceptible to getting flanked. The only way to avoid this is to master the handbrake turn to put enemies in your arc but often by that time the health deficit means you will lose the fight.
While being chased in the MTSJ isn’t ideal you do have the tailgun to discourage that. And again, the flip-turn will let you make enemies regret chasing you.
While the midrange and chases are where you thrive, you’re still going to be at risk when fighting the other vehicles with midrange weapons such as the KBB and the SJD.
Matchups
With a wide array of foes and each having their own strengths and weaknesses. Knowing when you’re at an advantage and how to deal with enemies is half the battle.
Most vehicles can deal with the MTSJ by getting in to its blind sides and ambushing it. But its your job to be the one doing the ambushes.
Looted Wagon
A heavy duty sniper that will happily tear you apart with its cannon and machine guns at a distance. You are faster, more agile and more than capable of outracing this lumbering behemoth. Get behind them and all you have to worry about is the cannon. The biggest threat to you is actually the grot bomb that they can fly. It is faster than your base speed, and even your ‘average’ speed. Meaning that if one is chasing you need to keep your dash loaded and ready to jump out the way of the incoming happy little suicide bomber.
Don’t be afraid to use cover and unusual approaches to get the drop on this boxy problem. In most close arenas like Deff rally you will be at a range where your missiles can get lock, allowing you to return fire with a volly of missiles while you seek cover. Dealing damage, forcing the use of their repair and letting you get out of line of sight and set up for an alternate approach.
When approaching from behind, opening with the big missile (RMB) deals a large chunk of damage and gives you a significant advantage.
At distance, fire missiles, get in to cover and find another approach. Up close, get behind them and make them chase you with the turret.
GMT
One of your harder matchups. The rockets and cannon make harassing this behemoth at range an absolute breeze, in close quarters however you will find that your health, and sanity, vanish shockingly fast.
You do not have the DPS or burst to remove the GMT from the fight instantly, rather the best use of your kit is to harass them at range, Or if they have positioned themself in a spot that is difficult for your team, rushing up on them with the rokkit kannon and the drill will let you disrupt them for your team, though this may cost you a krumpin. Your Drill is also an effective tool for disengaging from this lumbering monster.
You are best at either fighting one after it has been weakened, or with an ally. If you meet one in a tight space, disengage as fast as possible.
Deffkilla Wartrike
This matchup is best described as a pair of glass cannons taking pot shots at each other. If they get the claw off first, then you are going to be at a disadvantage, but not at a total loss. You are faster than they are when they havn’t harpooned you, and they have worse weapon arks than you do. Keep your distance and fill them full of missiles. If they get close and try to claw you, don’t be afraid to use the handbrake turn to point the big missile at them and blow them in to the next century. They are very squishy.
Kustom Boosta Blasta
These guys are free krumps. They are also a mid to long range combatant, but unlike your homing rockets they have to track a target, which against a fast, small, target like the MTSJ is a lot harder than it should be. Their normal escape method of jumping in to the air simply makes it easier for you to track them with missiles.
That isn’t to say they are not dangerous, getitng too close can open you to the frag grenade which will pop you in to the air, or disrupt your movement. With the MTSJ the loss of speed is death. That and if they can track you with their main weapon it can and will put the hurt on you.
The worst thing they can do is get on one of your sides out of ark and chunk away your health with their main gun, If this happens seek cover, you will not win a DPS race if they have that much of an advantage.
If you need to get them out your way the rokkit cannon or the drill are fantastic ways to make them move at high speed.
Boomdakka Snazzwagon
In the same bracket as the Blasta, though with their own unique threat. So long as you stay out of their main weapons arc you will have no trouble sending these guys to the skrap pile. The Snazz is a dangerous threat at close range, and when you are in is front ark, which is the front 120 degrees or so. That machine gun will chew you apart in no time at all. Your best method of engaging with these guys is to get behind or beside them and keep the pressure on.
You absolutely love it when they pop smoke. No one else can see, but you don’t need to, just keep traversing your guns untill missiles start doing their work. Put pressure on, let them pop smoke and think they’re safe and watch as the missiles make them regret thinking they’re safe.
When they run from you, they’re offering you free skrap, they can’t shoot behind them and you are faster than them, fill them full of dakka.
The only thing to be aware of is the flame bottle that will not only stop your regen but do a total of 20 damage over time which is enough to put you at risk if you come out a fight with low health.
Rukkatrukk squigbuggy
More of a threat to you than most people give them credit for. Full 360 fire ark, high burst and disruption all combined in to one mean package. The real problem though is squig buggies rarely travel alone. Take them out fast, and take them out first. They can outheal your damage if they’re paying attention and the mines can kill your momentum faster than you can call a grot green.
There isn’t much to say here beyond that.
Shokkjump Dragsta
These gits can be a pain, combining the long range of the Looted Wagon with the speed of a light vehicle, with their own homing rocket attack these are going to be your most common bane. Fast enough to keep up with you, and with a long range weapon they need special care when engaging.
Your best bet is to get on to the right hand side of the Dragsta, they cannot fire their main weapon on that arc, allowing you to tear them apart
On Deff Rally they will be your main competition on the race to the next point (other than mirror matches). Letting them pull slightly ahead will allow you to fill them full of missiles, krumpin them before they manage to get there. On the point they will either be in the fight, which renders them not a threat to you, sharking around the edges. Or they will be sharking around the edges of the point as well, turning in to a lethal game of cat and mouse. Be ready to ram them with the dash and willing to pop the rokkit cannon agressively.
On Kill Konvoy they are your main threat when delivering and racing for bombs. Able to hit you at a distance and keep up with you with their warpjump. When they have the bomb however, they cannot use the warp jump, letting you outrace them and krump them before they can deliver the bomb.
Megatrakk Skrapjet
The mirror Match is pretty simple. It turns in to something akin to a jousting match, both skrapjets racing at each other, trying to get the most missiles off, followed by a sharp turn and trying to keep the enemy in arc while being out of arc for the enemy’s main weapon. The real decider is whicever player lands the rokkit cannon first. Due to the homing missiles, unless there is a lot of terrain to hide behind then running away isn’t an option. If it’s possible drag the duel back to your teammate to gang up on them.
Strategy
Your general strategy for the MTSJ will depend on the gamemode. But in general you want to be on the move, always, and constantly hunting for people to catch out of position, weak or otherwise in a vulnerable situation to get a volley of missiles at. If you can have a buddy to do this with, even better. Chase down bomb runners, race for the new capture point and generally be the fastest git on the map.
On Kill Konvoy you are a bomb runner and hunter. Your high speed, homing missiles and ability to out-run almost anyone makes you more than suited to hunting down the enemy bomb carrier as well as getting to the new bombs first. Remember however the MTSJ is not only fragile but have limited arcs. This means that it needs to be careful of groups of enemies with the bomb carrier, as well as avoid grabbing the bomb when several enemies are there. You can grab the bomb and if you feel like you won’t make it to your allies in time, it’s more than feasible just to run like the wind as far from your stompa as you can, making it more effort for the enemy to run the bomb back.
Save your boost and rely on the drill and F to get you places unless you need to get there now. Maximize airtime by using the dash off small ridges and features of terrain.
Dash can be used to not only change direction but to make sharper turns and ‘dodge’ around obstacles, making it easy to lose pursuers in tighter confined areas. Making it much harder for people to chase you when you have the bomb.
The big missile is an amazing tool for krumpin bomb carriers that you get close to.
In Deff rally you want to be the first to a point, always. The MTSJ likes being on the edge of the fight as has been mentioned. This not only keeps you out of the line of fire of higher DPS vehicles but also gives you the chance to be the first to bolt towards a new point. Get to the new point, handbrake turn and use your longer range to pick away at approaching foes.
Always keep an eye on the surroundings to watch out for snipers, sneaky players and potential targets. Remember your front is the most dangerous part.
Distance is your friend, long corridors and open areas let you fill the sky with missiles before the enemy gets a chance to notice you or land damage. When you’re chasing someone there’s no reason to stop firing, any missiles that get launched are potential damage. And getting the machine gun on them is bonus damage.
If a teammate is in a fight, consider throwing a few missiles at his target, not only will it make his life easier, but you’ll get assists/krumps this way.
If you see someone at low health, spraying in their direction with the hope of sending a missile towards them is always a good idea, it’ll prevent or stop natural regen.
If you catch someone unawares, it’s best to start shooting early, You are faster than them, and in most cases have a longer range, meaning that as long as you can track your target you will likely out damage them.
If an enemy decides to flee, and you are not in a dangerous situation, there’s nothing preventing you from chasing them down. But do not get drawn in to long goose chases, they can easily drag you in to a pack of their allies which will spell your doom. Letting them run away and focusing on someone else is often enough to tip the scales in your teams favor.
The handbrake is your friend when you need a sharp turn, but so is your speed. Learn to balance turning and dash-boosting to maximize your agility.


Be the first to comment