
Contents
- How to Fix Common Issues
- The Same 1-5 Files Keep Refusing to Verify!
- I’m Only Getting 0 Medals!
- Connectivity Issues
- Crashing Issues
- Crashing at the Table
- Difficulty Issues
- Audio Issues
- AppID 10002018 Issue
- Repairing Windows with DISM/SFC
- How to Repair Steam’s Library
- Loadout Issues
- Possible Fix for Crashing or Unable to Launch on a PS5
- Samples Aren’t Showing
- Low FPS Sometime after the April Patch
- Fix to a Lot of the Issues
- SOS Beacons
- Missing Text / Letters
- Voice Chat Problems
- Colorblindness
- GameGuard 114 Error / GameGuard Errors
How to Fix Common Issues
A common fix for both connectivity, crashing, not loading issues is to clear out the directory:
%APPDATA%\Arrowhead\Helldivers2.The above should also probably be done periodically after trying other fixes, as other problems may cause problems in this folder until those other problems are fixed.
The next common fix is to install all pending updates for your machine. This includes Windows Update, Armory Crate, iCUE, Razer, SteelSeries, Logi(tech), and any other manufacturer software for the parts in your machine.
The Same 1-5 Files Keep Refusing to Verify!
When I verify game integrity, it always detect 5 files that need to be reacquired.
Verifying isn’t doing anything. Those five files are the self-updating anti-cheat. You have newer versions than what is on Steam. You download and overwrite the new versions with the old versions from Steam. Then you launch the game, and it updates those five files to the newer versions again. Whatever problem you’re having is separate from verifying files.
I’m Only Getting 0 Medals!
There’s a cap on all the currencies. Here are what most of the caps are, currently.

Connectivity Issues
Reboot your PC/router/modem. Try turning off/on crossplay.
If none of that helps, you can try reseting/flushing your DNS cache with the instructions
Open a CMD terminal as an administrator. Type the following commands and press enter after each one:
netsh winsock reset
netsh int ip reset all
netsh winhttp reset proxy
ipconfig /flushdns
Then reboot.
If that doesn’t help, you can try changing your DNS server settings to use publicly available ones from Google or Cloudflare.

Additionally, try clearing out a particular folder. It contains a file that has a weird 20 byte hex value seemingly called hostability. We’re not sure why it exists, but it seems to impact network connectivity.
Also UPDATE your NETWORK ADAPTER drivers. From the designer. If it comes from Intel, get the drivers from Intel, for example. If it’s RealTek, get it from RealTek. Do not try and ask Windows to do it for you, it will likely not get you updated drivers. Google the name of your network adapter, and the word ‘driver’.
If you’re struggling still, try using a different connection (maybe a hotspot or USB tethering via smartphone?). If things suddenly start working, the issue is your network or ISP. If things don’t, you’re either unlucky (and both ISPs are not working in some fashion) or the problem is local to your PC.
Crashing Issues
This is the most common fix for several issues, as it fixes data corrupted in user settings. If you are facing issues, please delete the Helldivers2 Folder from the AppData. In order to do that, follow the steps:
- Press Windows + R
- Type %appdata%
- Find and open the “Arrowhead” Folder.
- Select the “Helldivers2” folder and delete.
These steps will delete all of your settings, meaning you will need to set up your game again, but no data will be lost.
- After that, clear the cache of your game settings (this also can correct bugs relating to language settings (EnglishUS seems to be the most stable), and you may even consider trying to delete your DirectX Shader Cache as well. (See image 2.)
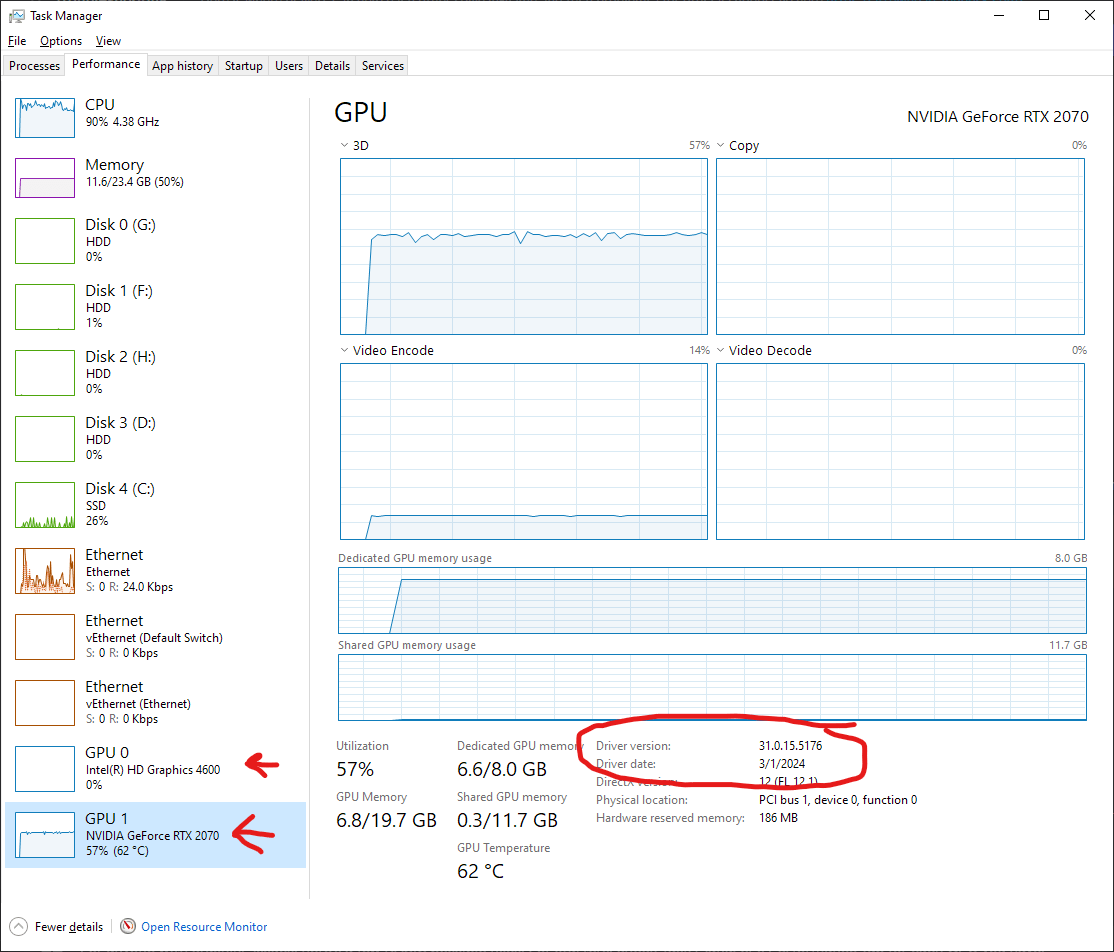
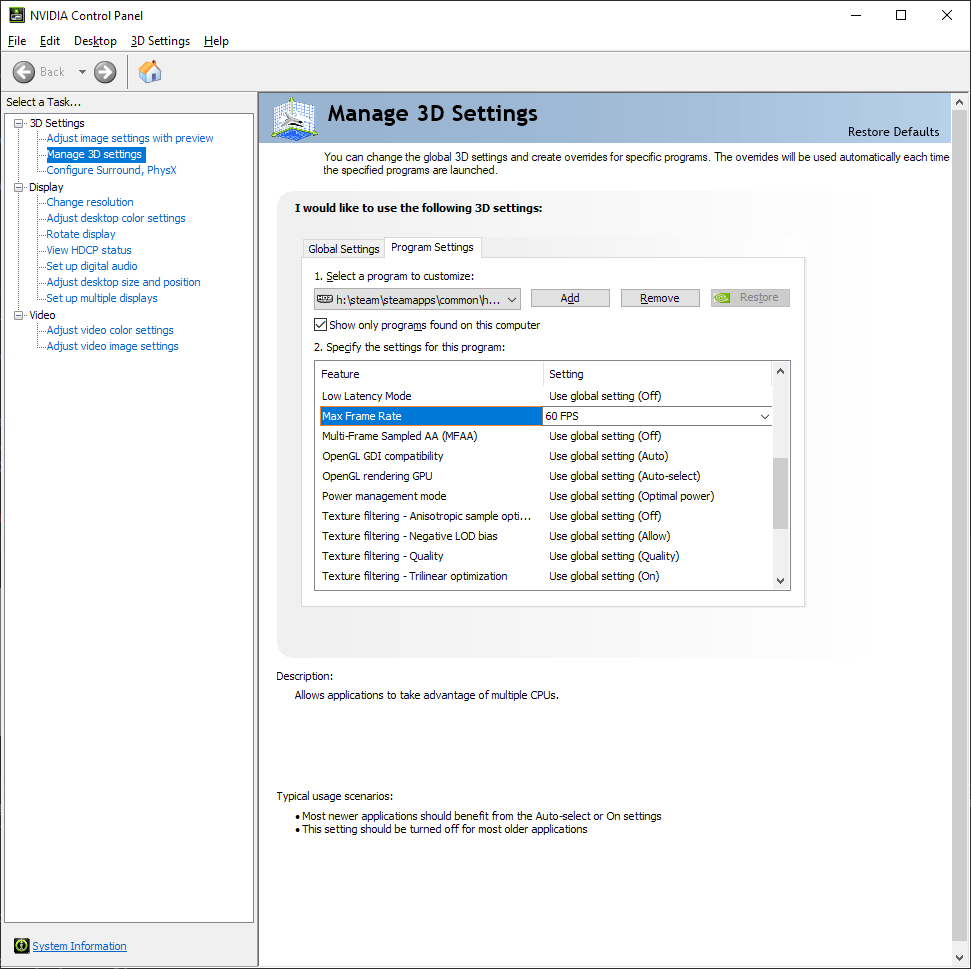
- If you’re still crashing, you may try limiting your FPS to 60 in the driver specifically for HD2 (see image 3, you may have to add Helldivers2 to the panel with the Add button). If this helps, it suggests your system might have some instabilities. See the Rule of Pi above.
- Additionally, some people have had success in reducing crashes by turning off Crossplay.
- Use English (US) as a language. We’ve had reports of Ukranian, Japanese, and German crashing the game.

Crashing at the Table
If tips for crashing don’t help (GPU driver updates and the like), try joining a friend on any mission.
Difficulty Issues
You have to finish a full operation. That’s a set of missions. If you’re on a difficulty that has operations with three missions, I don’t think you can just do three random missions: you have to do (and finish) the a single operation. Host it yourself, fresh, to be sure you’re there from the start.
Many people report it not being fixed, so I suspect they didn’t fix it correctly, especially since some people are reporting that they’ve been stuck trying to unlock difficulty X for ages, but if they join a game on difficulty X, they manage to unlock X+1 and can continue unlocking everything above it.
Audio Issues
Audio input/output:
Change the input device through the Windows game bar overlay
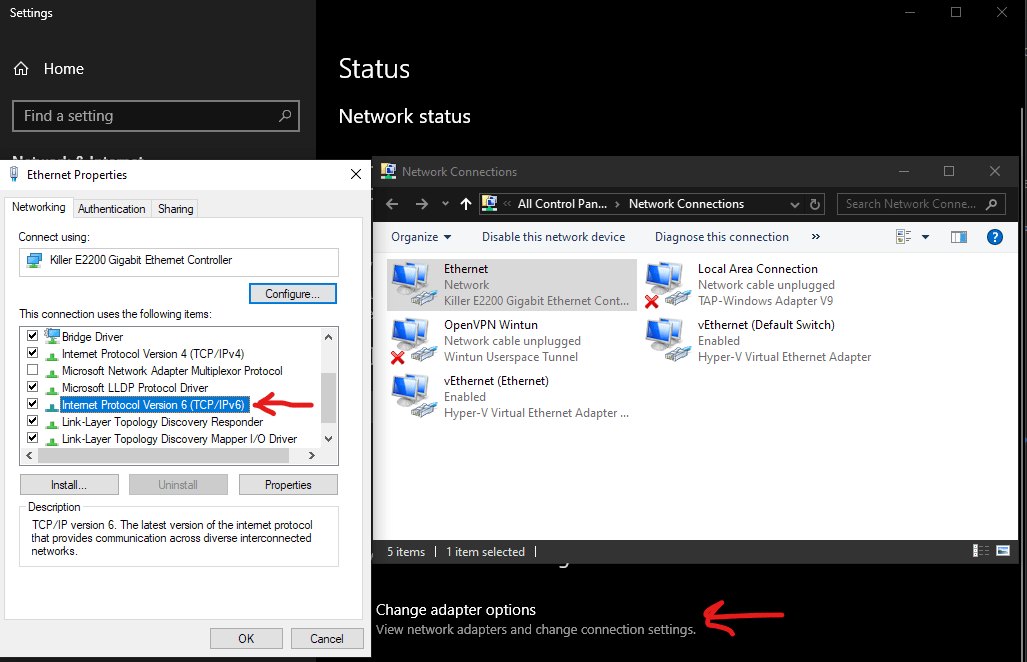
Possible On Main Menu fix:
If it says “On main menu” in the steam friends list then a solution is to turn off VPNs, proxies and virtual machines. Basically anything that will show up in control panel>Network and Internet>Network Connections. If you use starlink then you need a VPN that connects you to a server as close to your computer as possible, for some reason. Also open Windows\System32\drivers\etc\hosts using notepad. If you fins any IPs there (not the 2 example ones) then you need to shut down what is causing that.
Additionally, if you have any software that interfaces with your audio, such as something from Razer that tries to emulate 7.1 surround sound, make sure it’s up to date. And maybe consider shutting it down entirely to see if it works around the problem. Or reinstalling it. Razer is not the only company, so think of what company would be making software for your audio equipment.
AppID 10002018 Issue
If you are getting the 10002018 Steam AppID Error, try the following:
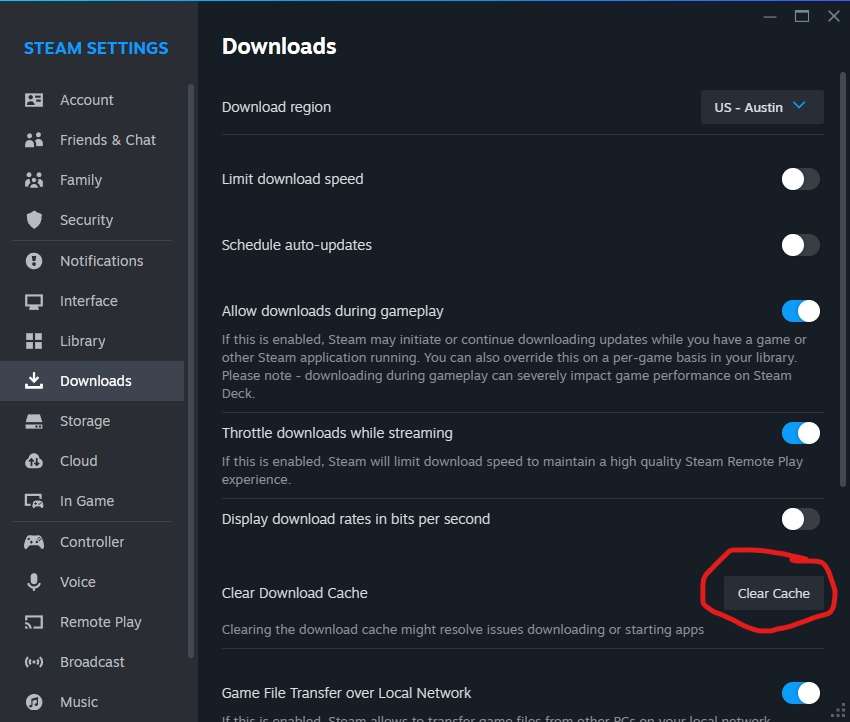
- Steam > Settings > Downloads > Clear Cache
(This has only worked for some people, unfortunately.)
Additionally, make sure you’re not blocking helldivers2.exe or gameguard.des with any extra (IMO, superfluous) security software, like Avast, AVG, Norton, McAfee, ESET, etc. This one seems to actually be the more common cause of this issue.
Some people have reported that a full reinstall of the game sorts out the issue.
In some rare cases, you may need to update all apps listed as installed in the Microsoft Store. The specific case was a “myHP” app of some kind, but there may be others.
Repairing Windows with DISM/SFC
To perform a basic DISM and SFC repair of Windows:
- Open a Command Prompt as an Adminstrator.
- DISM.exe /Online /Cleanup-image /Restorehealth
- sfc /scannow
- In that order.
If it says things were repaired, reboot and run the same sequence until it stops telling you things were repaired.
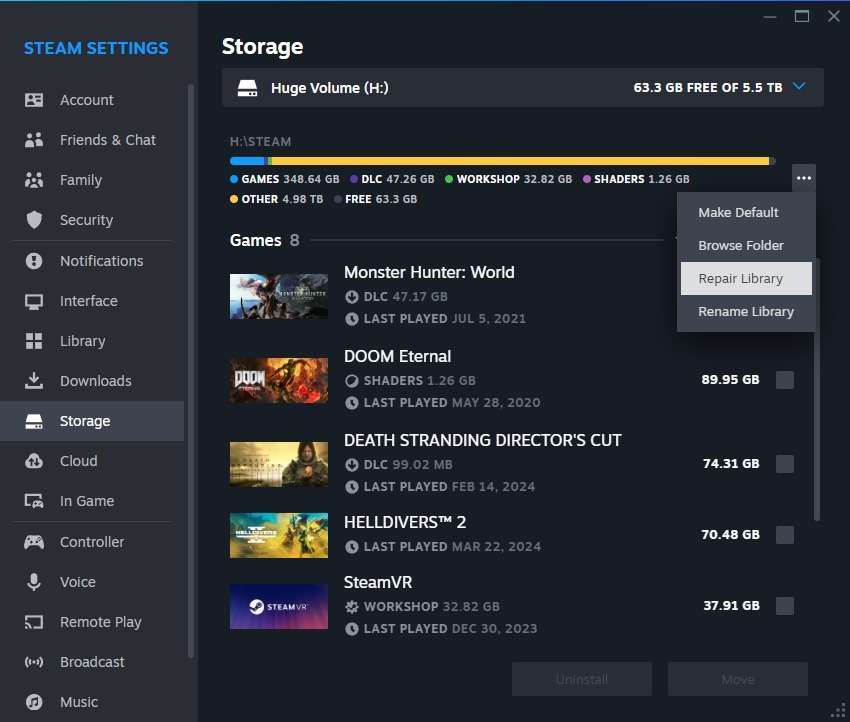
How to Repair Steam’s Library
How to repair Steam’s Library:
Loadout Issues
The data for loadout and voice is stored in a file called testament_new.sav in \Steam\userdata\<ID#>\553850\remote.
This file ALSO exists on the Steam Cloud. I know of a couple possible fixes:
- Clear your Steam Download Cache and repair its Library.
- Turn off the cloud for Helldivers 2, shut Steam down, delete that file, restart Steam and launch the game.
- Turn off the cloud for Helldivers 2, delete the file above and fully uninstall and reinstall HD2.
Note: This will clear your loadout, chosen voice, and reset all the tutorial messages you’ve seen.
If one of those fixes works, you can likely turn the cloud back on if you want to.
Possible Fix for Crashing or Unable to Launch on a PS5
This is what I did, I uninstalled the game and installed it back, then I launched the PS5 in safe mode and rebuild the database option, the constant crashing corrupts the game files.
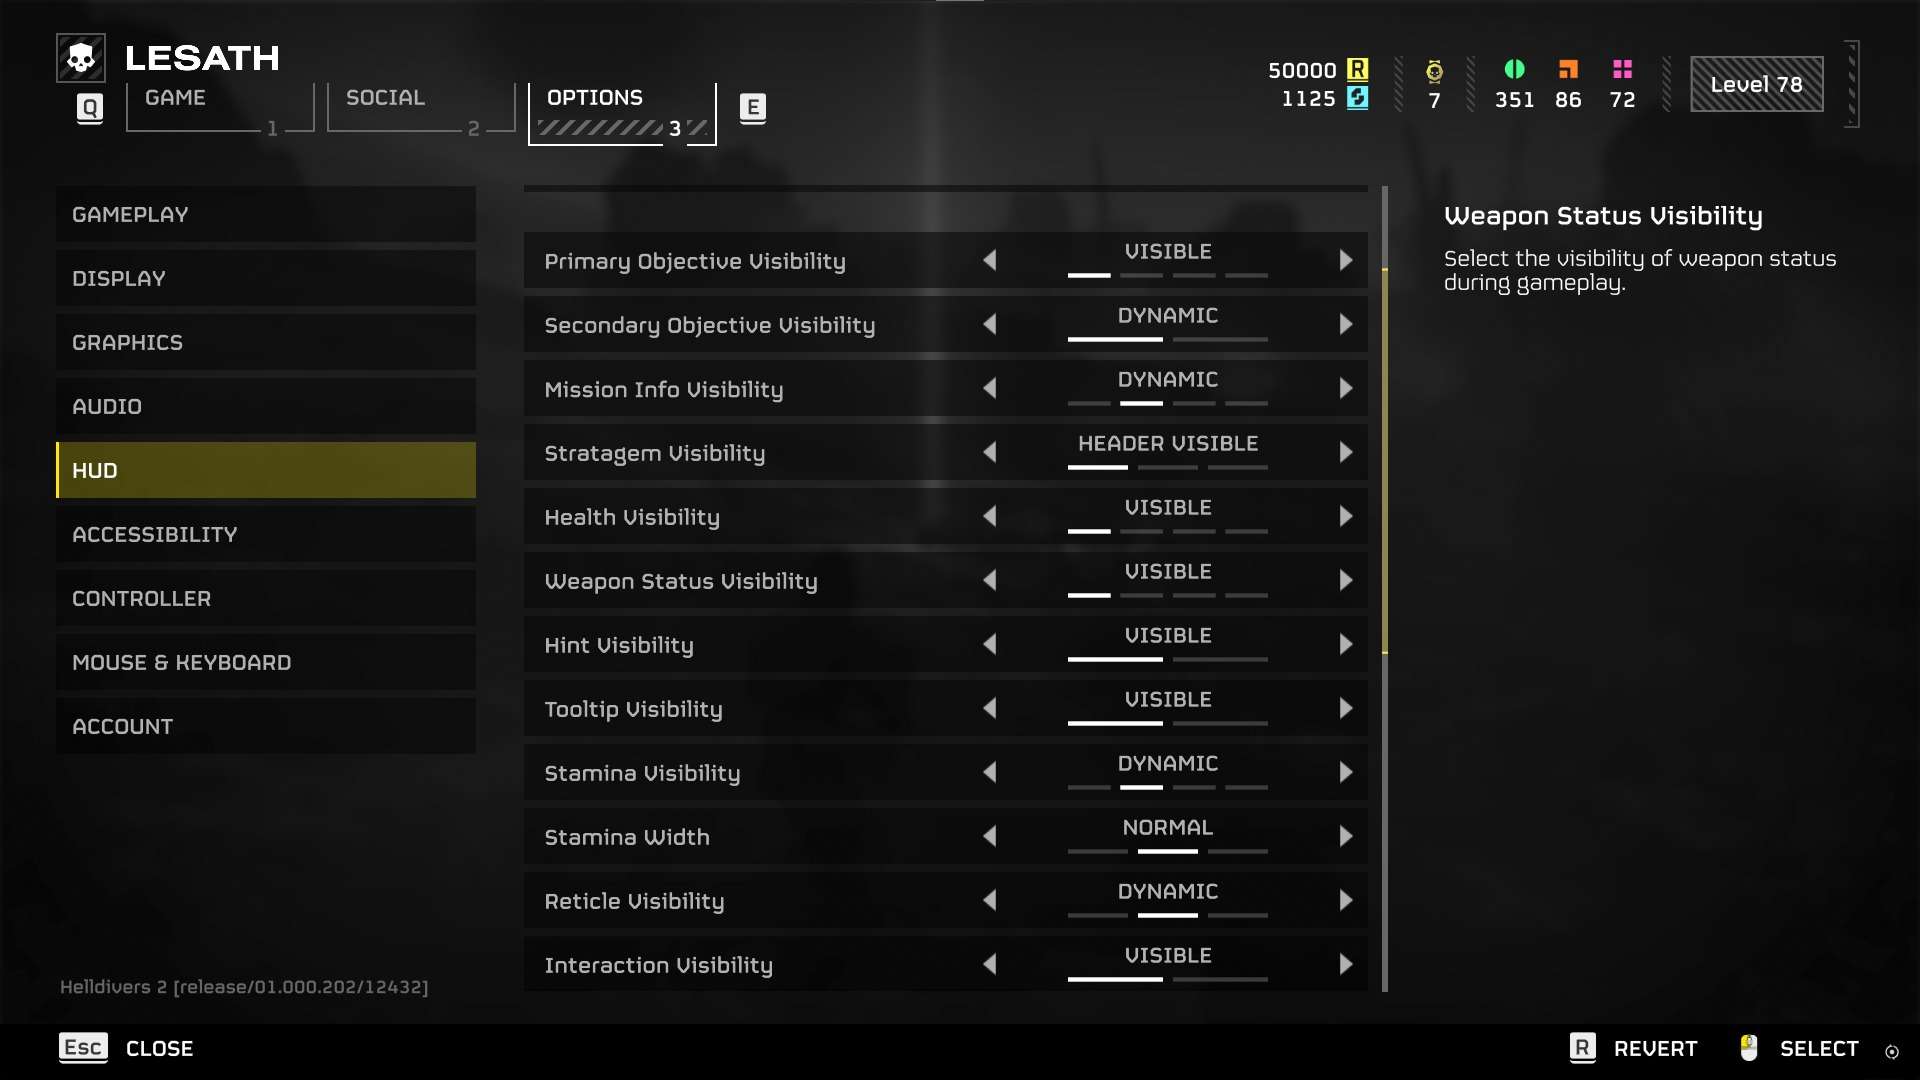
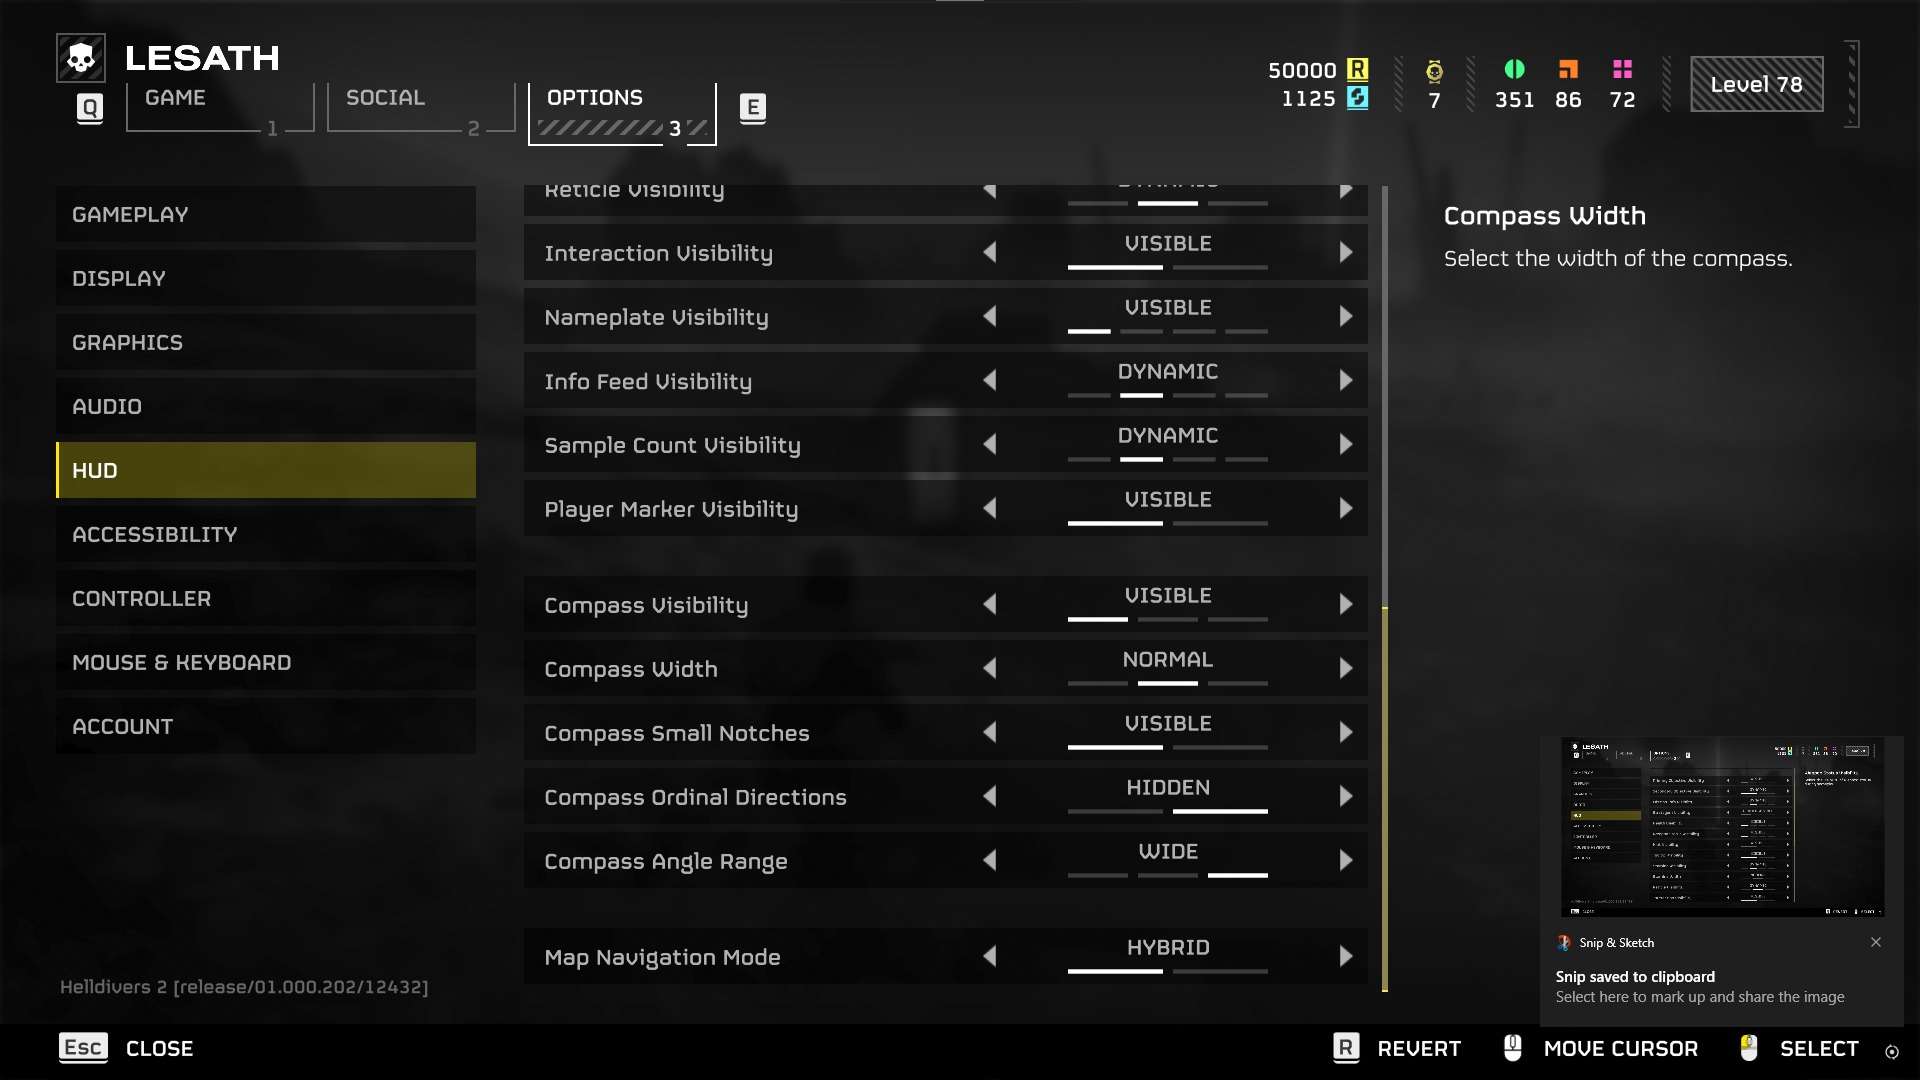
Samples Aren’t Showing
This is what I have my HUD set to, and everything works.
Low FPS Sometime after the April Patch
There are two potential workarounds to the current framerate issues related to Webroot:
- Don’t use Webroot. (People have reported that disabling it is insufficient, but feel free to try.)
- Try D3D11 rendering by putting –use-d3d11 in the Launch Options for Helldivers 2 in Steam.
Fix to a Lot of the Issues
Fixes a lot of the issues but not all of them. This should be the first thing you do.
All steps should be on a fresh PC restart.
- Win+R > %appdata%\Arrowhead\Helldivers2 and delete shader_cache folder.
- Win+R > C:\Program Files (x86)\Steam\steamapps\shadercache and delete 553850 folder.
- Then in Steam select Helldivers 2 > Game Properties > Installed Files > Browse > bin > Delete GameGuard folder.
- Steam select Helldivers 2 > Game Properties > Installed Files > Browse > Tools >
- Run: ggunstinst.exe
- Then run: GGSetup.exe
- Then Verify integrity of game files in Steam.
- If that doesn’t work, try to run the game in DX11. Steam > Properties > General > Put –use-d3d11 into Launch Options. If that doesn’t work revert it.
- If that doesn’t work, Win+R > %appdata%\Arrowhead Delete Helldivers2 (You lose your in-game settings [not progress] but it should delete any broken or corrupt settings.)
Make sure all your drivers are up to date. Including Windows, GPU, BIOS, chipset, and UEFI.
- Open HD2 > Options > Graphics > Use Async Compute. Restart HD2.
In Steam select Helldivers 2 > Game Properties > Installed Files > Browse > bin > Right Click helldivers2.exe > Properties > Compatibility > Click Run this program as an administrator then click Run this program in compatibility mode for then select Windows 8 on the list. Apply. Try the game.
For hard crash or 100% CPU/Overheating try underclocking your CPU to Eco Mode.
SOS Beacons
Computer
- Delete user_settings.config:
The config file can be found in the Helldivers2 folder in Appdata. To find it, go to:
- C:\Users\[your username]\AppData\Roaming\Arrowhead\Helldivers2
- Delete game.dll:
The DLL file will be placed in the game installation folder. If you don’t know where to find it, follow these steps:
- Open Steam > Library
- Search for Helldrivers 2 in your library
- Right-click on Helldivers 2 and select Properties > Installed Files
- Click Browse
- On the now open folder open data > game
The game.dll file will be in this folder
- Verify files on Steam:
- Open Steam > Library
- Search for Helldrivers 2 in your library
- Right-click on Helldivers 2 and select Properties > Installed Files
- Click Verify integrity of game files
- Follow the process.
Missing Text / Letters
Computer
Solution #1:
Verify files on Steam:
- Open Steam > Library
- Search for Helldrivers 2 in your library
- Right-click on Helldivers 2 and select Properties > Installed Files
- Click Verify integrity of game files
- Follow the process.
Solution #2:
Update your graphic drivers:
On Windows 11:
- Open the Windows Start menu and type “Device Manager.” Click Open;
- Click Display Adapters, then right-click your graphics card and select Update Driver.
On Windows 10:
- Click Start, type “Device Manager,” and click Open;
- Click Display Adapters and select your graphics card;
- Open the Driver tab, click Update Driver, and select Search automatically for updated driver software.
Or…
Select Browse My Computer for driver software to choose a driver that you’ve already found and downloaded. Then click Let me pick from a list of available drivers on my computer. Click Have Disk > Browse to navigate to the folder that contains the new driver. Click Next.
Solution #3:
Revert Drivers to 545.65 Version:
You can download NVIDIA drivers here: Nvidia.com
Note: Just a reminder; when reinstalling GPU drivers or reverting to the previous stable versions, please use DDU to completely remove the driver and files first, and then reinstall the driver after restarting your PC.
Solution #4:
Disable Steam Overlay. With the game close:
- Open Steam
- Go to Library
- Right-Click on Helldrivers 2 and select “Properties”
- Under “General” toggle OFF “Enable the Steam Overlay while in-game”
Solution #5:
If you have an iGPU such as AMD Radeon Graphic, the game will disregard that you set it to your dGPU. This in turn can cause flickering of Hud and/or Text going missing. Disabling the iGPU in Device Manager can potentially fix the issue.
Note: iGPU is integrated GPU and dGPU is dedicated GPU
Solution #6:
Some players have reported that playing the game in Windows mode with Scaling set to Native has corrected their missing text and textures.
While in-game:
- Open Settings menu
- Go to Options > Display
- Set “display Mode” to “Window”
- Set “Render Scale” to “Native”
Computer and PlayStation
Solution #1:
Reset your in-game HUD. While in-game:
- Open Settings;
- Go to Options > HUD
- Press the key to Revert.
Warning: Resetting Sample visibility will also reset keybinds.
Solution #2:
If you can’t see the Samples Hud. While in-game:
- Open Settings menu
- Go to Options > HUD
- Set “Mission Info Visibility” to “Dynamic”
- Set “Sample Count Visibility” to “Dynamic”
Solution #4:
Disable SSGI. While in-game:
- Open Settings Menu
- Go to Options > Graphics
- Set “Screen-Space Global Illumination” OFF
Voice Chat Problems
Computer
Solution #1:
If your input/microphone device not working in the game:
- Close the game;
- Go to Control Panel > Hardware and Sound > Manage Audio Devices > Recording;
- Find your microphone;
- Select it and press Set Default.
Your selected microphone should now show with a green check mark. Make sure to only have one selected as default.
Solution #2:
If Helldivers 2 still does not recognize your microphone after Solution 1:
- Close the game;
- Go to Control Panel > Hardware and Sound > Manage Audio Devices >
Recording:
- Find your microphone;
- Right-click on your microphone;
- Within the pop-up window select ‘Set as default communication device’.
Solution #3:
If Helldivers 2 still does not recognize your microphone after Solution 1 and 2:
- Close the game;
- Press the ‘Windows key’ + ‘G’. This will bring up, Windows Game Bar.
- On the left-hand-side of the screen, there should be a window labeled as ‘Audio’
- Select ‘Voice’;
- Change the ‘Windows default input’ to your microphone
Then change ‘Default communications input’ to your microphone.
Colorblindness
Computer
- Go to Settings > Accessibility;
- Select Color Filters;
- Turn the color filters switch ON;
- Select a color filter from the list.
Try each filter to see which one suits you best.
PS5
- Go to Settings > Accessibility > Display and Sound;
- Choose Color Correction;
- Turn ON Enable Color Filter and choose a Color Filter;
- Tweak the slider to change the color intensity.
GameGuard 114 Error / GameGuard Errors
Solution #1:
- Close other software. Antivirus, firewalls (at least to try launching the game), fan cooling software, RGB lightsync, overlays, and more, anything you can think of. Sometimes updating works, but the best move is to close or fully uninstall. Examples include:
- Vortex mod manager
- Corsair iCue
- Advanced System Care
- MSI Afterburner
- Armory Crate
- Kerish PC Doctor
- Aurora
- ASUS Aura Sync
- Asus GPU Tweak
Solution #2:
- Old or defective drives (HDD and SSD) are known to be one of the causes, give your drives a scan and unplug any faulty drives. This includes internal and external storage devices and could also be the cause for the Running Install Script error.
Solution #3:
- Uninstall GameGuard:
- Locate the GameGuard Folder: Go to the Helldivers 2 folder on your PC. Click on the “bin” folder within it.
- Delete the existing folder named “GameGuard” within the bin folder.
- Relaunch the game, it will reinstall GameGuard.
Solution #4:
- Run Helldivers 2 as an Administrator:
- Locate the exe for Helldivers 2.
- Go to Properties and run as Administrator.
Solution #5:
- Whitelist the GameGuard folder.
- Open your PC’s antivirus software.
- Navigate through its file explorer to go back to the GameGuard folder.
- Add this folder specifically to your antivirus whitelist.
Other Solutions:
- Using a VPN to change your location then launching the game. You should then be able to remove the VPN after first launch.
- Open your task manager and see if there is GameGuard and nProtect running (check background processes as well); close them, then launch the game.
- Disconnecting WiFi/Ethernet, pairing to a hotspot, launching game. Then closing game and reconnecting to normal WiFi/Ethernet.
- Install the game in another disk or partition, with Windows or without it to cover your bases.


Be the first to comment