
Contents
1.0 Level / Farm Build Guide
By Ambrodel.
New and improved Level/Farm build, for all classes in 1.0!
This build is useful from level 75 and all the way up to clearing Faction T4. You can use this to farm things lightning fast once you have all the items shown, but even prior to that, you can kill stuff easily. No tank needed! As with any endgame build like this, you may need to adjust certain things along the way, until you no longer die easily!
Click to enlarge…


The focus for this build is on clearing fast, not on having 800 different interactions and minmax everything to perfection. The gear in the buildcards comes from all levels of content, including Raids and Endless mode, and are the items you should be using in the end. I made a list of alternatives that you can (and should) use until you get the proper stuff, scroll down to find it. When fully geared as shown, the clear speed for 50 rounds of Elemental Domain T4 will be less than 20 seconds. Considering that these enemies have a lot of Elemental Resistance as well as the barrier on top of their HP, this is pretty damn fast. For comparison, the other factions all take 11-14 seconds, so regardless of which you pick, it’s gonna be fast!
Pre-150 you can use the Item Comparator just fine. At 150 your focus should be on replacing all non-150 gear as soon as possible and start chasing the specific items from the screenshots or the list, depending on your progress.
Do not skip content. Going through the different things too fast will set you back quite a bit, as you cannot reliably do the harder content without preparing for it in advance. You will need to do the unlock requirements for each Augment slot anyway, so there’s really no reason to skip the higher tiers of Bounty, Agony and Factions. Make sure you get the required items from each stage before moving on.
When you reach Ancient Bastion, you will most likely need to respec a bit to survive. I suggest preparing a tank you can use for this when the time comes, but once you are fully geared, even that bugger goes down without a tank. You need to finish Ancient Bastion to unlock Endless mode!
Character Tactics aren’t important. Random and Strongest on everything is equally good. I use Strongest, just because I can.
Until you can get the shown Divine augments, use whatever you feel is good among the ones you have available.
Red/Yellow/Blue Unique gems should have Damage, Arcane/Lightning/Physical Damage, Attack Speed and Health Points. Transmute them as needed. White Unique gem should additionally have Evasion and Arcane/Lightning/Physical Resistance for a tiny bit extra survivability and damage.
Meteorites are Arcane/Lightning/Physical Damage and Attack Speed.
Heart of The Abyss should come with Thrash and preferrably Butcher, but as long as it has Thrash, the other one is of little importance.
Until you can get the Mastery Focus from either Ancient Bastion or through the Unique gloves Magic Finder, dropped in a raid, another Meteorite will do just fine in that slot. Use the Magic Finders on any character when you get them. They are meant for fast farming and that’s what this team does best! I prefer the warrior, just because.
Enchant Thrash on weapons for more damage. Like, a lot more. There’s a noticable difference with and without! Use Circumvent on rings until you get near endgame and can kill the Molten Behemoth in Ancient Bastion. Defiance on chest helps you survive the occasional big hit before you can kill stuff fast enough. And Covet helps you get the goodies faster! Do not skip enchants on your gear!!!
Choose and upgrade your attributes on gear, do not expect to just stroll through the game with random crappy rolls!
Also remember to Imbue/Infuse your gear where needed (shoulders, chest etc.) to get different attribute distributions.
Make sure you Paragon, Reinforce and Bless the items that will last you a while, even if it’s not the final item. It still helps and you will need to upgrade your gear as you progress! And of course, when you get those final items, spend every resource you have on making them the best possible! It will pay off so fast!
Nemesis priority should be:
- Attack Speed
- Crit Chance
- Crit Damage
- Magic/Melee/Ranged Damage
- Arcane/Lightning/Physical Damage
Get Attack Speed as your guaranteed roll and one of the others as #2 and it won’t be important if the third one is on defensives. If you feel like minmaxing, Speed and both Crits! This list is also your priority for attributes until you can imbue/infuse the gear as they should be.
Mage Weapons
Guide to the Abyss (Spell Tome, Mainhand) and The Contract (Ward, Offhand).
You want to be using this combo for the speed it provides over using a staff. When you reach Agony, replace The Contract with either Eldritch Artifact or Arcane Core. Don’t upgrade any of these to max, not worth it. But do give them some!
Ranger Weapons
Sundown (Pistol). Max these as soon as possible, they will only get replaced in raids, so worth the material cost!
Warrior / Paladin Weapons
Runic Axe or Obsidian (Sword). I prefer Obsidian. Brute’s Pummeler (Fist) if you get that divine while farming stuff anyway. Will last until raids, so some upgrades will be good.
Helm
Berserker Helm. Upgrade, will get replaced in Agony 7 at the earliest.
Shoulders
Imbued Pauldrons should be easy enough to get, so no alternatives. Max them!
Chest
Pathfinders Tunic from Bounties will last until Endless is unlocked, so upgrade it.
Bracers
The default Satin/Dragonscale/Iridium are good enough. Replaced in Agony, so some upgrades.
Gloves
- Missions/Bounties: Traveller’s Gloves
- Agony: Nature’s Gauntlets
- Faction: Slayer’s Gauntlets
If you find Emperor’s Strength, use those, ignore the others. They will get replaced in raids, so you decide on upgrades. The sooner you get them, the longer you benefit from upgrades.
Belt
Ravagers Cord can be hard to find, use whatever until you do. Max it!
Legs
Imbued Tassets. Replaced in Agony, so some upgrades.
Boots
Pathfinders Boots are fairly easy to find in Bounties, use whatever until you do. Max them!
Cloak
Jungle Cape, Satin/Dragonscale/Iridium. Replaced in early Agony, so some upgrades
Amulet
Royal Pendant. Replaced in early Agony, so some upgrades.
Rings
Hybrid Band. Lasts until Faction T4, so it’s worth the upgrade cost!
Trinket
Call of the Void for the mage, Elemental Stone for the ranger, Spare Eyestalk for the warrior.
- Bounty: Pathfinder’s Trinket for the warrior/paladin.
- Faction: Ruination for all.
If you find Emperor’s Blessing, use that and max it!
Augments
All team members use Area attacks, so the only obvious choice for the Fated augment is Destruction. It is useful both against 2-3 enemies, but when maxed it can also hit quite hard on a single target.
Reaver’s Shield is chosen for the armour “penetration” it provides. And because it works with the actual penetration, this one is a no-brainer. Now, before you ask why I pick this and use armour reducing abilities at the same time, let me just say: Because I can! Sure, you could replace this with Orcish Warblades or one of the handcannons, but I just…. like this. So I use it.
Obsidian Pendant for the same reason. And also because there’s not really any alternatives. The other choices require ailments or the enemy to live long enough to benefit from the buff/debuff they provide, and they really don’t live long enough.
Antiquity Tunic seems like a super choice for a build that just needs to hit hard and fast. Doubling with the worn tunic, this augment seems like a no-brainer. There may be one or two others that can give an edge in Endless mode, but this build is not made for that.
Relic
All team members use the Juggernaut relic. As all their gear have Health Points on it, it’s a pretty solid damage increase that is always active and doesn’t fall off if getting hit (Marksman), doesn’t do its damage over time (Assassin, Barb, Inquisitor), is chance-based (Archmage, Crusader, Vizier) or just defensive (Battlemage, Renegade, Templar, Warden). Enemies die too fast for DoT abilities and while the chance-based things might be good, they’re unreliable and not very attractive.
Generally speaking, do not worry about the numbers you see in the build as you progress. They are absolutely worthless for any kind of comparison. As long as you live and the enemies dies, you are doing great. Yes, in some content one class or another will be waaaaaaay higher than the others, but in other content it will be far more even. It’s all working as intended.
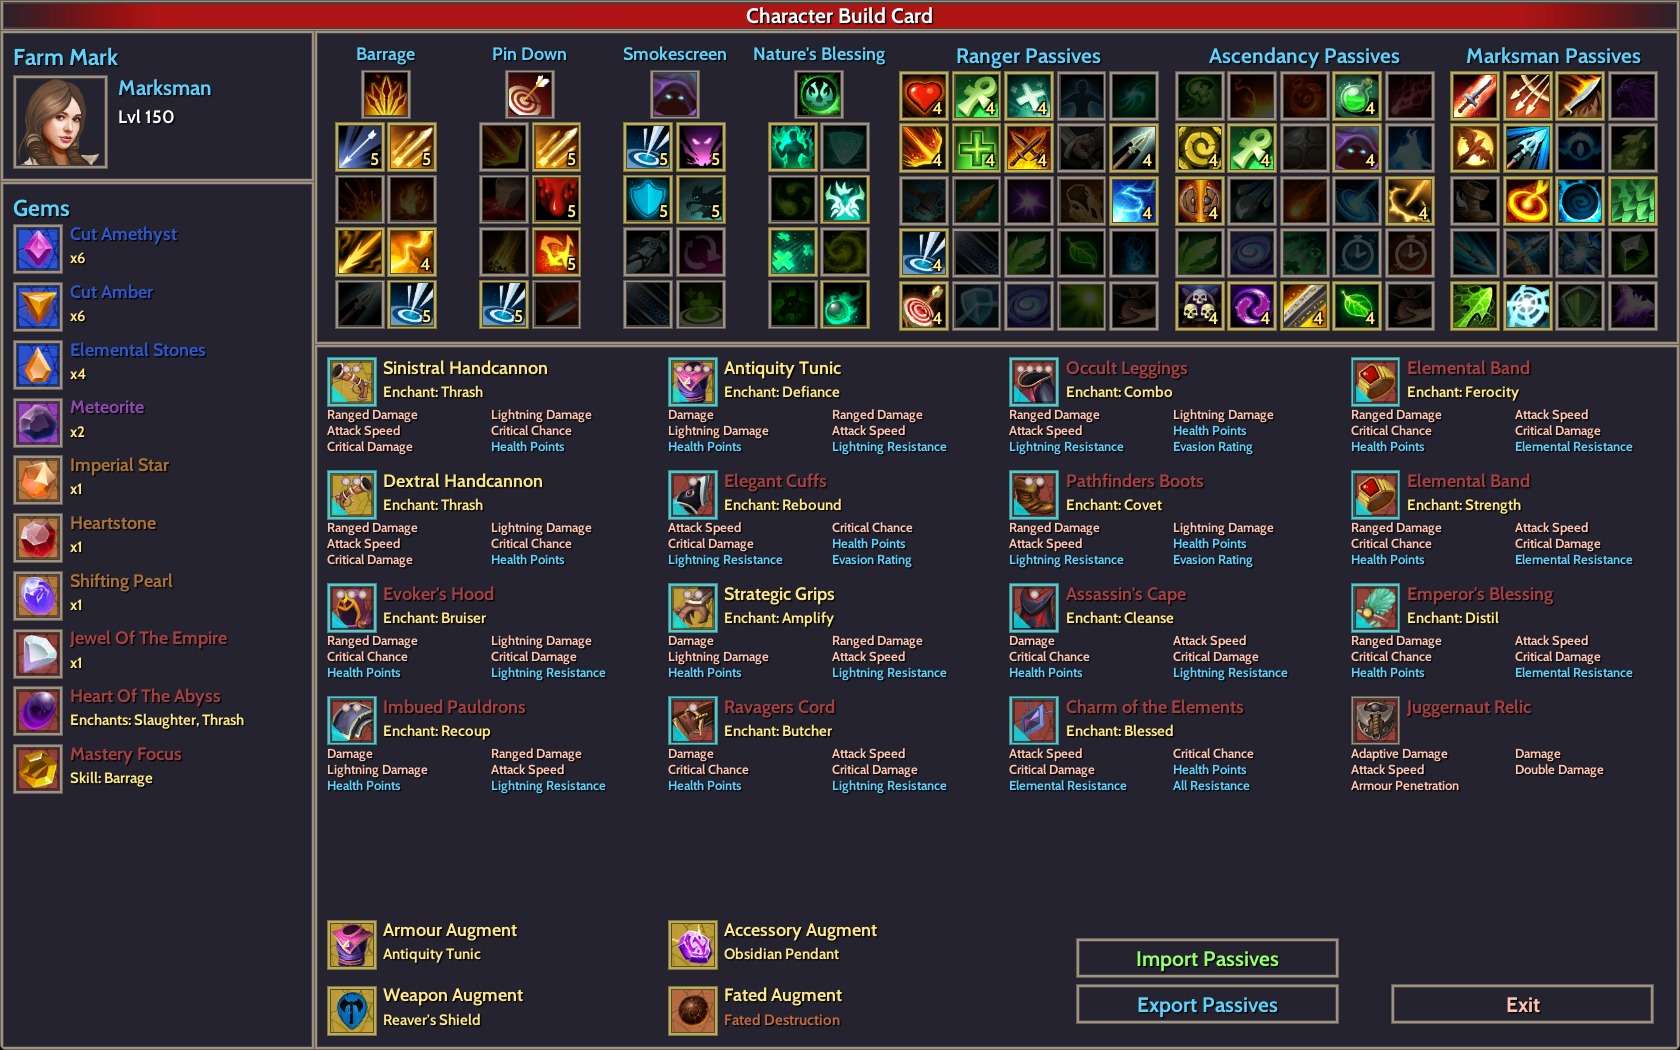
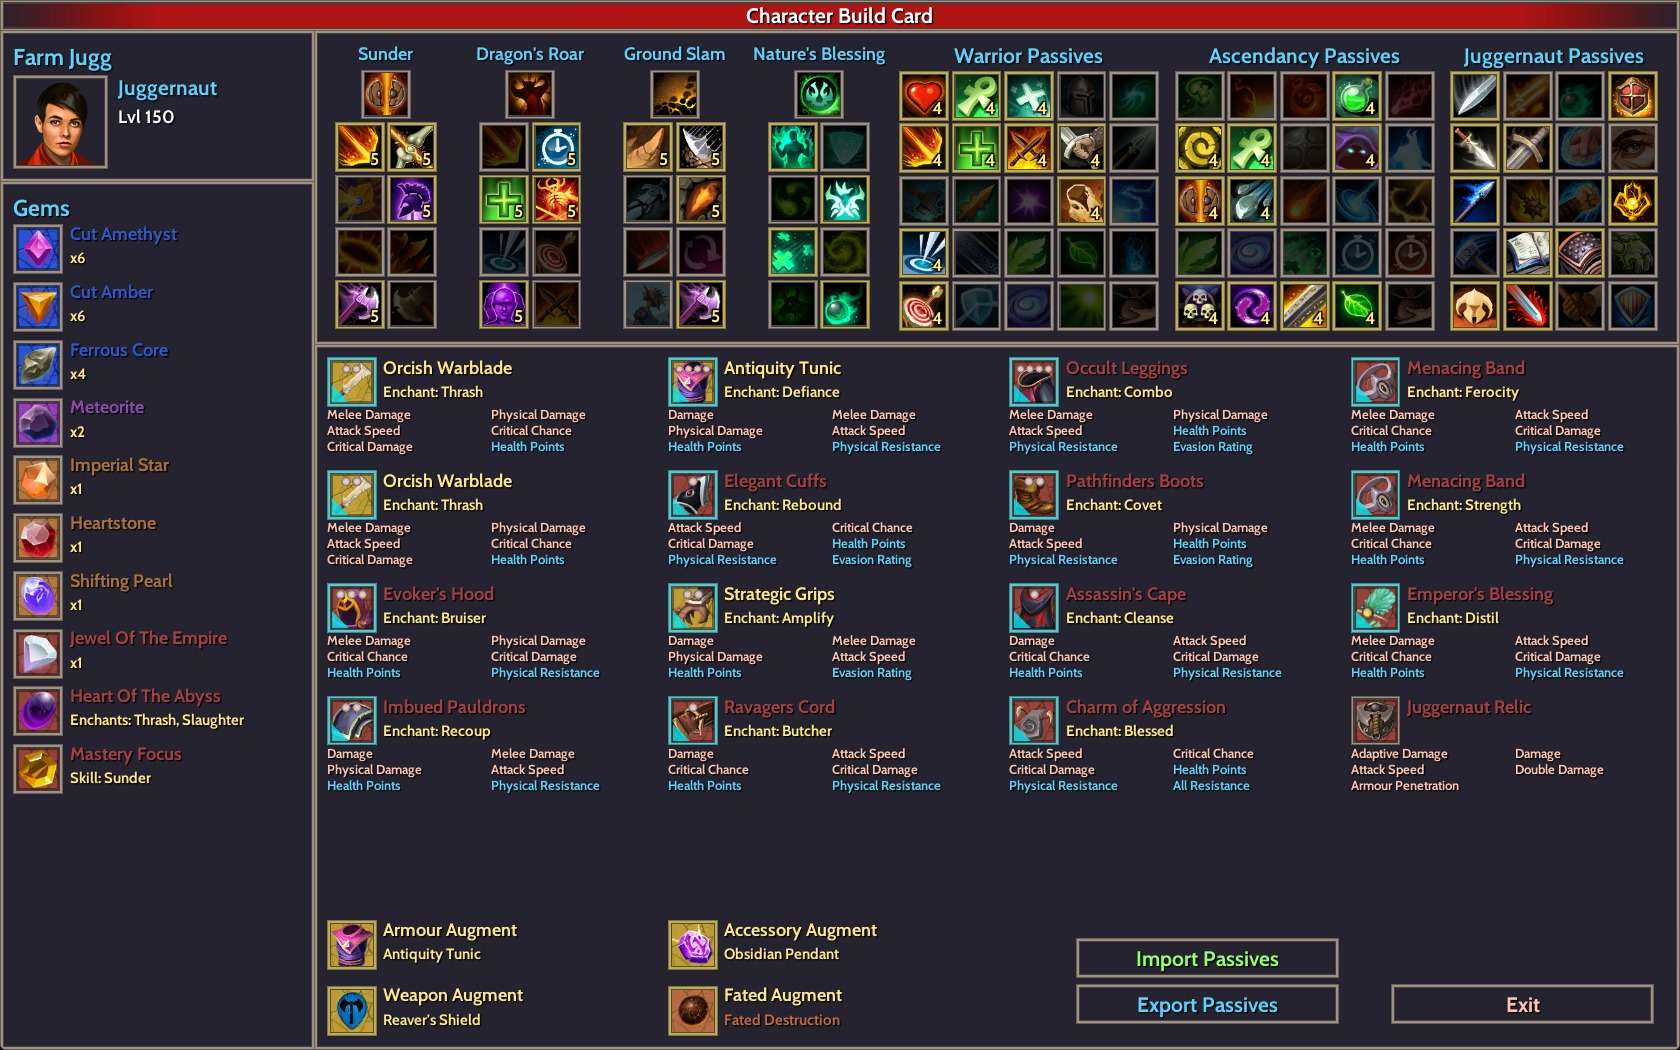
Warrior in Detail
Warrior is my first choice for this build. It is Juggernaut to take advantage of the Adaptive damage gained from both the passive and the relic, and the hardhitting passives in the Juggernaut tree.
With Stalwart, you get 15% more Health. Going through Endurance, those extra health points becomes more All Resistance, which in combination with the Ferrous Core gems grants more Physical Penetration, resulting in more damage.
The extra health also gives you bonus armour through Hardened Armour which gives you more adaptive damage with Adaptive Armour. The end result is a tanky Juggernaut that hits like a truck!
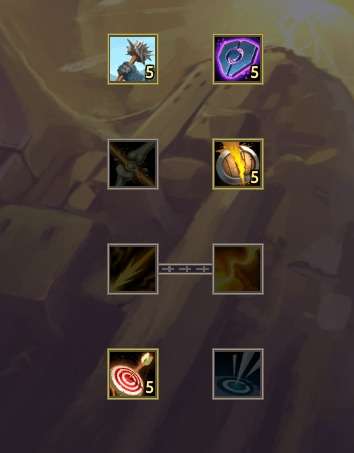
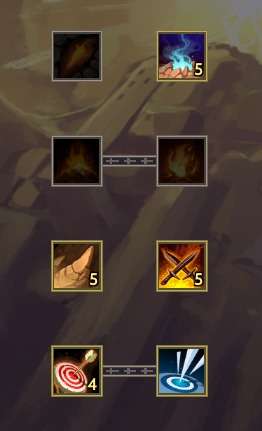
Off The Bench can trigger your other two Offensive Cooldowns, which should be specced more or less like shown in the two attached images. Armour Break is specced with Precaution primarily to increase armour, which results in more adaptive damage. Earthquake is specced for Unsteady Ground to make your next attack do 100% more damage, which makes Sunder even stronger. And yeah, those Orcish Warblades do the same! These two aren’t meant to be a big part of your damage, but hey, they help, so why not spec them for these? The other points are more or less irrelevant, but I like the shown setups. Dragon’s Roar is obviously chosen as the primary Offensive because of the team buffs it provide.
Ground Slam is the Defensive cooldown of choice, simply because it provides a damage buff. Easy peasy.
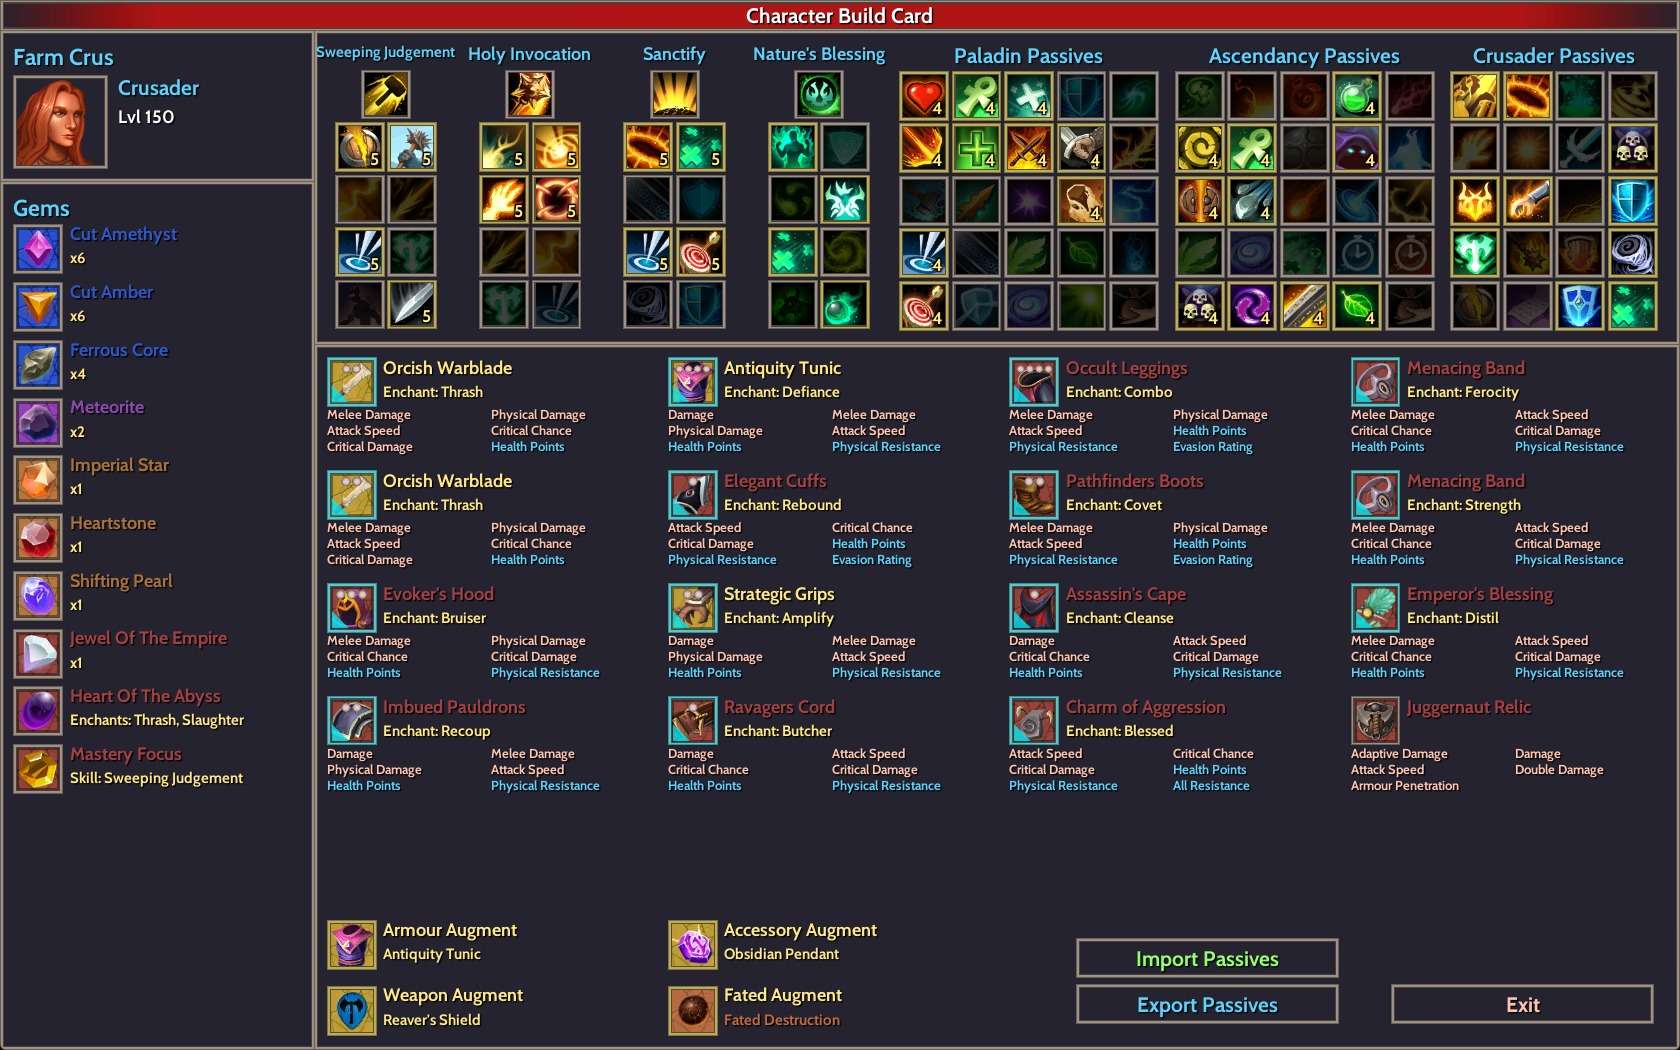
Paladin in Detail
Crusader was chosen for this build, to take full advantage of all the Blessings the class can provide. Crusaders have the benefit of making them up to 50% stronger than normally, regardless of how you proc the blessings, so in terms of buffs it is similar to the Warrior. The Crusader and Juggernaut play out fairly identical, with Sweeping Judgement being very similar to Sunder, so these two can be swapped with no noticable difference.
That said, Crusader does have a benefit, most useful at lower levels. The Blessings that can be triggered from the chosen skills. Sweep and Holy Invocation can both provide Blessing of Haste, which can be good before you get access to it through the Crusader Passives. Sanctify can also be specced to provide Blessing of Resolution and Blessing Of Protection. Combined with the heal from this Defensive cooldown, lower level teams might prefer a paladin over a warrior.
Ranger in Detail
Marksman provides a lot of straight-up damage buffs, but only for the ranger itself. Which is fine, but I still want it on my team as the second member. It is specced Lightning Barrage to provide the Shock debuff, making enemies take more damage if they live longer than 1 second. Pin Down grants more attack speed, which is always useful and Smokescreen gives your entire team some evasion and dodge. In early levels it can be specced to provide some healing as well, before you get access to Nature’s Blessing from factions. And if you don’t run with the Paladin, it’s quite nice as well.
It may seem counter-intuitive to take Renewed Focus, Strength and Speed at the same time, but at endgame, they are always up. You almost instantly gain 50 stacks, resulting in a +25% damage multiplier, +25% attack speed, +15% crit chance and +750 All Resistance AND the +10% damage multiplier and +10% attack speed multiplier at the same time. It sounds like you only get one group or the other, but nope. You can have both!

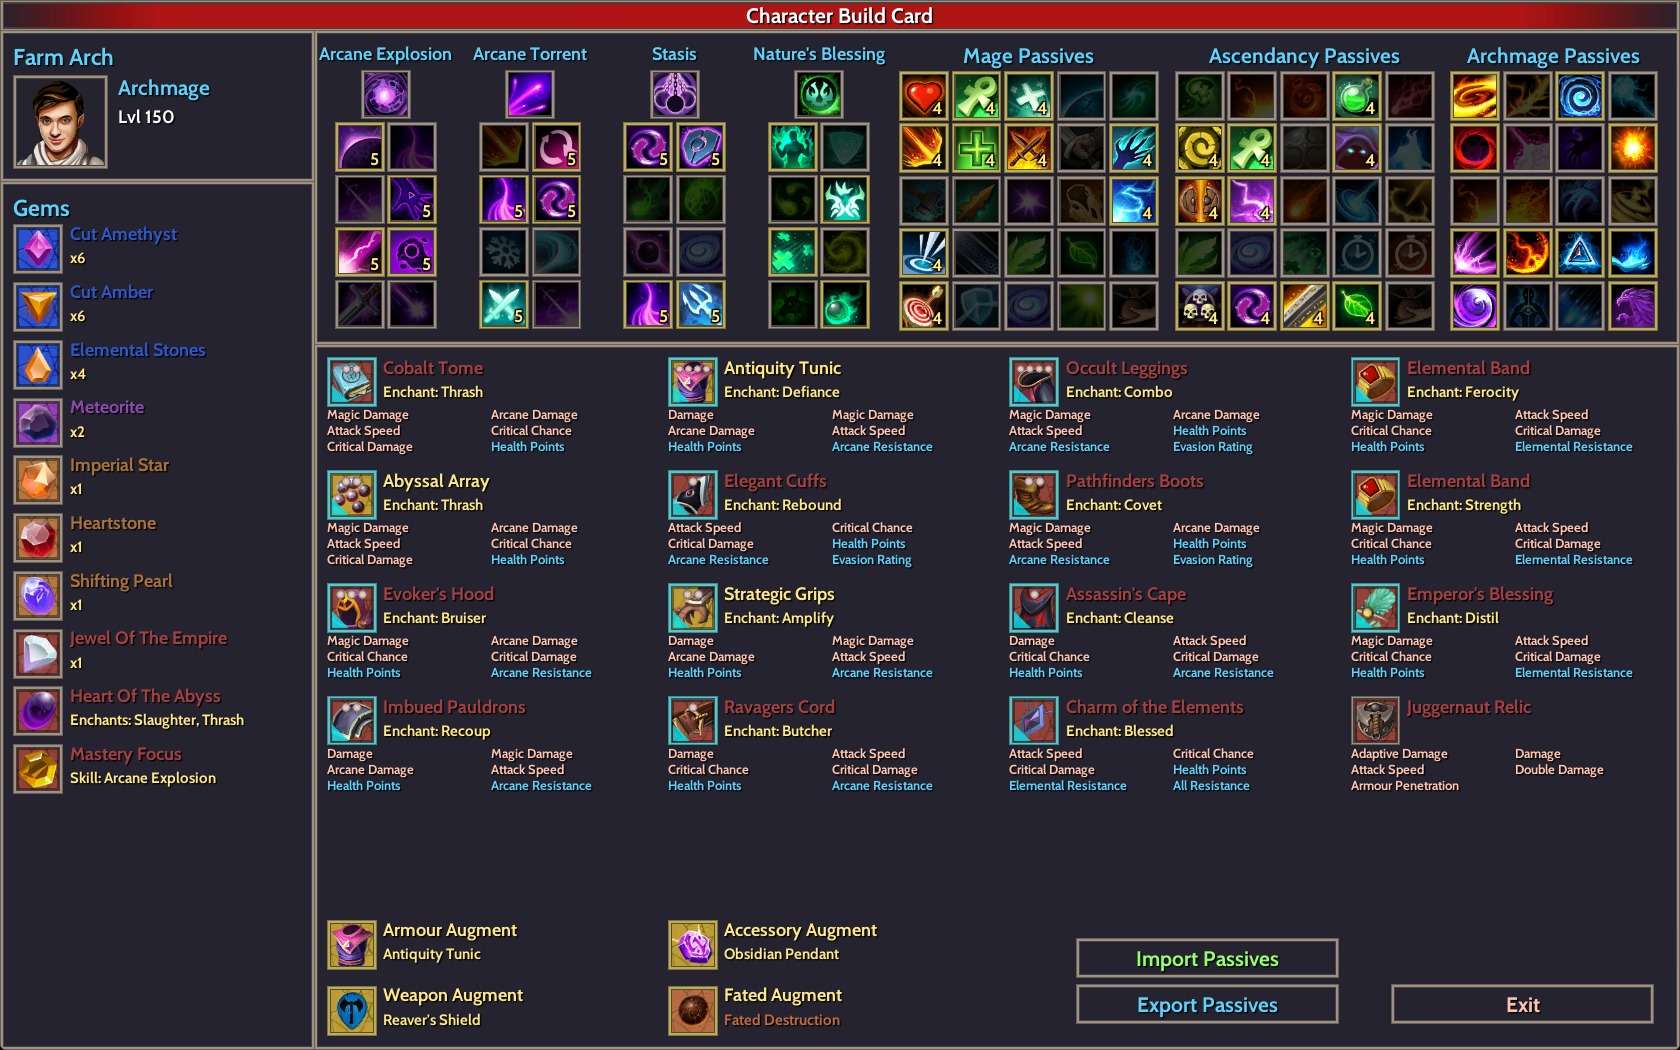
Mage in Detail
For a long time, my favourite has been Vizier, but in 1.0 Archmage took over. Elemental Blast can be specced to hit all targets, basically doubling your Arcane Explosion. When it procs, you get more damage and speed, restore some barrier, lowers the enemy resistances, reduces the cooldown of your offensive and defensive cooldowns and of course 10% dodge chance is always useful. So what’s not to like? That’s right, nothing!
Arcane Torrent provides a nice little Double Damage buff to the mage, while Stasis provides up to 10% More Damage to the entire team. Really simple, straight up damage, which is why I have mage in my final spot on the team.
Kill Speed
And finally, the proof of how fast this thing is!
Elemental Domain T4 is chosen because it has high Elemental resistance as well as the extra Barrier layer on top of HP. This means it is the fight that takes the longest to finish and it still does that in less than 20 seconds!
As mentioned previously, do not worry about numbers with this build. As long as you kill stuff and don’t die, it works. You are doing great!

Be the first to comment