
All things must rot, figuratively or literally, and the Horned Rat and his offspring are the worldly reality of this simple truth.
I see you want to worship the great Horned rat, yes-yes? Then allow me-me to enlighten you with this guide on how to play with the Skaven and kill all the ‘things’. This guide-guide will cover the basic things of the Under Empire and some tips to help you-you understand and get started with Skaven. Now go and KILL-KILL!
Other TWW2 Guides:
Contents
Intro
All credit goes to Peroronccino!
You want to infect the world? New to Skaven? Interested in what this faction has to offer? In this guide i will briefly explain some of the Skaven features and share some tips about this faction to help you along your way.
Skaven are a hard race to play since the lizard-things… will surely pose a great threat early on and during multiplayer battles (basically everything thats bigger than a rat). The Skaven armies consist of cheap cannon fodder and low quality units for increased quantity. Their armies can use tunnels in the campaign and have a higher chance to ambush enemy armies on the campaign map. Skaven might not win a 20/20 battle unless you keep your eyes glued to the screen and use everything you have available to you. Otherwise just go 2 vs 1 in the campaign.
So how can we win with the Skaven? This guide will show you some things about the Skaven that might not have been apperant at first!
Campaign Basics
The Skaven are short and live underground like dwarves. This is shown in some aspects of the game mechanics such as using ruins as settlements and tunneling under the ground just to resurface somewhere else later.
The Skaven settlements are camouflaged to all other races on the campaign map and other factions might confuse them with ruins. You can obviously take advantage of this mechanic by having a camouflaged settlement and leaving it undefended or having a strong Skaven army ready inside to strike at any non-skaven army that passes by, thus having the benefit of a supporting garrison as reïnforcement. Skaven can also colonize a ruin starting at tier 3 at the cost of a lot of food.
For Skaven, having the surprise and sheer amount of troops is key to victory! However, having too many armies and settlements can pose a problem with food (less leadership/growth/happiness). Another trait that the Skaven have is spreading their corruption, but more on that below in this section.
Food:
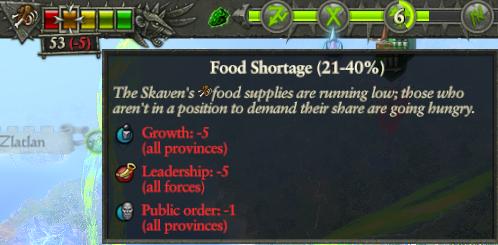
Eat eat eat. Food is a precious resource for Skaven since they have a high metabolism. You will run into problems if you don’t counter this issue right away. The hud on the campaign map gives information on how much food your growing empire has. If this falls below the 41% threshold you will get negative penalties that will affect your armies as well as your settlements.
Food is hard to aquire by building food related buildings, you need a resource for that in order to build that specific building and they’re rare and far from your starting position. The main way of collecting food while playing as the Skaven is aquired mainly through battling the other races, even rival Skaven clans, or raiding regions.
You are meant to loot settlements and eat your victims, devouring the world is the will of the Great Horned Rat after all. This makes the Skaven a very expansionist and hard to play faction since you will need to continually battle the other races for food if you have more settlements and army’s. However having too many settlements and armies might give you a hard time to collect enough food if there are no enemies in the vicinity to feast on.
Each army consumes 1 food per turn and so does each settlement. So as a wise rat you need to think how you want to expand, what settlements you want to conquer and how many armies you want to field. Think about what the benefits are of holding a region(s) compared to the food loss you will get.
The exploitative planning commandment only holds +2 food per region while most regions have 3 settlements or more which whill have a total of -1 food per region if you use the commandment. The commandment will be used a lot during the campaign to prevent your faction from starving in the mid to late game.
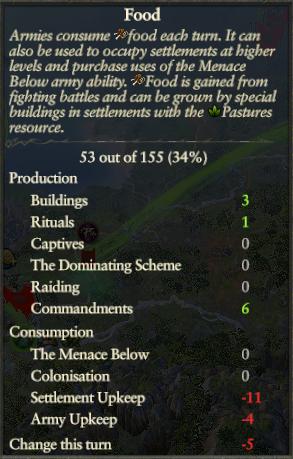
Here you can see me having 11 settlements and 4 armies, each draining 1 food. Because i have 1 other buildings that produce food and i’m not doing anything like raiding or battling, this will lower my overal food supply by -5 each turn. I have a rite activated and the commandments i’m using on the regions make sure it wont drain more. If i go out and win battles it will replenish my food supply. You will be doing this a lot.
- Top Tip: The amount stored is dependant on the amount of settlements you have.
Skaven corruption:
Adding to the existing corruptions, we have the Skaven corruption added to the mix. This corruption is unique in the sense that it has a drawback for the Skaven on the campaign map but a boon in battles where corruption is very high!
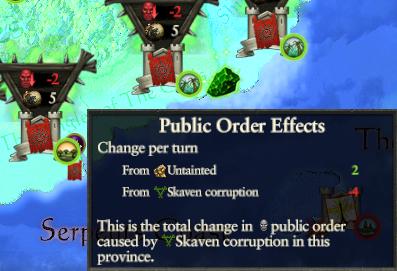
Here are some pros and cons for having a high Skaven corruption in a region belonging to you or the enemy.
Pros:
- More uses for the Menace Below ability during battle.
- Lowering public order of rival factions if it spreads there.
Cons:
- Lowering your own public order where corruption is high.
Skaven Rites
In this section i will explain some basics of the skaven rites they can perform on the campaign map. It focusses on aiding the destruction of enemy settlements and helping your own faction getting the upper hand in the struggle for supremacy.
Since Skaven love spreading disease and despair they certainly have some interesting rites for use:

The Scheme of DOOOOM:
You can use this scheme whenever you researched a few technologies. Once the rite has been ‘purchased’ with currency you can use this special Skaven engineer to cause an earthquake at an enemy settlement, damaging their buildings and collapsing walls so your army doesn’t need to wait anymore to build siegetowers and battering rams!
The engineer appears like a regular hero at your capital and when you use it on an enemy settlement it will die and never come back again till you perform the rite again when the cooldown is over.
The Pestilent Scheme:
The pestilence scheme works like the scheme of DOOOOOOM. BUT this one spawns a priest that can spread the pleague to a settlement and any nearby armies that are in the vicinity. This makes sieging an enemy settlement a cakewalk once enough enemy units have died within the walls! Ofcourse the priest dies when you use it like the Scheme of DOOOOM!
Becarefull that you keep your units away while the pleague is in effect or else they will be infected too!
The Thirteenth Scheme:
Using this scheme grants a diplomacy boost towards fellow Skaven and a loyalty boost for lords. This scheme is best used when you’re about to attack or are defending against enemies since the mors clanstone ability grants +40% armour piercing when you use it during battle and will boost your hero succes chance and provide a negative enemy hero success chance.
The Dominating Scheme:
This will be one of the first schemes you will use since it is pretty handy for rapid expansion of your faction. It will provide benefits to food, growth, public order and recruitment cost.
Skaven Loyalty
This section will focus on the loyalty system that the Skaven have.
You will start with your lord on the campaign map. This one will be unaffected by the loyalty system since this rat is your faction leader. The recruited lords from the campaign map all have an indicator of how high their loyalty will be when you recruit them. The max loyalty a lord can have is 10 and the minimum is 1. Having the lord loyalty drop to 0 will result in a rebellion which will ruin your campaign if you gave him really powerfull units like rat ogres or hell pit abominations.
When your lord has low loyalty consider doing the following things:
- Win battles
- Recruit more units
- Complete missions
This will raise your lords loyalty and will prevent a rebellion from happening. Having a high loyalty ensures that your lords won’t rebel any time soon when you lose a battle or two.
Skaven Units: Infantry
This section will provide a general understanding of skaven units. Most Skaven units have 2 passive abilities! These are important as you will use it often in battle.
- When leadership is low they will have a 12% speed buff for retreating safely.
- When their hitpoints are above 50% it will result in a defense buff +8 and a leadership buff of +6 and a speed penalty of -12%
Skaven slave units:
These units are basically the tier below tier 1. The worst of the worst you can field and only usefull as cannon fodder and swarming the enemy. Not much good can be told about these slaves since they are only good at dying and holding the enemy in place. They have the trait expendable. This means no one other than these units will suffer a leadership penalty when one unit routs.
Clanrats:
These rats are the main units you will use during the campaign, they are cheap compared to the other factions units in the same tier. These are your beginning units you will use to expand further into the campaign. The units are pretty good at what they are meant to do (also being meatshields). My suggestion would be to get the shielded versions since they can block some missile attacks.
Plague Monks:
This is your anti infantry unit. They are pretty good at flanking the enemy and causing casualties. Beware though, they have less armour and melee defense.
Death Runners
A great flanking unit using concealment bombs to get in close and finish the job your main units cant. they have armour piercing damage and cause -50% armour against the unit they attack. Great for dealing with heavily armed enemy units, but also vulnerable.
Stormvermin
Your higher tier infantry. Stormvermin are good for holding the line and dealing with higher tier enemy units. The halbert version excels at taking down enemy cavalry and big units. Usually placed at the flanks or at the back (in reserve).
Plague Monk Censer Bearers
The plague monk censer bearers are great at lowering the enemy morale. This unit causes a -10 leadership debuff and emphasises on dealing damage from the flanks or rear to make the enemy rout.
Skaven Units: Missile
Skavenslave Slingers
A good starting unit for peppering the enemy with stones while your melee infantry holds the enemy down. This is the unit you will use most in the early game.
Night Runners
A decent melee combatant and skirmish unit, mainly used to harass the enemy and quickly retreat. This unit can be used as melee infantry, but has less armour than clanrats. Oh and they also fire on the move!
Poison Wind Globadiers
These missle units excel at standing behind the main combat line and hurling poison towards enemies. Their effectiveness increases when throwing them at larger enemies, dealing more damage to them than regular enemy infantry. These are your solution to those pesky lizard-things.
Warpfire Thrower
The warpfire thrower, throws..fire. It bbq’s enemies with ease and causes a morale debuff of -8 for 10 seconds when enemies are burnt. This unit is great for flanking and killing off infantry while your clanrats or slaves are holding the enemy units down.
Gutter Runners
These are better than the night runners since they have snare nets to slow down faster units constantly and have the stalk ability which conceals them in any terrain (the enemy won’t know what hit them!). They also fire on the move and are used as skirmishers/harassers in battle. The gutter runners are mostly used to pick off more precious units since they can flank easily without being seen from afar. They are not so good at hitting heavily armoured infantry with their missles however.
Death Globe Bombardiers
This is the bigger brother of the poison wind. The death globes are more lethal and are usefull against high concentrations of enemy units. Large groups will lose hitpoints quickly when pinned down and hit with these babies. They also have armour piercing which means they can be used against heavy infantry as well, but are less potent against big units since they have lost the bonus vs large ability that do poison wind globadiers do have.
Skaven Units: Monsters
Rat Ogres
These big rats will decimate anyone before them. They have armour piercing damage and have a high initial damage considering they have the frenzy trait when the leadership is high within the unit. These units are very versatile and can be used to smash through the middle, sides or rear of the enemy army. Make sure you get these as soon as you can. Becareful of missle and spears though!
Hell Pit Abomination
Vulnerable against fire, but regenerates! When it dies it has a chance to spawn skavenslave spears or regain some hitpoints. This one is best used against large units like cavalry and other monsters since it has a bonus against large. It causes fear and terror, making it a very powerfull monster.
Skaven Units: Artillery and Warmachines
Plagueclaw Catapult
The catapult gives the skaven an edge over anti infantry at longe range. The catapult gives the plagueclaw contagion to anyone hit by the plague infested boulder, giving them a leadership penalty of -10. After some testing they tend to hit accurately and rack up kills against enemy infantry after you hold down the enemy with your Skaven units. Just make sure the enemy clumps up.
Warp Lightning Cannon
This big boy is a beast in its own right. The warp lightning cannon is a cannon designed to take down the big monsters that come right at you. Boasting a very large range of 430, it outclasses all the artillery pieces of the other races in terms of range. This is my favorite piece of equiment to field so far since skaven really need to fend of the bigger beasts fast, because most troops will have a hard time dealing with them.
Doomwheel
This wheel brings doom right to your enemy…on wheels! This piece is classified as a chariot and should be used as such. Going for only the infantry, dealing heavy damage with its automatic bolt throwers in front and sides. Since it’s armoured, the enemy will have a hard time taking care of this chariot when you smash it into their lines, bring it back and smash it in again. Giving them a run for their money.
Legendary Lord: Queek Headtaker
Faction effects
Queek steals a percentage of xp earned by other lords. This is a very good skill for a faction leader to have since Queek will be strong in the early and mid game when you have 1 or 2 additional lords fighting for your faction. Make sure to be winning battles frequently with other lords as well so Queek can reap the rewards and level up faster than other legendary lords.
There will be a -2 loyalty debuff for your factions grey seers so try to avoid recruiting any of those lords in the early game if you seem to be losing battles and are new to the Skaven.
Lord effects
Melee attack +10 and weapon strength +10% against dwarves and greenskins. This gives you an indicator which factions to attack more, but you will see them rarely in the campaign early on.
Upkeep -50% for stormvermin and clanrat units. This is a really nice addition to this lord. This means you can recruit more stronger units to make up the bulk of his army.
+2 uses for the “Menace Below” ability. This makes Queek again, a very offensive character.
Queek has several unique abilities you can upgrade during the campaign:
Extremely distrustfull:
- +15% chance of wounding agressors
- Leadership: +8 (Lord’s army)
Rend & Slaughter:
- Leadership: +8 (self)
- Passive ability: Frenzy
Make Examples!:
- Loyalty: warlord recruits +2 and -2 for greyseers
- Leadership aura size: +20%
- Aura leadership effect: +5
- Attribute: Causes Fear
Life is very cheap (fully upgraded):
- Casualty replenishment +20% (Lord’s army)
- Upkeep: -10% for Clanrat units (all forces)
- Armour: +10 for Skavenslaves and Clanrats (Lord’s army)
- Unit experience: +4 for Skavenslaves and Clanrat unit recruits (Lord’s army)
Crimson Guard (fully upgraded):
- Unit experience: +4 for Stormvermin unit recruits (Lord’s army)
- Recruitment duration: -1 turn for Stormvermin units (all provinces)
Violent rise to power (fully upgraded):
- Public order +2 (all provinces)
- Enemy hero succes chance: -20%
- Hero action success chance: +12%
- Ambush success chance: +25%
- Wound recovery time: -1
Skaven Hero’s
In this section i will briefly point out what different hero’s do in the campaign.
Assassin
What cannot be solved by potions and subterfuge by afar will be solved by deadly twin blades up close. These are your loyal rat ninja. They are dedicated hero killers in battle.
Embed Hero
Will replenish troops in the host army.
Constant Local Effect
Will reduce enemy regions happiness or increase it for your own region.
Target
- Settlement: Will assault the garisson.
- Hero: Will attempt to assasinate an enemy hero.
- Army: Will assault a unit in the enemy army.
Warlock Engineer
The Skaven engineer is the artificerof Skaven society, blending arcane sorceries with technology in an insane and mind boggling mix. They wield the power of ruin in battle. They function as a mage.
Embed Hero
Embedding this hero will give your army a campaign movement bonus.
Constant Local Effect
The constant local effect of having this agent in your region is that it will boost the income by a certain amount.
Target
- Settlement: Will steal technology, resulting in a 25% boost to research rate.
- Hero: Will wound an enemy hero for a set amount of turns.
- Army: Will hamper the movement of an enemy army.
Pestilent priest
Embed Hero
Increases the chance to find a magic item by 15% after winning a battle.
Constant Local Effect
Will increase the spread of corruption in a local region.
Target
- Settlement: Will damage the enemy walls of the target settlement.
- Hero: Will attempt to wound an enemy hero.
- Army: Will hinder the replenishment of the enemy army.
Opening Moves
If you were smart to untick the intro option then after choosing your starting lord of clan Mors, you will be viewing a little intro video. After that you will get a guided tour of your surroundings. Fear not! The elf-things are actually pretty weak compared to the lizard-things you will have to face to the east.
You will get a mission to take a settlement of the “Fortress of Dawn” elf faction. You know what to do don’t you? Kill the elf-things (capture them for food after) and recruit some more units once you move more left along your border so you can strike the settlement on your next turn. Recruit Skavenslaves or clanrats, but i would go with clanrats since they are a cheap replaceable frontline unit (-50% upkeep). Put a point in route marcher. End your turn and wait.
Try to get a non aggression pact with Zlatlan. Now go and take the settlement starting at lvl 2 and repair the docks. You need to build up your gold income after all. After this your mission will be complete and you will have some money and warpstone. Keep an eye out for those missions if you want to gain an edge in the campaign. Build a ratling warrens for replenishment or the Taskmaster’s platform (unlocks a technology tree later on when you upgrade it).
- Smal Tip: Keep capturing enemies at the post battle screen for lots of food so you can colonize ruins at higher levels.
- Medium Tip: You can auto merge units with ctrl+m or use the encamp stance to regain unit health quickly in the field.
- Big Tip: Clan Moulder will ally against you with the elves if you appear weak! Traitors.
Colonize the ruin (or search it if you feel lucky, to complete the mission and gain extra cash) and defend your own territory for now and replenish your troops. By now you should have an army of 18 units strong, mostly filled with clanrat troops. After recruiting some more units you can recruit a lord of your choosing and build up a second army. Using the expansionist planning commandment you should have unlocked the first Rite “The Dominating Scheme”. This rite will help you grow more quickly if you have money. Try to spend as much points as possible in queeks unique ability tree since it will give you powerfull bonusses (see his lord page for more information).
In the next few turns the Fortress of Dawn faction might want to have some beef with you, destroy their navy when it tries to conquer one of your settlements and bring the fight to them if you feel like it. Or continue on to the east since they are weak anyway and won’t attack in some time, your second army can hold them off if its strong enough.
Your next conquest should be the “Jungle of the Gods” province since the Caverns of Sotek has a warpstone bonus. You need warpstone to win the vortex campaign. Continue to expand south-east, ignoring the other Clans non aggression pact, since they are your stepping stone to greatness anyway. They will probably lay siege to the elven settlement if they have reached it faster (and they will fail making it a perfect opportunity to kill their last army). If you go to war to defeat their army, you will be at war with another clan further to the east. Since they have a stupid defensive pact..and it won’t save them yes-yes.
No matter! They will be overrun by the lizardmen in a few turns. Wait, build your army, maybe even a third one if both are full and prepare to take clan Moulders settlement and erase them from the southern lands. This will open up a quest battle! Take the quest whenever you can and earn the warp-shard armor that comes with it. You will need it in the battles to come. After this is done continue to expand east, taking all the settlements if you wish. Build a clan armoury when you can to open up the technology tree, or an assassins hideout to unlock an agent and completing a mission.
The Avenue of Gold will have a gold mine to increase your income. The Last Defenders will have the food resource you need to build a food related building. I won’t spoil too much as to where to find it but now you know what faction has the first food related building plot. They can prove a real challenge. You were advancing to the east anyway so good luck with that. I suggest doing the battles yourself instead of auto resolving them.
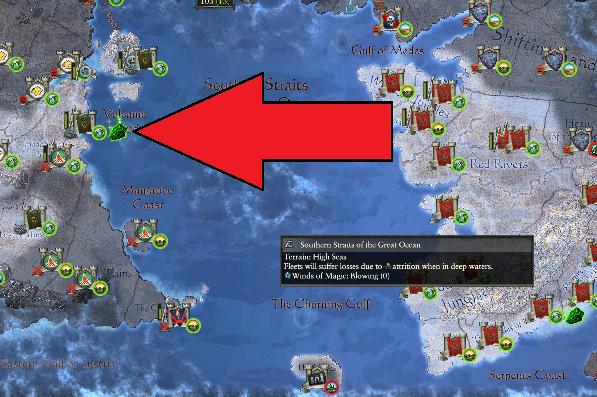
Further east, between the mountain lies the warpstone resource site on the starting landmass held by the wood elve-things/lizard-things (depending on your playthrough, wood-elves are a bítch). Holding these two resource sites will slowly inch you towards victory till you are brave enough to venture beyond the southern lands. The final ritual resource site lies north where the vampires are. They shouldn’t pose a big threat.
- Hint: There is a second resource site north west from your starting position
This should conclude your opening moves to get you started. After this you will probably leave the landmass with 1 or 2 armies to search for more ritual resource sites in the west.
I wish to part with you all with some pieces of advice:
- Try to build siege engines when you can for additional firepower.
- Protect your ritual sites when you conduct your ritual.
- Never start the rituals when you’re out of movement points.
- Try to protect your capital when you are doing a ritual. The enemy mostly converges there.
Hint on where to find a ritual resource site on the other landmass
Be the first to comment