
Rudimentary beginner’s guide for No Man’s Sky Next. Guides new players through the essential basics, one step at a time.
Quick Start (TLDR Version)
A full, but still rudimentary, guide follows in the sections below. But this is a TLDR quick start list for those with less patience (however, that lack of patience is not a virtue in No Man’s Sky… just saying.
- Pause > Log, look at your objectives and secondary objectives. Unpause.
- Mine rocks for ferrite dust.
- Inventory button > Multitool screen > Scanner > Repair using the ferrite dust.
- Scan. Look for yellow/gold icons revealed by scanning. Go to nearest ones. Collect Sodium.
- Inventory button > Exosuit screen > Hazard Protection > Recharge using the sodium.
- When ship icon appears on HUD, head for it, collecting sodium and, if possible, oxygen as you go.
- Get into ship. Progress through options. Hop out of ship to autosave. You can now autosave anytime on exiting ship.
- Follow Log objectives meticulously, step by step.
- Check Guide section if you have questions. Clicking on any item will add a quest on how to build it and collect its ingredients step by step.
See below sections for more thorough directions, advice, and information.
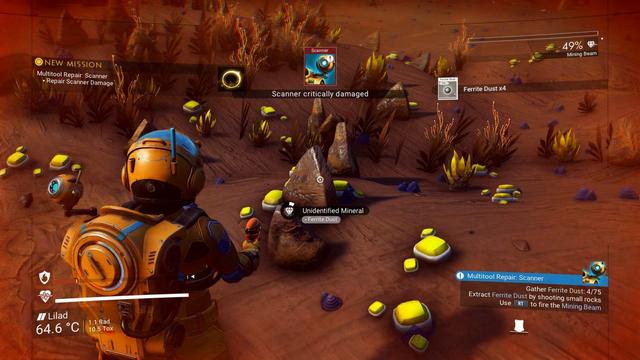
Repairing Your Scanner
You aren’t required to do this first, and depending on your starting conditions, you may wish to instead repair other parts of your multitool (more on what that is below,) try to find a cave (natural caves will allow your hazard protection to recharge if one is nearby,) or try to find an immediate way to recharge your hazard protection on your own.
However, for most players, being able to scan for and find the resources needed to do so is probably the most pressing concern. Therefore, the first thing you should do is repair your scanner, as without it you’re essentially blind in terms of navigation, finding resources, etc. The game will tell you as much both in the lower right hand corner, and in your secondary quests if you pause and look at your quest log. (Pause > Log.)
To do this, you need ferrite dust, and the way to get that? Rocks. All the rocks scattered about, however tiny, can be mined for ferrite dust. To mine, you simply pull the right trigger on a controller, or click the mouse button. (See Options > Controls for a full list of in-game controls, or the Controls, info, and tips section of this guide.) As you do so, you will see the total number of ferrite dust tick upwards in the lower right, if this secondary objective has been selected in your Log screen. (Pause > Log.)
Since you’re now mining, now is a good time to mention the mining laser overheat timing. On the upper right of your screen, when mining you will see a meter fill. If you continue mining beyond that point, you will overheat your laser and have to wait while it cools down.
However, if instead you release the mining trigger/button just as the meter reaches maximum, it will instantaneously cool down, allowing you to mine almost uninterrupted. If you run out of charge entirely for your mining laser, you’ll need carbon to refuel it. More on that later, but general rule is plants = carbon.
Once you reach the amount of ferrite required to repair your scanner, enter your inventory, move to the Multitool screen (the multitool is your, as it sounds, multi-purpose tool in the game; scanner, miner, etc. all in one,) and mouse/cursor over it. Press the prompted key/button to repair, provided you have the required ingredients. Which you should after mining a small amount of ferrite dust from rocks.
When used, your scanner will send out a pulse in all directions, and then temporarily display HUD icons for nearby resources, structures, and more. Mousing/cursoring over those icons will reveal more about them. Right now, you mainly want SODIUM. And fast. It will be yellow/gold in color after scanning. Collect that before anything else, so as to recharge your hazard protection. Followed by oxygen, to refill your life support. More on that below.
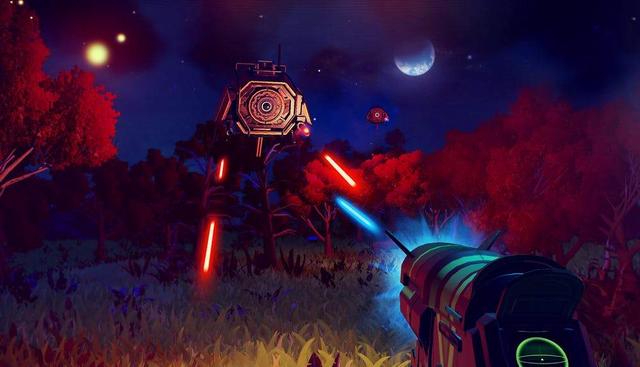
Wait! I Can’t Mine, Sentinels Kill Me!
The game is populated by Sentinels. Sentinels don’t like it when you mine their worlds. So it’s best to stay as far away from them as you can when mining. You can see them, hear them, and an icon will appear on your HUD when they are close enough to you, as well as a large directional indicator, telling you where they are. If they approach you, which they will do to investigate after you mine large objects or a lot of material, just stay calm unless they attack first.
If you don’t attack them, unless it’s a particularly hostile planet, you should be alright the first few times you mine. Even more so, if you stay out of their line of sight and detection range. If you continue to mine right in front of them, expect to be punished. Basically, treat sentinels as a stealth enemy you should avoid. (At least until you’re more advanced and can wreck them for materials if you want to.
Some worlds have particularly hostile sentinels. You can always check the aggressiveness of sentinels in-game by pausing, and going to your Discoveries screen, and navigating (if it isn’t already displayed) to the planet you’re currently on. It will list information such as weather, Sentinels (typical, aggressive, etc.) how much conflict there is (peaceful, etc.) and this will let you know at a glance how rough a time you’re in for! Always scope it out.
Again: If you start out on TOO rough an initial planet, don’t be afraid to start a new game, and “re-roll,” since your starting planet is selected randomly. With that out of the way, back to progressing and surviving.
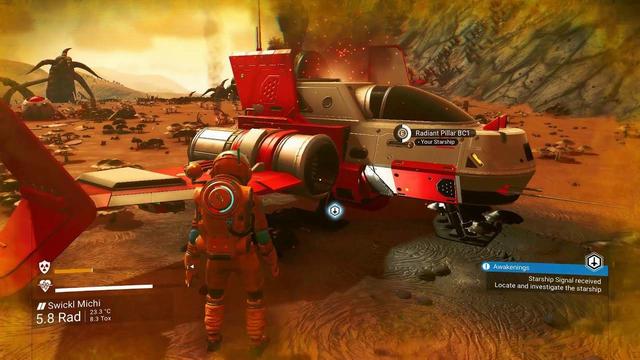
Staying Alive and Finding Your Ship
Order number one, obviously, is staying alive. Your hazard protection is probably dangerously low, and falling fast. Now that you can scan do so, as this will allow you to find life saving materials, such as sodium to replenish your hazard protection. Mouse/cursor over the icons that appear on your HUD after scanning. Find one that is sodium, preferably one near to you, and start heading toward it as quickly as possible. Press the button/key prompt for collecting them once in range, then go into your inventory.
Navigate to your Exosuit tab (inventory key/button > scroll left or right to the exosuit inventory) and find your hazard protection. Select it, and press the displayed button/key prompt for recharging it. Choose sodium to recharge it with. Your hazard protection will replenish, and your sodium quantity will decrease. Boom. Now you know how to survive the harsh environmental effects, and how to gather fuel to stay alive. All fuel/consumable resources work similarly.
You should have also been prompted with a ship beacon detection by now. It will appear on your HUD very shortly if it hasn’t already. You will receive a quest log update instructing you to head for it. Head for it as quickly as you can, mining sodium as needed as you go.
Optional note: You also need oxygen or life support gel (which you can craft if you have the ingredients) for your life support, so be on the look out for that, although it depletes much more slowly than your hazard protection does. The exception, is if you sprint. Your life support will fall much more quickly when running. Try to walk when possible.
Further optional note: Some players may wish to add their analysis visor at this point. Depending on whether or not survival is perilous for you, and how fast your starting world depletes your hazard protection, this may not be advisable. It’s not required yet, I do not recommend doing it yet, and your priority should really be reaching your ship and recharging your hazard protection continually, so if you are barely surviving, scroll down to how to reach your ship and what to do when you get there, ignoring this step for now!
But if feel you have the time and that it’s safe enough that you aren’t on the verge of death, and are so inclined, then you see any plants around, quickly mine them to receive carbon. Then choose a free inventory slot in your exosuit, mouse/cursor over it, and select Craft Product. Then choose the carbon nanotubes. Once you have enough of these, go to the multi-tool page of your inventory, select a free slot, and click the option to add a device. Create the visor.
With the visor, you can find your ship even more quickly, and also start scanning your environment in more granular detail (for which you receive credits – as you do for uploading planets and star systems, which can be done from your Discoveries menu. You can also rename them, there.)
Again… This is not yet strictly required, or recommended, as it takes precious time up, but if you feel safe enough and have time, go for it. Just don’t then waste too much time scanning plants and rocks and such trying to make money, as your hazard protection slowly falls and kills you. If that’s your predicament, move on to the next section instead. We’ll get back to the visor soon, don’t worry.
Now that you have some breathing room, head for your ship HUD icon, collecting materials as needed along the way. Once you reach the ship, get into it immediately by holding down the displayed button/key prompt. Note that entering the ship allows your hazard protection to replenish. (As does hiding in sufficiently sheltered natural caves.) Pay attention to the text on screen, read everything, and note that when changes occur and a beep happens, it usually means your quests have been updated. So check the details in your Log frequently. But much more importantly…
…you can now save. Simply get out of your ship, to create an autosave. You can now save any time, by simply getting in and out of your ship. Everything else you’ve done up to this point, has been to gain this little save foot hold. Now you have the freedom to do things like experiment without fear of losing progress, or tweak settings and restart where you left off.
Now that you can save, and know the rudiments of how to survive, you should also note that in addition to Life Support and Hazard Protection, you also have actual health. To restore your health, you can use your visor to scan for containers concealing health items, or find them within structure interiors occasionally. Always be on the lookout for them, should your health deplete, as will happen once Life Support and/or Hazard Protection fail.
Repairing the Pulse Engine
Your ship is critically damaged. You need to repair its components. First, the pulse engine. As before, follow the prompts and in-game information. You need more ferrite to create metal plating. Get out and mine some more rocks. Once you have enough, go into your inventory, select an empty space in it, and choose the displayed button/key for Craft Product. Select the metal plating from the list of buildable components. Boom. Now you know how to build parts for everything in the game, effectively. It follows this same basic mechanic.
Go to the ship inventory tab of your inventory, and mouse/cursor over the pulse engine. Hit the displayed “repair” button/key, and select the component that requires metal plating to repair. That’s one more thing done. There’s still another component of the pulse engine that needs repairing, however.
Next up, the game will instruct you to seek out a hermetic seal. Leave that on hold for the moment, and instead select the other mission objective. The game will prompt you to investigate the crash area. (Immediate area around your ship.) When you do, you’ll find a beacon you can interact with. Do so. I won’t spoil the text, but get through it all. And choose broadcast. You will receive some navigation data, and instructions to build a signal booster, and learn that you need yet more metal plating to do so.
Get back to mining rocks again until you have enough ferrite to create metal plating, and do so. Then it will tell you you need carbon. Use your scanner, and your eyes, and seek out plants, or anything else that is suggestive of carbon. As a general rule, plants are good sources of carbon.
Note: Carbon is also a means of recharging your mining laser, which needless to say, is essential to your ability to survive efficiently. Keep carbon and sodium on hand at all times as a basic survival rule. Oxygen as well.
Once you have sufficient carbon, you will be instructed to create a carbon nanotube. Do so the same way you did the metal plating, in a free inventory slot. The game will then tell you to create the signal booster. To do this, outside your ship, press up on the d-pad, or the requisite keybinding (check Options > Controls for details if uncertain,) which is how you access the Build interface in the game in general. The first option is the signal booster. Place it wherever you wish outside. Then approach the signal booster and interact with it.
Choose to input the navigation data. Then select the only available option to you.You will now have a new HUD point of interest.
Note: There are a few things you need to do before departing for it.
- Approach your signal booster, and press the specified button/key to take it with you. Don’t forget it.
- While you’re at it, if you haven’t yet created your visor, look and see if you have enough carbon nanotubes to add a visor to your multitool. If you don’t, collect some more carbon and/or create more carbon nanotubes, and then add it to your multitool. As discussed earlier, the visor allows you – critically – to see your ship’s location even once you’re out of range, and less critically but still importantly, to scan animals, rocks, plants, etc. Even sentinels. You can learn a lot about your environment this way if you read the scan results … plus you get paid for it. This is the time to build it if you haven’t already, even on a dangerous starting world, as now you can save, and spend some time…
- Farming essentials before your journey toward that point of interest. It’ll be a little while before you return to your ship, and you’ll be out of range… so you’ll want the visor to find your way back, and plenty of sodium and carbon. If you find any oxygen (look for oxygen rich plants revealed in scans) grab that too. Also check your inventory Craft Product option, to see if you can craft any life support gel yet. You may have the materials now to do it. Check around the crash site for containers as well. Do it now if you haven’t.
- Save your game by hopping in and out of your ship before heading out.
Ready to trek forth? Okay. Now make your way to the point of interest in the distance. You may have noticed that your “find hermetic seal” quest has been merged with the directive to seek out this location… that’s why we put that on the back burner earlier. You’ll find it there.
The journey is somewhat long, potentially. So keep an eye on your hazard protection and life support. Replenish as needed. Scan animals to see how much threat they may pose. Avoid dangerous predators.
You’ll eventually reach a structure, or several. Explore them. Head inside and interact with everything you can. You’ll eventually receive the hermetic seal. Woo! That was a fun trip, eh? Now you need to get back to your ship.
Oh, scrud. Where is it? This is why we built the visor before leaving. Point it in the general direction of your ship, and you’ll see its HUD icon. Get going back to the ship, mining anything useful along the way as always. When you return, hop in and out to save again. Time to repair that pulse engine!
Go into the ship inventory as before, select repair on the pulse engine, and use the hermetic seal to repair the second un-repaired part. You now have a functioning pulse engine. Now for the damaged launch thruster…
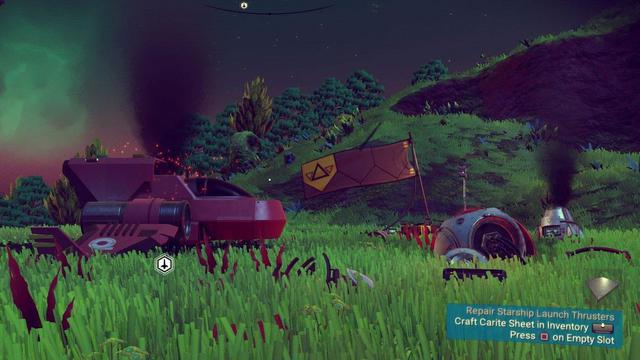
Repairing the Launch Thruster
You will now receive the objectives needed to repair the launch thruster. For this you will need pure ferrite, and Di-hydrogen Jelly. You may already have the latter. I did. But as I’m not entirely sure if that happens automatically for everyone, here’s how you acquire some (other than simply finding some already intact): Scan for di-hydrogen resources. Go mine some. In your inventory, on a free slot, craft product, Di-hydrogen Jelly. Simple.
The pure ferrite is a little more involved, but still straightforward. First you need more metal plating. That’s easy enough. You’ve done it before. Get mining and/or crafting. Once you’ve got some, you can deploy a portable refiner. Same deal as with the signal booster. Outside of the ship, open the Build interface. Place the portable refiner. Approach it and interact (perform maintenance.)
You’ll need to transfer some carbon into its fuel inverter slot, then some ferrite dust into the input. Then on the output, hover over “begin” and hold down the button/key to start. You’ll start pumping out pure ferrite. If you need more carbon and/or ferrite dust, just mine it, then go back to the refiner. Rinse and repeat until you have enough. The game will tell you when that is, provided you have this quest selected. (You need 50.)
Then, as with the pulse engine, just go into the ship inventory, select launch thruster, repair one part with the di-hydrogen jelly, and the other with the pure ferrite. Boom. All done. You can now use your ship. Before you do, don’t forget to take the portable refiner with you, as you did the signal booster earlier.
Take to the Stars!
Your sole remaining objective for the moment is, “Leave the planet. Seek answers among the stars.” So do what it says! Get poppin’. Fire your launch thruster to take off. There’s a dedicated landing button to initiate landings. A boost to move at higher than normal speed. And your pulse drive or jump drive to move even faster, shortening what would otherwise be immensely long trips between planets.
You have weapons and shields (which can be recharged if damaged,) engines (which require fuel,) and can switch between weapon types. Ships function much like your exosuit, in that they have parts and those parts can be repaired, recharged, depleted, etc. and new parts can be built to improve or change functions.
You will receive a new quest objective as soon as you exit the atmosphere of your starting planet. Go to the next section of this guide if you want to move on to that! There will be more specific information in that and subsequent sections.
Some notes on the freedom you now have: But nothing strictly forbids you from simply striking out on your own and exploring from this point on, and trying to figure things out. (Other than the fact that you’re still very weak, don’t know all the game’s systems yet, and haven’t yet discovered warp technology, of course. More on all of that to come in subsequent sections).
You can scan from within your ship the same way you have been on foot. This will reveal planets, starbases, and other points of interest. On starbases, you can find shops and traders. You can interact with ships and, if you so choose, other players. You can shoot asteroids for resources.
You will occasionally be killed by pirates, or kill them instead. (Note: If you die in your ship, scan for your “Remains” near where it happened, to get your items back! Fly into them to collect them.) You will learn alien languages, discover new blueprints and modules to further upgrade your technology, buy new and better ships, and the continuing quests and tutorials will even soon guide you into owning your own frighter!
On planet surfaces, you will find trading posts, mysteries to uncover, you can establish your own custom bases, and much more. From here on out, I trust you have learned the basics of how to navigate, mine, replenish, survive, and upgrade, at least in the most rudimentary sense. Everything else in the game works under the same basic principles, with a few twists here and there. If you’ve understood what you’ve done up until now, you’ll be able to understand the rest of the game with relative ease. If not, feel free to check out the sections below as well. I will continue to update them as able.
You are now free to do whatever you want, essentially. Basic priorities should be following the first quest prompt you get after leaving the atmosphere (you’ll receive a transmission – answer it, or just listen – follow the next section for full details and more help,) which will lead you to obtain the terrain manipulator… among other things. You should also then think about adding a weapon to your multitool, expanding your total number of inventory slots, getting an advanced mining laser, making money, and learning as much as you can about the game’s many as yet unexplored mechanics. More will be said on all of this in subsequent sections.
Check the Controls, info, and tips section if you’re ever truly stuck. There’s (almost) always a way forward, and remember that everything in the game works under these basic principles. It’s just a matter of degree and complexity from here on out. If in doubt, experiment and explore thoroughly. Never neglect the in-game Guide section, either!
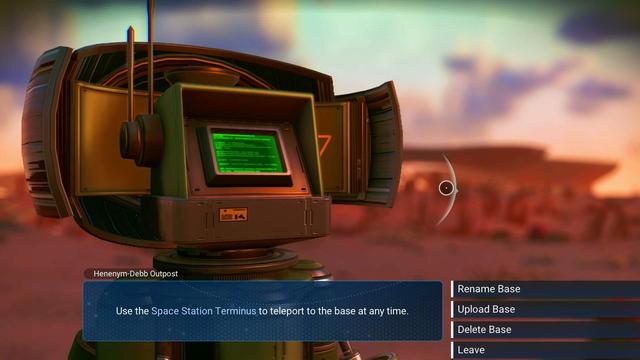
Terrain Manipulator & Base Computer
After you exit your starting planet’s atmosphere, having “taken to the stars,” you will receive a transmission. Press down on the d-pad (or the x key) and scroll to the symbol that looks like an audio wave consisting of vertical lines and select it to answer. Choose to listen or respond. You will now receive a quest to go to a specific location on a new planet. It will appear on your HUD on the planet in question. Look around. Then aim at that HUD icon, and initiate your pulse drive to move at high speed toward it. If you looked right at it before initiating the pulse drive, a sort of “autopilot” will guide you toward it, down through the atmosphere of the new planet.
Once you are above it, press the button/key to initiate landing (see Options > Controls for a list of all controls, if in doubt.) Once there, approach the source of the transmission (the HUD icon you’ve been trying to reach) and interact. Continue through the prompts, and you will eventually receive the terrain manipulator.
You can now switch between the mining laser and terrain manipulator at will with the press of a button/key (see controls for specifics.) Quest log will tell you that you need to claim a base, and that to do this you need a base computer. For which, in turn, you require chromatic metal. And for that, you need copper.
Scan the area, and you should see that the planet contains copper deposits. You may have to use your visor to “tag” them (see prompts and Options > Controls for specifics on how to tag with your visor) but you should find some before long.
Note: If for some reason you don’t find any copper on the planet, you may need to exit this planet in your ship (return to space) and scan other nearby planets. You can always scan planets by aiming at them and doing planetary scans. This will reveal certain facts about planets, including resources.
Further note: The area immediately around where you landed, will contain a post with which you can interact to map the area, and manually save. These save points are how you manually save in the game, for future reference. Getting in and out of the ship is how you auto-save.
Once you reach a copper deposit, switch to your terrain manipulator, and use it to mine the copper.
Note that there are many substances in the world you will need to switch modes in this way to mine, or to equip your multitool with an Advanced Mining Laser (more on this in a future section) to mine. For now though, the terrain manipulator will get the job done. True to its name, you can also use the terrain manipulator simply to dig holes and caves in terrain. This can be helpful for avoiding environmental hazards like storms. You will need to dig very deep for this to work as well as natural caves, however.
Like the mining laser, the terrain manipulator requires recharging. If it runs out of charge, check your multitool inventory, mouse/cursor over the mining laser, and press the charge button/key prompt to see what exactly you need to charge it. This should be something you do for all your items and components – going into them and seeing what, if anything, they need. Everything in the game works similarly, as stated earlier, and these principles apply to almost everything in the game. Knowing how to navigate one menu, means knowing how to navigate most other things.
Once you have some copper, the game will give you further objectives. One of these is to refine the copper into chromatic metal. To do this, you need to deploy your portable refiner again (you already know how to do this from earlier.) Do so, put some carbon into the fuel inverter as before, but this time put copper into the input. Start it up, and start refining chromatic metal. Mine more carbon and copper as needed until you receive your next objective, which is to create the base computer.
You place the base computer – once you have the materials – just like everything else. Go into the Build interface, find the base computer, and place it wherever you want. Exit the Build interface, and interact with the base computer. You will go through a few steps, and eventually “claim” this area as your base. You can now build here. Time to learn how to build structures.
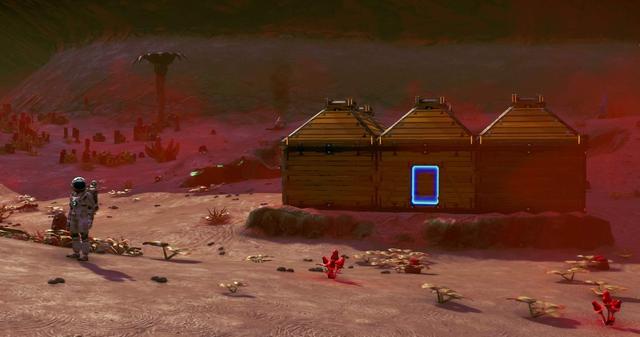
Your First Base
After placing the base computer, the game will now instruct you to begin building a base. This works just like everything else you’ve constructed so far. Open the Build interface, and go up through the options until you see the wooden floor. Provided you have sufficient carbon, you can build it (components you wish to build or place will always tell you how much of an ingredient you need.)
If you don’t have enough carbon, just search for plants – the larger the better, trees etc. – and use your mining laser on them to mine carbon. Then return to the area you’re building in, and place the floor. The game will then walk you through placing three wooden walls (they will automatically “snap” to the sides of the floor you’ve already placed,) a roof (note the required ingredients,) and a door. You can use your shelter – once it has a roof – to protect yourself from storms and other environmental hazards, even before placing the door. When inside it, your hazard protection will replenish.
Once you have completed this extremely basic structure, the game will tell you to return to the base computer.
Blueprint Analyzer
The game will now walk you through deploying the Bluepring Analyzer. To do this, you will need magnetized ferrite. Getting this is simple. You already have (or know how to to make) a portable refinery if you’ve been following this guide. (Search for “refinery” without the quotes if you haven’t, and you’ll find it above.)
You simply need to refine some pure ferrite, and then refine it again into magnetized ferrite. Just mine the carbon (for fuel) and ferrite dust required to do this. Load the fuel inverter of the refiner with carbon, place ferrite dust into the input, refine into pure ferrite, then repeat the process on the pure ferrite. Then you also need to create some more carbon nanotubes (which you also already know how to do if you’ve made if this far. Again, search above if you haven’t learned how yet, or have forgotten,) unless you already have some.
Once you’ve done all of this, you can place the Blueprint Analyzer in the Build Interface the same way you’ve placed everything else so far. To make use of the blueprint analyzer, you’ll need to find hidden underground technology. If you glance at the quest log, one of the objectives will suggest using your analysis visor for precisely this purpose. This gets to be a bit of a drag depending on how lucky you are, but you can indeed scan and use your visor to find buried technology.
Once you reach its location, use the terrain manipulator to dig down, then interact with it to acquire it. You will either receive salvage modules, or nanite clusters from them. It’s random, so you may have to explore and keep digging them up to find modules. Some systems or planets may also be more or less likely to have them, but this world you’re on for this mission should eventually yield some no matter what.
Make your way back to your blueprint analyzer, and interact with it. You will see a list of technologies/components you can unlock. Green means you can unlock them, red means you don’t yet have enough salvage modules. Salvage modules are how you unlock them. These components are things you can deploy at your bases, new parts to build with, etc. Feel free to experiment with them. They all work effectively the same way as everything else so far, with their own requirements and uses. A few have particular uses that will be covered later on in the guide.
Eventually – if it hasn’t already – the game will direct you back to the base computer. Interact with it as directed, and you will receive a cryptic transmission. This will give you a new quest objective to seek out intelligent life, and a star base.

Your First Star Base Visit
Completing the previous section will result in a new HUD target, off planet. Get back into your ship (make sure your launch thrusters and jump drive are fueled – if they aren’t, mine for and create the needed materials) and take off. Aim your ship at the new HUD target, and head out of the atmosphere. Once out of the atmosphere, aim directly at the target, and engage your jump drive.
You’ll eventually arrive at your first star base. Fly around until you see the entrance, and enter its beam. You will then automatically be piloted into the base, and land. Hop out to explore.
In addition to your quest objective of asking around about the strange signal you received, you should take some time to explore. Aboard star bases, you can find many useful services. You can interact with NPC ships that land in the hangar. This will allow you to buy and sell goods, or even purchase entirely new ships.
Note: A word about buying and selling, and a note of caution regarding purchasing new ships. The interface may be a tad confusing at first. The upper left shows how many units/credits (currency) you have. You can press a button/key (which one will be denoted at the top of the sale screen above the goods available) to switch between buying and selling mode. You can manually adjust the number of items you wish to buy or sell, and which inventory you want to sell from or buy to (ship or exosuit.)
Once you’re ready to buy or sell, mouse/cursor over the image of the item itself, and press the prompted button/key to complete the sale or purchase. Do so for each item.
When purchasing ships, it is absolutely critical that you:
- Make sure you have enough resources to repair and refuel your new ship if necessary.
- Manually transfer any items you do not wish to lose in your current ship’s inventory, over to the new ship.
- Break down any components or upgrades installed in your ship that you can, so that you will have those resources available to create them in the new ship. (This basically means any upgrades you have manually installed in your ship prior to now.)
- Be fully satisfied that you have sufficient inventory space to do all of this, between your exosuit and new ship’s inventory.
Once you purchase the new ship or exchange ships, you will lose anything still in your old ship’s inventory! This means you may end up stranded, or having to do a lot of shopping or mining before you can take off. You have been warned.
Other services in star bases, as you explore, include the character customizer. Here you can choose your race, head, torso, arms, legs, hands, boots, and backpack, as well as adjust markings and colors. It’s not super deep, but it’s a great addition to the game included in No Man’s Sky NEXT. Once satisfied, simply back out to save your new appearance.
You’ll also find technology shops. Here you can exchange nanite clusters for new blueprints or modules. Carefully read the technologies for sale and understand their purpose. You can also refer to the in-game Guide entries for further information. Blueprints and modules allow you to create new upgrades, components, and items.
You will also find wall terminals where you can buy and sell goods. Make sure you explore both sides, and all rooms, of the star base. Sometimes, doors and areas will be locked, requiring special items to access. Don’t worry about that for now.
There is also a teleporter available… but don’t worry about that for the moment unless you already know what they’re used for. More on that later.
Lastly, you’ll also find NPCs who will offer rewards for assisting them with specific tasks, teach you new words of their race’s language, and ask for things. Helping them, completing tasks for them, etc. will improve your standing with that race’s NPCs, unlocking otherwise greyed out quests or interactions during dialogue with them.
One of the many optional goals of No Man’s Sky, is learning all of the races’ languages so as to understand them better, and improving your standing with them all so as to open up more options when conversing with them. You can also learn words of their languages by interacting with alien artifacts. You have likely already run into these on planets while on foot.
Alright, now that you have your bearings and have explored a bit, talk to everyone until you find the NPC who will respond to the code message by giving you new coordinates! This will once again give you a new HUD target, on a planet outside the star base.
Before you leave, make sure you’ve stocked up on essential supplies, especially anything needed to fuel your ship, as well as sodium and oxygen. Then get back into your ship ( hop back out once quickly to save,) and set course for that target.
Acquiring the Hyperdrive
After completing the previous section, you will once again receive a new HUD target on a nearby planet. Make sure you’re stocked up, and head towards it. After arriving, land and approach the destination. Interact with it and you will receive a blueprint for a hyperdrive! The hyperdrive will be what – eventually – allows you to travel from one star system to another. First you need to build it though, just like everything else.
The game will tell you to head back to the star base to purchase microprocessors, as the first ingredient. If you look at the lower right, it will actually tell you the total amount of money needed to complete these purchases. Yowza! That seems like a lot of cash! Don’t worry, though. It really isn’t. In fact, before too long, you’ll find you’re a millionaire in No Man’s Sky.
But to start with, do what the game suggests, and check your in-game Guide section for the “How to make money” tips. One easy – though inefficient – way, is to blast asteroids, and then sell the silver and gold at a star base. Another is to mine lucrative materials and sell them as well. Whatever tactics you choose (I’ll leave it to other guides to give you the best money farming strategies, as this guide is intended solely to cover the basics,) when you’re able to, purchase microprocessors until the game gives you the next objective.
Once you do, you’ll be told to collect Copper (unless you already have enough.) Fortunately, you already know where to find copper from earlier. Head back to that planet, and scan for copper deposits, and whip out the terrain manipulator to collect some until the game gives you your next instructions.
Next up, drop (or return to) a portable refiner, and use the copper to create more chromatic metal. Then transfer the chromatic metal to your inventory, and switch over to your ship inventory. The game will suggest using a technology slow instead of an inventory slot to save space. This is a good time to point out that ships – and other inventories – have different sections. Select the Technology icon in the starship inventory, and you’ll find the technology inventory, with spaces all its own.
Here you can craft the hyperdrive. Congratulations. Now you have a fully functioning starship, complete with warp capability. Now there’s just the issue of the fuel for said hyperdrive…
Acquiring Warp Fuel
After you have the hyperdrive installed, get back into your ship and leave the planet you’re on. As soon as you do, you’ll get a new HUD icon and mission objective. Travel to the source of the mysterious signal, and land near it.
Get out and enter the structure the signal is originating from. Go inside, and you’ll find a computer panel that you have to repair by removing material from two components. Once you’ve done so, interact with the panel, and take the antimatter. You’ve receive the antimatter, as well as a new blueprint.
Craft the antimatter housing in a free inventory slot. To do so, you’ll need sufficient oxygen and ferrite dust. If you don’t already have them, they’re easy to find. Once you have the antimatter housing, next you need to craft the warp fuel itself.
After crafting the warp fuel, you can now fuel the hyperdrive. To do so, you can either use the inventory recharge option as per usual (remember that the hyperdrive is in the technology section,) or you can use the quick menu (D-pad down or x key,) scroll to and selection Recharge, select the hyperdrive, and then the warp fuel. Note that you can recharge all critical systems in this way if you choose to.
The game will now tell you to explore deeper space, but before you leave your starting system, make sure you do whatever you want to (or feel the need to.) In particular, stock up on essential supplies.
When you’re ready, open the galaxy map.
The Galaxy Map and Warping
To open the galaxy map, first go into space (you can’t be too close to a base or in an atmosphere,) and then use the quick menu (down on the D-pad or the x key,) and select the galaxy symbol.
The galaxy map isn’t anywhere near as baffling as it may seem at first. Press any button/key to bring up a list of controls for it. You can place waypoints to star systems that interest you for whatever reason, and search for discoveries by other players.
There are a number of filters you can switch between. You can choose a destination star system (as long as it’s in range of your current hyperdrive and you have it sufficiently fueled,) or choose one of the other filters such as the path to the center of the galaxy (probably not a bad idea to start with.) To do that, holds toward the “next star system” until it progresses to it, and the camera will shift from your current location to it.
Whatever you choose, once you’re ready, select the star system you want to warp to, and hold. You’ll initiate a warp jump. You’ll come out of warp in the new star system. Get ready! Sometimes you’ll almost immediately be attacked! If this happens, flee to a space station, or fight it out. If you die, scan for your remains/grave, so you can pick your lost items back up.
Once you’re in this new star system, you’ll receive a new HUD target and mission objective. It will guide you to an outpost on a new planet.
Antimatter
Once you feel safe and ready (perhaps stopping at the local star base for supplies, and to “ask for directions,” which will reveal some interesting other HUD targets in the local star system incidentally – do this at every star base, when possible,) head to that outpost you received coordinates for when you warped into the system.
It will lead you to an NPC who will give you the blueprint for Antimatter. The game will then direct you to create some. You know the drill. Scan – on this planet, and elsewhere if need be – for the materials required. Or raise money and shop for it. Check the in-game Guide for any ingredients that must be refined. You don’t need a step by step guide for this bit. You’ve got this. Everything in the game follows the same basic principles. Do whatever you need to do to obtain the items, then craft the Antimatter.
Once you’ve done so, the game will once again walk you through creating the antimatter container, and a warp cell, and tell you to recharge you hyperdrive again. Do so. The game will then encourage you to warp out of the system again. You may do so, exactly as before, making sure to stock up on anything you feel you may need first. At this point, you have everything you need to make warp fuel whenever you need to.
Before leaving, why not thoroughly explore, talk to everyone at the star base, and try out some optional side missions? If nothing else, it’s a great way to get out and stretch your legs… as it were.
When you’re ready, head to the next system.
Useful Tips
Changing Camera Views
Press down on the D-pad, or the X key. Scroll to “Utilities” and select it. Then scroll to the option to change your camera view and select it. You can also do this independently for your ship, not just your player character.
Playing Solo / Offline
Pause. Options > Network and Voice > Network Play: Off. Some players have reported not disconnecting after doing this. If this happens, save and restart the game and it should apply the settings.
You can also independently choose whether to share your bases and discoveries in this section.
In-game Guide
Read the in-game Guide entries. Seriously. Read them. All of them. They are a wealth of information. Many of the game’s most basic and essential concepts are covered therein, and as you explore, new entries are added. Furthermore, you can click on anything in the guide to be given a step by step quest teaching you how to build them, and find their ingredients! The game will hold your hand as much as you let it.
Escaping Hostile Sentinels
If you arouse the wrath of the sentinels, you will receive what is essentially a “wanted level.” The higher it goes, the worse things are going to get for you. To lower your wanted level, you need to stay out of sentinels’ line of sight, while also being more than a minimum distance away from them. Once you do this, a timer will start. If it runs out fully, you’re in the clear. If they get too close to you or see you however, the timer will pause.
Common strategies include digging deep enough holes with the terrain manipulator that you are both hidden and out of range, hiding inside structures (if your wanted level is low enough,) fleeing the star system entirely, or hiding deep within natural caves. Good luck. Sentinels can also be valuable sources of materials when destroyed, once you’re advanced enough to survive their onslaught.
Repairing Frigates
It may not be immediately obvious how to go about this. Travel to the frigate which has suffered damage or issues, and initiate landing on one of its external landing pads. A captain will make a damage report, and if you accept it, you can then enter the frigate and follow the HUD markers to find the damaged sections to make repairs.
Impossible to reach HUD targets on planets
This happens because a target is actually on the other side of the planet but does not appear to be. Increase your elevation, and travel at high speed above the planet. Wait until you are actually sure you’re above the target, then dive toward it.
Basic advice
The basic premise of the game should be familar to you by now. Whatever challenges you find yourself facing, applying the skills learned by following this starting guide will (eventually) work to overcome them. All the menus and interfaces work similarly. All of the components a quest or another item says you need to build, will tell you the ingredients you need, and those ingredients will likewise tell you what materials they in turn require. All you have to do is mouse over things, scan, search, trade, and shop until you find what you need.
Some things happen in inventory slots. Others happen by placing them in the environment, and interacting. You’ve seen both of those sorts of dynamics already. A few will require specific NPCs. Pay close attention. If you can’t find what you need right away… explore. Scan everything and everywhere. Talk to everyone. Try everything. And keep reading the in-game guide entries. (I can’t stress that enough.)
Planets have different kinds of hazards. You may need to discover new technologies to make them survivable. Pay attention to what’s harming you.
If you’re struggling to find a certain resource, in addition to scanning, scan with your visor meticulously. Often you won’t find certan resources until you do. If you still can’t… the planet you’re on, if it’s not a ubiquitous resource, may simply be devoid of it. Search elsewhere.
Don’t get discouraged. Have patience. Be observant. Explore. Search. Experiment. This game isn’t as overwhelming as you think it is. Don’t be in such a rush. Enjoy the journey. Relax. Have fun. You have a whole galaxy (and then some) to explore. It isn’t going anywhere.
Derelict Freighter Events
Why can’t I land on this derelict?
There are two different derelict freighter events in the game.
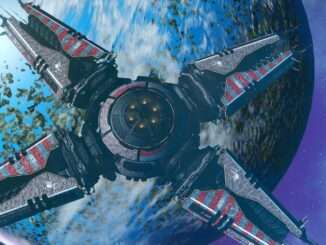
Not Boardable, if the derelict…
- Is broken into large pieces, like the lower freighter model in this image (below)
- Has no landing pads by the bridge
- Has shootable cargo pods nearby (it may not)
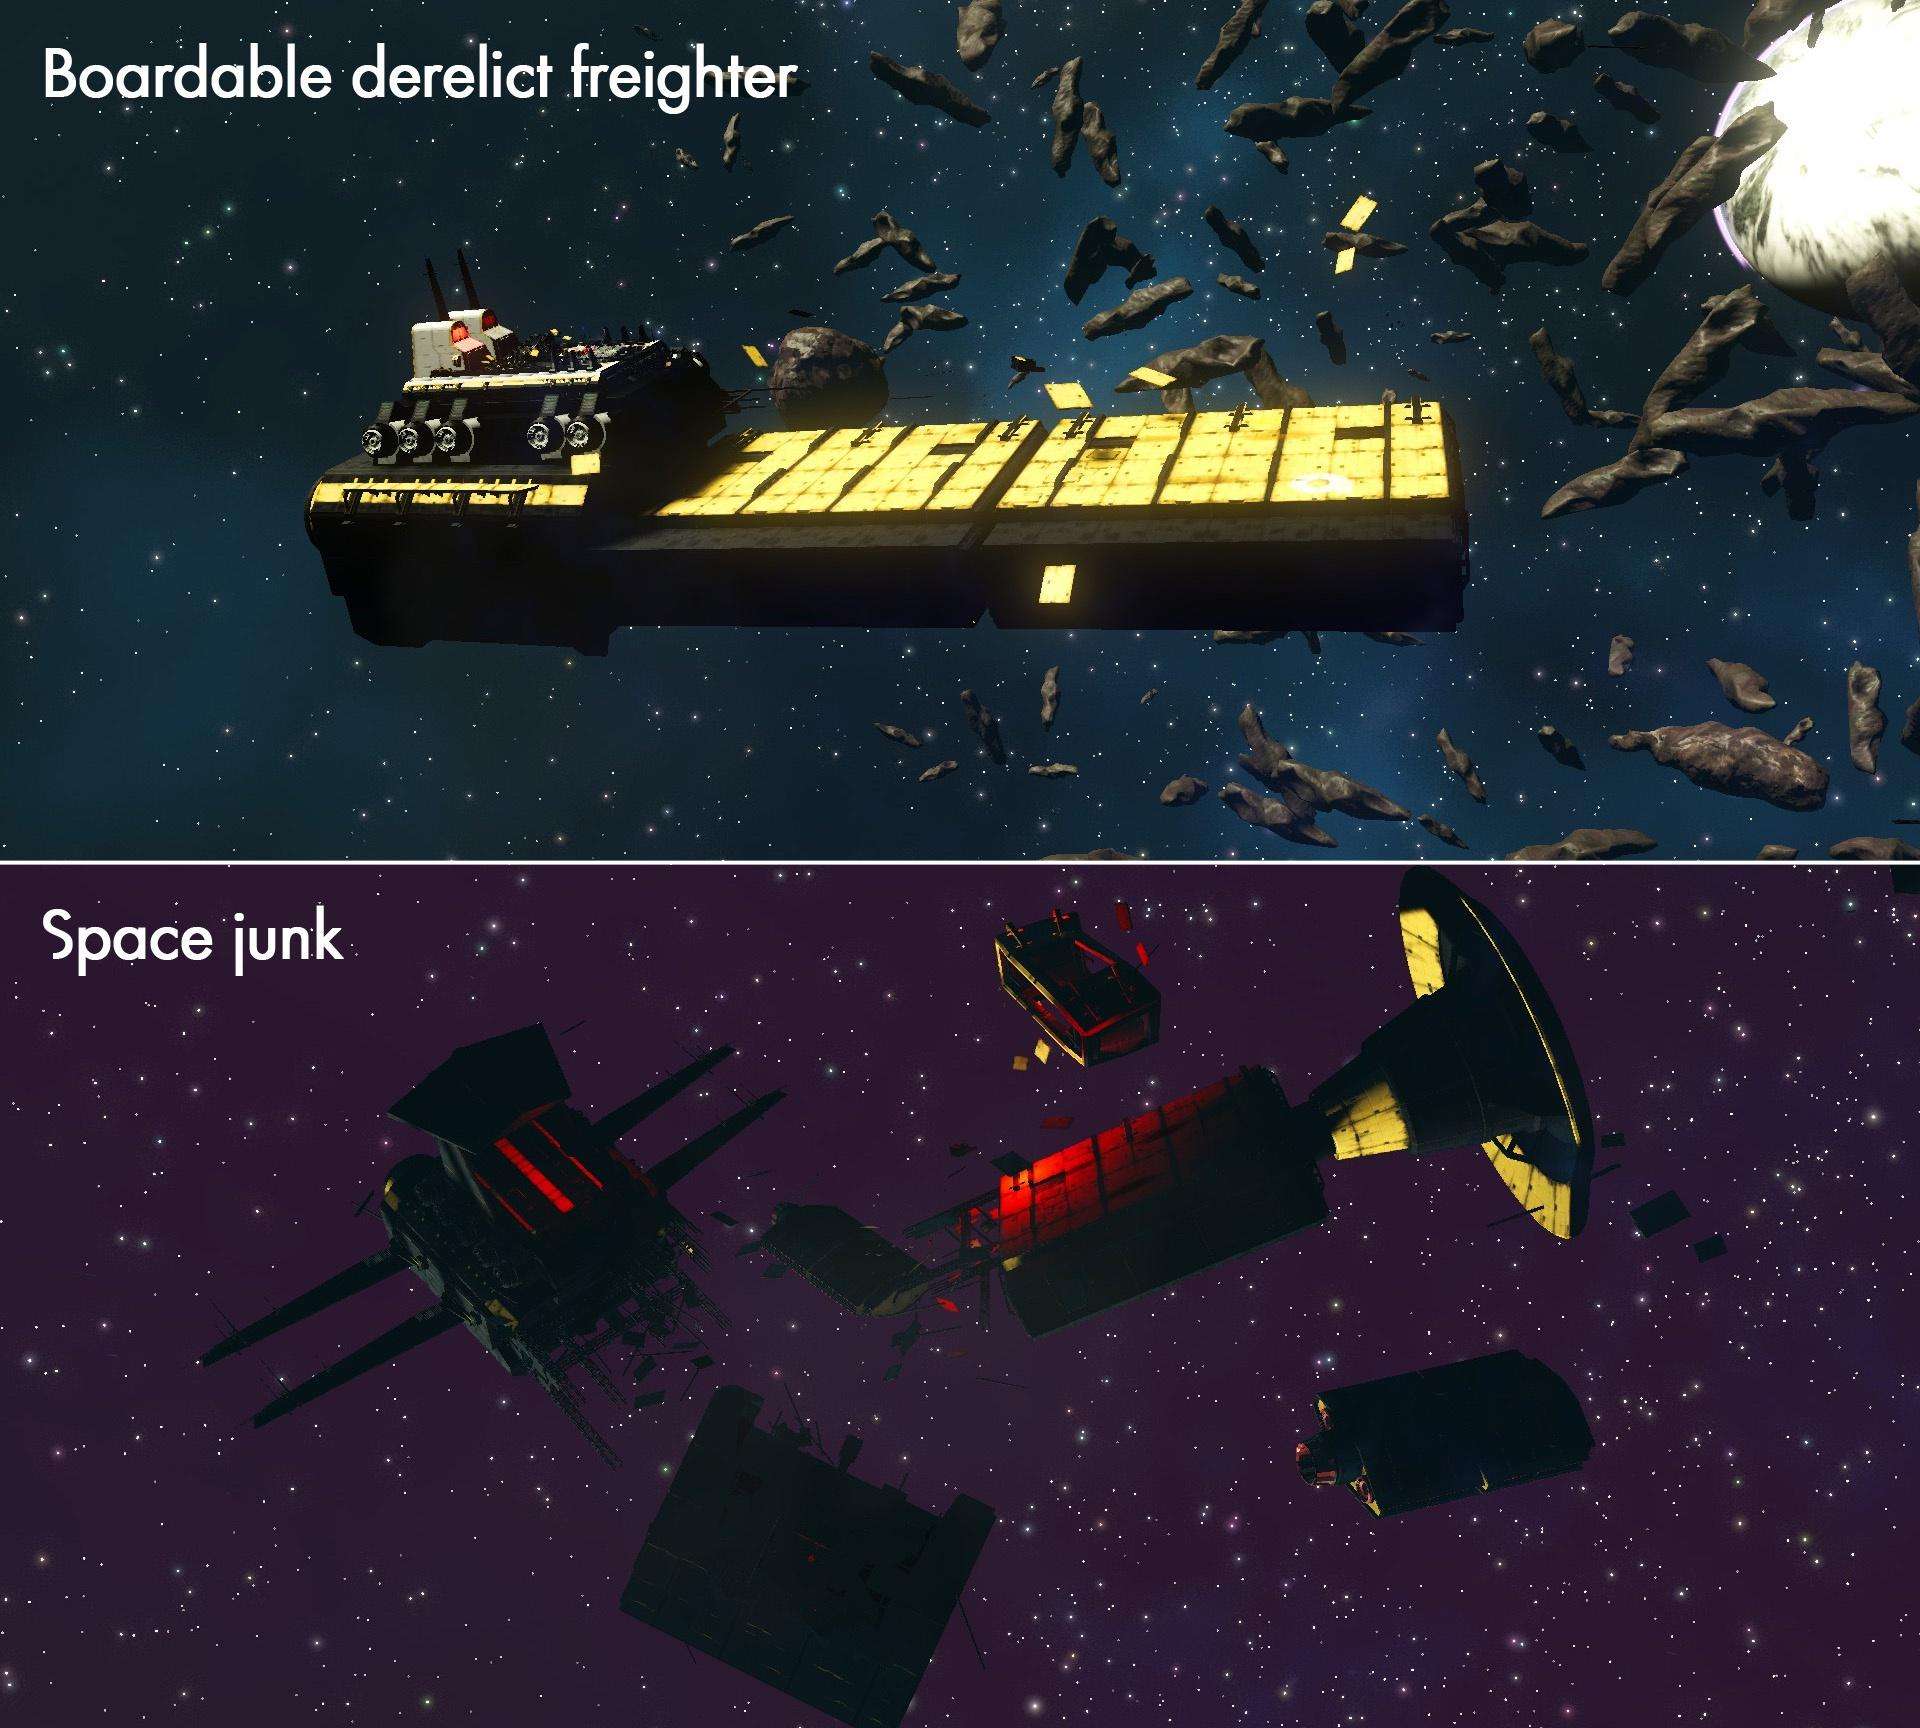
If there are nearby cargo pods, you may shoot them for materials, which it will trigger pirates.
Boardable, if the derelict…
- Is not broken into major pieces
- Has four landing pads located by the bridge
- Looks like the top freighter model in this image (colors vary)
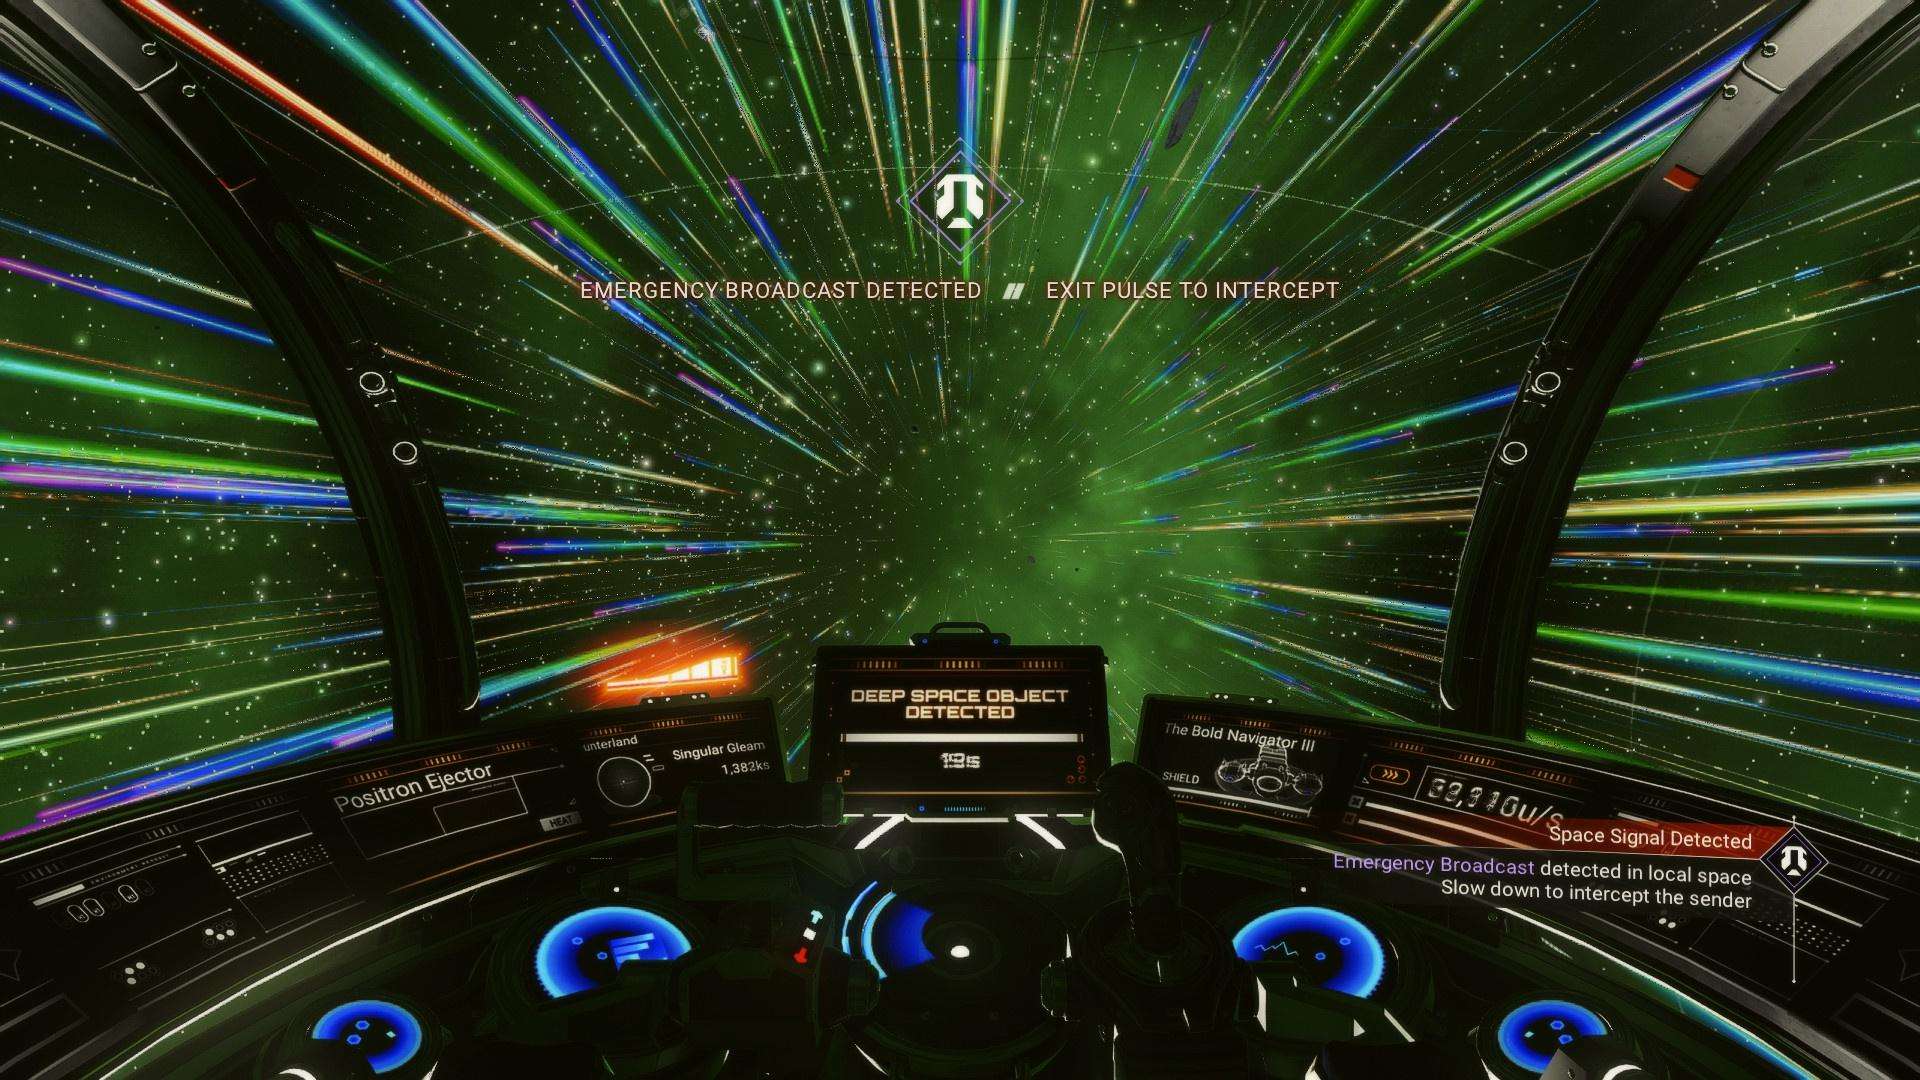
You may find it just by pulsing on rare occasions. But if you activate an Emergency Signal Scanner (ESS) in your inventory, you’ll ensure one spawns. Once it’s detected (see example below), exit pulse, land and loot. Be ready with life support recharges, cold protection recharges, and ammo for your weapon of choice.
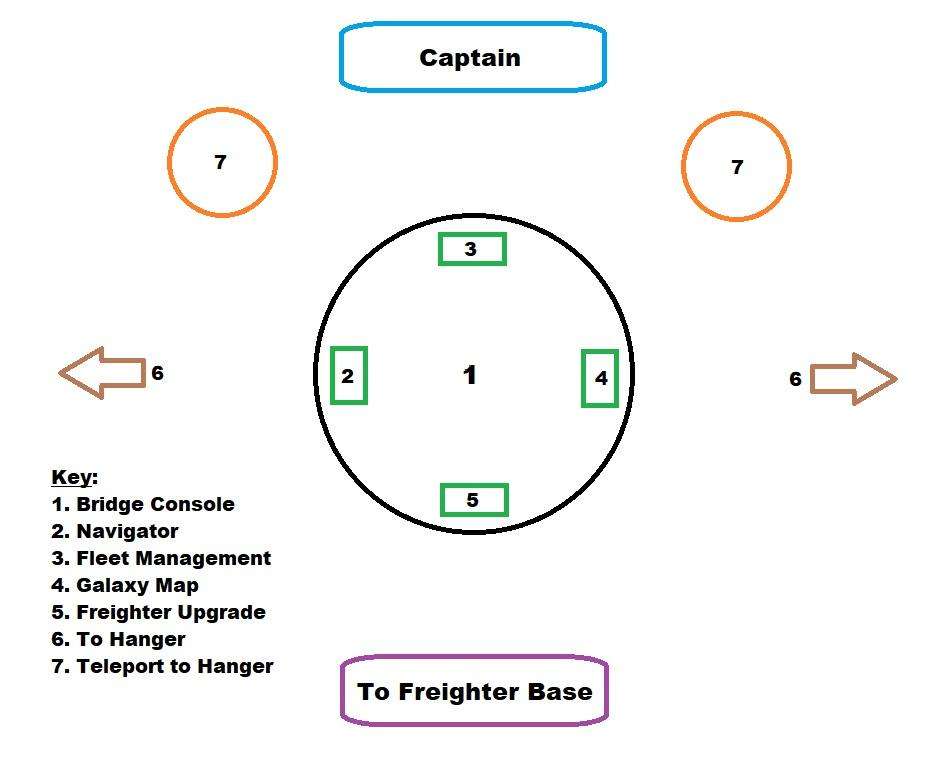
Recruiting Your Squadron
Acquire a freighter if you don’t have one.
Unlock at least 1 squadron slot in the Fleet Management Terminal on the freighter.
Slots Cost (in Nanites):
- 1st 800
- 2nd 3,500
- 3rd 7,500
- 4th 10,000
Rank Upgrade Cost (in Nanites)
- C > B 1,200
- B > A 4,100
- A > S 9,500
Go to an inhabited system. If it is an Outlaw system you cannot recruit from the station and must use another location.
Talk to an NPC pilot and recruit to your squadron. When recruiting, the class a ship spawned in doesn’t matter. Instead, make your recruiting choices based off ship appearance (and pilot appearance, if so desired) as well as pilot class.
All prices are Normal mode and may vary depending on your mode/custom settings.
Spectral Classifications
In the Galaxy Map, below the star system name, you can find the spectral class letter:
- F & G = Yellow (copper/activated copper)
- K & M = Red (cadmium/activated cadmium)
- E = Green (emeril/activated emeril)
- B & O = Blue (indium/activated indium)
Colour blind filters are available in Options > General Options > Galaxy Map Colour Filter.
Non-living ships and freighters require hyperdrive tech upgrades to be able to reach RGB systems. An Indium Drive (Starship) or Temporal Warp Computer (Freighter) will cover all systems, no need for the previous drives to be installed other than a boost to range — most notable for the Freighter.
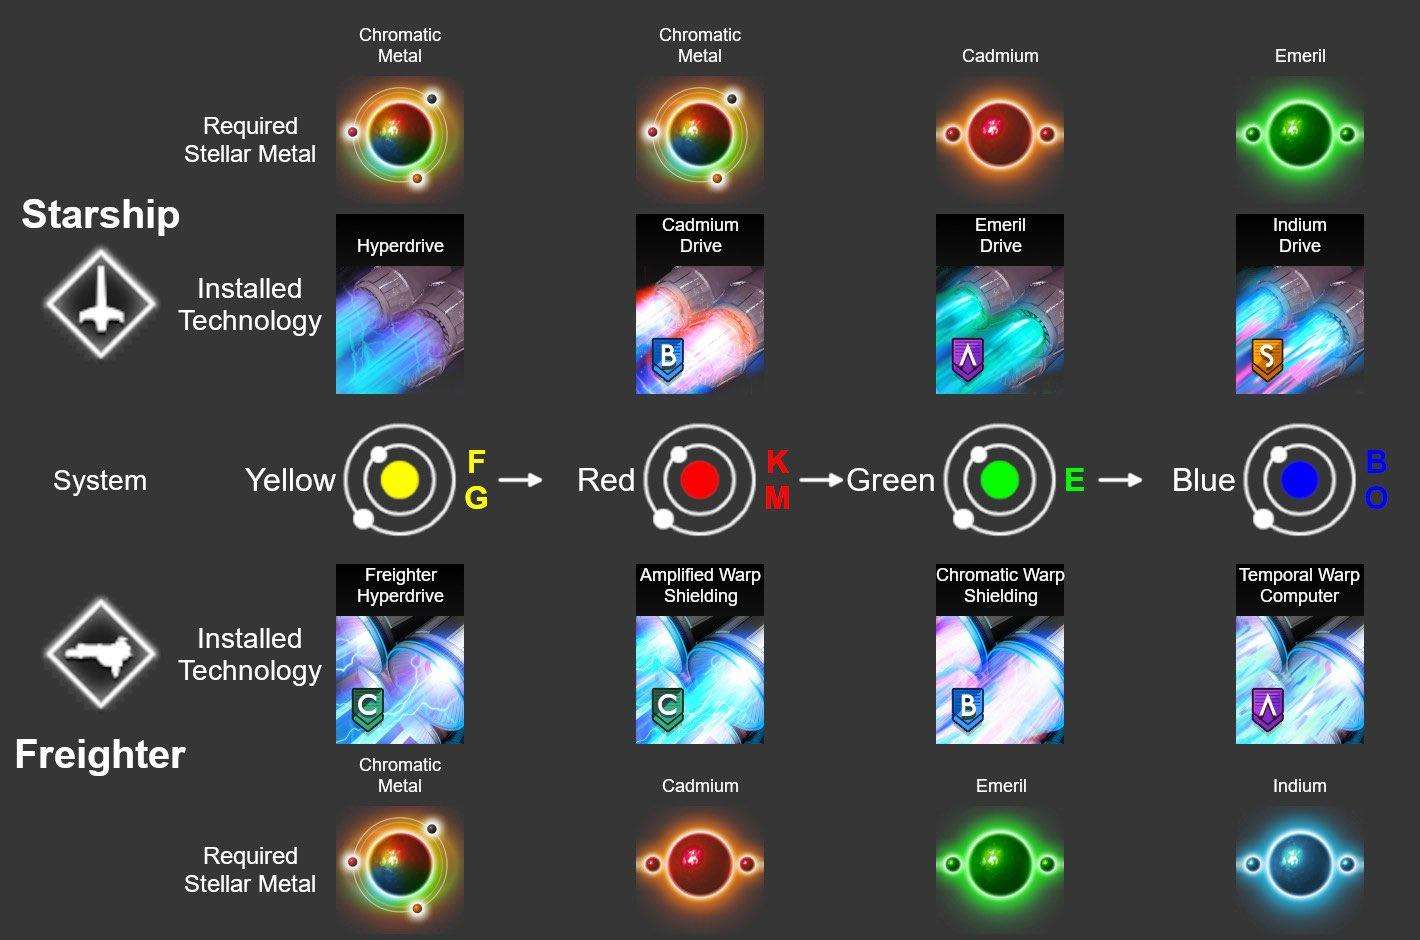
Note: There’s no information in game files that proves the host star temperature and oddities have any influence at all on system planet biome probability chances.
Did you know? A star system may have only its stellar metal, its activated version or both.
Locating a Portal
Using Planetary Charts
- Step 1) Obtain (exchanging navigational data or purchasing with nanites) 3 Alien Cartographic Data chart from a space station cartographer (the NPC shop right of the Guild NPC, on the teleporter side of the station);
- Step 2) Obtain the required race relic item. There’s 3 items (Korvax Casing, Vy’keen Dagger, Gek Relic), and the one we will need for this depends on the system race.
- Step 3) Land on a/the planet, exit ship, use the Alien chart from your inventory. Since there are multiple buildings of the same type, you may need to use multiple Alien charts until you get a marker for an “Alien Monolith”.
Note: Do not visit non-monolith markers – using 3 alien charts in the same inhabited system should guarantee a monolith marker, since charts cannot mark the same building type twice. Reload the restore point done in step 3 to reuse the same 3 alien charts, in case something went wrong.
- Step 4) Reach the “Alien Monolith” marked location. There’s multiple monolith designs, but one constant is that they always have 3 knowledge stones near them, and are built on top of a platform.
- Step 5) Interact with the monolith, pay attention to the dialog text because it will help with answering the Monolith “puzzle” correctly. After doing so, and being rewarded for it, interact with this Monolith again. This second time though, there is no puzzle to answer, we just ask the Monolith to locate the planet’s Portal for us, sacrificing the correct faction relic item obtained in step 2.
Tip: Performing a save before interacting with the Alien Monolith allows the player to reload and retry the Monolith puzzle again.
Note: The more words of the system faction the player has learned, the easier it will be to answer the puzzle correctly.
Using Exocraft
To find a Portal using this method, the player will need a land exocraft (roamer, pilgrim, nomad, colossus) with the Radar Power Resonator tech installed –
- Step 1) Obtain the required faction relic item. There’s 3 items, and the one we will need for this depends on the system faction: A “korvax casing” (Korvax systems), a “vy’keen dagger” (Vy’keen systems) or a “gek relic” (Gek systems).
- Step 2) Spawn the exocraft, enter it, open the quick menu, and in the Signal Booster submenu, select “Alien structure”.
Note: If you don’t immediately get an Alien Monolith marker on your HUD, get on your ship and travel away from that area a fair distance, and try again.
- Step 3) Reach the “Alien Monolith” marked location, correctly answer the monolith puzzle, then interact with the monolith again – and ask it to locate the planet’s Portal, sacrificing the required faction relic item, obtained in step 1.
For uncharted systems, obtain the glyph address of that system via photomode, and portal to it from another system. To fully use the portal network, the player should have unlocked all 16 portal glyphs.
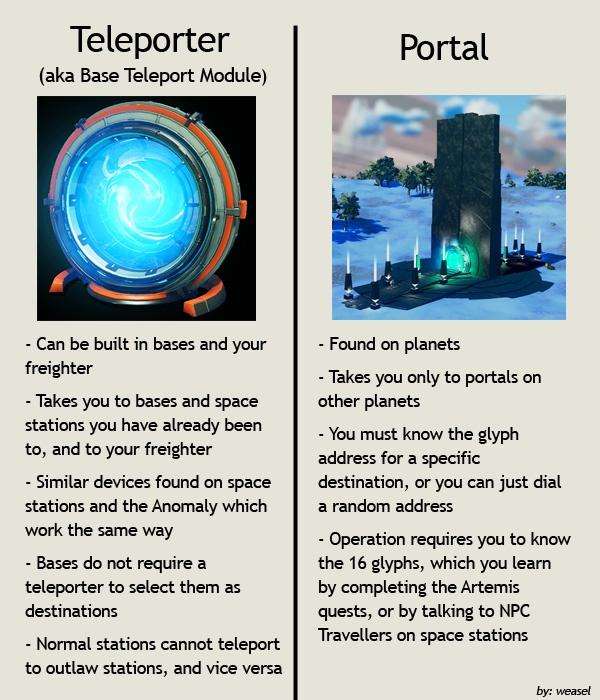
A portal is not the same as a teleporter.
Bugs, Fixes & Workarounds
Opt Into The Experimental Branch
You may also consider opting into the Experimental branch. The Experimental branch is not guaranteed to be stable, however generally speaking, it does tend to receive fixes and stability patches more quickly than the standard public release branch. If you’ve encountered an issue, I would urge you to try opting into the Experimental branch first, before attempting the workarounds below.
To be on the safe side, you may wish to backup your save files before opting in, which are located in: C:Users[Username]AppDataRoamingHelloGamesNMSDefaultUser (note that the [Username] folder will be your Windows username, and the DefaultUser folder may look like something random seeming, e.g. st_349728423978789 and that is the folder where your actual save files will be.)
To opt in, in Steam to go Library > Games > No Man’s Sky (right click on it) > Properties > Betas > Select the drop down menu and choose the Experimental branch opt-in. You will also need to enter the code: 3xperimental
Check the General Discussion forum for the latest pinned Experimental thread as well, and please let the devs there know, by posting in that topic, about any issues you encounter while using the Experimental branch. This allows them to make fixes before moving the patch to the public version, as well as improve future Experimental branch builds. This helps them, you, and everyone else.
Cannot Complete Triangulation Quest
There is an issue some users experience where they cannot progress the quest by placing the final scanner. There are two possible workarounds for this issue. The first is to simply place the scanner next to where the game tells you to (don’t worry about it not working as intended for now.) When you interact, you will not be given the option to triangulate, but don’t worry. Instead, choose the option to scan for a structure, and follow the usual steps. When done, return to the scanner you placed, and it should now offer the triangulation option.
The second, is to reload your game. Some users report that this resolves the issue. La d your ship near where it tells you to place the final triangulation component, then hop out to autosave. Then reload. Some users report this fixes the quest.
If neither of these workarounds helps, and you have also tried the Experimental branch and your game is updated, then you should report this using the bug report form and bug report discussion board as described at the start of this section. If using the Experimental branch, report the issue in the latest stickied Experimental topic as well in General Discussion.
Freighter Hyperdrive Has No Fuel Despite Being Full
There is (or was – it may have been fixed in the latest patch or Experimental branch) an issue which sometimes causes full freighter hyperdrives to register as having no fuel. This can strand players under certain circumstances.
If you can, attempt to teleport to another star system, and summon your freighter. This may allow you to at least avoid being stranded. However, some users report that this does not work for them.
The Experimental branch (and possibly public branch by now) did patch this issue, but some users are reporting that the problem persists. If you can, attempt to load a save from prior to this happening. Report the issue, including reporting it in the Experimental stickied thread if you’re using that branch and still run into it.
Base Computer Archives Issue
There is a potential issue in which the game will instruct players to return to their base computer for blueprints. However, they will then be unable to progress, and the game will tell them their base computer is instead aboard their freighter. Likewise, on the freighter they will also not be able to interact or progress.
There are a handful of possible workarounds for this. Try them one at a time and see if one works. If not, do not hesitate to report the bug.
- Summon your freighter to another star system. Then return to the system the game seems to think your base computer is located, and place a new base computer on another nearby planet. This may force the quest to become fixed, and allow progression.
- While next to the base computer on the planet, summon your freighter to orbit. The HUD icon will then return to the base computer instead of the freighter. Some users have had to repeat this for it to work. Others have reported it does not solve the issue.
- Travel off-world, into space. Summon the freighter, so that it leaves the mission waypoint. Then return to your base on the planet, and save your game. Exit the game entirely, and then reload that save. The game may reset the mission target to the base computer on the planet and allow you to progress.
Report this bug if none of these workarounds work. For that matter, please report it regardless if encountered.
When Playing A Save File From Before Next Old Bases Cannot Be Restored
You can get your base back. However, you need to find a non-player-crafted base computer. These are difficult to find now. But they do exist. Once you find one – preferably on a planet you like – you can summon your old base. Again, this must be a base computer “in the wild,” not one that you craft/deploy yourself.
Also note that an in-game tutorial section directly referencing this has been added. However, if it is unclear exactly what to do, please follow these directions. Here’s what you need to try to search for non-crafted base computers “in the wild.”
All you need is a beacon, one navigation data, and your portable signal scanner.
- Land somewhere.
- Deploy your scanner.
- Jump in and out of the cockpit to make an autosave. I recommend having a recent manual save from before you jump so that you can recycle the warp fuel.
- Activate the scanner, feed it the navigation data, select habitable base.
- If it reads shelter or settlement, look at it. If it says habitable base, you’re golden.
I’ve heard you can also deploy the scanner in your freighter. One to three scans per system should tell you if it has something worth looking at. You don’t need to move to each planet. It’ll scan system-wide.
Tech Layouts
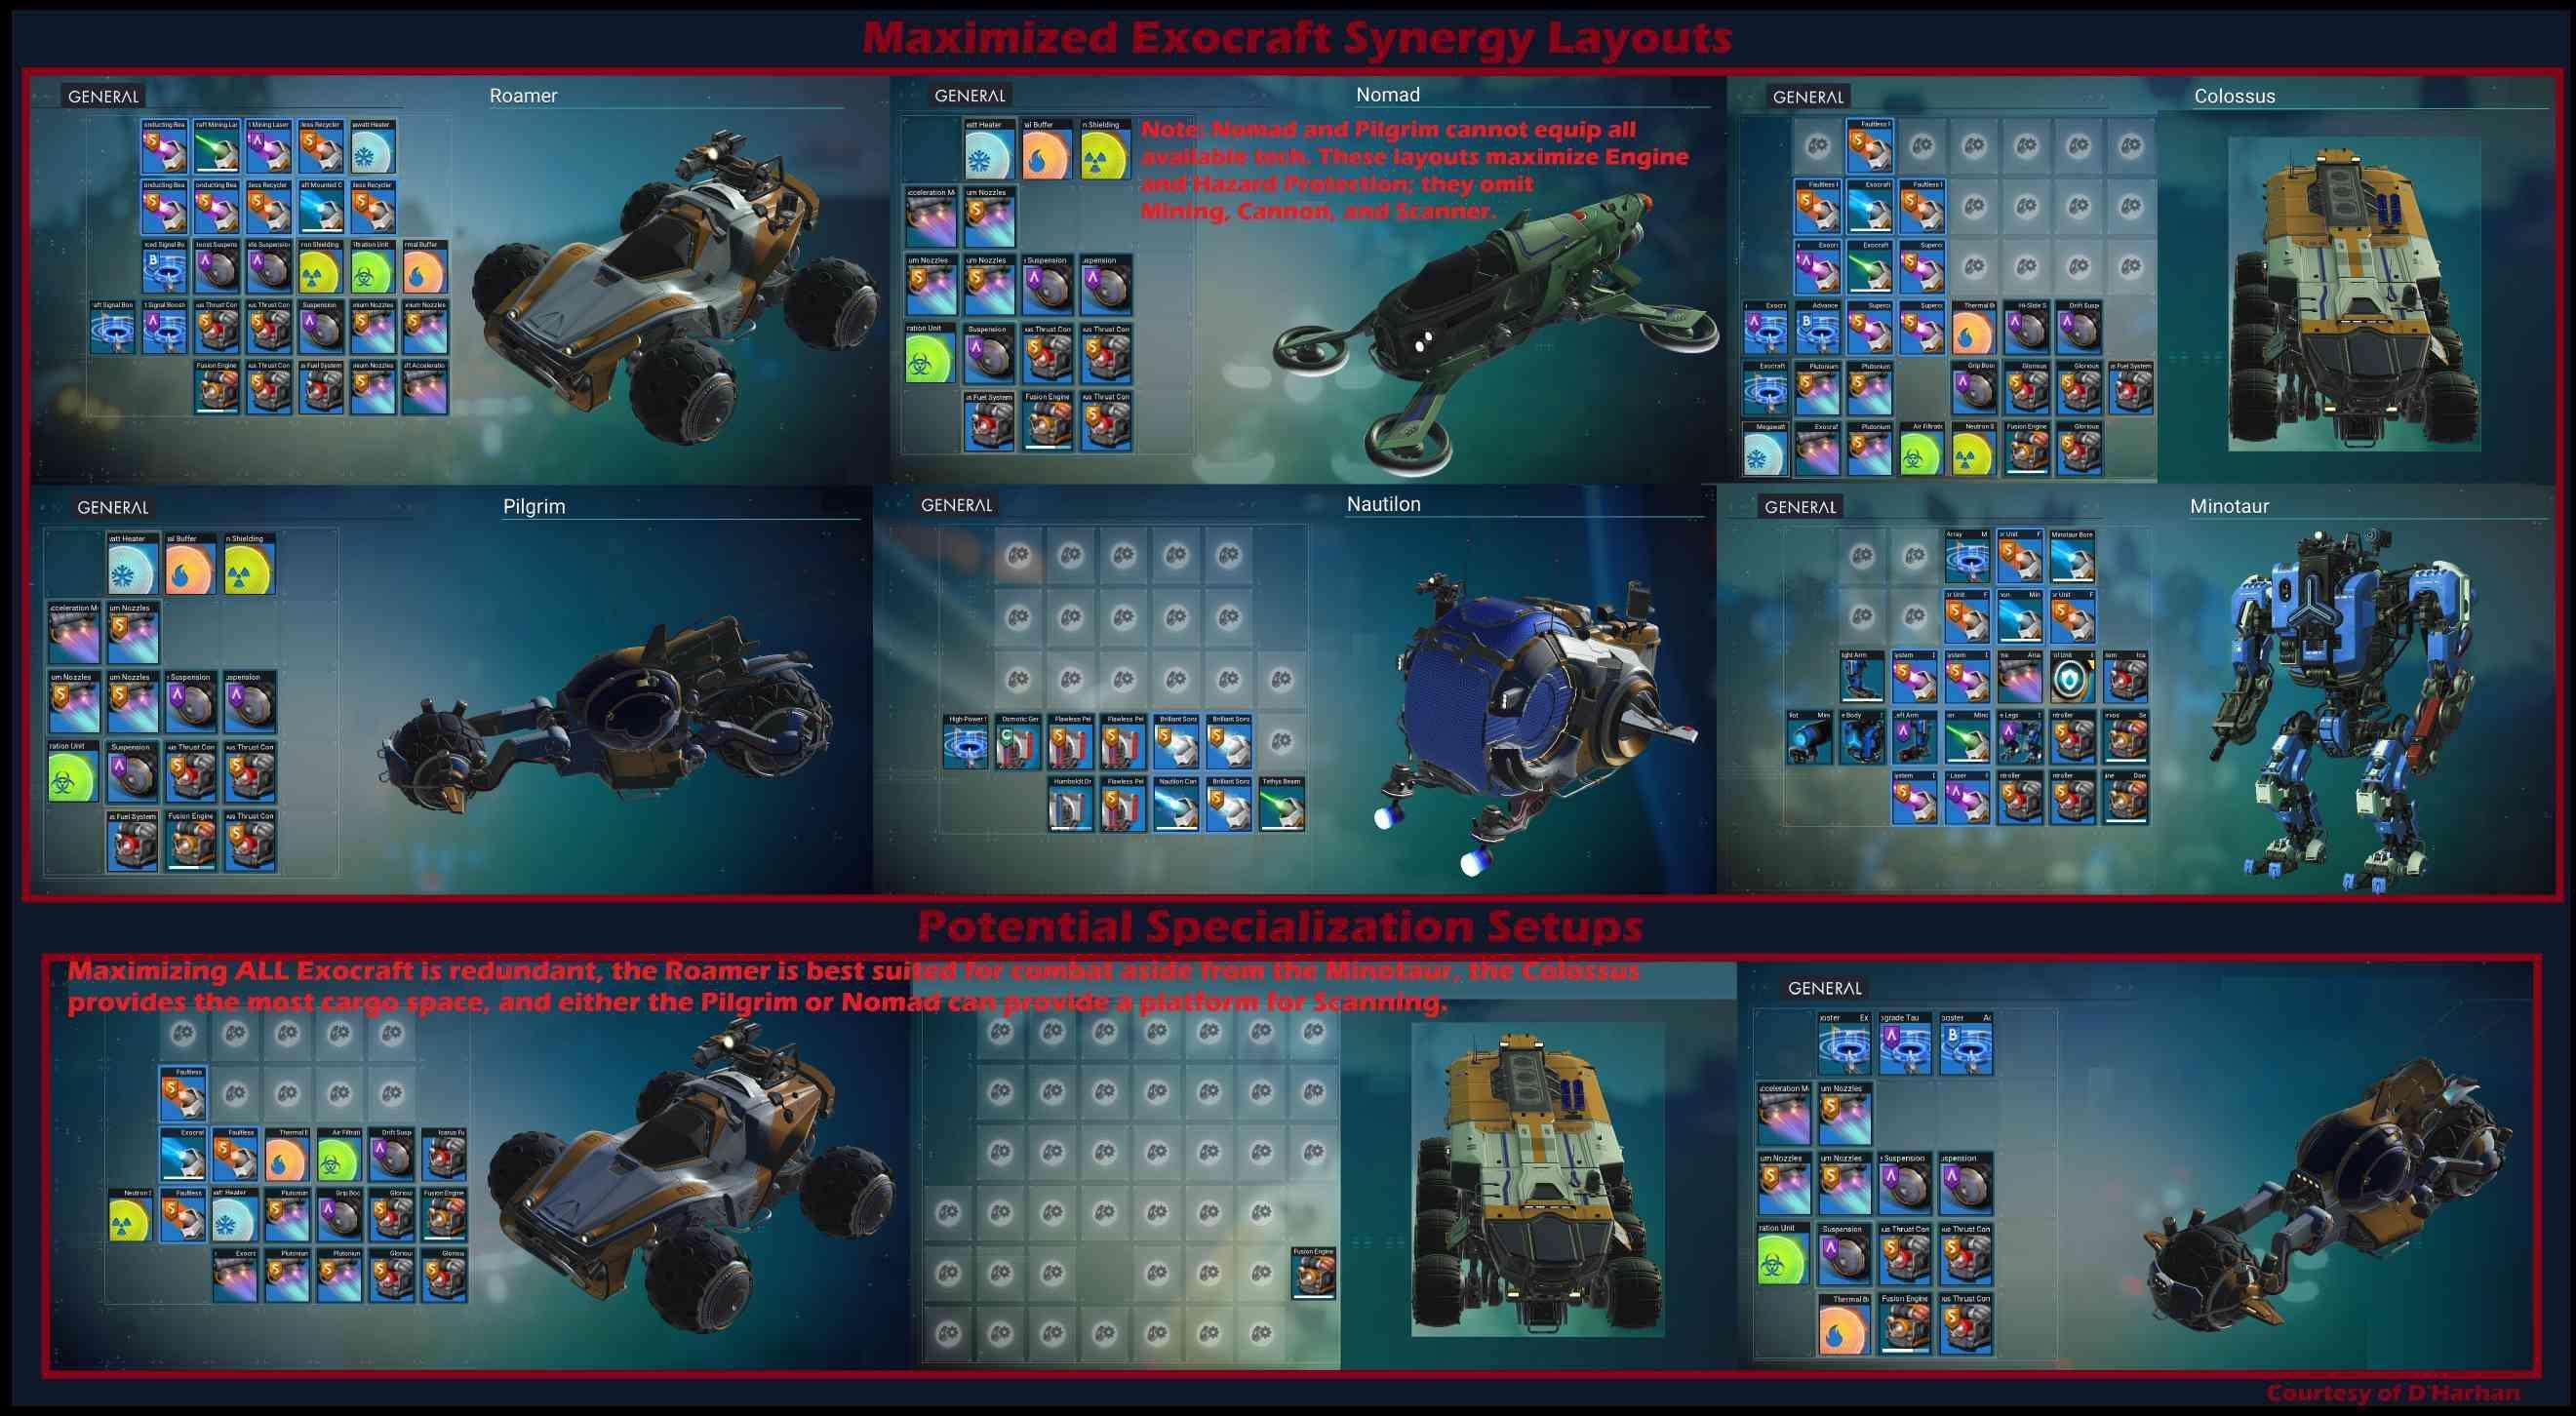
Synergy Layout for Exocraft Tech
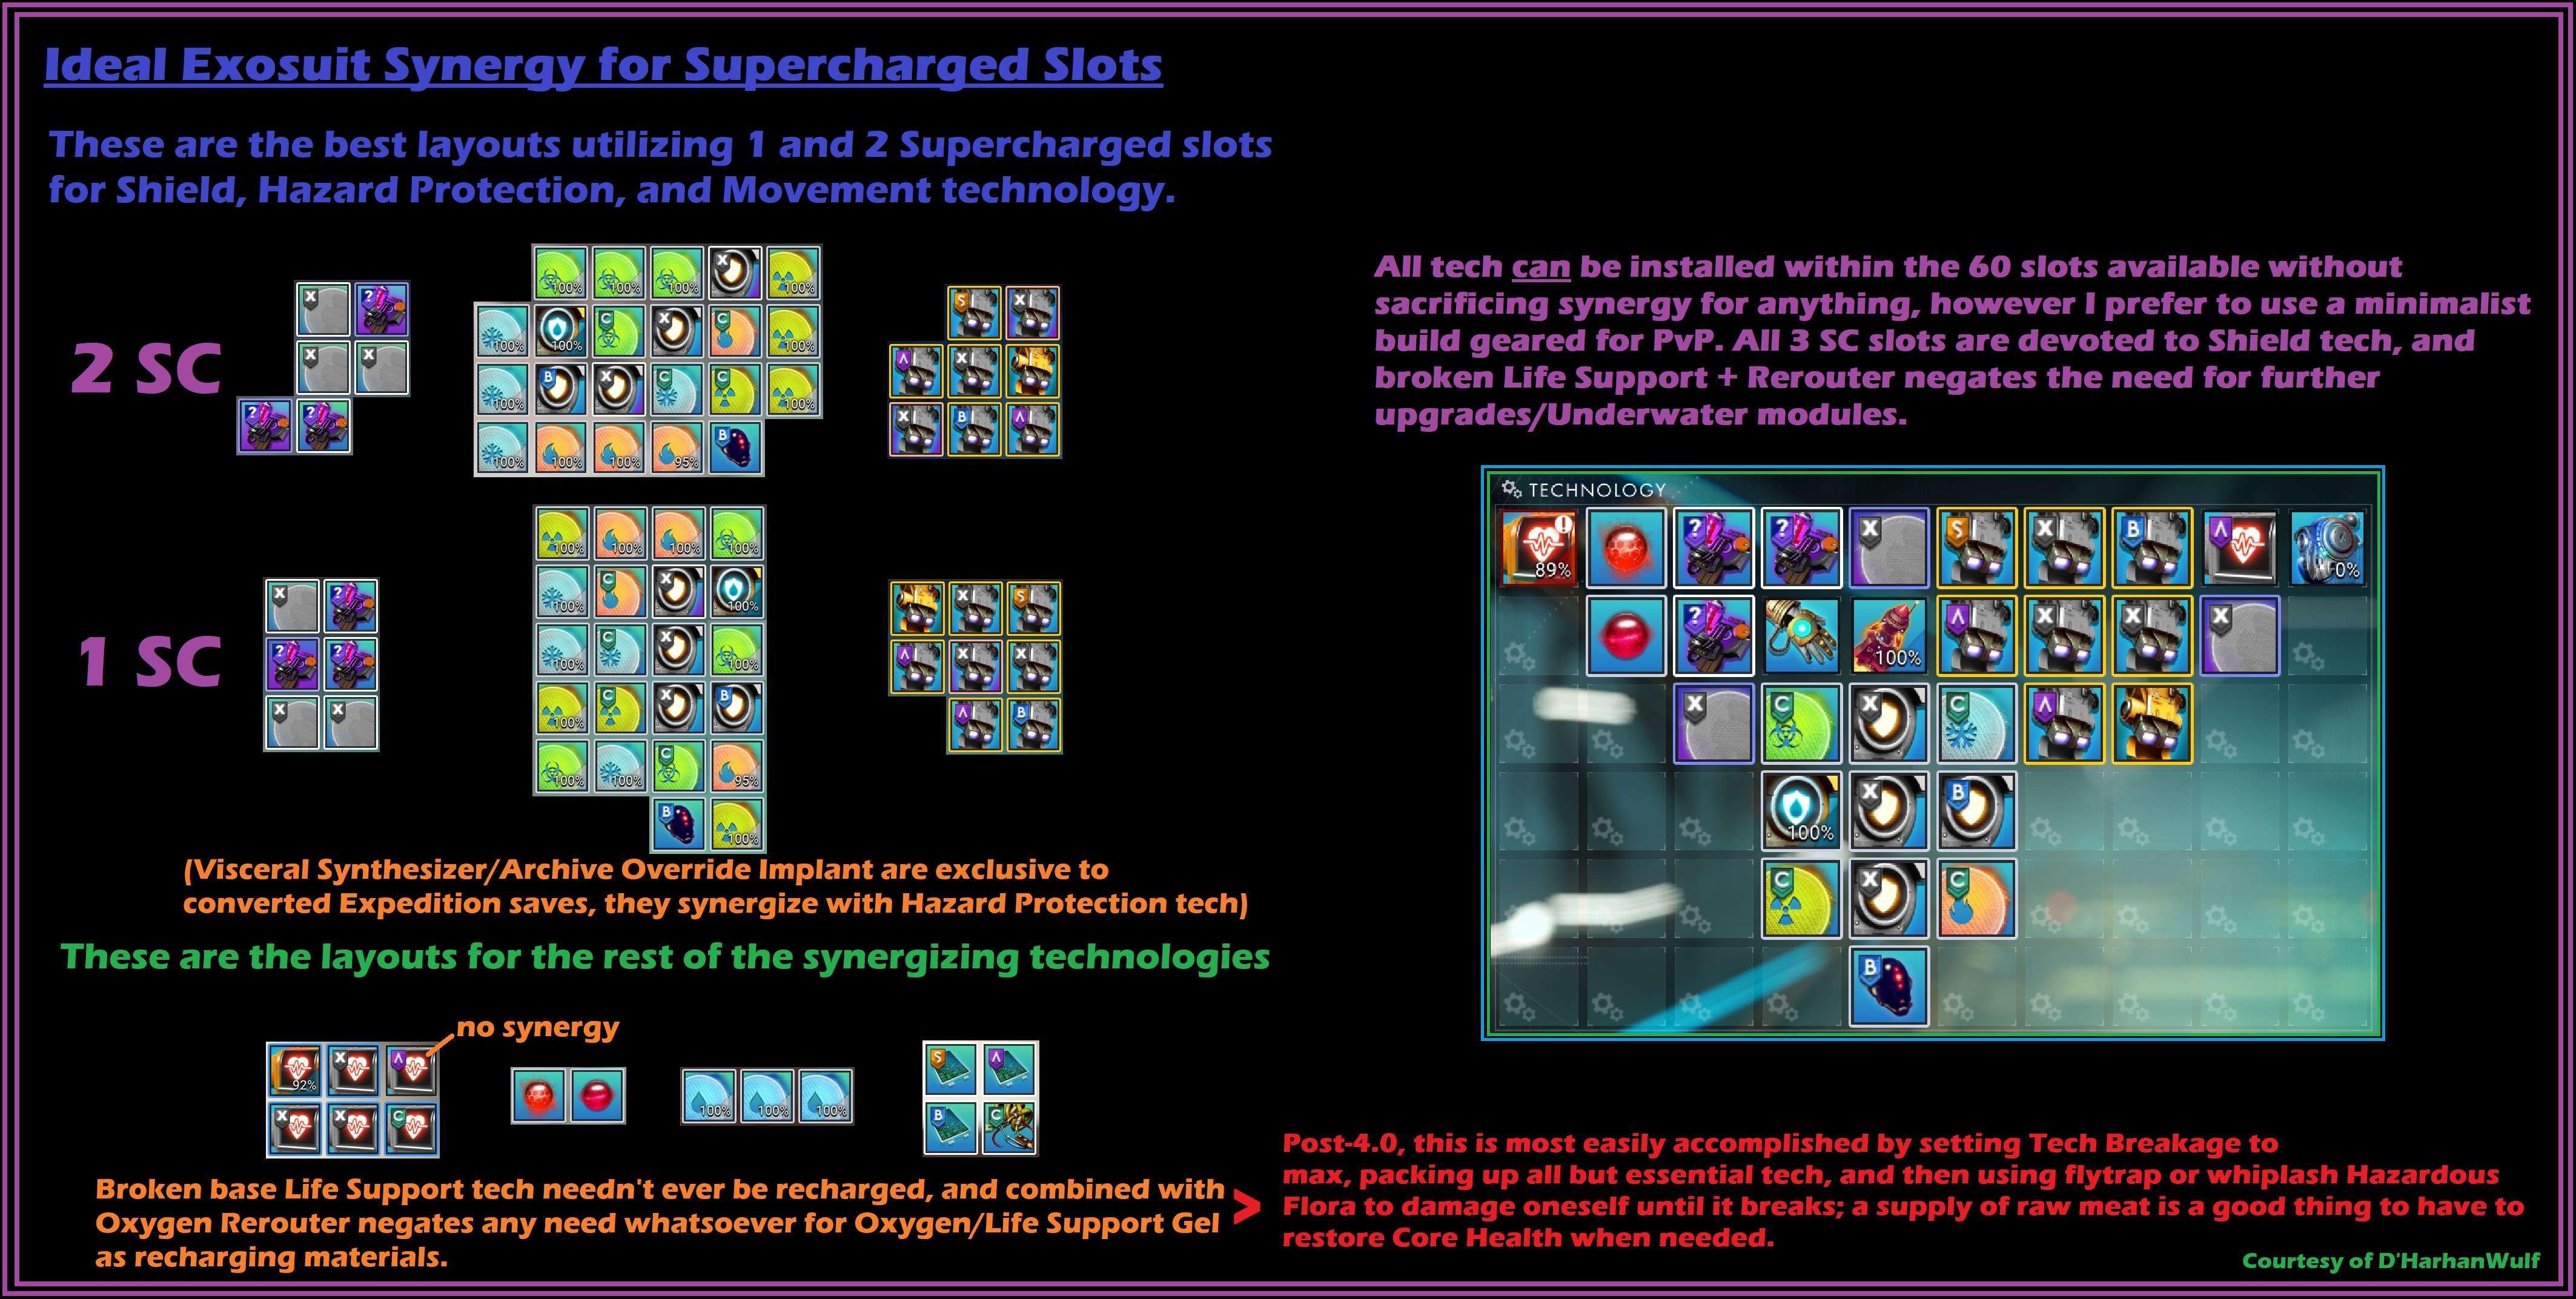
Ideal Layout for Exosuit Synergy
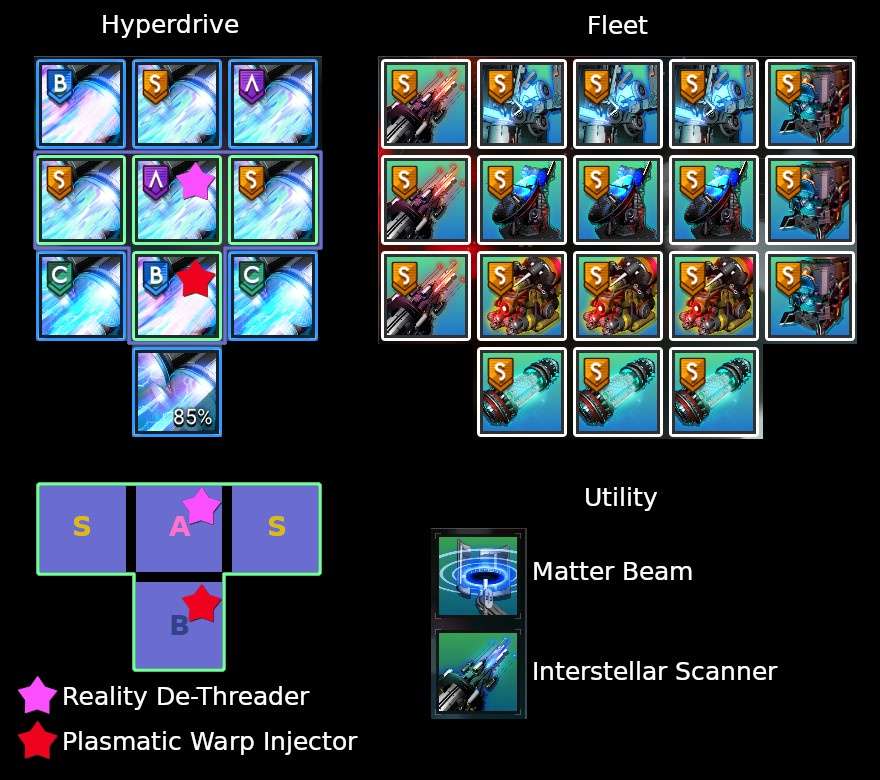
Freighter Tech Layout
This is an example of perfect adjacency and supercharged slot arrangement for freighters. Different freighters can have different supercharged slot layouts which can result in varied stats.
Note that bonuses from supercharging always beat adjacency bonuses: You can opt to break the adjacency, when/if your supercharged slots are not adjacent to each other at all.
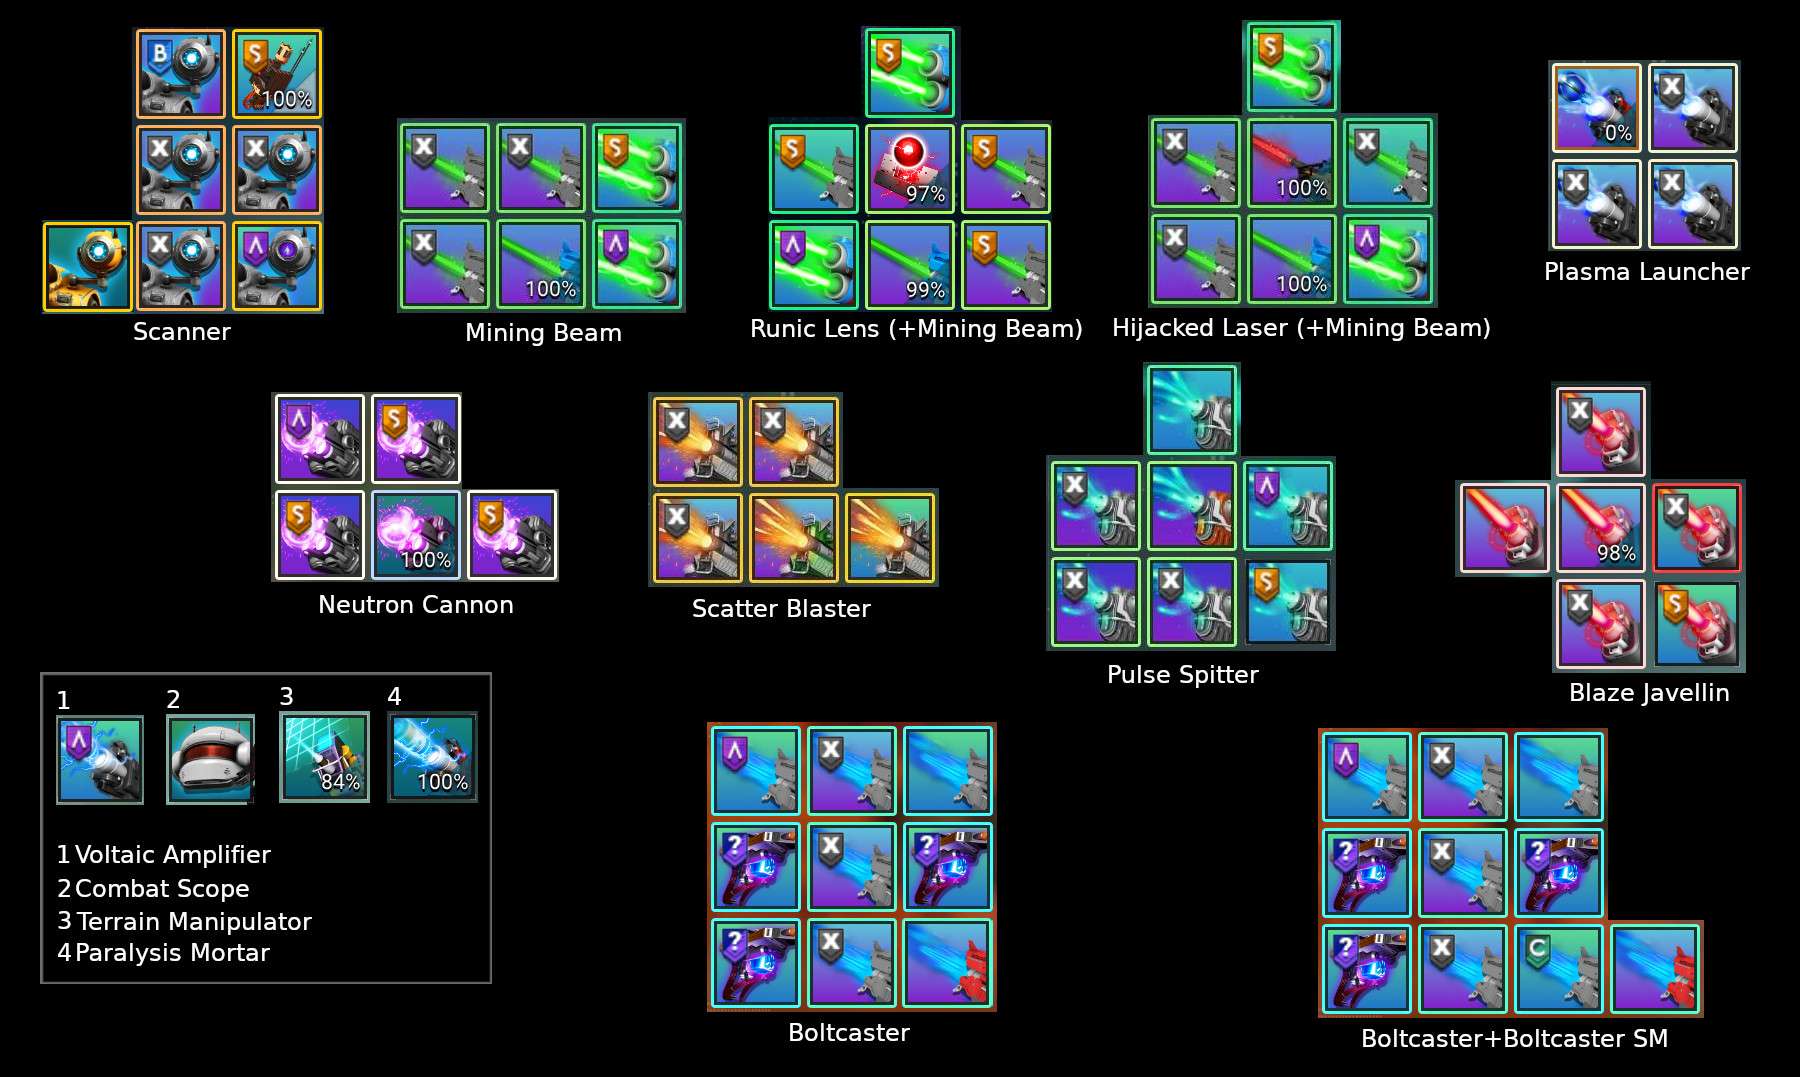
Multitool Tech Layout
This is just an example of adjacency and supercharged slots. Note that supercharging bonuses always beats adjacency bonuses. Therefore, to maximize tech stats, split apart tech to utilize supercharged slots, as they will yield superior results over maintaining perfect adjacency.
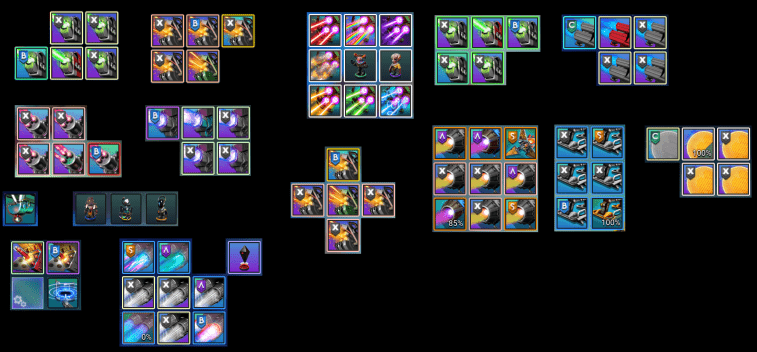
Starship Tech Layout
This is just an example of adjacency and supercharged slots. For hyperdrive and pulse engine, this example does not apply to sentinel interceptors.
I appreciate your time and hope this little tutorial was helpful.



Be the first to comment