
Farming Base Guide
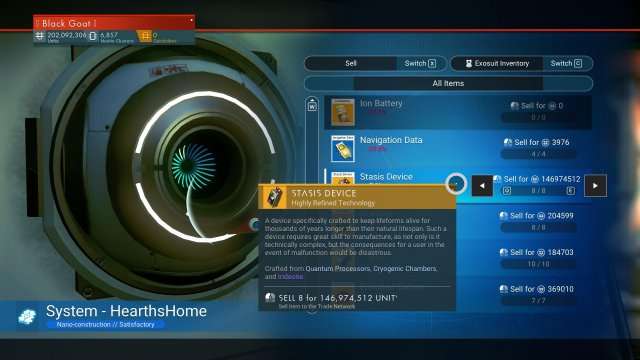
This is a guide to build a farming base on a planet. It will let you make all the materials to craft “Stasis Devices”. These items sell for 18 million units each.
If you follow this guide, you can make 8 Stasis Devices (147 million units) every 120 minutes. This means you can earn over 1 billion units in half a day. You only need to spend a few minutes harvesting each time.
I will explain why we limit production to 8 items per cycle. I will also include tips on how to make cycles faster and how to increase production for maximum profit.
This guide will give you build ideas. It will not give you a step-by-step building plan. You can put your biodomes, oxygen harvesters, refiners, and plant fields wherever you want.
Introduction and Prerequisites
A Note on Starting Out: Producing T5 trade items like the Stasis Device is not a task to be undertaken right after a Traveler awakens. This is advanced gameplay that will require a large number of blueprints as well as the ability to locate, mine, refine or buy thousands of units of raw materials needed to craft the structures and seed the hundreds of plants that will be required in setting up our functioning farm. This process will also require a bit of time, how much time will depend on how quickly you can farm up the needed blueprints and gather the construction materials.
I went about this in a relaxed way, doing other in-game things at the same time while also having very bad luck with blueprint drops so it took me around 20 in-game hours total to complete this farm from first conception. With my collected and simple knowledge in this guide, I hope it should take you less than half that time to start making billions and enjoying the true fruits of your farming fortune: exotic ships, capital freighters, and the freedom from grind to spend your game time exploring the galaxy’s infinite wonders.

When to Become a Dirt Farmer: You don’t have to wait until endgame when you have seen and done everything to start this process but you should be solidly into the midgame; having saved up a few million units, maybe built a small base and unlocked some blueprints from the NPCs, expanded your ship and exosuit inventories, discovered some rich systems that will be useful for buying bulk construction materials and T0 raw inputs, and ideally have familarity with how to aquire technology blueprints from Operations Centres and Manufacturing Facilities on planets (I will detail this process further below).
What you will need: the most important prerequisite for what we are trying to do with this farm are the blueprints for the T1-T5 trade goods we will be producing. Without those blueprints, even a fully functioning farm will leave us with nothing but an unusable glut of carbon and thousands of units of plant materials that are almost entirely useless on their own. In short, we have to find all the necessary blueprints to complete the T1-T5 production chain if we want to make our fortune from the dirt, so that is where we should start.
Blueprints that we absolutely need:
- Nitrogen Salt
- Thermic Condensate
- Enriched Carbon
- Semiconductor
- Superconductor
- Poly Fibre
- Heat Capacitor
- Circuit Board
- Quantum Processor
- Lubricant
- Glass
- Living Glass
- Hot Ice
- Cryo-Pump
- Cryogenic Chamber
- Grantine*
- Iridesite
- Stasis Device
Optional blueprints (these items can be bought):
- Magno-Gold
- Aronium
* Note on Grantine: This was once an optional blueprint as in the past this item was sold but while double checking my facts for this guide, I was not able to find it. So it may have been removed from sale lists the way Nitrogen Salt and Enriched Carbon were recently. No matter, it is easy to make.
The chart below shows all the above T1-T5 trade items/blueprints needed in our production chain as well as their relationship to each other, it would be good to familarize yourself with this information or keep it handy for reference.

Getting the blueprints: Some of these blueprints you can get by doing the Scientist Station and Base Computer questlines but many others, particularly the higher tier ones, you will only get by completing the puzzles found at the terminals in Manufacturing Facilities and Operations Centres on the surface of inhabited planets. Gek and Korvac systems seem to provide the most trade good blueprint rewards from their sites while Vy’keen seem to more frequently provide module rewards so I would recommend staying in Gek/Korvac space to farm your blueprints.
There are three ways to go about finding Manufacturing Facilities and Operations Centres:
- Ask NPC lifeforms for directions in stations or at trade posts, sometimes you will get lucky and they give you the right site, other times they will offer a useless ruin or distress signal.
- Fly low and slow over inhabited planets looking for these sites. You can test to make sure you’ve found the correct facilities by shooting their doors; if they take damage, you’ve found the right type of building.
- The fastest way I’ve found is to feed Navigation Data into the Signal Booster portable technology placeable and choose the option to “Scan Secure Frequences” as this almost always returns a correct site. You can easily find 1-3 Navigation Data on practially every space station in the game, look for interactable blue cubes, orange diamonds, and black discs on tables and counters.
Once you have found a suitable site, they all work the same way: to enter you will have to shoot and destroy the “Reinforced Door” if you did not do so with your ship’s cannons from the air. This will trigger nearby sentinels to attack you and others to spawn. Usually they are not a threat but some facilities have multiple “dog” sentinels and even two-legged “walker” types so blast the door open quickly and run inside, the sentinels will not follow or continue to attack you once you are inside, it as if you become invisible to them and they will eventually despawn or leave.
Now that you are inside you must interact with the facility terminal and solve a puzzle, some of these are simple math riddles, others are more like logic puzzles or even guessing games with a few hints given to you in an alien langauge that you may or may not have found the words to understand yet.
I recommend using the following data spreadsheet to find the correct answers for each:
If you fail, simply reload your last autosave and try again until you succede and recieve a random reward of a blueprint, upgrade module, nanites, words, or units. (The rewards do not change with a reload so there is no point in trying to reload until you get a specific blueprint.)

Once you have completed a facility, continue searching, scanning, or asking about more until the planet and system have run out of facility/centre spawns or you start to get sent back to sites you have already cleared, this is the time to move on to another system.
I would also highly recommend while searching these facilities that you take the time to dig up nearby buried “salvaged technology” visable on your visor scanner if you have not farmed these already. You will need to turn in several dozen to the Blueprint Analyzer to unlock the Biodome base room that we will need to construct our farm in the next section of this guide.
Final Word: Grinding for these blueprints is the most time-consuming and least rewarding aspect of setting up your farm, but if you can get through this repetitive part, you’ll have done the vast majority of the “work” already. The next section will detail preparing and constructing our farm and machinery, which is where the real fun and logistical challenge begins.
Preparation, Set-Up, and Construction
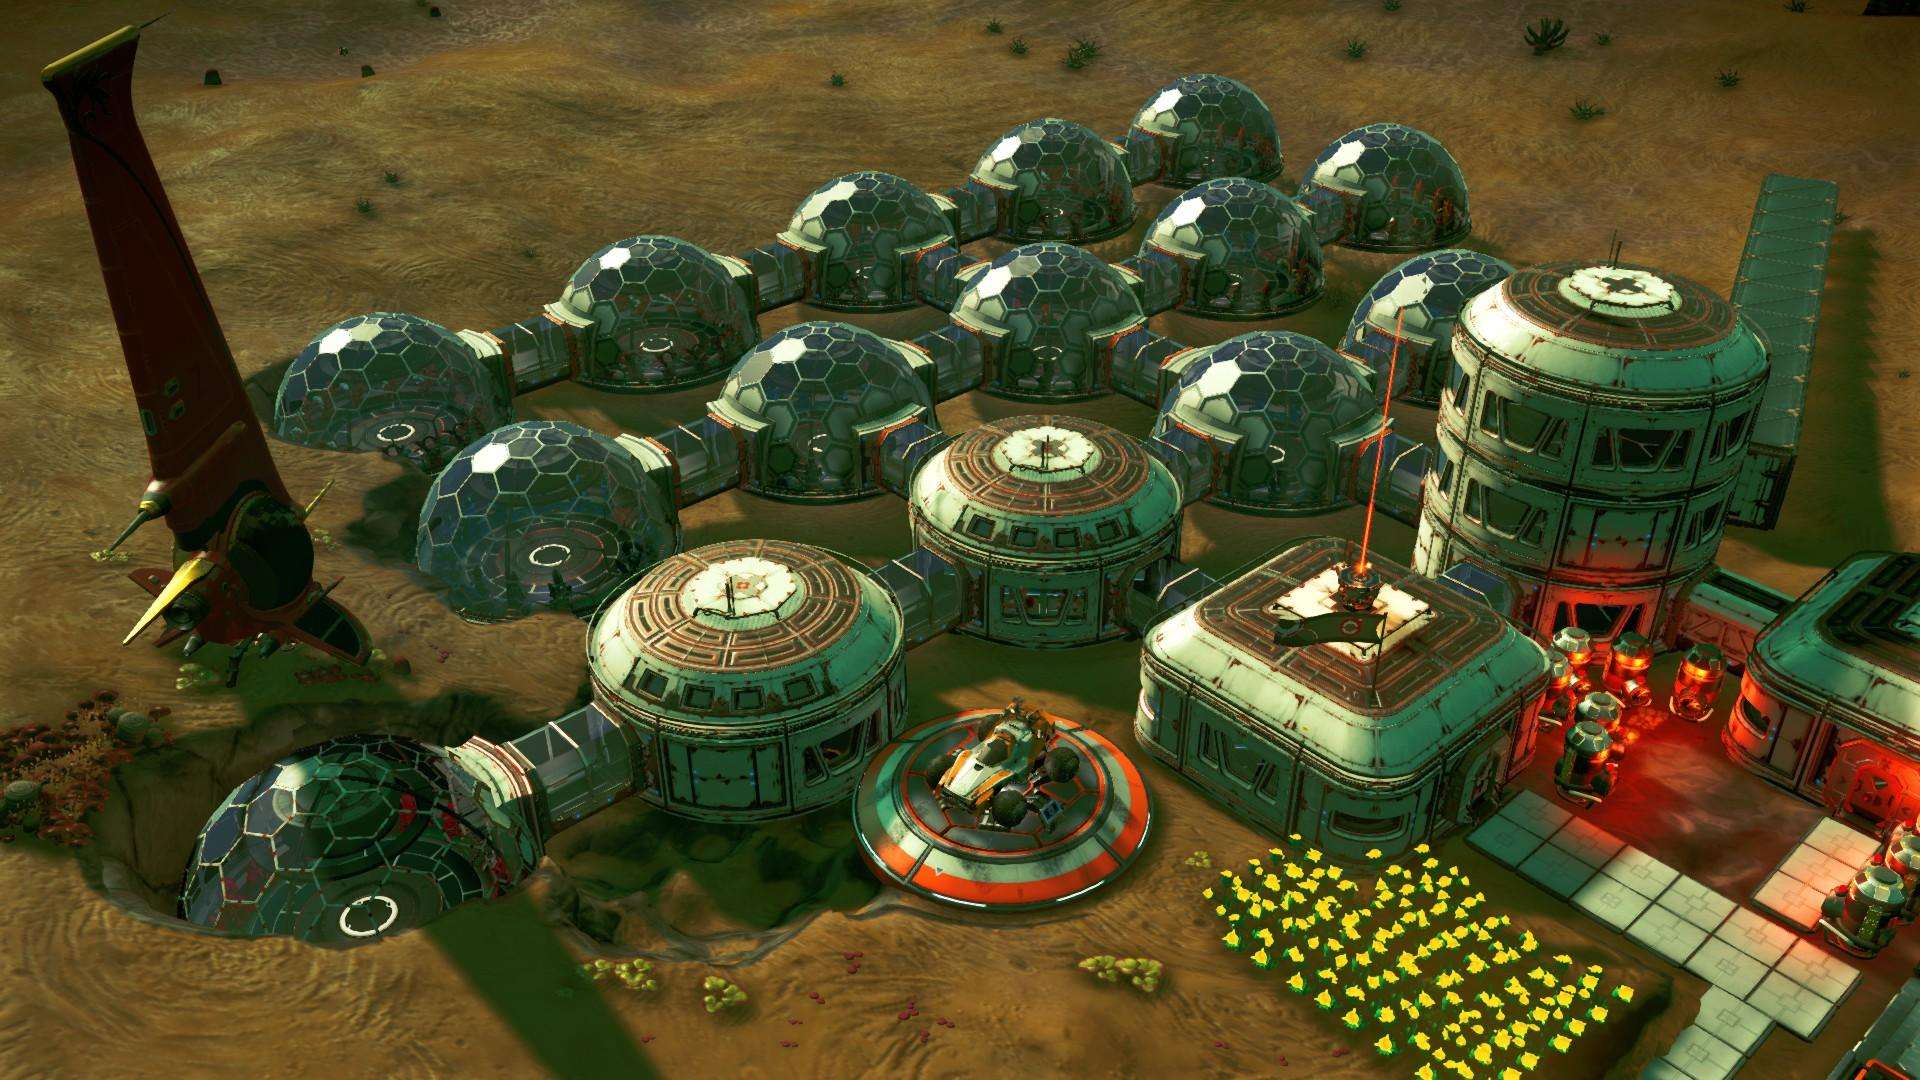
Where to build the farm: It truly doesn’t make a huge difference in set-up or final harvest time where we locate our farm so I suggest building it on a planet you like or already have a base set up on.
Ideally speaking, if you wanted to minimize the building materials needed for farm construction by using the fewest hydroponic biodomes possible and maximize the usefulness of local planetary conditions in harvesting the proper plants you would want to locate your farm on either a Lush or Radioactive world. The reasons for this being that Star Bulbs and Gamma Weed are our largest crop, requiring 64 plants each to provide the materials we need. By locating on a world of either type, we can plant the respective crops directly into the dirt and thereby build 5 less biodomes than we would otherwise need on a planet incompatibe with any of our crops.

What do we need to prepare? Before we start building the base rooms, farm domes, seeding the plants and constructing the additional machinery required to support production, we need to make sure we have all the required base construction blueprints.
We will need the blueprints for:
- Glass
- Large or Cylindrical Rooms
- Biodome
- Oxygen Harvester
- Medium or Large Refiners
- Gamma Weed
- Coprite Flower
- Star Bramble
- Solar Vine
- Echinocactus
- Frostwort
All of these blueprints come from either the Blueprint Analyzer (Biodome), the Scientist Station questline (Glass, Oxygen Harvester, Refiner), the Farmer Station questline (the plants), or the Overseer/Base Computer questline (Rooms and Refiner).
Make sure that you have farmed enough buried salvaged technology and progressed these NPC’s quests far enough to get the listed blueprints at least, going further to recieve the Galactic Trade Terminal, Landing Pad, and Holo-door blueprints can be useful but are not required for our build.
Notes on base construction: I’m not going to list out all the materials needed for building the rooms to host refiners and the biodomes for the plants because the number of those and the layout you use will vary depending on your existing base setup, the type of planet you are on, whether you intend to scale this operation up or down to your own specifications, and how optimized you wish your farm’s layout to be.
At this point you may wish to construct the refiners and harvesters that will support the finished farm with carbon fuel so that you can make use of them in producing the materials you will need as you begin to put the base and farm together.
I recommend building and using 4 Medium Refiners and 5 Oxygen Harvesters which will require:
- 25 Metal Plating
- 25 Oxygen Capsules
- 35 Di-Hydrogen Jelly (Purchased or 1400 Di-Hydrogen)
- 400 Magnetized Ferrite
Construction notes continued: A large ammount of both Pure Ferrite and Magnetized Ferrite will be required for constructing your rooms and hallways regardless of how many you build, so hopefully you have rocks located near to the construction site you can mine or you have bought the required materials in bulk from a rich system’s space station or alien traders.
Be aware that you can combine Ferrite Dust with Pugneum in the Medium or Large Refiner to expand the ammount of Pure Ferrite you recieve from refining the dust. The same is true for adding Pugneum to Pure Ferrite to recieve additional Magnetized Ferrite. Use this recipe to your advantage if you have a supply of Pugneum left over from your blueprint farming and are lacking in Ferrite.
You will also need a source of glass before you can begin construction on the hydroponic biodomes themselves as they require 5 glass each which is 250 frost crystal, equal to harvesting 5 frostwort. If you do not want to farm wild plants for this material you may need to build a temporary farm for frostwort in a large planter inside a large room to grow your glass materials as you prepare the rest of the base materials, fortunately Frostwort grows to maturity in just 15 minutes so this glass can be produced very quickly.

Materials needed for the farm: The thousands of Ferrite and dozens of glass required to construct the base rooms are nothing compared to the materials needed to seed the 240 plants that the farm will host, so I hope you are ready for the big logistical challenge of this build!
The completed farm will need:
- 16 Coprite Flowers
- 8 Echinocactus *
- 32 Solar Vine *
- 56 Frostwort
- 64 Gamma Weed
- 64 Star Bramble
In materials that requires:
- 640 Coprite
- 800 Pyrite *
- 3200 Phosphorus *
- 5600 Dioxite
- 6400 Uranium
- 6400 Parafinium
- and 6600 Chromatic Metal
*See Appendix entry on doubling these materials to increase production frequency to 60 minutes
Skip to the section below this one for a detailed description of suggested methods for obtaining the above materials should you need help collecting them before construction.
Layout and construction suggestions: Once you have aquired all of the required materials for finishing the farm you should consider its layout before placing everything but do be aware that you can delete any placed object and recieve 100% of the materials back for that object or building. So don’t be afraid to make a mistake, change your mind, or redecorate, it is as easy to fix as a few keypresses.
I would recommend placing your Oxygen Harvesters near your base’s landing pad or teleporter entrance as they will be the first thing you want to harvest and refuel each time you arrive at the farm to run a production cycle.
As for your large or cylindrical rooms that will house your base apparatus and large or medium refiners, those should ideally be placed in the middle of your base/farm so that you can run reactions within those refiners as you tend to nearby tasks such as harvesting your biodomes.
The hydroponic biodomes should likely go around your central rooms in a tight circle to save on travel time as you harvest or off to one side in a neat, easy to remeber grid so that you can make sure to harvest all rooms and plants in one pass without having to backtrack.
Finally if you have any exterior plants the ideal placement for them is in one long line or a corridor formed of two lines so that you can simply walk down the line or corridor, holding “E” to harvest each plant as you go past. Alternatively you can place them in a grid for a more traditional farm plot look if your base asethetic is important to you but this does slow the harvesting process.
A finished farm base with this build may look something like the below:
Methods for Obtaining Farm Materials
Farm construction and seeding materials:
Coprite: This is one of the more difficult to obtain materials because it can’t be farmed in the wild. It is only generated by feeding carbon to planetary fauna and then harvesting their droppings. Fortunately in the farmer quests you should have already done to unlock the needed blueprints, you planted and grew some Coprite Flower. Hopefully you have some remaining coprite to seed some temporary plants to grow a coprite supply to reach the needed 640. If this is not the case, Coprite can be synthesized in the medium refiner with the formula: 1 Mordite + 1 Condensed Carbon = 4 Coprite. Mordiate can be rapidly obtained by killing living fauna and some flora.
Pyrite: An easy one, Pyrite is mined in ground deposits or from some minerals on desert planets. It can also be obtained in the medium or large refiner with the recipe 1 Gold + 1 Oxygen = 2 Pyrite. Gold can be obtained in large quantities by breaking down Lemmium in a refiner or mining it from ‘Metal Fingers’ deposits or in small quantities as a rare material in asteroids. Can occasionally be bought on space stations and from alien traders.
Phosphorus: Can be somewhat difficult to find but it appears as deposits and in minerals on scorched worlds and is occasionally sold on space stations and from alien traders. It can also be produced in the refiner with the recipe: 2 Dioxite + 1 Ferrite Dust = 1 Phosphorus but this is a rather costly recipe to use so it is better to mine or purchase in bulk since we need 3200 units.
Dioxite: Another easy material to gather, it appears in minerals, flora, and mineable deposits on ice worlds but is also easily made in the medium or large refiner with the recipe 1 condensed carbon + 2 sodium nitrate = 6 Dioxite. This is a great recipe as a way to use up excess sodium nitrate, which has little use except as a catalyst beyond the early part of the game. Sodium Nitrate supplies can themselves be multiplied with the recipe 1 Sodium Nitrate + 2 Oxygen = 6 Sodium Nitrate. Using these two recipes alone can provide you with all the Dioxite you might need should mining prove difficult or time consuming. Dioxite is also occasionally sold in bulk by alien traders and space stations.
Uranium: the rarest material of the lot and the most difficult to synthesize in the refiners, fortunately it is frequently sold in bulk amounts in opulent and wealthy systems, if you haven’t searched one of those systems out already, you should because you will need the bulk products they offer for material inputs as described in the next section of this guide on the production process. If you are unfortunate and can not find Uranium for sale, it is minable from “Metal Finger” deposits frequently found on moons and dead worlds or in minerals on Radioactive planets. Uranium can be syhthesized in the refiners with the recipe 2 Phosphorus + 1 Ferrite Dust = 1 Uranium. This is also a costly and time consuming recipe to make use of but if nothing else it is capable of creating Uranium with just Carbon, Sodium, and Ferrite Dust by first transmuting to Dioxite, then to Phosphorus, and finally to Uranium.
Paraffinium: This material can occasionally be hard to find but it appears in mineable deposits on lush or tropical worlds and in some minerals on the same worlds. It is also easily synthesized from Silver in the medium or large refiner with the recipe 1 Silver + 1 Oxygen = 2 Paraffinium. Silver is quite easy to obtain by breaking down Herox or Dirty Bronze alloys or from destroying asteroids.
Chromatic Metal: This build requires quite a lot of metal to construct and metal is often a bit of work to produce, so it would be best to purchase it in bulk if possible or at least maximize the metal you refine by using higher tier materials such as Cadmium or Activated Indium or making use of the advanced recipes available exclusively to the large refiner for example the incredible: 1 Oxygen + 1 Ferrite Dust + 1 Cadmium = 30 Chromatic Metal.
Potentially needed production materials:
Ionised Cobalt is purchasable in bulk in rich systems, it is minable from deposits and found in underground minerals but most easily obtained by breaking down 1 Tetra Cobalt into 150 Ionised Cobalt in a refiner. Ionized Cobalt can also be multiplied in a medium or large refiner with the recipe: 1 Ionized Cobalt + 2 Oxygen = 6 Ionized Cobalt. If needed additional Oxygen Harvesters can be constructed to support maintaining a surplus of Ionized Cobalt this way.
Inputs, Harvesting, and Production Cycle
Now that the farm is built, it is time to produce: The first step in each production cycle must be to purchase our T0 raw gas material inputs. We have to buy these materials instead of harvesting them primarily because Atmosphere Harvesters are limited to 3 per planet and they only draw one type of gas per planet so if we were to build our own harvesters to get the full amount of gas we need, it would require 48 harvesters spread out over bases on 18 different planets!
Instead of all that work harvesting and teleporting around, it is simple enough to make a few trips to bulk sellers in Opulent systems to buy the full amount of each gas we need for about 300k units total:
- 4000 Nitrogen
- 4000 Radon
- 4000 Sulphurine
4000 is the amount of gas we use as an input simply because space station trade terminals in Opulent systems are almost guaranteed to have at least 4000 units of any of these three gases that they may sell. 4000 units of each gas as an input gets us to 8 Stasis Devices as our final product and we can always be sure to get that much input to match our farm’s material production. Sometimes vendors have more than 4000 units, but not always enough to create another full Stasis Device, which is why the magic numbers in our production cycle are 4000 and 8 and everything revolves around them.
Should you not be able to find an opulent system to sell you 4000 units of each gas in bulk or the vendor be temporarily out of stock, you can still easily reach the required 4000 input by spending a few extra minutes trading with the aliens that land on the station as they frequently have large amounts of gas for sale between 2000-4000 quantity in any of the rich type systems.
Back at base and rolling up our sleeves: Once you return to your farm with the required raw gas materials the first thing you should do is empty your Oxygen Harvesters. You will get 1250 Oxygen from doing this and will put stacks of 250 oxygen into each of your 4 medium or large refiners with 250 left over. With this oxygen you will add stacks of 125 condensed carbon to each of the 4 refiners input hoppers (full stacks of 250 can be used but only half will be consumed) and begin running the “Oxygenate Carbon” recipe as shown in the picture below.
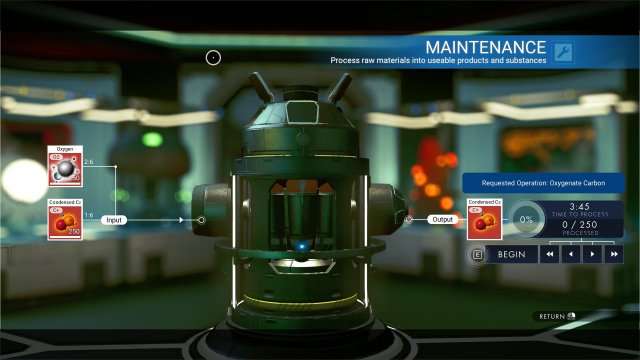
You will need to empty the output hopper and restart the reaction 3 times for each refiner until the oxygen is spent and the 500 condensed carbon that was consumed has been transformed into 3000. 2400 of this condensed carbon we will use in the next step of production, while 250 of it will go to refueling the Oxygen Harvesters. The remaining 350 carbon we will combine with the extra 250 oxygen from the harvesters for one last run of Oxygenate Carbon to replenish our supply of condensed carbon and ensure we have at least 500 condensed carbon to start this chain at the next cycle.
One last thing to do: Before we begin production in earnest we should prepare the materials for our 8 Iridesite finishers by buying 8 Magno-Gold* and 8 Aronium* and crafting 8 Grantine using 400 Dioxite and 400 Ionised Cobalt.**
*If unavailable for purchase 8 Magno-Gold and 8 Aronium can be crafted with 400 Phosphorus, 400 Paraffinium, and 400 Ionised Cobalt for each item type, 800 total.
**Ionised Cobalt is purchasable in bulk in rich systems, it is minable from deposits and found in underground minerals but most easily obtained by breaking down 1 Tetra Cobalt into 150 Ionised Cobalt in a refiner. Ionized Cobalt can also be multiplied in a medium or large refiner with the recipe: 1 Ionized Cobalt + 2 Oxygen = 6 Ionized Cobalt. If needed additional Oxygen Harvesters can be constructed to support maintaining a surplus of Ionized Cobalt this way.
Now for the fun part, synthesis! With all of our T0 raw inputs ready we should kick off our production cycle by crafting them into our T1 products starting with combining the gasses and the condensed carbon to free up inventory space before we harvest our plants and continue with the rest of the chain.
Reference the flow chart below as a visual aid as I describe my preferred order of operations step by step for the entire production cycle.
Step by step production cycle:
- Step 1. Combine 4000 of each Nitrogen, Radon, and Sulphurine with 2400 total condensed carbon to create 16 each of Nitrogen Salt, Enriched Carbon, and Thermic Condensate.
- Step 2. Combine 8 Thermic Condensate with 8 Nitrogen Salt to create 8 Semiconductors.
- Step 3. Combine 8 Enriched Carbon with 8 Nitrogen Salt to create 8 Hot Ice.
- Step 4. Combine 8 Semiconductors with 8 Enriched Carbon to create 8 Superconductors.
- Step 5. Combine 8 Hot Ice with 8 Thermic Condensate to create 8 Cryo Pumps.
- Step 6. Get dirty! Harvest your Gamma Root and Coprite combining them to create 8 Lubricant.
- Step 7. Harvest your Solarium and Frost crystal combining them to create 8 Heat Capacitors and using the remaning Frost Crystals to create 8 stacks of glass (40 glass total).
- Step 8. Combine your 8 stacks of Glass and 8 Lubricant to create 8 Living Glass.
- Step 9. Harvest your Cactus Flesh and Star Bulbs, combining them to create 8 Poly Fibres.
- Step 10. Combine your 8 Heat Capacitors and 8 Poly Fibres into 8 Circuit Boards.
- Step 11. Combine your 8 Living Glass and 8 Cyro Pumps into 8 Cryogenic Chambers.
- Step 12. Combine your 8 Superconductors and 8 Circuit Boards into 8 Quantum Processors.
- Step 13. Combine the 8 Magno-Gold, 8 Aronium, and 8 Grantine to create 8 Iridesite.
- Step 14. Combine the 8 Iridesite with 8 Cryogenic Chambers and 8 Quantum Processors to create 8 highly lucrative Stasis Devices and do a little fist pump.
- Step ??? Profit as seen below.
Afterword on maintaining production readiness: As described this production cycle can be run once every 120 minutes (since that is the growing time for the Solar Vine and Echinocactus) and while it requires no real maintance or tasks to be done while waiting for your plants to grow between cycles, it is a good idea to make sure that you have a ready supply of Oxygen, Condensed Carbon, Sodium Nitrate for conversion to Dioxite as needed, and Ionized Cobalt as needed for Grantine if it is unavailable for purchase.
If you find yourself low on any of these materials and can’t find any for purchase, additional Oxygen Harvesters can always be constructed at your farm in order to run the oxygenate-type reactions in your refiners that will multiply the supply of these products infinitely. If you find yourself lacking in a material to keep the production cycles rolling, you will need to judge your needs and adjust your oxygen production to support them accordingly and maintain production readiness.


Be the first to comment