Contents
Pure Long Ammo Loadout (Irons)
Сrеdit gоеs to IMЯIR!
Hunter: Tier 3
Health: 3 Big
Traits came with: Pitcher, Doctor, Frontiersman (I get this quite a bit actually)
Primary: Mosin
Secondary: Uppercut
Tool 1: Knife (With the 2.5 update, knife light attack one-shots grunts)
Tool 2: Throwing Knife
Tool 3: Decoy (Used for lanterns when you have a low level teammate or don’t have Beastface)
Tool 4: Medkit
Consumable 1: Greater Vitality Shot
Consumable 2: Frag Grenade
Consumable 3: Big Bundle of Dynamite (Reserved for bosses but never not willing to use on humans, use Frag first)
Consumable 4: Anyone of the above three or even a Hellfire
Core Perks Acquired In Order of Importance:
- Beastface
- Greyhound
- Determination
- Doctor
- Physician
- Bulletgrubber
- Iron Sharpshooter
- Fanning
- Frontiersman (don’t get if you’re using the bayonet or do get it if you want an extra tool)
- Kiteskin
This leaves you with 6 points to spend elsewhere. Should you expect to be near explosives, then get Bulwark. If you’re using the bayonet, you might want Mithradatist for the hives and spider, and will then have two points to spend, which you can either get Tomahawk, Boltseer, Salveskin, or Gator Legs and Decoy Supply. At this point though, with the many variations to choose from, it really depends on your playstyle for these last six points.
A trick for the Mosin with Bulletgrubber: When firing the Mosin, your character performs an animation to release an empty shell from the gun, if you reload before emptying the gun of that empty shell, your character will catch the empty shell and place it back into the gun as a full bullet. I expect this to be patched out at some point down the road.
3 Head Stabs with Mosin Bayonet to kill armored, 1 Head Stab for hive, 5 gut stabs for Meathead, and so long as you’re not stabbing kneecaps, 1 stab to kill a player. Aim for the head, neck, or upper spine to be sure.
Pure Medium Ammo Loadout (Irons)
Hunter: Tier 3
Health: 3 Big
Traits came with: Pitcher, Doctor, Frontiersman (I get this quite a bit actually)
Primary: Veterli Karabiner
Secondary: Dolch Precision
Tool 1: Knife (With the 2.5 update, knife light attack one-shots grunts)
Tool 2: Throwing Knife
Tool 3: Decoy (Used for lanterns when you have a low level teammate or don’t have Beastface)
Tool 4: Medkit
Consumable 1: Greater Vitality Shot
Consumable 2: Frag Grenade
Consumable 3: Big Bundle of Dynamite (Reserved for bosses but never not willing to use on humans, use Frag first)
Consumable 4: Anyone of the above three or even a Hellfire
Core Perks Acquired In Order of Importance:
- Beastface
- Greyhound
- Determination
- Doctor
- Physician
- Quartermaster
- Bulletgrubber
- Iron Sharpshooter
- Frontiersman (don’t get if you’re using the bayonet or do get it if you want an extra tool)
- Kiteskin
This leaves you with 5 points to use elsewhere. Spend at your own convenience. If you’re a good shot and don’t like the precision for whatever reason, whether it be the rifle stock sticking off your back as a dead giveaway, you can skip getting Quartermaster and instead have 13 points to spend on defensive and utility perks.
Also keep in mind that with Bulletgrubber, if you have 1 bullet left in the Dolch, you’ll have to fire that shot in order to rack a strip in. Otherwise you’ll be reloading the long way. Things to keep in mind.
Shotgun Loadout
Hunter: Tier 3
Health: 3 Big
Traits came with: Pitcher, Doctor, Frontiersman (I get this quite a bit actually)
Primary: Crown and King
Secondary: Dolch
Tool 1: Knife (With the 2.5 update, knife light attack one-shots grunts)
Tool 2: Throwing Knife
Tool 3: Decoy (Used for lanterns when you have a low level teammate or don’t have Beastface)
Tool 4: Medkit
Consumable 1: Greater Vitality Shot
Consumable 2: Frag Grenade
Consumable 3: Big Bundle of Dynamite (Reserved for bosses but never not willing to use on humans, use Frag first)
Consumable 4: Anyone of the above three or even a Hellfire
Core Perks Acquired In Order of Importance:
- Beastface
- Greyhound
- Determination
- Doctor
- Physician
- Packmule
- Frontiersman
- Kiteskin
This leaves you with 21 trait points to spend. For the extra accuracy you can spend 8 and get Quartermaster to equip the Dolch Precision. If that’s the case, you’ll want to get Bulletgrubber because with the precision, you’ll be doing more sniping than you would with the regular Dolch, which would most likely be used for short range skirmishing. With this you’ll have 7 points left to spend, on which I leave up to you to decide; however, if you go for the 21 trait points without the aforementioned perks, I do recommend still getting Bulletgrubber, and spending the rest on your defensive perks. Bulwark, Bloodless, and Mithridatist.
I personally recommend getting Bulwark and Bloodless. They’ll come in clutch if you’re quick on your feet and sharp witted.
Compact Ammo Loadout
Sorry, I don’t ever use compact ammo, for any reason, ever. Ever. If by some miracle I think I’m a man enough to use the winfield or any gun firing such ammo, I’ll write something here. I also don’t use the Specter or Obrez.
The only time I ever did use compact ammo was when I was running double Chain Pistols with fanning. Fun stuff.
Beastface, Greyhound, Determination (Synergy)
- Beastface
- Greyhound
- Determination
The traits I currently have listed right here are the first three I buy, always, if of course the hunter I recruited didn’t come with them. The first reason I buy beastface is simply because of what it has already descripted in its tooltip box. Beastface gives you the freedom of being able to walk close to animals, which is more freedom than some would imagine if you consider that you might find yourself in a position where you don’t want to be crouch walking in the open because you don’t want to give your position away. Couple that with Greyhound and you can go on a cross-map tour without setting off any crows or other animals (assuming you’re not just blindly running straight and keeping your eyes open as to what’s ahead of you). What makes it even better is Determination, the icing on the cake. Determination not only puts you into stamina recovery faster for your action bar, but your sprint bar as well, which if anyone else has noticed, can sometimes regenerate a tiny amount of stamina while sprinting even though the game says you can’t regenerate your action bar or your sprint pool while either one of them is in use. (Seems to only work with a knife out when you have Determination as an active perk. On occasion I’ve seen it happen on Mosin Bayonet)
Sieging a compound and need to deal with some zombies while being shot at but you don’t want to waste your ammo? Determination has got your back. Chasing enemies with the bounty but you’re winded? Determination will put you at full sprint speed before you know it, don’t give up. Need to throw throwing knives and have them do more damage but you’re all out of stamina? Etc etc etc…
Greyhound? Speaks for itself, I’m sure those with an imagination can fill in the blanks with how it synergises with the above reasons. If you can’t, ask a friend, or seek professional help from a doctor. They’ll probably tell you that you have a prexisting condition that you were born with and nobody can help you. My condolences to your parents.
Physician / Doctor
Fortunately this section is shorter. Physician reduces the time to perform bandaging and doctor allows you to heal two bars. With the Hunter having 2 big bars then 2 small bars, if your current health is at 1 bar, you get back 75. Whereas if you were 1 big 4 smalls, you’d only get 50. But if you’re at 3 bars, it’s a full 100; however, if you play like me – you’re gonna die every now and then, and you don’t want to lose the 50, and if you play with friends like mine – you’re more than likely going to get revived again – so count your blessings and try to get 2 big 2 smalls if you know you’re gonna die only to be revived.
Bloodless / Bulwark / Mithradatist
Bloodless: So long as you’re bleeding, this trait often comes in clutch when you’re on death’s door. If you get hit with the machete and live, you’ll have two more seconds to live thanks to Bloodless. In that time, if your gun is empty and you can’t shoot, switch to your knife and stab. If you can’t do that, run away and bandage up. Do something. Relay information to your teammate via voice chat. Die in the water so that its less likely you’ll get burned. You’ve got choices.
Bulwark: Whether it be a red barrel, frag grenades, dynamite, hellfire – so long as you’re not within its lethal range, if the damage is unavoidable, you’ll be that much closer to a full bar. In which case, if you’re near a health supply, or have Doctor and Physician, you’ll be topped off all the more faster. While this isn’t what will always happen, this is micro-strategy, and being able to understand this is a plus.
Mithridatist: Whether you’ve been spit on by the spider, hit with a poison crossbow, or are being harassed by a hive jar, having your sound back and health on its way to recovering, the better. Don’t understimate the power of this trait; however, the easiest solution to not having to get this perk? Don’t ever allow yourself to be in a situation where you’re being spat on by the spider or chased by hive bees.
That last part is actually the answer to all of the above traits. Don’t get hit by anything or allow anything that does that type of status damage to you. Meaning, don’t stand next to red barrels, don’t get hit by zombies with cleavers, etc etc etc.
Kiteskin / Packmule
Not gonna talk about Packmule, that’s pretty self explanatory and customizable for whichever way you decide to play. I don’t use flashbombs or anything else besides really unless I feel like breaking the monotony of only playing with Hellfire Bombs, Big Bundles, and Frags. So… pick and choose at your own leisure here. This is just how I play, not how I think anyone should play.
Kiteskin is a life saver sometimes. If you’re the type of person to jump off a ledge and rush someone, you need this. Especially if you’re low health. I’ve noticed the lower your health, the more damage you can take from falling. So, don’t jump ignorantly – bring Kiteskin or don’t do it. Thank me later. Unless of course you have a partner and they’re known as Chad the Front Row Clutcher for UC Davis.
Frontiersman / Decoy
I mainly get Frontiersman for Decoy and nothing else for two reasons. The first one is because the Hellhound’s detection range for sound is much farther than all the other AI. See enemies sneaking by Hellhounds? Throw a decoy to insight some trouble. Enemies turn their backs to you to shoot the dogs and their movement becomes easier to lead with your irons, do them a favor and put one in their heads.
The second reason being teammates that don’t have Beastface. What better a way to help your teammate break lanterns on animal cages than a decoy? Nagant Silenced? No thanks.
Salveskin
This isn’t too special of a trait at first glance; however, should you get hit by a Hellfire and have to do some running to get to cover from an enemy with a mosin or uppercut and manage to survive that, you’ll have suffered some health loss from being on fire. If you were at full health, that Mosin shot, depending on the range, might kill you in one hit. Salveskin is there for you to put you back at full capacity (if of course you’re not missing a bar) much faster than if you were without, and save you from the one shot death that comes to most wounded players.
Single Bounty Map Patterns
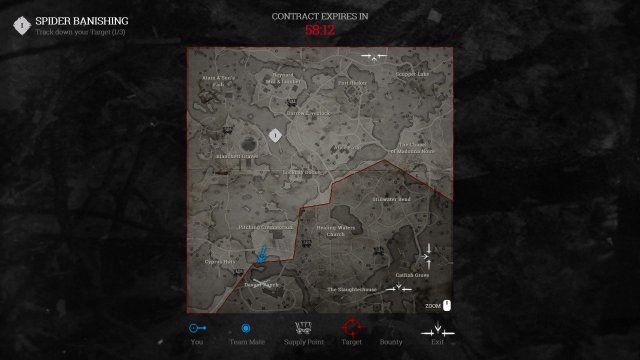
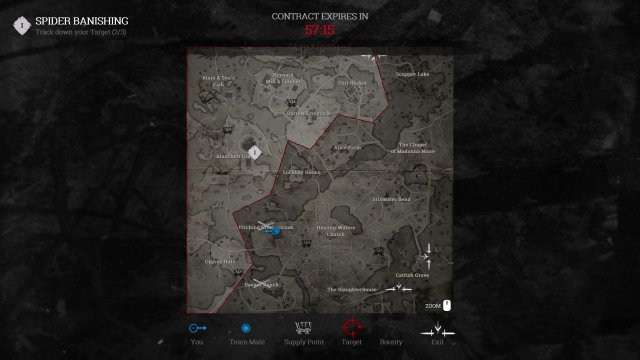
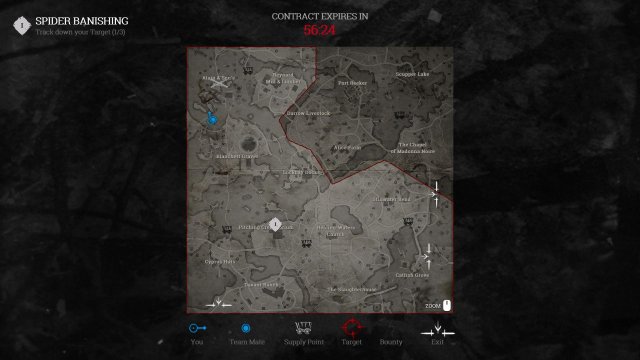
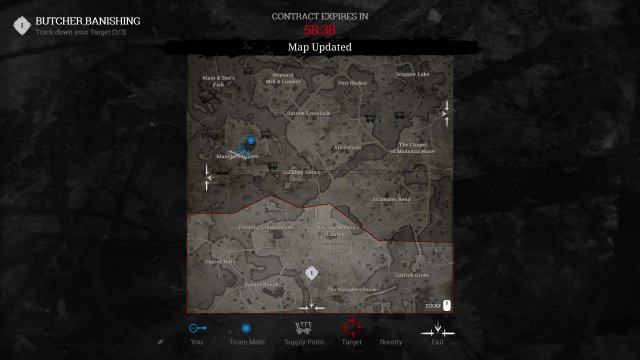
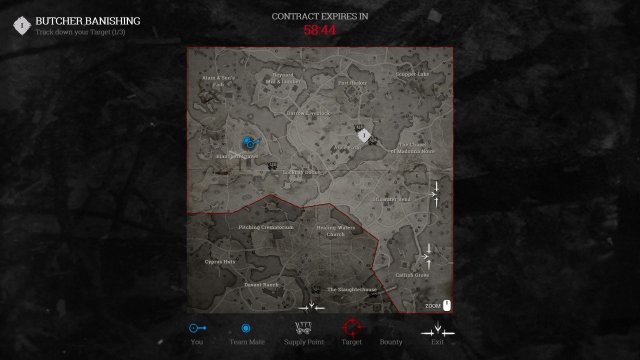
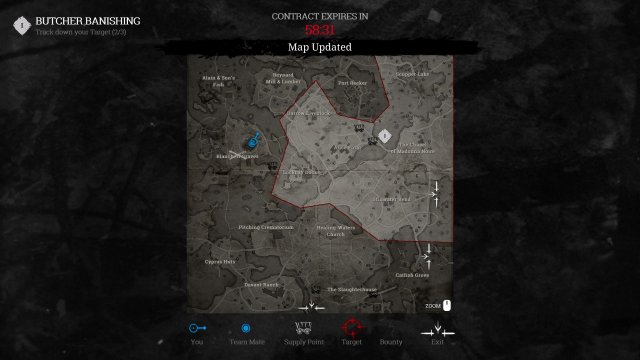
Below you’ll see screenshots of some of the most common patterns for single bounty missions. Regardless of whether or not you’re doing Random or Contract 1 or 2, the patterns are always the same. Doesn’t matter where you pick up the clue either.
The importance of this is, if you’re quick enough, you can be one of the first ones to show up at the bounty, if of course someone doesn’t spawn there already, and you get more time back for your life. Take for example pattern 2, if you spawn at Alain and you’re inexperienced, I’m sure most of you go to Reynards since its the nearest clue. Instead, go to Blanchette, because you’ll be heading to the bottom of the map anyways, and then head from Blanchette to Pitching. The only time I would ever warrant going near Reynards from Alains for map pattern 2, is to kill players so you don’t have them at your back.
There is of course an exception to the above when it comes to efficiency. Take for example example 1, should you spawn at Davant, you should head to Pitching since its right next to Cyprus, which if you notice, is still a place you can discover a clue at, even after picking up the second clue for that map pattern. If you had gone from Davant, to Cyprus, pitching would of been unavailable, and you would have then had to have gone to Blanchette.
Outside of those two instances, if you’re like me, I grab the first clue, check the map to see what pattern it’ll be, and then head to where I know the boss or bosses will most likely be, and do my sweep for other hunters having checked clues. This is valuable information for those who know how to use it.
Single Bounty Map Pattern #1
Part #1
Part #2
Single Bounty Map Pattern #2
Part #1
Part #2
Single Bounty Map Pattern #3
Part #1
Part #2




Be the first to comment