
Do you have no idea of what you’re doing?
Do you get your sh!t pushed in as a result of this?
Do you need a bit of “hand holding” from the beginning in order for you to feel confident enough to set out on the greatest video game adventure of your life time, in the most depressing world ever concieved by the f*cked up mind of a japanese guy?
Well then this guide is for you!
Introduction
First off, all jokes aside, if you’ve never played a Dark Souls 3 before then it can a be a bit hard to understand how to approach enemies and bosses, what stuff to focus on and how to get an effective start early on. This guide assumes a few things that are explained in the sections below, but also that you don’t spend your souls until your done with Firelink Shrine, however, if you feel like you don’t want to risk losing your hard earned souls, feel free to use them to upgrade your stats as you go… just make sure you read the Stat Allocation part of the guide if you choose to do so.
Bulletpoint List
Rather get this section out of the way early, because I have a sneaking suspicion that not too many people are going to read the whole guide – which is fine – and instead just want a quick summary of what to do. So here you go.
- Start as a Knight.
- Choose Sovereignless Soul as gift.
- Pick up all the things in the starting area.
- Kill Gundyr (weak to Firebombs in blob-phase).
- Tree jump skip.
- Get Silver Snek Ring and put it on.
- Cheese Blade Master.
- Smack big Crystal Lizard.
- Use S.Soul.
- Spec atleast 20 vig. and 15 end. before focusing in offense stats.
- Infuse the Longsword with Raw ASAP
- Recommendation: Aim for 27 vig. (1000 HP) and 20 end. before specing offensive stats.
Choosing Class & Gift
You definitely have a bit of choice when it comes to choosing your starting class, however, this guide assumes that you start as a Knight with Sovereignless Soul as the starting gift.
The reason for this is that the Knight is one of the only two classes that start with a shield that has 100% physical defense (other one being the Herald, which is also a decent choice) i.e. if you block an attack that does purely physical damage you take 0 damage from that attack, it also has a stability of 48 (higher stability means less stamina is used when blocking an attack) which is albeit not great is still “meh” in the best possible way.
You also start with a longsword which is one of the better weapons in the game, not necessarily for the PvP (even if it is good for that as well) but also for PvE due to the fact that you can dish out several attack with even just the modest amount of stamina. Keep in mind tho, that there are enemies that after taking a few attacks goes into rage mode and tanks through the next attack as they fling out one of their own.
As for the starting/burial gift, you also have a few solid choices, but as previously, this guide assumes that you choose the Sovereignless Soul (same as Soul of a Nameless Soldier, usable item for 2,000 souls). That being said, as long as you don’t choose either Young White Branch (transforms into a local prop/object, no real use for it and you get many of them early on and purchase them later) or the four Cracked Red Eye Orbs (PvP consumable item, use them to invade the worlds of other players. Probably the worst choice because you can get 5 from an NPC as soon as you arrive at Firelink and you can also get the non-cracked version really early on as well which can be used infinitely). But otherwise, you can’t really go wrong.
Towards Firelink
Starting out you will face your first basic hollow enemy, after beating him, turn right and run towards the end where you’ll find a Soul of a Desecrated Corpse. Turn around and continue on and you’ll pick up the Ashen Estus Flask (Restore FP… a.k.a Mana). Continue forward and past the crossbow enemy and you’ll arrive at a ledge, don’t fall down, proceed around the overhang and you’ll find a bonfire. Light said bonfire and rest at it. This will give you the “Rest” emote and also restore any health you might have lost and Estus you might have used.
After resting and regaining your Sunny D and Sunny D Quantum, continue on and take a right down the path after you kill the hollow enemy. Down this narrow path there’s two other hollow pondering their existence in a very depressing manner. End their misery and make sure you kill the hollow to the left of the path as he tends to gank you if you don’t kill him right away. After killing him, go the other way (to the right of the path) and follow that ledge and you will see a path going down and under. At the end of this path is one spear & shield enemy plus a crossbow one, deal with them as you see fit and the treasure is yours… 5 firebombs! All jokes aside tho, these are pretty good for the upcoming boss, as his second phase is weak to fire.
Backtrack towards the bonfire (and rest at it if you need) and where you took a right to go down the path with the two depressing hollow, go instead forwards and you’ll come to a little ledge. If you look down the ledge, you’ll see an item pickup. What you need to do is to sprint and jump to get there. This is pretty much the angle you want to have:

Congratulations, you’ve just picked up your first Titanite Shard out of god knows how many.
There’s really only one way to go from here, so head towards the ledge and press attack as you drop down to do the majestic, meta shattering, plunging attack!! Even if you just slammed the enemy so hard that his ancestors ancestors felt it, don’t celebrate too much because there’s another crossbow enemy that needs to be dealt with. Do so and continue on past him and you’ll see a gentleman kneeling in the middle of an arena.
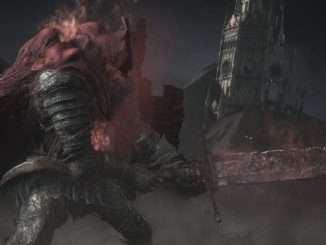
Say hello to Iudex Gundyr kids, your first skill check :3
Iudex Strats
This is the place where most people give up on the game on their first go, but as a Knight, this fight is somewhat trivial.
First off, you can damage him as he gets up after you pull out the coiled sword from him, doing this gives you a pretty good headstart. Do note that this is only possible on your first try as the following attempts he’s already up and ready to go, so while he’ll still be beatable with the strategy listed below, you won’t get that bonus damage in.
So during his “normal” form, here’s what you do:
- Attack him while he gets up after pulling out the sword, make sure you leave a bit of stamina left so you can dodge the first attack.
- Keep your distance for the first minute or so, this give you a chance to learn his startup animations as he’s going to do an attack
- Always dodge towards an horizontal attack (if you can’t roll away), meaning that if he swipes from your left dodge towards your left. As far as vertical attacks are concerned, dodge to either side
- Poke and run away, watch his attacks and when he’s done with a combo, run in and get a couple of hits in and then back off.
After getting him to about half his health, he’s going to start transforming to his “gooey” form where he’ll gain some serious attack range. Here’s what you do:
- Stay on his right side as he transforms, make sure you don’t go too far behind him as the hitbox of the arm is a bit wonky and will hit you as he swings it around.
- Use the firebombs from far away, it’s a relatively safe way to deal some damage to him but keep in mind that he might do a jumping lunge that can reach freakin’ halfway around the world.
- Stay close to him and bait out the slam, he has a move where he uses the tail part of his gooeyness to jump up and slam down which you can easily avoid and then punish the ever-living ♥♥♥ out of him, which can be baited out if you stay close to him and circle around the back. Be warned tho, if you get caught in this, it will hurt like hell!
Worth pointing out is that point #2 in his normal form is something that you should make a habit of doing for every boss and pretty much any enemy. Knowing your enemy’s attack animations means that you’ve won half the battle. If you know what they’re going to do based on the first few frames of an animations you have more time to plan what to do about that attack.
By following these tips you should be able to take him down without too much trouble. Also, don’t get discouraged if you die a couple of times, you’re more than likely going to die a lot more during your first playthrough so you need to learn how to cope with that ASAP.
Tree Jump, Snake
After spanking Gundyr, you will arrive at Firelink Shrine. Feel free to put the coiled sword in the middle and rest at the fire if you want. There’s a lot of stuff to explore and pick up around the shrine, but before doing so, head up two flights of stairs on the east side of the shrine (south being the entrance). Going outside and up to the left you’ll come upon a door that is locked and next to it is an item you can pick up for some free souls, do so, then turn around and you will see a tree that is growing out and over the ledge… time to get those MLG parkour skillz on. You will need to perform the tree jump.
Here’s a video of how to do it (this is not me, it’s just somebody who I think does it rather well and also slows down the video so you can see how to do it):
You need to sprint towards the tree, turn right ever so slightly then jump. Keep at it, you’ll get there eventually.
After getting on the roof, continue around and hug the wall on the right. You will find an opening to the rafters, go in and around the rafters to the left and you should see another glowy item pickup on a hanging corpse one the west side which is an Estus Shard, give that to the Blacksmith later and he can upgrade your Estus Flash with an additional use.
Continue to the northern wall and smack it, because it’s an illusory it will disappear and you can continue on. When you hit the next wall, fall of to the right and in front of you will be a chest, open it, pick up the Covetous Silver Serpent Ring inside and put it on (increases souls gained by 10%) and then drop down to the main chamber, go to the blacksmith and choose “Reinforce Estus Flask”, then rest at the fire for a health and Estus refill.
Cheesing Sword Master
Go back out of the shrine through the southern exit and turn right. Continue on and go up a flight of stairs. You will see an item on a corpse dangling from a tree… it’s a ♥♥♥ shield so don’t bother with it. If you look where the path leads you’ll see somebody standing in front of the tower. This is the Sword Master and he’s a mean S.O.B at this point. I’m going to explain how to cheese him because he’s actually really hard if you haven’t played a lot of souls games before this one. That being said, against my better judgement, I do sort of recommend you atleast try to fight him fair and square.
Here’s how to cheese him:
Get his attention and go and stand in this place.


Then… just block (2-hand the shield, just in case) as you stand close to the stair wall. It will send him off the edge towards his doom. He’ll drop his sword and armor and in order to get them, just quit out and load the game again and there will be an item pickup where you first found him.
Smash the Crystal… Lizard
Remember where you found the Ashen Estus Flask at the beginning? Well you need to head back there and the easiest way to do so is to warp back to the “Cemetery of Ash” bonfire and go back down the ledge. Take a left between the crossbow hollow and the doorway ruin, walk through the water (a few enemies are at the start of the water part) and you’ll come to a clearing where you’ll see something shiny in the corner to the right. That’s the thing that you want to kill but be careful, if you don’t pay close attention, you’ll die rather fast. Remember your fight with Gundyr, poke him and back off.
Patience is a motherf*cking virtue in this game.
It won’t take too long for him to go down tho and soon enough you should have netted you some souls and a Titanite Scale, which is used to upgrade boss weapons later on.
Congratulations, you’ve just finished Firelink Shrine!
There are still a few secrets left for you to discover, but I don’t want to ruin that for you ^^
Stat Allocation
After smashing the ever-living crap out of the big crystal lizard, make your way back to Firelink Shrine. Once back there, use the Sovereignless Soul item to get another 2,000 souls.
By this point, you should sit at ~13,000 souls (give or take) and that should be enough to get you to 20 Vigor and 12 Endurance, make it so.
Later down the line, I’d recommend that you get Endurance to 15, then Vigor to 27 – which will put you smack at 1000 HP in non-embered form and 1300 HP when blazing – and finally pump Endurance up to 20 for a couple some more attacks per spam-chain, prioritize Vigor before Endurance tho, after you’ve reached those stats you can start pumping into other stats. However, like I said, only a recommendation.
After upgrading your character, you should now be prepared to deal with just about anything that The High Wall of Lothric has to throw at you. So sit down at the bonfire and warp to said location.
Things to Do in Lothric
As you emerge from the small, yet unbelievably heavy, door you will notice a bonfire at the bottom of the stairs, light it. From here, continue down the stairs next to the bonfire and you will see the corpse of a dragon. There’s a set of stairs to the left at the far end of the section of the wall, go up those and go around the dragon corpse and fall down from a ledge to a balcony below (make sure you look carefully before you walk off).

Here you will find a stack of 2 Gold Pine Resins, these can either be used to fight Vordt, however, I find it far more useful to save them for the sages fight later on, feel free to use them against Vordt if you have trouble with him tho.
Continue down the ladder as per usual and when you get to the point where you can either go up a set of stairs or continue below them towards a bunch of enemies, go up and as soon as you hear any sound, f*cking run! Sprint to the door at the tower part, you’re pretty much guaranteed to not get hit by the dragon’s fire if you do this, get inside and DO NOT KILL THE MIMIC!! I cannot emphasize this enough, so many people I talk to and articles I read mention that you should kill it in order to get the Deep Battle Axe inside… don’t be that shortsighted, save that mimic for when you can start buying Undead Hunter Charms from the Old Shrinemaid (give her Paladin’s Ashes which is located to the left of the first bonfire after Crystal Sages) so that you have a relatively easy way to farm the Mimic head and the faster you get that, the better off you are. Trust me, you’ll thank me later.
As you exit the tower a Lothric Knight will come out of the next tower. If you’re fast enough, you can run to the corner that’s to the right of that door and stay there in order to hide from him (you want to be in the marked area and pushed up against the marked pillar).

As long as you stay perfectly still, he’s not gonna notice you. All this being said tho, I’d recommend you atleast try to fight him (a few times), if not now, then after you’ve lit the next bonfire… because it will be a good skill check for yourself.
As you get into the tower, watch out for the undead thief that will try to gank you as you enter. Deal with him and then head out of the door to the right and continue up to a bonfire. Light it and behind the wall on the other side of where you came up to the platform will be a Titanite Shard, take it.
Go back into the tower and on the right there will be an item pickup, balance on the beam over to it and pick it up, you’ll get some firebombs that you’ll be using in a moment. There are two thieves here and they might decide to gank you so don’t relax just yet. Deal with them as you see fit and then head out the door on the same level.
To the right of the exit are some souls to pick up, do so and continue on dealing with enemies as they appear. After climbing/dropping down a small ledge you’ll see a bunch of hollows praying on a roof, ready your bombs and the slowly approach. As you get closer one of them will stand up and you’ll see some particle effects on him. BACK OFF!!… otherwise you’ll get hit by the goo shooting out of him and that hurts a lot. Let him transform completely and then throw a firebomb, this will stun the goo-monster and you can run in and get a few hits in, but be sure to back off in time. You also can’t really stun lock it with firebombs, you need to wait a couple of seconds after it has recovered. After taking it down and getting the Titanite Shard, follow the path shown below and kill the small Crystal Lizard to get the all mighty Raw Gem.


Infuse your longsword with the Raw Gem ASAP, this removes scaling (meaning that you get no damage bonus from any stat) but increases the base damage. This is really good early on as it give you a damage increase to your weapon so that you can instead focus on investing souls in survivability stats during the early stages of the game while still having some means to defend yourself.
Whether or not you choose to go back to Firelink immediately or infuse it later, you go down a ladder and from here you have a choice. You can either proceed to where the crossbow hollow is and go down a ladder to the courtyard below where the Winged Knight is patrolling (which you should choose to not confront regardless) or you can take a right into the house that you just climbed down the side of. If you choose the right option you’ll find two Titanite Shards, two Undead Hunter Charms (which can be used on the mimic earlier in order to have a chance to get the coveted Symbol of Avarice) and an Estus Shard (plus a key to unlock an NPC vendor). However, you’ll have to deal with a Lothric Spear Knight, two greataxe hollows and a halberd hollow among others… you can always come back for those things later 😛
After sneaking past the Winged Knight in the courtyard (he’ll walk in circles around the fountain, so the easiest way is just to walk on the other side of the fountain to get to the other side of the courtyard), you should take a right as you come out of the courtyard, there’s going to be a crossbow hollow there and another hollow behind you. Deal with them and continue on up the stairs and you’ll come out to an open place where you see a single hollow dangling around. Get his attention by throw a bomb at him and kill him separately. As you approach the other side a bunch of peasant hollows are going to climb up the right side (four to be exact) and if they gang up on you, they can easily kill you, so make sure you kill as many as you can while they are climbing up and jumping down. After dealing with them, open the door and head up the elevator inside by stepping on the plate.
When your trip is done you’ll see a door in front of you, turn around and pick up the Throwing Knives behind you. They are useless as a damage item, but really good for getting an enemy’s attention and baiting them out. After that open the door and head out, kill the greataxe hollow and head up the stairs. Watch out of the two dogs and the crossbow hollow on the little overhang. Deal with the enemies and go up the stairs on the opposite side of the crossbow hollow, where you’ll find another crossbow hollow. As you go over and kill him, another peasant hollow will transform into a goo-monster. Repeat the steps earlier with the firebombs and kill him to get another Titanite Shard.
Make your way to the overhang mentioned earlier and continue up the stairs. Looks familiar? That’s the bonfire you first lit when you arrived here. Now hold on, I didn’t do this to troll you, now you have an easy way to get back to the part after the courtyard where you just came from. If you didn’t go back and infuse the longsword earlier, do so know and use the souls you’ve gotten to upgrade infuse and upgrade the longsword plus invest in stats (if you decided to go inside the house earlier and found the two Titanite Shards in there, you should have six of them by this point – not counting and random drops – which means that you can get your sword to +2).
Backtrack to the point where you came out of the courtyard and continue on. If you’re embered you’ll find a summon sign here for Lion Knight Albert (pic below). Summon him and continue.

Deal with the two Lothric Knights on the left as you see fit and proceed inside the church (??). Talk to the hold lady there – her name is Emma – and you’ll get a Small Lothric Banner and if you talk to her again, you get the “Way of the Blue” item which you can equip in the covenant slot (pic below) and this specific one has the effect that if you get invaded while having this equipped it will auto summon a Blue Sentinel or Blade of the Darkmoon to help fend of the invader.

Go back down the stairs where you fight the knights and continue downwards where to spear and shield hollows and a crossbow to the right will be waiting, deal with them.
Vordt, the Eskimo
If you look to the right of the open portcullis, because you “defeated” the Sword Master, you’ll find his summon sign there. It’s up to you whether or not you want to summon him because the HP and resistances enemies, including bosses, scale according to the amount of players in the session so while it might be easier to deal with some enemies because you can stunlock them, a lot of the bosses actually becomes harder because of the increased scaling… imo atleast… shut up…
Remember the Gold Pine Resin you found earlier, you use it on your weapon in order to do increased damage against Vordt, but you might be handicapped against the Crystal Sages later on. The choice is yours, but real talk for a second here, Vordt is really not that hard if you – once again – slow it down and observe him in order to understand his animations and moveset. The one thing I should point out tho is that when he goes into rage mode… dodge to the side when he rampages and run to his right side when you see him charge up an attack.
After dealing with him a bonfire will spawn and the big door will open. Light the bonfire, go back to Firelink and spend your souls, then go back and go to the edge behind the door. You’ll get a prompt saying “Raise banner”, do so and watch a cutscene of you being transported down from the High Wall of Lothric.
Conclusion
Congratulations, you’ve made it to the Undead Settlement and here’s where your true journey begins and my guide ends. If you’ve been following this guide, you’re prepared to deal with anything the Undead Settlement has to throw at you. I also feel that the best thing about Dark Souls 3 (and the other Souls games) is the experience of finding stuff yourself, so I feel like I would you a huge disservice by continuing on in this guide, since this isn’t supposed to be a full-game walktrough.


Be the first to comment