
This is the Barotrauma dev team’s official manual for building your own characters using the in-game character editor. The manual is not comprehensive, but it does go into some technical detail. A video tutorial is planned to follow later, but I feel that some things are better explained in text format.
Other Barotrauma Guides:
- Reactor Guide.
- Stealth Traitor Guide.
- Submarine Editor Basics.
- Submarine Builder’s Guide.
- The Medical Doctor’s Guide.
Contents
Introduction
All credit goes to Regalis!
This guide concerns an upcoming version (soon!) of the editor, not the currently released one, but it should in many places be of use even for the current version. Furthermore, the character editor itself is still very much a work in progress. Many things will change and there’s plenty of room for improvement. Also note that creating characters currently requires a bit of technical wizardry, and it’s not advised to jump into it if you are afraid of some .xml editing.

This is the Barotrauma dev team’s official manual for building your own characters using the in-game character editor. The manual is not comprehensive, but it does go into some technical detail. A video tutorial is planned to follow later, but I feel that some things are better explained in text format.
All characters in Barotrauma are made up of a ragdoll ‘skeleton’, on the one hand, and the animations that go with that character, on the other. In the character editor, you can edit both of these. A ragdoll is created from limbs that are connected with joints. The animations are basically definitions about the movement of the ragdoll. In the following, you can find more detailed instructions for each of these steps, plus some information about .xml editing.
Tip: Use keys [1], [2], and [3] on your keyboard to quickly switch between the limb, joint, and animation edit modes.
Creating a New Character

It’s currently easiest to create fish- or wormlike creatures – anything that walks is a bit trickier at the moment. So, ideally don’t attempt a crab with 10 legs as your first character.
To create a new character, click the ‘Create New Character’ button found on the ‘Files’ panel. The following view will ask for basic information about the character you are about to create. The paths to the config file and the texture path are both relative to the Barotrauma project folder.
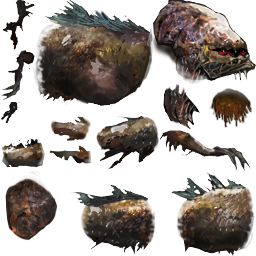
One thing you should have on hand at this point is a texture for the character. In Barotrauma, all characters are made of limbs that have a sprite. In practice, you’ll need a sprite sheet, where the sprites for all the limbs of your character are found. Write the path to the texture file in the ‘Texture Path’ field.
You also need to select or create a new content package for the character, which contains the custom content for the game. A content package is essentially a mod. Select the content package you want to use for the character or create a new content package by providing a name for it and clicking the ‘Create New’ button.
The third thing you will need is a character config file, but that will be automatically created for you. You can define a path for it in the ‘Config File Output’ field. The default should be fine too.
Once you have filled out the basic information, it’s time to create some limbs. Use the ‘+’ and ‘-‘ buttons to add or remove limbs. You can easily add multiple limbs by defining a 2D grid (the ‘X’ and ‘Y’ fields) and pressing the ‘Add Multiple’ button.

Don’t worry too much about the definitions here. We just want to add some limbs that we can edit later on. It’s also possible but currently not advised to define the joints here. It can be done later much more easily.
The File Structure
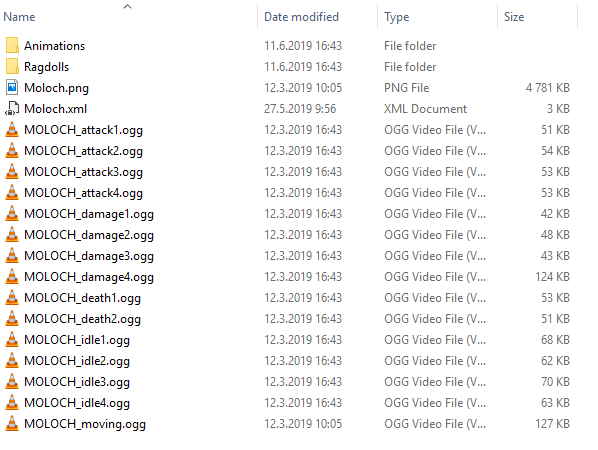
When you create a new character, you are asked to define a path for the character config file (e.g. Mods/MyMod/Characters/Mycharacter.xml). It’s strongly advised that the texture and sound files are placed in the same folder or in subfolders at the same location as the character config file.
When a new character is created in the editor, the system automatically adds the reference to the character config file in the content package and creates the animation and ragdoll files for you.
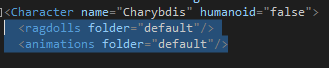
If for some reason you don’t want to use the default paths, you can change the paths in the character config, by changing the values for the ‘folder’ attributes of ‘ragdolls’ and ‘animations’ elements.
Important: Don’t rename the animation or ragdoll files or the game won’t be able to use them. This will hopefully be changed at some point, but for now, use the default filenames.
Important: To avoid issues with the file structure, please capitalize the first letter in the character name and nothing else. The character name should match the folder name.
Tip: You can have multiple ragdolls and animations for a single character, but currently only the defaults are used in-game.
Editing Limbs

When you are done with adding some limbs, click the ‘Create’ button. At first, your character will look a terrible mess with all the limbs on top of each other. This is because there aren’t any joints yet to join and keep apart the different limbs. For now, let’s just ignore how the character looks in the game view; it won’t look right before we add the joints.
Tip: You can add limbs after creating joints and create joints before the limbs are final. However, it’s easier to define the limbs first. Then the joints. And then iterate.
Before going into how we add joints, we should first adjust the source rects and the colliders of the limbs. Source rects are simply definitions about the position and the dimensions of the limb; they mark where the limb is on the texture file (in pixels). Colliders, on the other hand, are the physical definitions of the limbs. They determine how the limbs move in the game world.
OK, let’s start editing. First, make sure that you have the ‘Spritesheet’ and ‘Limbs’ toggles selected on the ‘Modes’ panel. Also cross over the ‘Adjust Collider’ toggle found on top of the screen.
Tip: You can change the collider shape by adjusting the collider dimensions from the parameters. Enable the ‘Parameters’ toggle to see the parameters of the selected limb.
You’ll now see the colliders of the limbs drawn in green over your character. Select the limbs over the sprite sheet. Drag the small box in the top left corner to move the source rect, and the box in the bottom right corner to adjust the size of the source rect (and the collider).
Important: When the ‘Adjust Collider’ mode is enabled, the colliders are automatically recalculated. If the colliders are of the wrong size, the collisions won’t work right. If the colliders are too small, the ragdoll can be unstable and even explode.
Tip: Use the arrow keys to move the source rect one pixel at a time.
You can add more limbs by duplicating an existing limb. Select a limb and click ‘Duplicate Limb’ [ctrl+c]. The new limb should now be selected. Drag the source rect to a position where you want it and adjust the size, just like you did with the other limbs. Most of the limbs can also be deleted [delete], but there are some restrictions to this.
Tip: If joints or limbs don’t get deleted or added correctly, or you have some other issue in the editor, take a look inside the .xml file. You can manually add or remove limbs and joints in the .xml too.
Creating Joints

When you are done with the main limbs (you don’t have to define all of them at once), you can start creating joints between the limbs.
Make sure to have the ‘Limbs’ mode selected. Then select a limb, and click the ‘Create Joint’ button [ctrl+e]. You can now draw a joint between two limbs. The starting point of the joint was defined when you pressed the button or the hotkey, and now you need to define the other end of the joint. To do that, hover your mouse over the limb you want and select it with the left mouse button.
Tip: Press [ctrl] to select and edit multiple limbs or joints at the same time.
Tip: In the joint editing mode, click ‘Copy Joint Settings’ to copy the settings of the first selected joint to the other joints.
The editing mode should now automatically change to ‘Joints’. In this mode, we can see the joint ends drawn as red circles. If you select one of the circles, it will change the color and show three small widgets next to each end of the joint.
Tip: You can edit and create limbs and joints also over the character in the game view, but it’s usually easier to do it on the sprite sheet.
Try dragging the circular widget. This is the anchor point of the joint. It defines the point from where the limb is attached to the other limb. The longer the distance between the two ends, the longer the joint. And the longer the joint, the farther the limbs are from each other.
Tip: If the limbs seem to be on top of each other and the joint ends look correct on the sprite sheet but wrong in the game view, try flipping the joint ends (i. e. just drag them so that they swap places).

When you get both joint ends in place, select one of the rectangular widgets. These are the joint angle widgets. They define the limits of joint rotation. There’s an upper limit and a lower limit. By default both are set to 0. When the joint limits are at the same value, the joint is as stiff as it gets. The upper limit should always be higher than the lower limit. Both limits go clockwise from -180 degrees to 180 degrees.
Tip: By default, the rotations start from the top and end at the bottom, but the ‘Spritesheet Orientation’ has an effect on this. Click ‘Spritesheet’ on the ‘Modes’ panel to see the orientation controls.
It’s possible, for example, to define some of the limbs from left to right and others from top to bottom, but currently you can only have one universal offset for the character. You can freely change the orientation depending on which joint you are currently editing, but it’s a lot easier if at least most of the limb sprites are laid out in the same orientation in the sprite sheet.
The ‘Spritesheet Orientation’ property also has an effect on some gameplay features, like the damage sectors. So be sure that you save the ragdoll with the correct orientation.
Basic Setup for the Ragdoll

At this point, you should have a character with some limbs and joints ready. Limbs and joints together constitute the skeleton of a character, or a ragdoll, as we call it. Enable ‘Ragdoll’ on the ‘Modes’ panel to see the ragdoll drawn over the character. On the right, you will now see settings that affect the whole ragdoll.
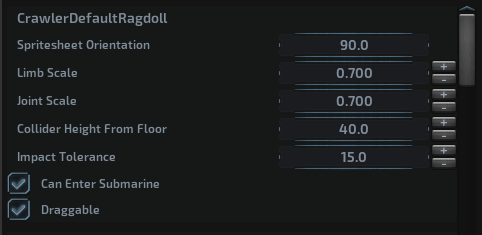
The characters have something called the ‘main collider’. This is an approximation of the character’s dimensions used for animations, multiplayer syncing and AI decisions. When you have the ‘Colliders’ mode enabled, the main collider is drawn in white (capsule) over the character. It’s important that the collider is of an approximately correct size. It’s also important that the ‘Height From Floor’ parameter is given a reasonable value. Otherwise the character won’t stand where it should. Note that this parameter has an effect only when the character is standing; it doesn’t affect swimming animations.
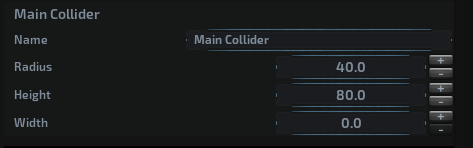
Enable ‘Parameters’ on the ‘Modes’ panel to see the parameter editor on the right. Ensure that the main collider is set up properly. You can now also review all the colliders of the limbs to check that they are the right shape and size.
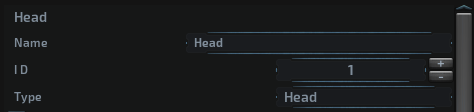
Yet another thing to check here are the limb types. Select the ‘Limbs’ mode to see the limb parameters for each limb in the parameter editor. Make sure that the character has a torso and/or a head, that the legs and arms are defined as such, and that the tail limbs are given the type ‘Tail’. If the limb types are wrong, your animations might not work as intended, because the system doesn’t know which limb it should move to make the character swim or walk, for example.
Tip: When you have limbs or joints selected, only the selected elements are shown in the parameter editor. If you want to see all the limbs or joints, deselect all by clicking the right mouse button.
When you are done, click the ‘Recreate Ragdoll’ button on the ‘Tools’ panel to apply the changes.
Tip: Currently there is no autosave in the editor (Sorry! We promise to do something about this later). Please use the quick save buttons often enough that you don’t lose your progress.
Tip: Try undo [ctrl+z] and redo [ctrl+r]. They should work for most things. Just don’t try to undo destroyed limbs or joints. That won’t work.
Animations

Animations are what make characters alive. Unlike in many other games, in Barotrauma the characters are entirely driven by physical forces. When we make the feet of the character to take steps or the tail to swing when the character swims, we actually define forces on the limbs.
Doing this kind of animation can be a bit different from doing ordinary animations with keyframes. We don’t have the same control on the movement. The upside is that the animations can adjust to the environment without any kind of tweening or blending from an animation clip to another – we don’t have any clips, but we do have animation definitions as a collection of parameters.
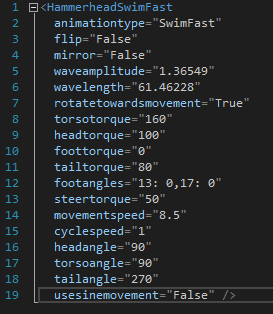
There are currently four animation types for the characters that you can edit: ‘Walk’, ‘Run’, ‘SwimSlow’, and ‘SwimFast’. Each of the animations is defined in a separate file and they have distinct parameters. Some of the parameters are common to all, some specific to the animation type. Most of these you don’t have to worry about, because you can easily experiment with the widgets that are drawn over the characters.
Tip: Press [e] to switch between grounded and swim animations. Press [Left shift] to switch between slow and fast movement animations. There’s also a drop down for selecting the animations.
However, there are some important parameters that you can edit only in the parameter editor. Select ‘Parameters’ on the right side of the editor view to open the parameter editor.
- Head/torso/foot move force defines the directional force applied to the given limb to move it.
- Head/torso/foot torque defines the angular force that rotates the limbs to the rotation defined in the Head/torso/foot angle parameter.
- Steer torque determines how fast the main collider is rotated when the character turns.
- For humanoids only: get up force defines how much force is used to force the character standing.
Tip: When the parameter editor is open, you can see which parameter(s) you are changing when dragging a widget over the character. The parameters that are updated should flash in green.
Limitations and Missing Features
There are some limitations to keep in mind when creating characters in the editor.
The most pressing of them are the following:
- Unlike the animation parameters, many of the ragdoll parameters are not updated at runtime. Click ‘Recreate Ragdoll’ on the ‘Tools’ panel to see the changes.
- You can edit attacks but cannot create them in the editor. So, to get the character to attack anything in the game, you’ll need to do some .xml editing.
- You can’t see afflictions at all, which means all the damage to other characters must be edited in .xml.
- You can’t edit the sprite deformations, which are used for example in the Moloch’s bladder to make it pulsate.
- You can’t edit the character config file (“Mycharacter.xml”) at all, meaning that you’ll have to do .xml editing to enable AI for your character.
- Creating humanoids is disabled to prevent crashes, because humanoids have prerequisites that are not enforced when creating a character. Note that you can still create humanoids using XML if you know what you are doing. Just use the vanilla human as the basis of your humanoid character and prepare for crashes.
Having the above mentioned limitations means that some things just have to be done by manual .xml file editing. Hopefully we can remove the need for this at some point, but for the time being, let’s look at how you can handle it.
XML Tweaking: The Character Config File

The two things that you will really need for your character are health and the AI. Health is pretty straightforward, but the AI might need a bit of explaining.
Tip: Editing .xml files can be intimidating at first, but it’s not difficult. Just check the existing character files and extrapolate from there.
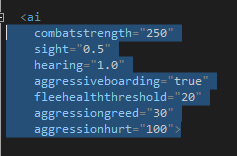
The non-human AI is currently just a simple state machine, where the AI determines which target it should prioritize in a given situation. In the ‘ai’ block, you can define these priorities: which things the character should target, which state it should use while targeting, and what (base) priority should be given to this target. The actual priority is determined by dynamic factors like the distance to the target. Some factors can be modified in the .xml. Let’s take a closer look at the most important of them:
- combat strength – Defines how strong the AI thinks the character is.
- sight – Multiplies the distance at which the character can see targets.
- hearing – Multiplies the distance at which the character can hear (or “sense”) targets.
- aggressive boarding – If true, the character tries to break into the submarine.
- flee health threshold – If the character has less health than this, it will flee.
- aggression greed – Determines how much the targeting priority increases each time the character does damage to the target. The actual priority adjustment is calculated based on the damage percentage multiplied by the greed value. The default value is 10, which means the priority will increase by 1 every time the character does damage 10% of the target’s current health. If the damage is 50%, then the priority increase is 5.
- aggression hurt – Determines how much the targeting priority increases each time the character takes damage. Works like the greed value, described above. The default value is 100.
You might also want to add some sounds and particles (like blood) to your character. If you want the character to drop some items, give it an inventory too. Each of these should be easy enough to add. Just copy and paste the appropriate blocks from other files and adjust the values a bit.
Tip: The AI characters only target entities that have <aitarget/> tags in the XML definition. For some things, like the walls, this tag is added automatically in the code.
XML Tweaking: The Ragdoll Files
OK, so now you know how to edit the .xml files – let’s go a bit deeper: we need to add an attack for your character. And that takes tweaking a lot of parameters.
Fortunately you can edit the attack parameters in the editor too (where you have the tooltips for most of them). So I’m not going through all the parameters here. Just copy and paste an attack block from another character’s ragdoll file and place it under the limb you want to use for the attack. This is much easier if you have given easily readable names to your limbs.
An important part that you unfortunately cannot see in the editor (for now, that is) is the afflictions. Afflictions are what actually do damage to characters. All the afflictions in the game are defined in Content/Afflictions.xml, where you can also create your own.
So, you might want to add some afflictions inside the attack blocks in the ragdoll file, like so:
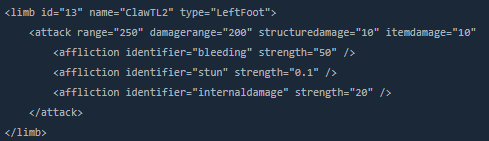
Some other things you may want to try to add to your character are damage modifiers and deformations. Damage modifiers can be positive (>1) or negative (<1), meaning that they can be used to define a shield or a weak spot, for example. Deformations are merely visual, but can be used to achieve things that are not otherwise possible to do. Take a look at MolochDefaultRagdoll.xml for a reference on both topics. Here’s some simplified code from Moloch’s ragdoll file:

Tip: Everything you edit in the editor has a representation in the .xml files. If you edit the animations, the animation files will change. And if you edit the ragdoll, the ragdoll file will change.
Publishing Your Character

Custom characters need to be shared with other players so that you can play together with them in multiplayer mode.
Fortunately, publishing a mod is fairly simple: first you need to select your newly created content package, which creates a folder called ‘NewWorkshopItem’ inside your game folder and copies the character file there. This folder and all its contents will be uploaded to the Workshop.
Make sure all the files required for your mod are present inside the folder: textures, audio, ragdoll and animation files. If you have wisely put everything in the same folder as the character config file, you shouldn’t have to manually add any additional files: the entire folder is included in the workshop item.
Once everything is ready, simply click ‘Publish item’. The mod should now be found in Steam workshop, where others can find and download it.


Be the first to comment