
How to Start in Sandbox Mode
Section One: Character and World Creation
When you start a new game, there are usually different sections with lots of choices. These are the choices that I think make the beginning of the game easier.
World Tab
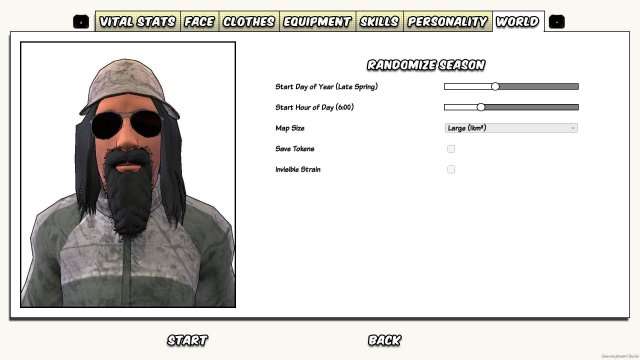
After you’ve fiddled with the Vital Stats and Face tabs, jump all the way to the end with the World tab.
Here you want to choose a starting season of Late Spring, or Early Summer. And you also want to uncheck the box next to Save Tokens.
Unchecking Invisible Strain is optional, it will make the game easier, but it doesn’t really come into great effect until later on.
The Reasoning:
From late autumn through winter and early spring, you have to think about the cold and getting too cold. Also, plants won’t grow then. In late summer and early autumn, you need to hurry and grow enough food for the winter. That leaves late spring and early summer. During that time, it’s warm enough so you don’t have to worry about rain or snow suddenly freezing you or killing your plants. Plus, you still have enough time to find seeds and grow a garden a few times before winter comes.
Apart from the auto save you get when you first start the game, there is no auto saving, you need to hit F9 to save manually. On top of that saving requires and consumes an item, the Crucifix Pendant. These drop fairly regularly, but when you’re still learning the ropes it’s handy not having to worry about collecting them. Unchecking this box will turn off the requirement for the Pendants, but you will still need to manually save the game.
The Invisible Strain is a hidden zombie virus which NPCs can be infected with without knowing. When the NPC dies they immediately turn into a White Strain zombie (the most difficult version). I haven’t seen this being really impactful until later on when I start forming up my own community, so it’s generally something you don’t need to worry about in the beginning, but if you turn it off it’s one less thing to think about as you’re learning.
Clothes Tab
Now, lets jump backwards to the Clothes tab. The reason you want to do the World tab first is your starting season changes how many Clothes Points you are given. If you start in Winter you’re give more so you can “buy” the warmer, more expensive clothes, etc.
The clothes you choose to start with aren’t super important since as soon as you start killing zombies you can loot and wear their clothes (gross right?). However some items of clothing are rarer than others and give slight boosts.
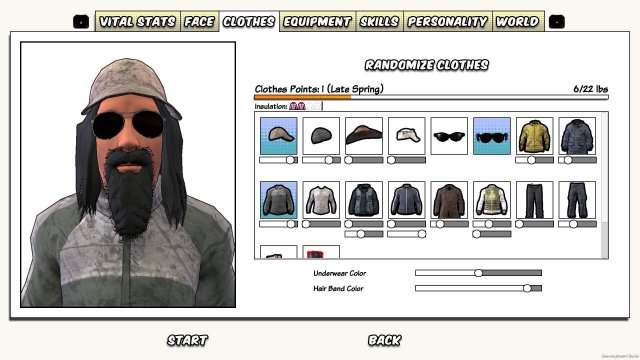
The two important items of clothing you should start with are: the Sunglasses (either type), and the Baseball Cap or the Cowboy Hat, or the Military Cap. These items cost 1 point each and each gives +1 to your Sight Rating.
Your Sight Rating is a hidden stat which increases how far you can see. Increasing this helps a lot when scouting since you’ll be able to see the zombies before they can see you.
The rest of the points don’t matter and can be spent on whatever you like. I usually buy that Long-Sleeved T-Shirt because it has a good gold to weight ratio.
Skills Tab
Lets move to the Skills tab now. This is the most important tab for your Easy Start.
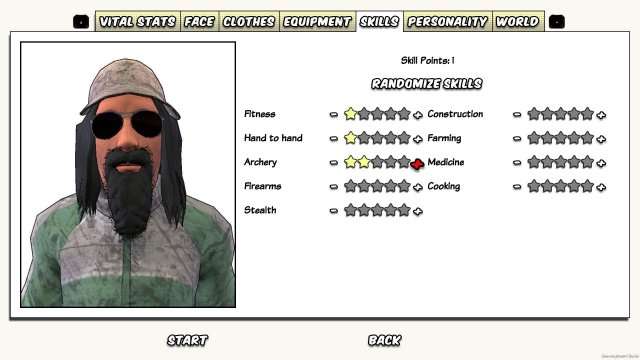
You want two stars in Archery, one star in Hand to Hand, and preferably one star in Fitness (if you absolutely want to buy another skill, I would take from Fitness before the other two). The last point can go anywhere, though I will give a few suggestions.
Why these points?
One star Fitness: Fitness influences your Stamina level. Stamina is used for running, fighting with melee weapons and fists, and kicking off zombies when they grab you. It also increases how much you can carry.
One star Hand to Hand: Every time you swing your weapons it takes Stamina, the more damage you do with those swings the better.
Two stars Archery: Zombies are fast and they don’t have Stamina, so they will catch you if you run. The best way to deal with zombies is by hobbling them so they can’t run. You do this by attacking their legs, and the best way to do that is at range. You need one star in Archery to be able to target their legs, and the second star makes you “lock on” quicker which will be important when you’re fighting multiple zombies. Keep in mind you can’t kill a zombie by targeting their legs, your goal is just to hobble them and buy you some space.
Where to put that last point?
I usually put it in Firearms, simply because leveling Firearms is awful. But other useful places would be Stealth, this will help sneaking up on rabbits and zombies. Or Farming, the amount of food/seeds you harvest from a plant is based on the farming level of the person who planted it, higher Farming = more food.
Why Archery over Firearms?
In my opinion, guns are an absolute trap in the beginning of the game. Do not use guns. Do not choose a gun as your starting equipment. If you loot a gun at the start, put it in a car and leave it for later. Do. Not. Use. Guns. (in the beginning) for three reasons: 1) Guns are loud and Bows are quiet, and noise matters. A lot. 2) Ammo is harder to find/make/buy than arrows. 3) Firearm stars scale horribly. This is a balance issue which hopefully is addressed at some point, but in my opinion you need at least three stars for guns to not totally suck, and four stars for them to be alright. Even with two stars, they’re still significantly worse than bows. So stick with the bow.
Equipment Tab
And finally, the Equipment tab.
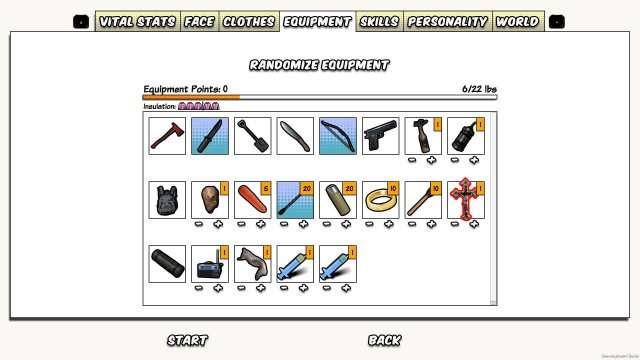
This is the equipment you want to match your previous choices in the Skills tab.
A Bow, 20 Arrows, and a melee weapon. Your melee weapon can be any of the first three (you can’t afford the Machete if you take the Bow and Arrows), but I recommend the Hunting Knife.
I’d rank them as:
#1 Hunting Knife
- Pros: Lightest melee weapon available. You can skin zombies (and people), and then throw these flesh chunks to distract other zombies (or eat them yourself, if you really want). With Flint you can start a fire. You can Assassinate targets.
- Cons: Shorter range, lower damage.
#2 Fire Axe
- Pros: Higher damage than the Hunting Knife, and you can chop trees for wood right from the start.
- Cons: Heavier.
#3 Shovel
- Pros: Higher damage than the Hunting Knife, longer range than the Fire Axe.
- Cons: Heavier, also digging is less useful in the beginning.
Do not take the gun!
- It’s a trap! –
Admiral AckbarMicheal Scott
Personality Tab
The choices in the Personality tab do have gameplay effects in that depending on what you choose different dialog options will be available to you. However I haven’t found them to be super critical in making the game easier or harder in general. So I’ll leave this up to you to decide.
Section Two: How to Fight the Zombie Horde
I will be trying to explain how to clear a town of zombies. Towns have the highest concentration of zombies outside of the generated Wandering Hordes, and will be something you’ll want to clear out so you can loot them. In going over how to clear a town I will also be explaining how to fight zombies and how some of their mechanics work.
Basic Mechanics: The Senses
Sight
Survivalist Invisible Strain uses a Fog of War view system where you have a visibility radius around you and your community members, and beyond that radius the world fades into fog. This is where the Sunglasses and Baseball Cap come in from the Clothing tab, they both increase this radius slightly.
Zombies and other NPCs use this same radius system. You and NPCs can see slightly further than zombies by default, but since you’ve increased your Sight thanks to your smart clothes choices you can usually see both of them before they can see you. Zombies and NPCs also have a Cone of Vision, so they can’t see behind them which allows you to sneak up and Assassinate them.
Stealth – press Ctrl to crouch and enter stealth – plays an important role in being able to successfully sneak up on a person, but even at five stars Stealth won’t allow you to crouch directly in front of them unseen. The exception to this is when you’re in cover. Crouching in a bush gives you cover and makes you harder to see, so it’s possible with a high Stealth skill, while couching in a bush, to have people walk right by you.
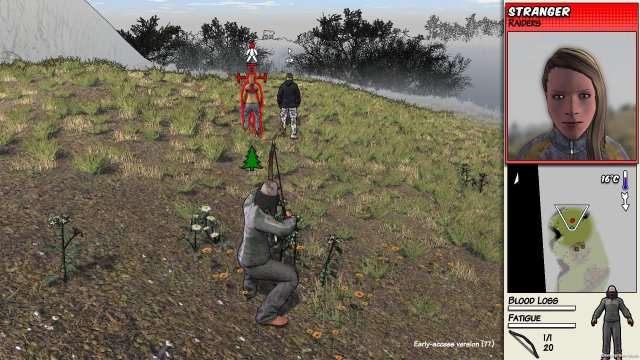
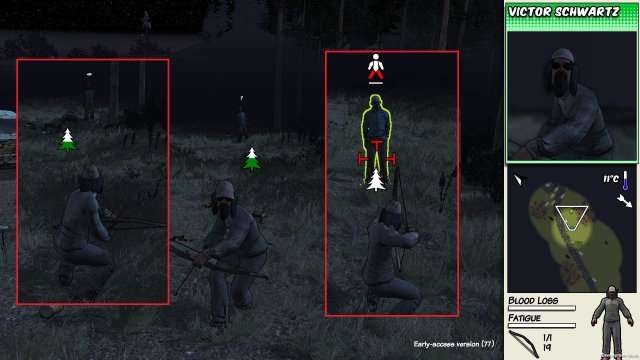
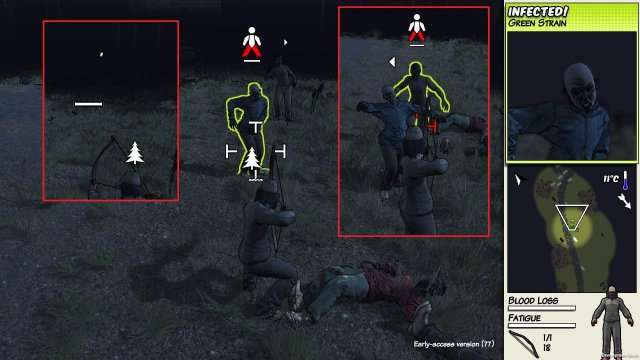
The raider on the right sees a zombie ahead so he stopped to watch, the zombie can’t see them so it’s not attacking. Neither of the raiders can see me because I’m in stealth and out of their cone of vision. If one were to turn around they’d see me immediately though since I’m out in the open.
Smell
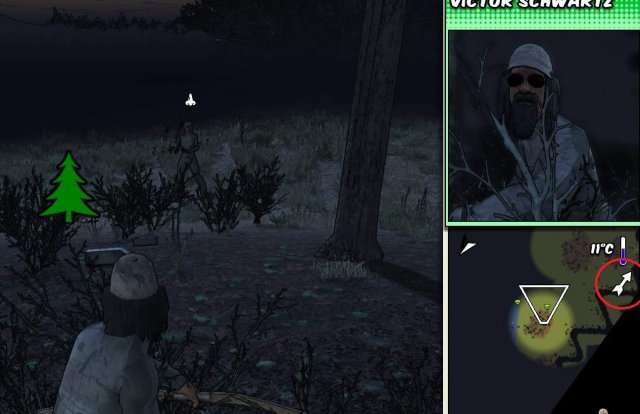
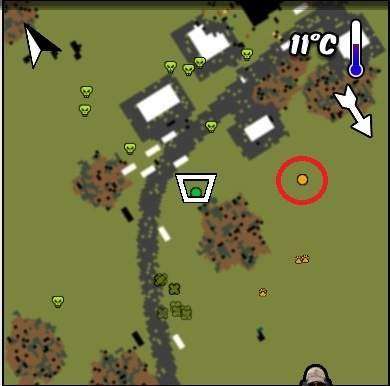
Both zombies and rabbits can use your smell to detect you, depending on the direction of the wind. On the minimap, below your temperature, there’s an arrow which denote the direction the wind is blowing. If you’re approaching a zombie with the wind at your back, it will be able to smell you. This is something which needs to be taken into account when sneaking near zombies or rabbits.
However it can also be used to your advantage in luring zombies away. You can approach until it smells you and then withdraw, the zombie will wander over to where you were to investigate and you can attack it with less chance of alerting other nearby zombies.
As long as the zombie doesn’t see you, you can continue to lure it to a safer place to fight.
Humans don’t use the smell system.
Sound

Like Smell, this is another aspect of approach which you need to keep in mind, but it can also be used to your advantage.
You can make noise in a number of ways, by throwing something (a bottle, a piece of meat, etc), by using a Wind-Up Radio, by running, by fighting, by firing a gun…
When a zombie hears a noise they will wander over to investigate. Whereas when a human hears a noise usually they will stop, crouch down, and wait.
Basic Mechanics: Targeting

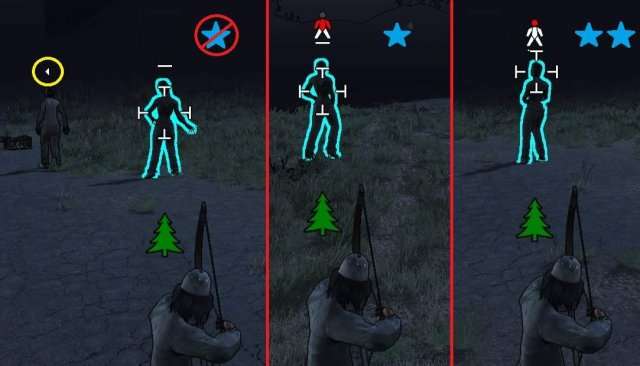
To target something, hold the right mouse button. This gives you several target areas depending on your skill level. To switch between them move your mouse up and down while holding RMB.
In the left picture I have zero stars in Archery. Here I have just the single target of the zombie (the torso).
In the middle picture I have one star. Now I can choose between the torso, which does medium damage; or the legs, which does almost no damage, but it hobbles the zombie so it can’t run.
The right picture shows two stars. Now I can target the head also, which does the highest damage but it also takes the longest for the reticle to lock on. When you’re targeting the head with a melee weapon, the enemy also has a higher chance to dodge your attack.
The more stars you get beyond this, the more damage you will do and the faster and more accurate your weapon will be.
In the left picture there’s also the little arrow, circled here in yellow. This means that that zombie is also in range and I can switch to it by moving the mouse to the left.
Now, Let’s Clear a Town!

I am going to be showing pictures with and without the Fog of War so I can try to show how the zombies are reacting out of view.
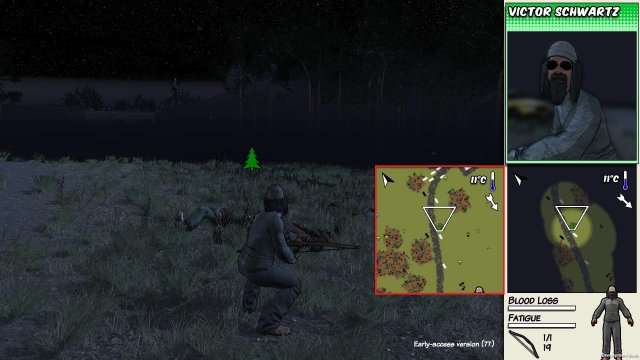
And keep in mind, this is still my brand new character. I don’t even have any shoes!
Step 1: Clear a “Kill Zone” outside of town
Near the outskirts of the town you want to clear an area of the surrounding zombies. This will give you a small area where you can pull the town zombies and fight them without having others hear you.
You can do this using the things I’ve talked about before, to lure a single zombie away from others and to the area you want to kill it. Depending on the concentration of zombies, this might be the hardest “pull” here. I my case there was a pack of three I tried to break up but wasn’t able to move far enough away before the first saw me, so I ended up getting a zombie chain.
Step 2: Start pulling zombies
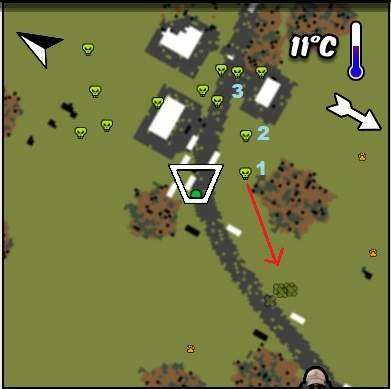
This is what the town looks like without the Fog of War, at least what I can see. And this is my plan:
- Pull #1 back to the kill zone.
- #2 will likely hear #1 and move to that location to investigate.
- Group #3 should hopefully stay put.
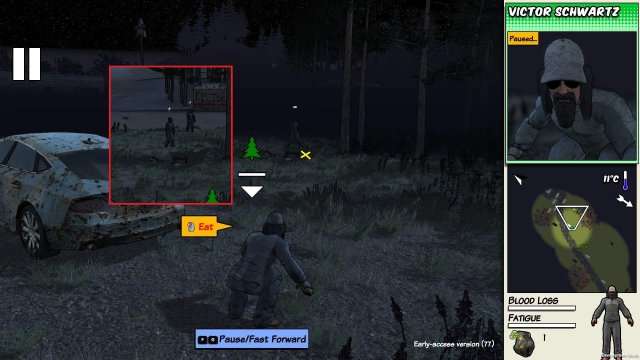
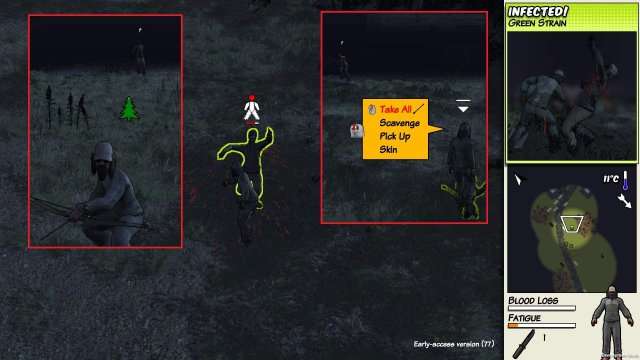
What actually happened was I tossed some rotten meat I skinned off a zombie and it attracted both #1 and #2, #2 moved into my view a second later. Both went for the meat and started “eating”.
Riding the edge of the zombie line of sight I’m able to get the interest of one, and use that to drag him back to the kill zone. When I think he’s far enough away I target the legs and shoot.
But I wasn’t far enough and #1 heard me. No problem, target the legs and hobble him too!
Notice the legs on the first zombie look different, that means it has been hobbled. The different strains take a different amount of attacks to hobble them. Green = 1, Blue = 2, etc
Once they’re both hobbled I switch to my knife to save ammo.
Here’s the updated town. Luckily group #3 has split up a little bit, now this will be easy, just pull those two lone zombies back towards the woods, which should hopefully split that cluster on the other side of the house.
I wouldn’t be able to see this with the Fog of War on, but the orange dot is another NPC. These people can be great – you can follow behind looting bodies as they mow through a town with a four star shotgun, or they can be death – as they fire off a shot from their one star pistol and draw every zombie for miles down on you two.
Pulling that lone zombie. Rinse and repeat. Shoot the legs, stab the face. The other one got alerted, no worries, one or two extras is rarely in issue once you know how to deal with them. Shoot the legs, stab the face go!
Step 3: facepalm stupid NPCs messing up my tutorial!
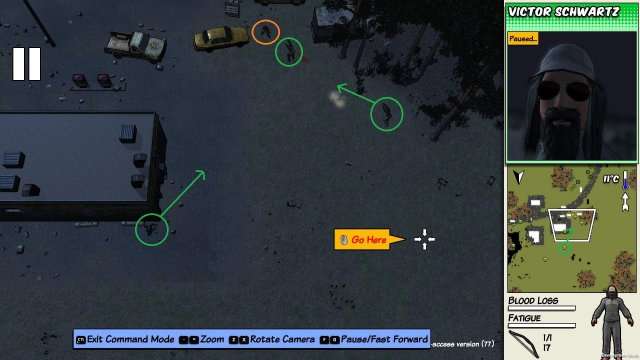
And this is what I’m talking about. She’ll probably be fine because they’re spread out enough, but she just pulled four zombies at once. It would have been more like 10 if I hadn’t been clearing here. Don’t. Use. Guns.
Step 3.5: Finishing up
After the NPC messed things up I reloaded and made a short video to show this all in action. But if you were to continue from there, it’s just a rinse and repeat. Pull as few zombies as you can, using your resources to break up groups and draw them back to “safe” locations where you can kill them freely.
Though as you can probably see from these pictures and the video, “safe” is rarely safe. You get stragglers sometimes and zombies don’t behave how you think they will, but as long as you keep calm and have taken some basic precautions like clearing a kill zone then you should be able to deal with them. And as you get more experience with it things become easier and easier and you’ll wonder how a town of Greens ever gave you trouble.
Section Three: Tips and Tricks
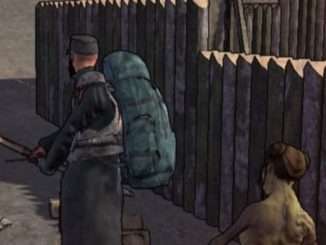
Assassinate
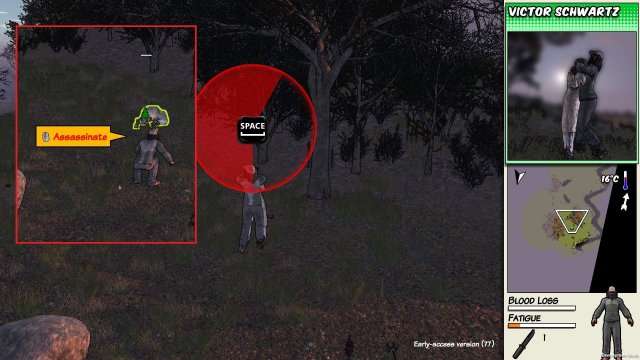
One of the special features of the Hunting Knife is that it can Assassinate. If you sneak up behind someone, you will get a prompt, then just mash Space bar until you slit their throat. A nice quiet melee kill.
This is especially useful when you’re trying to attack a Looter settlement and someone is wearing body armor and a helmet. Without a helmet you can usually 1-shot them in the head with about a three star Archery skill, and without body armor I think it takes at least a four star skill to 1-shot them in the chest. But if they have both armors, the only way to kill them quietly, and without starting a war, is with the Assassinate ability.
Bases
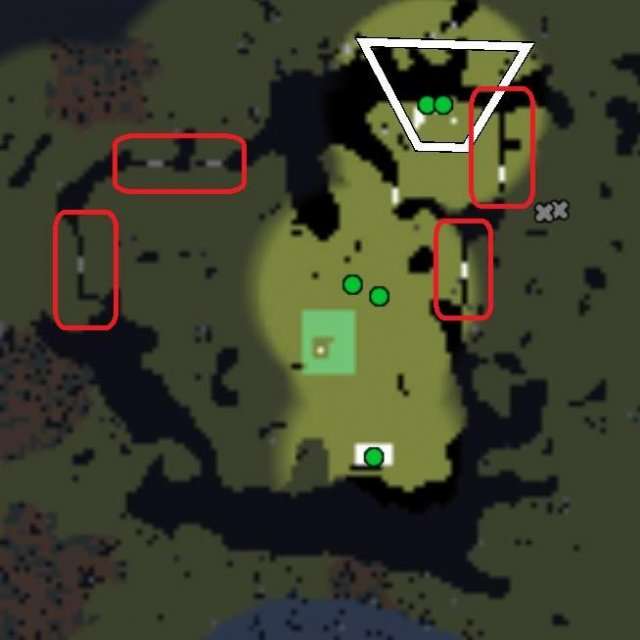
Find natural plateaus with cliffs to build your bases on. Not every map will have these, and the tops are rarely flat, but their defensive benefits far outweigh their drawbacks in my opinion.
In this particular base, those red boxes are the only place I needed to build walls, the rest was protected by natural cliffs, this means I can defend that large area with a maximum of four people.
Destroy them from the inside
This is a little trick to take over a Looter base. It requires a little luck and some work, but you can wipe out a full base within the first week if you wanted to. The key is to thin their ranks while bolstering yours.
Hunt rabbits for their chief(s), fight (and win) with Fisticuffs, talk to everyone. Once you spend a few days sucking up to them people will like you enough to abandon the camp and join you. Target the ones with the body armor and the shotguns, try to get as many of them on your side as you can. The first few will probably join willingly, but that last one will need to be threatened.
Once you have everyone you can recruit, now it’s time to pick a fight. Everyone else will already be upset with you for “stealing their people” so starting a war will be easy. Then just run. Let all your new recruits go nuts in their camp. They will die. But they will take a lot of the remaining enemy with them. Then you’re usually left to clean up the last few guys yourself with your bow.
I’ve been able to clear out a camp of 12 Looter on day 5 this way. All I had was a bow and a bullet proof vest.
Taking over
If you’re holding a Toolbox you can take over buildings as long as the former owners are dead. You can also demolish the building as long as it’s empty, this will give you half the resources that went into building it. This is really helpful when you’re first starting your base and you have a defeated Looter base nearby, demo all their buildings for some quick materials.
Farming
Farm early and often. Farming is the primary source of food in the game, you can loot some junk foods (chips and stuff), but farming is what will carry you through the winter. Hunting rabbits is fun, and is needed for quests, but they likely won’t be able to sustain you.
The amount of food/seeds you get from your crops goes up based on how many stars the farmer who planted it has. Anyone can water or harvest, it’s only the planter who matters.
One trick I use sometimes is to manually harvest all the crops, then pause all my farmers except for the highest one, and let them replant everything. That way you can have a couple of two stars watering to grind up their skill, while your crops are all four star.
Once you get a four star or above farmer then food will not be an issue again. The amount of food produced is insane for the high stars.
To get seeds, sometimes you can find them in abandoned houses, and sometimes Raiders will be carrying them. But the easiest way to get them in the beginning is just to buy them from traders or friendly communities. You don’t need too many to get going, they multiply fast.
Also keep in mind that not all crops have seeds, some crops are the seed. Cucumbers for example, you plant the whole veggie rather than a seed. So make sure your people don’t inadvertently eat all your seed crops.
Don’t rush
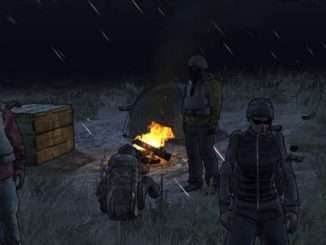
Take your time in the beginning. Sleep in abandoned buildings or cars, and don’t recruit anyone you don’t need to.
This is because as soon as you build something, even just placing a tent, you’ll start to get Raider bands spawning to attack you. They’ll start at the edge of the map and target your buildings specifically. They’re not too hard in the beginning, but unless you can kill a band of three hostiles then it’s probably better to wait a bit before starting a base. Use the abandoned stores and such to hold your stuff until you’re strong enough.
Similarly with recruiting people, as soon as you start recruiting people they start needing things! “Oh whaa there’s no Outhouse, oh boohoo there’s no food, you’re the worst leader ever.” Then they get all moody and stop working. Recruiting people early on is often more bother than it’s worth IMO.

Be the first to comment