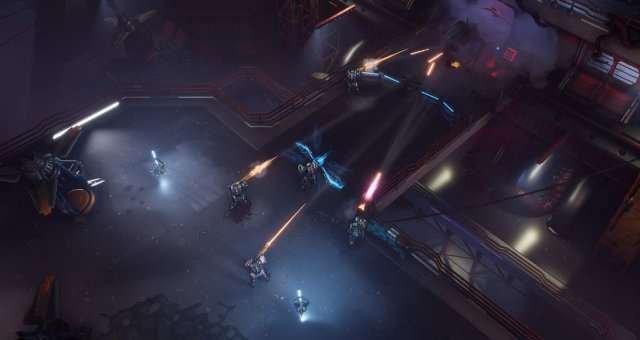
Welcome (back) Marine, in this short build, we’ll cover the basics of the game, character building UI, ingame UI, and gameplay basics mostly.
First Steps on Mars
What Changed if You Played TRS
One of the biggest changes in TRS2 is the way you create your character loadout, whereas in TRS1 you could and had to flat out pick 4 skills, a primary and a secondary weapon, in TRS2, you have more control over your builds and as such, over your own playstyle.
Before we get into it, there are TWO BIG CHANGEs TRS1 players need to know first hand:
- Armor as you used to play around is gone, your only ehp is now your health, you can still increase your damage resistance by various means, but each hit you take is actually depleting your health pool.
- Skills are now consuming a ressource called energy, they spend a different amount depending on their utility and energy regeneration is directly dependant on the way you build your character.
Armory UI
With that being said, let’s take a look at what the character building UI looks like:
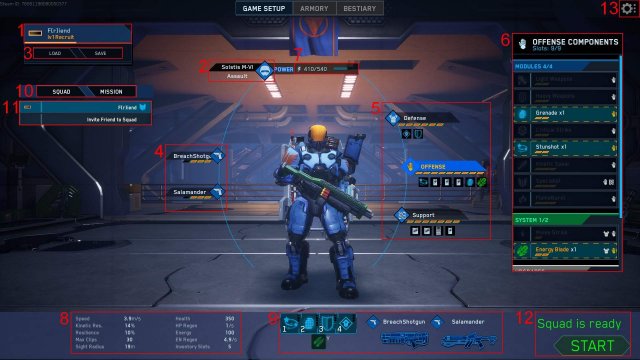
It might look intimadating at first, but after a few games, you’ll get used to it naturally and you’ll come up with constant new ideas to try out builds or optimize a one you like. But first let’s decipher this:
- It’s your current rank, be aware that ranks have been «evolved», to rank up now, not only will you need a set amount of XP, but you’ll have to achieve goals, for instance, the goal to reach rank 2 is currently «Kill 50 monsters».
- The class you are playing at the moment, if you click on the helmet, you can change your class.
- I guess it speaks for itself but who knows, you can of course save builds you liked and load them at will 😀
- First big change, you can see a number of slots for each weapon type, the number of slots for each weapon type is adjusted depending the class you play, allowing you to natively pick or not different weapons.
- And here is the big part, as for the weapons, you can notice a number of different slots, basically, the 3 categories each grant access to different skills or passives, each skill or passive is costing X slots each, you then have to try and find skills you like and have them fit the slots. It’s worth noting that the blue skills are «class skills», you can pick up to 4 of these and upgrade them up to level 5. The green skills are «native skills», you can pick up to 2 and they have no level upgrades.
- When you choose any of these categories – weapons included – you have this big tab on the right displaying all that you can pick in the slot you are looking at.
- But that’s not just about fitting slots, each skill or passive from «Defense», «Offense» or «Support» are not only costing slots in the category you rig them in, they are also costing «suit energy». Suit energy defines your energy regeneration rate in game, so the more free suit energy you have left on your build, the higher your in game energy regeneration rate. Each skills and passives have different energy cost, and some passive are increasing your max suit energy, so that’s all around finding a good balance for your build.
- All the information concerning your stats are there, most are explicit so I’ll just talk about a couple: «Kinetic Res.» is your damage resistance for most of the damage you could take in game, «Resilience» is your ailment resistance.
- It’s an overall view of your current build, if you hover over a skill, it will display extensive information of what the skill does at each level.
- Clicking on «Squad» shows who is in your game and what they are playing, going for «Mission» displays the current difficulty and other parameters set for your upcoming run.
- Player list, and you can invite friends from your Steam friend list.
- In that case I’m the host, but if you’re not, it’s the «Ready» button.
- Button to access the options menu.
It covers the basics you need for your first steps in your loadout building, have fun finding what suits your playstyle 😉 Now onwards to what the game does look like.
About Controls
But before we get into this let’s talk a bit about controls, they are mainly the same as any tactical top down:
- Right click to move your character and interact with objects on map.
- Left click to target at a monster.
- WASD to move your screen or with mouse scrolling.
- Swap weapons with Q.
- Left click an item in inventory to use it, or use keybind.
- Right click an item in inventory to drop it.
- Tab to open map.
- G to detonate explosives.
- Press «Space» to center the camera on your character.
- Activate overwatch with «E», note that it will reserve a portion of your total energy in order to maintain this mode, but it works like an auto aim with a small delay for target switching.
- Holding «Shift» will enable the manual aim mode, while using it you have increased critical hit chance. You can also toggle the manual aim with middle mouse button.
The rest of the controls are keybinds and you can change them anytime to what you like.
Ingame UI
And back to the game itself:
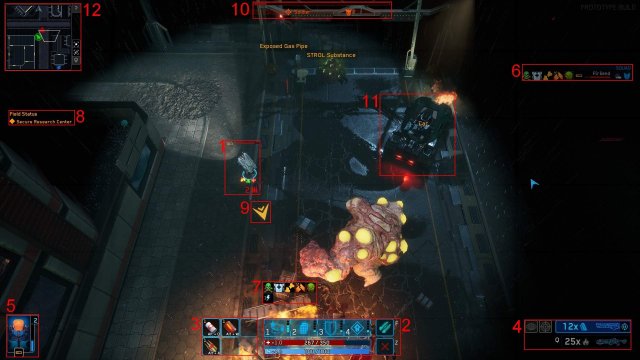
- Yes, it’s you Marine, but not only, under you is a very important data, the number of bullets left in your current clip, if it gets too low, it’s displayed in red.
- Your skills, health and energy UI. Both health and energy regeneration are shown there. On a side note, your energy regeneration is halved while you are moving, you might want to keep that in mind.
- Your inventory, self-explanatory, each slot also displays your current keybind to it.
- Your weapons, the number displayed for the primary weapon is the number of clips you have left for it, the number for the secondary is the raw amount of ammunition you have at your disposal. The 2 icons on the left are respectively showing if you currently have overwatch or manual aim mode active.
- Your character portrait and level, clicking on the portrait will pop a tab containing all your stats – speed, kinetic resistance etc…
- An overview of your squad, also shows what ailment each squad member has contracted.
- Here you can see all the ailments and buffs affecting you. Hovering over any icon will display ailment/buff effect.
- Your current objective.
- The direction to your next objective is pointed by the arrow next to your character.
- The difficulty you play in, the wave you currently encounter, and the red bar top is an indicator of when the current wave will end and a new one will spawn, when red bar is empty, a new wave pops.
- Many objects on the map have a purpose, it’s not only decorative but it’s on you to find out what they do and how to use it at their best.
- Your minimap.
Minimap
Talking about minimap, I’ll upload one just so you see how it looks like, there is no extra need for explanation about this I think since all of it has its own legend.
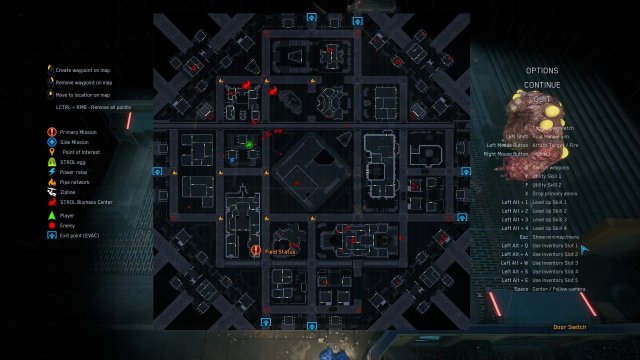
I hope this little guide will be helpful to help you take your first steps on Mars, there is much more to add, but that shall come in another and more in-depth guide.


Be the first to comment