An analysis of how to manage farming in “Kingdoms and Castles” in order to maximize food output per worker.
Other Kingdoms and Castles Guides:
Intro
This guide explains the best ways to set up food production in Kingdoms and Castles. It compares how well each food building uses its workers. The main focus is how much food each worker makes. Workers cost a lot to keep, so using them well lets more people do other jobs. This guide is for players who know the game’s basics. For example, it does not explain why farms should be near granaries to stop food from rotting.
Early Game: Farms vs. Orchards
Just comparing the building by themselves. Farms give 6 base food, a +2/+4 bonus for meduim/high fertility, and +2 for a master worker. Orchards give 24 base food, a +1/+2 bonus for each meduim/high fertility tile, and +3 for master workers. We will assume that you have master workers for all calculations since mastery seems to come fairly quickly, so the vast majority of your farm/orchard’s lifetime will have master workers.
This gives a range of 10-12 for farms, and 31-35 for orchards. however, orchards require 3 workers while farms only require 1. Taking this into account gives us the range of food production per worker:
- Farm: 10-12 food/worker
- Orchard: 10.33 -11.66 food/worker
Based on this information alone your build preference should be:
- 1: Farms on high fertile ground
- 2: Orchards on all medium fertile ground
- 3: Farms on medium fertile ground
So you should build high fertile farms unless there is no fertile land available. In this case you should try to build orchards, but if you don’t have spots for an orchard then just build more farms. This rule of thumb should work for the early game until you have enough resources to consider building windmills.
Mid Game: Windmills and Storms
Windmills give each surrounding farm +3 food production, however they cost a lot more to build than either farms or orchards and employ one worker, so it is important to only build them in situations where it is worthwhile. For example building a windmill that borders only 4 farms only gives 12 extra food, so really it would have been better to just build a high fertility farm instead.
An important note that may not be obvious before we get started: the windmill bonus stacks, so a single farm may be affected by multiple windmills, this may be useful depending on the layout of your plots, however for ease of calculation I am only considering single windmill deployments here. I may come back later and do some calculations on multi windmill deployments depending on interest.
To measure the efficiancy of a windmill/farm deployment one can simply divide the total amount of food produced in the adjacent farms by the number of workers in the farms + windmill. The result will depend on the number of farms, and their fertility levels.
The chart below shows the efficiancy of a windmill deployment in food per worker with increasing high-fertility farms going down the rows, and increasing medium fertility farms going across the columns. Green cells are cases where the deployment is overall more efficiant than the same number of workers on high-fertility farms. Yellow cells are cases where the deployment is more efficiant than the same number of workers on low fertility orchards.

So a simple rule of thumb from this would be that a windmill is good if
- There are 7-8 adjacent farms and at least 3 are high fertility.
- There are 5-6 adjacent farms and at least 4 are high fertility.
STORMS
Now in all this there is something I have ommitted, and that is that sometimes there are rainstorms which wipe out some of your farm crops but not orchards. This may make orchards better than farms depending on two factors: How often rainstorms occur, and how many fields are destroyed in a rainstorm. To get this data I watched my game for ~50 years and recorded the time between rainstorms, and what percent of my fields were destroyed in each storm. An important note is that not all rain events cause crop failure, some are just nice weather effects it seems.
How many fields are destroyed in a rainstorm
The average rate across 6 storms was 24.1% (+/- 2.7%) of fields had their crop destroyed. I think this data is pretty robust since the error is low, and I had over 60 fields in each storm. I imagine that the programmed rate is 25% since that’s a nice round number, but I’ll use my result for calculations.
How often rainstorms occur
The average time between damaging storms was 12.25 (+/- 9.6) years. You can tell that this data is pretty unreliable given the large error in my average. the number of years I recorded between storms were 9,25,13,2. Initially I was hoping that the rate of storms was either fixed, or at least random within a certain range (ie: every 4-9 years) so that I could get a good average.
However it seems that storms are programmed as a random process (a storm has a fixed random chance to occur every year). for calculations I’ll use both my 12.25 year average, and a more conservative 9 year average. If I had to guess however I would say that the programmed rate is 10% per year, for an average of 10 years between storms.
How much do fields lose from storms on average?
given 24.1% fields damaged per storm and 12.25 years per storm each field will lose on average 1.97% of it’s production. using the more conservative 9 years per storm average the loss is 2.68%
Below are the windmill graphs updated for 1.97% loss of production:

And the more conservative 2.68% loss of production:

Based on this the payoff point moves a bit. The updated rule of thumb would be that a windmill is good if:
- There are 7-8 adjacent farms and at least 4 are high fertility.
- There are 5-6 adjacent farms and at least 5 are high fertility.
Late game: Distribution and Bakeries
In the early game it is pretty easy to build your farms, granaries, and houses within walking distance of one another. However as your town expands you will want to build large blocks of manors to make efficient use of happiness buildings, and surround them with fortifications for defense. This can present several problems for supplying your citizens with food.
- Granaries must be close to farms, else farmers will not be able to harvest their entire crop (BAD EFFICIENCY) it can be difficult to ensure that granaries are also close to your residences to allow fast food pickup.
- You will want to provide your houses with charcoal, which will require your heads of houses(HOH) to make more trips.
- the larger houses have fewer HOHs per resident. hovels have 1 per 5, cottages have 1 per 6, and manors have 1 per 6.25. this means that each HOH will need to make more trips per year in order to keep their house supplied, making it more important to shorten trips.
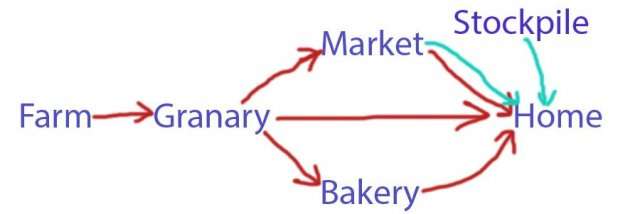
There are two ways to provide intermediaries between your granaries and your houses by having either bakeries or markets pick up food from the granaries. Here’s a poorly drawn figure to illustrate:
Red arrows show movement of food, teal arrows show movement of charcoal. the charcoal production chain is not shown since it doesn’t really have any time-sensitive components, unlike harvesting.
Granaries: 1/2 workers for 200/450 food storage for small/large granaries. Since farmers must bring food here anyway it makes sense to position them so that they can also supply part of your city, this will reduce the need for markets/bakeries.
Bakery: Takes 3 workers to operate, it consumes 1 food and 1 charcoal to produce 4 food. Produces 32 food per year (occasionally 36, the ‘bread production’ time does not neatly divide the length of the year, so occasionally there will be a year with 9 batches instead of 8). I didn’t discuss this in the food production sections since it costs nearly as much as a windmill (before you consider the constant cost of charcoal) and has the worst production efficiency (8 food/worker, 9 in a good year).
Given that each citizen consumes about 1.6 food per year a bakery will not even supply a full manor (25 people need ~1.7 food each, 42 total). The only positive I can think of is that it requires few trip to the granary/stockpile per year to operate, so there may be a niche for it to supply houses around a small resource outpost, or since they are small you could fit them into small areas of your city to help with supply.
Market: Takes a whopping 10 workers. These guys lift! everyone else walks around with stacks of 3 resources, but these guys carry 6-stacks of food/charcoal at once. This makes them really efficiant at keeping the market supplied even if they have to travel slightly farther, they also allow you to centralize both food and charcoal pickup. It’s a large commitment of your workforce, and takes up the same space as a manor so you should be sure to place markets only when needed.


Be the first to comment