More Empire of Sin Guides:
- Economy Guide.
- Neighborhood Guide.
- Diplomacy Guide.
- Gangster Guide.
- Missions Guide.
- Combat Guide.
- Events Guide.
- Racket Guide.
User Interface
Getting familiar with the various menus and options available to you is key early on.
Main Gameplay Screen
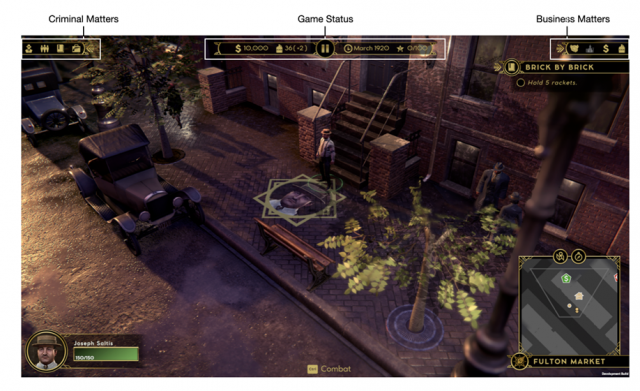
The image below shows the names of the various menus. Their function will be described in detail later on.
There are five main elements of the standard gameplay screen to become familiar with:
Criminal Matters: This is your portal to almost anything related to characters.
- Gangster Rap Sheet: Shows a breakdown of information about your Boss and currently hired gangsters: traits, items, stats, and background. This is discussed in more detail in the Gangster section.
- The Black Book: Shows a list of gangsters of hireable gangsters and their relationships to each other. This is where you hire gangsters. It is broken down in more detail in the Gangsters section below.
- The Mission Journal: Here you will find a list of all completed and in-progress missions, their descriptions, and objectives. This screen is discussed in more detail in the Missions section.
- Black Market Vendor: Here you can buy weapons and gear. The Black Market is discussed in more detail in the Combat section.
Game Status: This is basic information about how you are doing. It contains:
- Cash: Your current cash, with the amount you earn per week in brackets following.
- Alcohol: Your current alcohol stores, with the amount of alcohol you produce each week following.
- The current in-game date.
- Your Notoriety: Notoriety is earned by completing most actions in game, and determines which gangsters you are able to hire. It is discussed in more detail in the Bosses section.
- The ability to pause the flow of game time is accessed through the button in the center of the bar.
Business Matters: This bar contains all the economic information you need. The following screens are broken down in more detail in the Economics section:
- Alcohol Info Screen: Shows your empires current alcohol production, use, and sales.
- Finance Info Screen: Displays an overview of your various rackets incomes and overheads.
- Empire Overview Screen: This screen breaks down your rackets on a per-neighborhood basis, and displays any neighborhood modifiers that are affecting them.
- Diplomacy Screen: This screen allows you to access a range of options and information for dealing with rival factions.
Character Bar: The character bar shows the currently selected Boss or Gangster, as well as their health and status effects.
Mini-map: The mini-map shows your current neighborhood and surroundings. It will show characters and rackets in the nearby area. Clicking on an area of the map will move the camera to that location.
An in-depth description of each of these UI elements is included in their relevant sections.
Viewpoints
There are three view-points on Chicago each of which comes with its own surveillance information.
- Street level: The standard view for combat and interiors. you can move characters around, buy or upgrade rackets, and interact with other characters and buildings.
- Neighborhood: Zooming out from street level will bring you to the neighborhood view. This will give you an overview of the whole neighborhood and its rackets. When you begin, most of the map will be covered with fog of war. Travel around Chicago to clear it. Much of the game can be played from this view. Like in street view, you can move characters around, buy or upgrade rackets, and interact with other characters and buildings.
- Neighborhood Overview: Zooming out further will show you an overview of how the different neighborhoods are doing in terms of customers, income and amount of rackets owned by you versus the other factions. You can travel to another neighborhood by zooming down into it and right-clicking one of the taxi icons around the map. You can also travel by right clicking any rackets you have already discovered and selecting ‘Travel To’.
Movement
So, you’ve made it to the streets of the Windy City. Starting off, only a small chunk of it will be under your control – a Safe House, a brewery, and another racket – but in time all of it can be yours.
It’s time to start building your empire. First, let’s take a look around. Until you build up a nice-sized crew, you’re probably going to be doing a lot of your wheeling and dealing in person. So it’s time to start pounding pavement: to move, select your Boss or Gangster and right-click on the ground. Drag and click over a group of characters (e.g your Boss and Gangsters) to move multiple at a time.
Move the camera using WASD or moving your mouse to the edge of the screen. Q and E rotate the camera clockwise and counter-clockwise, respectively. Use Z and X, or the scroll wheel to zoom in and out.
Right clicking on a building, character, or interactable item will bring up the radial menu, allowing you to perform a variety of actions depending on the context.
Neighborhoods
The bottom right corner of your screen has the name and a small map of the neighborhood you are in. Like any neighborhood you may be new to, the best way to get to know the place is to walk around it. You know already that the best way to travel between neighborhoods is to click the taxi icon, or right click the racket you’d like to visit and select ‘Travel To’.
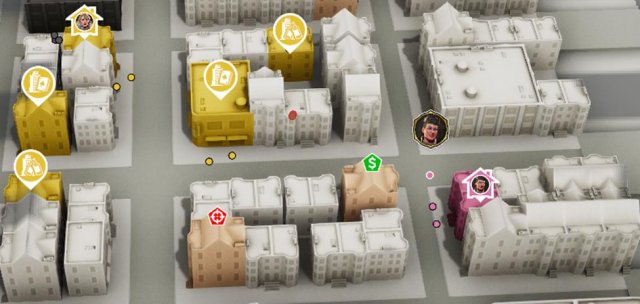
As you become familiar with your surroundings, the streets will open up and show you what’s happening in each part of town. What do you see? Well, probably something like the picture below:
Let’s take a closer look at what each of the icons above the buildings mean:
- Red Target icon: This means the building is from an enemy faction. In this case we can only see thug rackets but as you make enemies their rackets will also have a red target icon. Thug rackets are ripe to be attacked and taken over, ransacked, or razed, depending on what mood you’re in. Hovering your mouse over these buildings will also give you a difficulty rating from 0-5, on how challenging they’ll be to take over.
- Green Dollar icon: These buildings are for sale. You have the option to buy them and open any racket you like, once you’ve got the right price.
- Color Coded buildings: These identify which rackets belong to which gang or faction.
- House Icon: These are Safehouses. The picture of the boss in the middle of this icon, indicates whose Safehouse it is. Notice that the color of the Safe House matches the color of the bosses rackets.
- Building and Heart Icon: These are brothels.
- Building and Bottles Icon: These are speakeasies.
- Building and Card Icon: These are casinos.
- Building and Barrel Icon: These are breweries.






Be the first to comment