
So you’ve managed to automate your Hydro Engineering – what now? Take your automation to a whole new level, of course!
Guide to Advanced Hydroneering
This guide is for players who have already built simple automated mining in Hydroneer using belts, harvesters, and drills. We will now improve that setup to increase mining production.
The Mining Rig
Let’s take a look at what makes an “optimal” mining rig (we’ll just refer to this portion – 1 of 3 we’ll be focusing on – as the “mining rig”).
Goliath Drills operate based on a few factors:
- The depth at which they are mining (where they sit in the mining field).
- The pressure being used (pressure tanks being used).
- Quality of the water (filters being used).
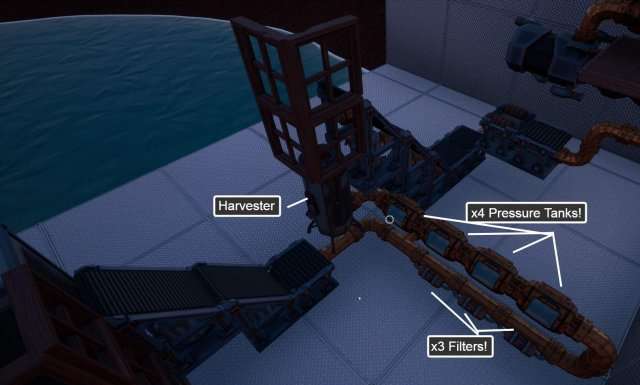
I’ve found this setup to be the best for getting those gnarly chunks of dirt to spit out of the Goliath Drills:

Let’s look at this in some better detail:
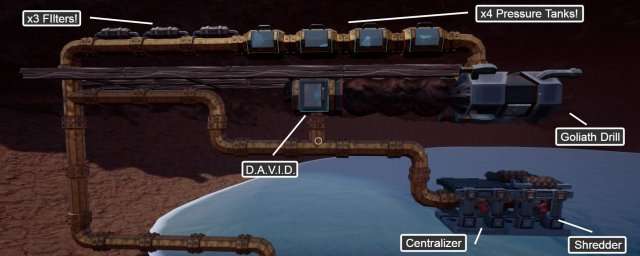
There are a few basic things I consider mandatory for each one of these mining rigs to work at their optimal level.
1. Water Filters – Minimum of 3 per Goliath Drill.
Filters are necessary – your drills will fail without them after only a couple uses (and will fail even with them in place), so always use at least 3 per drill – or be prepared to spend most (if not all) of your time repairing your drills.
2. Pressure Tanks – Minimum of 4 per Goliath Drill
Goliath Drills can run off of little to no pressure, but the output of each drill is based largely on the pressure it is supplied. Lower pressure will spit out smaller chunks, which leads to smaller ore when processed. ALWAYS use 4 per drill!
3. D.A.V.I.D. Unit – 1 per Goliath Drill
Drills need Dirt to function! This setup tilts the mining rig* on it’s side, allowing for the D.A.V.I.D. unit to constantly be refilling the dirt supply for our drill.
Using drills at a 90-degree angle has two benefits: It lets the D.A.V.I.D. vehicle supply dirt to the drill without issues. It also reduces the chance of dirt getting stuck on belts or ramps. This is because less of the dirt touches other surfaces.
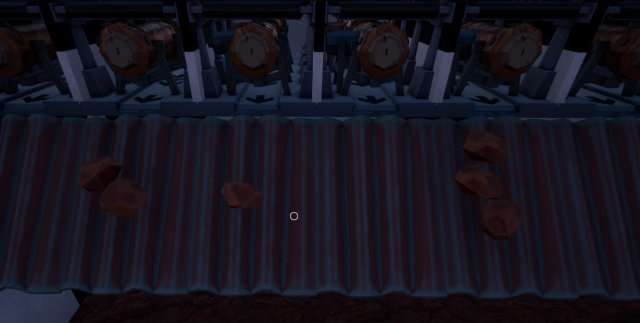
Ramps aren’t perfect as we can see – let’s just skip that part and drop the dirt directly onto a belt and into the shredder!
Harvesting/Processing Rig
So we’ve got our Mining Rig pumping out onto a centralizer and shredder – but where do we go from there?
Welcome to the Harvesting/Processing rig:
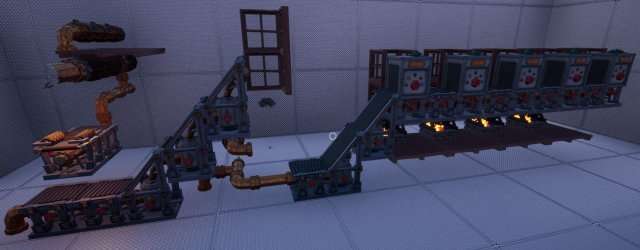
As you can see, our Mining Rig sits to the left of the image – dirt goes through the shredder and drops down onto a perpendicular belt (leading to the right) and through our harvesting and processing sections. Let’s take a look at the Harvesting section in more detail.
Harvesting Rig
Here is our processing section of our rig in a little more detail:
As previously stated, dirt goes from the shredder (at left) down to a belt facing right.
From there, it goes up 2 vertical belts, and drops down into a harvester (the windows are a blocker to keep dirt falling into the harvester). You could use a funnel here, but I find dirt gets stuck inside the funnel more often than not, especially at higher rates of mining.
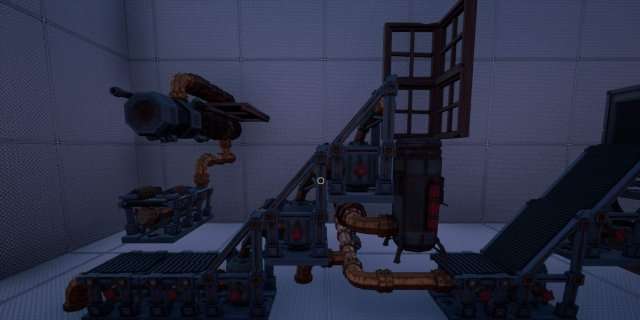
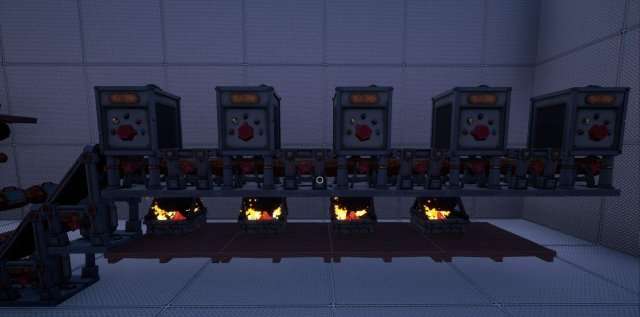
Here is a shot of the pressure tank/filter setup that the harvester uses:
As with our mining rig, I use the same tank/filter setup for each rig. 4 Pressure Tanks, 3 Filters. We’ll only be using 1 harvester per series of mining rigs, so this one won’t take as long to setup (we’ll see a setup that used a series of mining rigs that all dump into this one harvesting rig later in the guide).
After your dirt hits the harvester, it drops down onto yet another series of belts that lead to the processing section of our setup. Again, note that the harvester drops down 1 block onto a belt, no need to use a ramp or anything. Just dump directly onto a belt – this leads to our “processing” section of the rig, where our ore will be easier to manage thanks to a series of Splitters and Smelters.
Processing Rig
So we’ve mined our dirt, ran it through the harvester, and now have our precious ore – what’s next?
Profit of course! To keep the game running smooth, and to maximize our profits, let’s take this ore and put it directly into a smelter:
As you can see, after hitting our harvester, our ore travels back up another 2 Vertical Belts, and into our Splitters. You’ll notice I have a single centralizer belt in between each Splitter – this keeps the splitters operating normally, as at higher volumes of ore going through the system, sometimes our splitters don’t sort properly. Nothing worse than losing our valuable ore because a splitter decided to dump a ton of gold ore into our iron ore smelters.
Here is a detailed look at our smelting setup (from behind the sorters):
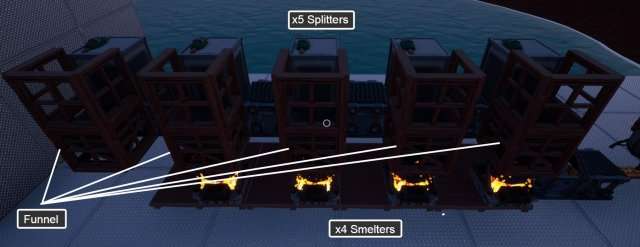
Each splitter has a funnel 1 block behind the sorter, directly below it. Again, the windows are used to keep our ore from being spat out onto the ground. Our dirt will drop from the splitter, into a funnel, and finally into the smelters.
From there, a click on the smelters produces our Ore directly into bars, ready to sell!
Putting It All Together…
So we have our mining rig, our harvesting rig and our processing rig in place. How do we kick this into a higher gear?
Simply build out a series of mining rigs, all of which drop onto a harvesting rig, and into a processing rig:
Above is a series of 20 mining rigs, all of which dump out onto a series of belts, which lead to the left, eventually hitting our harvesting rig.
This is where things get a bit complicated – Drills need frequent repair, even with filters, so you can see I’ve set up a series of Large Wood Floors directly in front of the drills, allowing for easy repair.
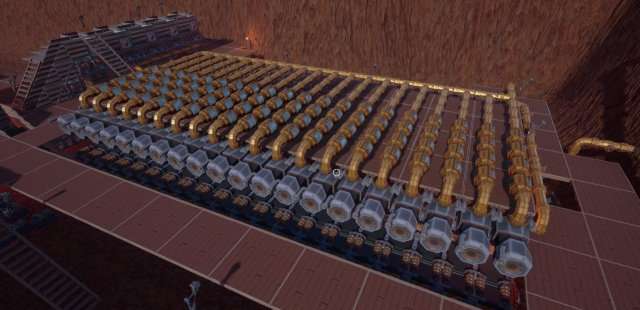
You can take this setup and expand as much as you’d like (or as Unreal Engine allows). Here is the setup taken to an extreme:
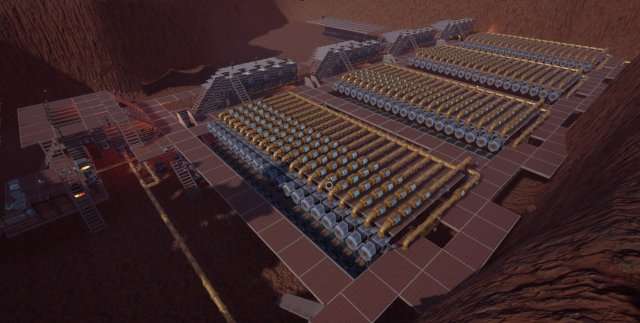
This is a series of 80 drills, separated into 4 sections, each with their own harvesting rig. Each harvesting rig eventually dump onto 1 large processing rig. Organizing this last section of processing is a pain, and really requires it’s own guide, which I hope to get done eventually.
Managing rigs of this size gets to be one heck of a job, including the use of valves and organizing your set up to process output efficiently. Once you get to this absurd size, Unreal starts seeing some issues running the game, but I’ll cover that in another guide to be made in the future.

Be the first to comment