
This guide takes a deep dive into the new damage system in ATS / ETS 2 introduced by SCS with the v1.49 update.
Introduction
This guide is written for any player who wants to understand how the new damage system works and how SCS intends for them to maintain their truck. But it’s also meant for modders or anyone interested in learning more about the game’s inner workings.
As a side-note, this guide is made for ATS, because this is where I did all my research in, but it is also applicable to ETS 2. There might be slight differences, but overall the same concepts apply for both games.
For this guide, I tried to figure out how the new damage system works as best as I could. I did this by diving into the files and also trying out a lot of things in the game. I also tried to relate the concepts of the game to the real world to make them easier to understand. But as I’m not a real truck driver, there may be some errors in here. If you find anything, please let me know, so I can update the guide accordingly.
Also keep in mind that this feature was just recently introduced, so SCS might change things in the future. I will try to keep this guide as up to date as possible.
Truck and Trailer Parts
All trucks consist of five distinct groups of parts:
- Engine
- Transmission
- Chassis
- Cabin
- Wheels
All parts, excluding wheels, form the core of the truck and are therefore also called core parts when referring to them together.
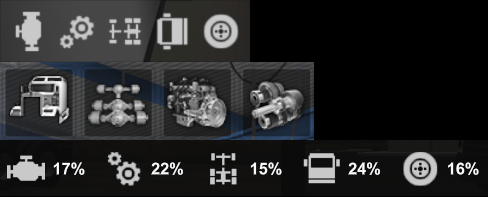
Img 1: Truck parts in diagnostics (rotated), upgrade shop and used truck dealer interface.
Trailers are made up of three groups:
- Body
- Chassis
- Wheels
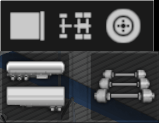
Img 2: Trailer parts in diagnostics (rotated) and upgrade shop interface.
Each of these groups, also called parts in the game, combine lots of (in reality) individual parts together to make it easier for the game to simulate and easier for the player to deal with.
The same grouping of parts can be found in the shop when buying or upgrading a truck or trailer. Truck, trailer and cabin accessories are not taken into account in the damage system, and therefore cannot take damage or accumulate wear.
Every part can independently take or accumulate damage and can separately be repaired or replaced.
Types of Damage
This section explains the different types of damage found in the game and how they are connected to form the overall damage system.
The game features three types of damage:
- Damage
- Wear
- Permanent Wear
(If I refer to any of these three types of damage in the following, they will be highlighted in a bold font. When talking about the state of a part I might also use the terms damage or wear which, if not highlighted, do not refer to these types.)
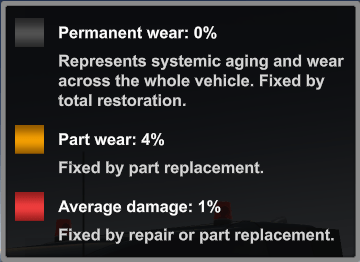
Img 3: The different types of damage, as explained in the game.
Damage
The truck’s parts accumulate damage with every mile driven. Crashing the truck also increases damage. Any damage can be repaired in a service shop.
Damage in the game combines all minor maintenance work on a truck, like oil changes, filter replacements, etc. into a single value for each part of the truck.
Wear
Fundamentally, both damage and wear work in the same way. Wear also increases with every mile driven and from accidents. The difference is, wear can only be reset by replacing the affected part in a service shop.
Thus, wear simulates the wear and tear of a complete system of the truck, which at a certain point can’t be repaired anymore and has to be replaced.
When the game determines the current state of a part, the part’s damage and wear are added together. In the guide, I will sometimes refer to this as the total damage of a part.
Permanent Wear
Permanent wear slowly accumulates with every mile driven and has no other sources. It represents the systematic aging and wear of the truck as a whole, and can thus only be fixed by totally restoring the truck.
Accumulation of Damage
In this section, we will take a look at how the parts of the truck and trailer get damaged.
Damage increases when the truck or trailer collide with another object in the game world, but can also accumulate over time when driving accident-free.
Wear accumulates in the exact same way as damage, only slower.
The cabin / body and chassis of both, the truck and trailer, don’t get any damage or wear from just driving around. They can only be damaged by getting into an accident.
The most straightforward of the three damage types is permanent wear, which grows steadily with every mile traveled by the truck. It has no other sources. The truck will age at the same rate, regardless of how it’s driven.
The remainder of this section will go deeper into the calculations of how damage is applied to the individual parts and how it’s configured in the game files. If you are not interested in these details or don’t like math, you can safely skip to the next section.
The game stores two decimal values, one for wear and one for damage, for every part of the truck and trailer. These values range from 0 (meaning no damage) to 1 (meaning 100% damaged) and are stored in the IEEE-754 floating-point format inside the game.sii file in your profile’s savegame:
vehicle : _nameless.266.34cf.d430 {
 engine_wear: &3d086363
 transmission_wear: &3ca4d01b
 cabin_wear: &3d57ed56
 engine_wear_unfixable: &3ab1544e
 transmission_wear_unfixable: &3a35eada
 cabin_wear_unfixable: &3b2cbdde
...
 integrity_odometer: 175
 integrity_odometer_float_part: &3e9c7ada
...
 chassis_wear: &3d86f456
 chassis_wear_unfixable: &3b57ed56
 wheels_wear: 3
 wheels_wear[0]: &3c37049c
 wheels_wear[1]: &3c37049c
 wheels_wear[2]: &3c37049c
 wheels_wear_unfixable: 3
 wheels_wear_unfixable[0]: &3b884a71
 wheels_wear_unfixable[1]: &3b884a71
 wheels_wear_unfixable[2]: &3b884a71
}
This code block shows the stored wear and damage values for a truck in the savegame, as well as the permanent wear odometer (integrity_odometer), which is divided into integer and decimal parts. Wheel damage and wear is stored for each axis separately, but currently they all accumulate damage at the same rate.
All variables that control the damage and wear of the truck and trailer can be found in the file damage_data.sii inside the def folder after extracting the game files.
Accidents
As of yet, I don’t know the exact formula that is used to calculate the damage from an accident, but I can provide some insight into how the damage is applied to the parts.
The amount of damage an accident causes is mainly influenced by the speed and weights of the vehicles involved. The impact speed gets squared and is then modified by the weights according to the game files. Most likely, the formula to calculate the kinetic energy of a moving object (E_k = 1/2 * m * v^2) is used. The resulting value is then multiplied by a truck and trailer damage coefficient (default value 0.0007), which then outputs the amount of damage that will be applied to the truck and trailer. Side and roof collisions have extra factors which increase the amount of damage dealt. Damage is also transferred from the truck to the trailer (and vice versa) with a ratio of 0.2, so 20% of the damage will additionally be passed on.
Each part has a ratio value for damage and wear which is multiplied by the accident’s damage and so determines the share of damage that the part will receive. As an example, the cabin of the truck has a damage ratio of 0.8 and a wear ratio of 0.04, which means its damage will increase by 80% of the accident’s damage and the wear of the cabin will increase by 4% of the damage dealt.
Out of all the individual truck parts, the chassis will be the most damaged in an accident, while the wheels will be the least damaged. The same applies to the trailer.
Wear and Tear
Wear and tear of the truck and trailer is simulated pretty straight forward. For every mile driven, a fixed amount is added to the wear and damage values of each part. Like I wrote before, both cabin and chassis can’t get any damage from this, as their increase amounts are zero.
With the SCS default values, the engine and transmission of the truck accumulate an equal amount of damage (2e-6) and wear (2e-7) for every mile traveled.
(I hope you are familiar with the 10^n e notation, as it will be used quite a bit in this guide. If not, just think of (x)e(n) as (x)*10^(n) or quickly research the concept).
This results in them reaching 100% of damage after 310,000mi or 500,000km. Their wear will be at 100% after driving 3,100,000mi or 5,000,000km.
Wheels accumulate the same amount of damage as the engine and transmission, but accumulate wear ten times faster (2e-5). What this means is that they reach 100% of wear after only 31,000mi or 50,000km. The same applies to the trailer wheels. (I’m not exactly sure if this is intentional by SCS or if this is a mistake, because this seems very fast in comparison to real life.)
All the variables that control the amount of damage or wear that’s accumulated by the truck’s or trailer’s parts are declared in this format:
*part*_wear: *value*    // damage
*part*_wear_unfixable: *value*    // wear
trailer_*part*_wear: *value*
trailer_*part*_wear_unfixable: *value*
For example, the values for the wheels are:
wheel_wear: 2e-6     // damage
wheel_wear_unfixable: 2e-5    // wear
trailer_wheel_wear: 2e-6
trailer_wheel_wear_unfixable: 2e-5
Permanent wear is different to the other damage types as it only applies to the truck itself and not to any of the truck’s parts. In the savegame, another odometer was introduced, which tracks the amount of miles driven since the purchase or last restoration of the truck.
After restoring the truck, this additional odometer will be reset to zero, whereas the normal odometer of the truck will stay untouched. The current permanent wear percentage of the truck can be obtained by multiplying the integrity odometer with the odometer wear value.
With the default SCS amount of 2e-7, a truck will get to 100% of permanent wear after driving for 3,100,000mi or 5,000,000km.
The variable for permanent wear is:
odometer_wear_unfixable: 2e-7It’s not declared in the damage_data.sii file by default and has to be added to the file in a mod to be able to change it.
All concepts explained in this section also apply to owned trailers in the exact same way.
Damage Visibility
There are three ways to determine the current state of the truck:
Diagnostics UI
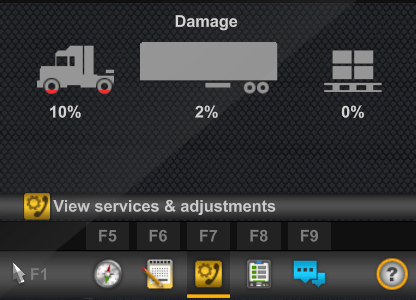
The easiest and most comprehensive way of assessing the current state of the truck or trailer is to access the diagnostics screen, which can be found on the top right of the home screen, or by going to a service shop and entering the repair interface.
Here you will be able to see the damage and wear of each individual part as well as the permanent wear of the truck. On the left side, you will find an overall assessment of the truck or trailer’s condition.
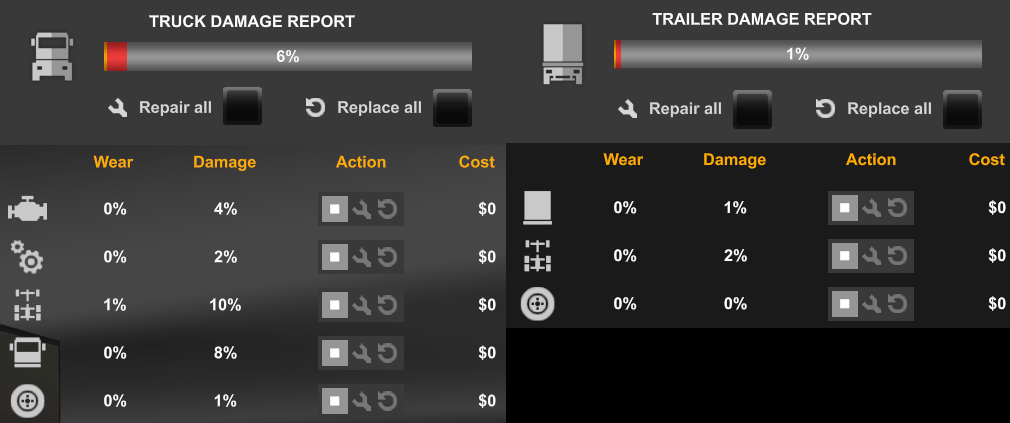
Img 4: Diagnostics interface damage report.
Route Advisor – Diagnostics Page
When pressing “F7”, a simple diagnostics page will show up in the route advisor. Before the update, this screen used to show the total damage to the truck, trailer and cargo. Since the update v1.49 this screen is now kinda useless, as it only shows you the damage to the most damaged part of the truck and trailer. Also, the warning below it seems to be arbitrary, as it will show warnings even if the truck only has a little bit of damage. Don’t trust these warnings.
Img 5: Route advisor diagnostics page.
Damage Warning Indicators
The first sign of damage to the truck you will notice is the damage warning indicator on the truck’s dashboard and the “Visit Service!”, “Check Engine” or similar message (depending on the truck) on the dashboard computer. They will show up when any core part of the truck has accumulated 15% or more of total damage (damage + wear combined).
If any core part of the truck exceeds 50% of total damage, a critical damage indicator will light up additionally on the dashboard.
Wheel damage will not trigger any warning indicators on the truck’s dashboard.
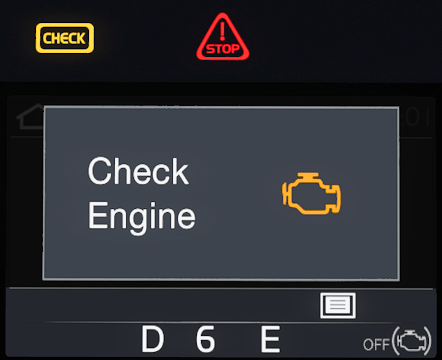
Img 6: Damage warning indicators and display message in the Volvo VNL (2018).
Damage Effects
A damaged truck can experience one or multiple effects, which are caused by different parts after they have accumulated 15% or more of total damage. Before this point, the damage will not cause any effects and the truck will behave indifferently from a completely undamaged truck. The following table shows the effects that can occur and which parts trigger them:
| Effect | Caused by |
| Engine stalling | Engine, Transmission, Cabin, Chassis |
| Reduced acceleration | Engine, Transmission |
| Broken gears | Transmission |
| Limited top speed | Transmission |
| Reduced traction | Wheels |
The more damage a part has, the more likely it is that its damage effect occurs.
The total damage to a part can only reach 100%. For example, if a part has 20% wear and reaches 80% of damage, then both wear and damage will be set to 100%.
This will not show in the diagnostics interface, only the wear will show 100% and no damage is displayed. A part in this state is considered broken and can’t be repaired anymore. Only a replacement will be able to fix it.
Lastly, permanent damage does not affect the operation of the truck in any way. The only effect it has is it limits the maximum amount of total damage a part can visibly accumulate. What this means is that when for example the truck has 25% of permanent wear, then the total damage to a part can only go up to 75% in the diagnostics interface.
However, the true damage that the game’s variables store can be higher than what the UI shows. In practice, this means that the older the truck gets, and the more permanent wear it accumulates, the less amount of “repair” can be gotten from replacing parts.
At least, this is how I think this system was envisioned. But in the current state this does not completely work as intended, as parts can accumulate more wear than what’s shown in the UI and thus can be replaced later.
The only effect it currently has, is that at a certain point where permanent wear + wear reaches a hundred percent, repairs have no effect anymore and the only viable option is to replace the affected parts.
Police Fines
In the game, you will receive fines when driving with a damaged truck or trailer.
The only way to get a fine for operating a damaged vehicle is to get pulled into a mandatory weight check, whereupon weighing, you will either receive a warning or a fine.
There are currently three variables in the game that determine the thresholds for fines issued for using a damaged vehicle:
fine_core_damage_treshold : 0.2
fine_wheels_damage_treshold: 0.6
warning_core_damage_treshold: 0.1
These variables are part of the police_data.sii definition file inside the def folder, but are not by default declared in the file. They have to be manually added in a mod, to be able to change them.
Damage fines differentiate between core truck parts and wheels. A warning about the usage of a damaged truck will be displayed if any part of the truck has reached or exceeded 10% of total damage. This also includes wheels, despite the variable name suggesting otherwise.
When the total damage to any core part is equal or greater to 20%, a fine is issued. For wheels, the fine threshold is 60% of total damage. Permanent wear doesn’t affect police warnings or fines. Damage to an owned trailer will be fined in the exact same way as the truck.
The default fine amount is $500. It can be changed by altering the fine_amounts variable at the twelves index:
fine_amounts[12]: 500 # damaged vehicle usageCoinsurance
Before diving into the repair of parts, I need to shortly explain a concept unique to ATS: Coinsurance. If you only play ETS 2 then you can skip this section.
Coinsurance is mostly found in health insurance and is the joint assumption of risk between the insurer and the insured. In it, the insured has to pay a percentage of the costs when the insurance policy’s deductible is exceeded. The remaining percentage is covered by the insurer up to the allowed amount.
In the game, the coinsurance system is used to split the repair costs. For any repair, the player has to pay a fixed deductible. But the deductible applies as long as the insured’s percentage of the repair costs is below it, which is not as it’s done in reality. If for example the repair bill is $2,000, the deductible $200 and the insured’s percentage is 2%, then the player would, in reality, have to pay $236. In the game however, the player only has to pay $200, because 2% of $2,000 is less than the deductible. This and that there are no monthly or yearly premiums needed to be paid make the system very unrealistic. For the player, it’s basically a free savings on the repair costs.
Despite its flaws, I will still explain how the system works in the game.
If you get into an accident, your part of the repair bill will increase. The more severe an accident was (determined by the amount of damage dealt), the more your premium will rise.
For any day without an accident, your percentage will decrease a small amount.
The damage to the truck of each accident in a given day is summed up in a variable in the savegame. When the day is over (at midnight) this variable is evaluated by the game. If it’s zero, then the coinsurance deductible and your percentage of the cost will decrease by $100 and 1%. If however, the truck got any damage during that day, the amount of damage in the variable is multiplied by the increase values of $500 for the deductible and 5% for the percentage and then added to your current rates. For example, if the damage during the day was 20%, then the deductible will rise by $100 and your own percentage share of the bill by 1%.
If you get into an accident, it is advised to get it repaired immediately before the day ends to make use of the lower insurance rates, before they increase the next day.
Your share of the repair bill is always going to be at a minimum the current deductible. If the repair cost multiplied by your percentage is greater than the deductible, then this will be your share to pay.

Img 7: The coinsurance deductible and percentage can be viewed in the diagnostics interface. In this example the insured only pays the deductible of $203, because $6,684 * 2% = $133.68 which is less than $203.
If you want to have a look yourself, the values that control the coinsurance concept can be found in the bank_data.sii file inside the def folder.
As we don’t have any ongoing expenses in the game, I think this implementation of an insurance is very unrealistic. Also, not every repair or general truck service would be processed through the insurance. In my opinion, an option to choose whether to make a claim with the insurance for the repair or not should be in the game. My advice would be to just ignore the insurance concept in its current state and be happy about the reduced repair cost. Otherwise, if you want your game to be more realistic, you should install a mod which removes the coinsurance and makes you pay the full amount for the repairs.
Repairs and Replacements
Parts can be repaired or replaced by entering a service shop.
Damage can be repaired by selecting the repair icon on a part. The cost for repairing is the percentage amount of damage displayed in the UI multiplied by the store price of the part. If the part for example costs $15,000 and the damage is 10%, then the repair cost will be $1,500.
Repairing a part will reset the damage to 0%, even if the damage was technically higher than what was shown in the UI. Also, the cost will always be calculated from the percentage shown in the UI and not the actual damage, even if it’s higher in the game’s memory. Replacing a part will also remove any damage it had. If a part is damaged, but the sum of permanent wear and wear is already at or above 100%, then it can’t be repaired anymore.
If a part has accumulated wear, then the only way to remove it is to replace the part, which will cost the full amount of the part’s store price. To replace a part, select the replace option on the part in the repair interface. Replacing a part will reset the wear and damage to 0%, regardless of the actual amount of wear or damage. Replacing a part also works if the truck has 100% of permanent wear.
Restoration
Permanent wear can only be fixed by a full restoration of the truck. This can be done at any level of permanent wear by pressing the “Request total restoration” button on the left side of the service interface. A restoration of the truck will set the permanent wear odometer to zero and remove any damage or wear on all parts of the truck.
A restoration of the truck will cost a lot more than its original store price. Any part of the truck will cost $1,000 + 1.1x its original store price to be restored. The same prices apply to the restoration of trailers.
The variables which control the price of restorations can be found in the service_data.sii file inside the def folder.
As permanent wear does not have any influence on gameplay, I would suggest holding out as long as possible before restoring a truck. The only impact you might see is when permanent wear reaches 100%, because then no wear or damage to the truck’s parts is displayed anymore in the diagnostics interface. Regardless of this, you still will be able to replace the parts to get rid of any wear and damage.
And lastly, a tip on how to reduce the cost of restoration: Remove all accessories and rebuy them after the restoration. The reason for this is, as accessories don’t get any damage, you will always be able to sell them for 60% of their store price. Doing so will reduce the restoration cost by $1,000 + 110% of the item’s store price. Rebuying the accessory afterward will only cost you 40% then, because you got 60% refunded before. This will save you a fair bit of money on the restoration. The same thing can be done when restoring a trailer. But don’t do this for core parts (cabin, chassis, engine or transmission) as they will sell for less if they have damage. Also, buying a lower tier item and restoring it, only to then buy the old item again afterward, will cost you more in total than just sticking with the original part.
Used Trucks
As this guide focuses on the damage system of the game, I won’t go into greater detail on how the used truck dealer works and how the used trucks are generated. But I can give a few tips on what to look out for when purchasing a used truck for yourself.
Used trucks will only have permanent wear and part wear. They will never have any damage. Permanent wear has the greatest influence on the price reduction of the truck. So try to find trucks with a lot of miles on them, as these will typically be cheaper and as we explored in this guide, permanent damage doesn’t really do anything for a long time. The percentage displayed for the parts of the used truck will always be part wear. If any of the core parts has more than 15%, then you will have to replace them, or you will experience damage effects, as discussed before. Used truck parts can have up to 40% of wear. Wheels can therefore safely be ignored in the purchasing decision, because their damage effect is pretty minor and 40% of wear on them won’t give you any fines. However, if you find two otherwise identical trucks, then go for the one with the lower wheel wear.
Ultimately, finding a used truck with high mileage but with core parts below 15% wear should be your goal.
Company Drivers and Damage
When you hire drivers for your company and assign them a truck, they can do deliveries for the company, which will earn you some money.
If the truck they drive has any amount of damage, they will repair it before starting their next job. The same applies to wheel wear. Any replacements or repairs get paid out of your bank account. AI drivers will not replace any core parts of the truck and will not restore the truck on their own.
Trucks driven by AI drivers will not accumulate any damage or wear. Only the permanent wear odometer will increase.
AI drivers will refuse to drive their assigned trucks if any core part has more than 20% of wear. So if you plan on buying a used truck for your company drivers, pick one that has less than 20% of wear on each of the core parts.
Trucks assigned to your company drivers can’t be normally repaired in the menu, and only have the option to restore them. This however is not really necessary as they don’t care about permanent wear. They will still happily drive a truck that has 100% of permanent wear.
To get around this, assign the truck as your own and then go to a service shop and replace any parts that have more than 20% of wear, and then give it back to the driver. This way you will save a lot of money.
Trailers assigned to company drivers won’t accumulate any form of damage when being used.
Final Words
TLDR / My Recommendations:
Repair core truck parts (engine, transmission, cabin, chassis) when they reach 15% of total damage (wear + damage). Replace any core part that has accumulated 15% of wear.
Repair wheels once they reach 60% of total damage. Replace them once they reach 60% of wear.
Not following these recommendations will lead to fines and negative effects on the operation of the truck.
This guide has emerged out of the research I did for a mod I made. The mod can be found on the Steam workshop here: Realistic Truck Wear. It tries to resolve some of the problems I have touched on in this guide and makes the wear of truck parts more realistic.
In my opinion, the new damage system is overall a step into the right direction, but it still has some obvious flaws that need to be addressed.
Very comprehensive, good work. Might it be worth mentioning that the integrity_odometer is also set to zero for trucks that already existed in a saved game when v1.49 was installed.