
A quick guide on how to quickly get every achievement as quick as possible (A quick read).
Contents
How to Obtain All Achievements
All credit goes to BEASTESS!
Basic Achievements
The Real Deal
Complete the tutorial: Self explanatory, just don’t skip the tutorial and you will get this.
Bug Stomper
Complete one bug mission: Self explanatory.
Bot Scrapper
Complete one bot mission: Self explanatory.
They mostly come out at night…
Extract from a mission during the nighttime: Planets have day and night cycles, wait for a mission to be night time. Complete it, and extract.
Strapping young lad
Customize your Helldiver: Swap your cape, body armour and helmet. This can be done at the armoury, or whilst in your hellpod.
Extractinating the countryside
Complete a defence mission: Sectors will fall under attack occasionally, any planet with the text DEFEND and a faction bar showing Helldiver progress (Blue) and enemy faction progress (Red/Yellow) is a defence mission. Finish one to completion, any difficulty.
In the nick of time
Extract after the mission timer hits zero: This one is easy, do a blitz mission, complete the main objective, then wait until the timer hits 1:59:00. The shuttle will take 2 minutes to arrive, so you will extract after the close has run down completely.
Alternatively, you can wait until the timer hits zero, at which point an emergency shuttle will be called down automatically. You get up to 2-4 minutes to arrive at the landing pad. But you get zero reinforcements and no stratagems. This is not recommended.
The long arm of Justice
Kill something past 100m: Pick up an anti-materiel rifle or bring a Diligence DMR. Set your scope zoom to the highest it can get, ping an enemy far away, then back up til you hit 100m and kill it. This is easiest done on level 3 mission as the areas are wide enough for this, and patrol units typically die in a single shot.
Cool guys don’t loo- AAAA
Get launched over 25m by an explosion: This can be done with a number of explosives. 500KG bomb, Hellbombs found in the map, 380mm ordinance. Any will launch you. If you have none of these, use the smoke spores found on some planets. They are grey fungi looking bulbs. Dive onto it, shoot it, and it should launch you fairly far. This can count for this achievement.
Job’s done
Complete a mission but fail to extract: Load up a level 1 mission, finish the objective. Die until your reinforcements run out.
Promote Synergy
Assisted reload a teammate: Have a teammate use the Recoiless rifle, Spear, or Autocannon. Pick up the support pack for it, and reload them by hitting your interact key next to them when their ammo runs dry.
Democracy ain’t done with you yet
Stim a teammate: Shoot your friend in the butt and stim them.
They don’t call it Tacticool for nothin
Complete 10 side objectives: Easiest to complete on bug planets, look for spore spewers (big ass mushrooms, think Morrowind) blow them up, finish the mission. Rinse and repeat. Any side objective works, and completing the radar tower one will reveal all others on the map if you do it.
Eat this!
Kill a bug warrior with a shotgun within 1m: Warriors look like this.
Blow its head off with any shotgun.
Get some!
Kill 10 enemies firing at least 150 bullets in the process: Call down a Stalwart LMG, load into a low level bug mission, piss of the bugs. Hoard ten tiny scouts into the open, unload on them and even if you kill ten or more, do not stop until your mag runs dry (Or until the cheev pops).
Stalking is illegal
Destroy a Stalker Lair: This is a side objective, it has a small blue icon that looks like a little spider. Find it on the map, and nuke it like you would any other bug nest.
Extractomundo
Extract as a full team on mission difficulty 5 or higher: Pick a mission on Hard (5) and blow through it, make sure all 4 people get on the extraction ship at the end. Just try and keep your idiots alive. Tip; turn off cross-play, or grab 3 friends with functioning brains.
For the greater good!
Kill 5,000 enemies: Self explanatory.
Nothing is bigger than freedom
Kill an Automaton Hulk: Has a giant weakspot on its back that requires medium pen. Railcannon strikes one shot these. 500kg bombs, Railgun rounds, Spear missiles, mini-nukes, or throwing your teammates reinforce make quick work of these. You must deal the final blow to get this achievement.
The taller they are…
Kill a Terminid Bile Titan: Railcannon strikes will not one shot these, but will heavily wound them. Two hellpods can kill it, 500kg bombs and repeated railgun shots can kill this. Easiest strategy is to spam raincannon strikes or Spear shots. Hellbombs can also make quick work of these if you can find them. You must deal the final blow to get this achievement.
Hot potato!
Throw a grenade back: You can toss your teammates grenade back, or go prone behind cover against any automaton. Done easily on level 2-3 missions, just press your interact key on it, and you will get this.
Patriot
Complete 50 missions: Self explanatory.
Doing your part
Complete 100 missions: Self explanatory.
Spread Managed Democracy
Kill 150 enemies during the same mission: Self explanatory, do a difficulty 5+ Extermination mission solo and you should get every kill to guarantee this cheev.
Advanced Achievements
Ship it!
Upgrade all ship modules at least one level: This takes around 400~ common samples. If you want to rush this, just save your common samples for each of the tier one upgrades.
Fully operational
Reach max level on one ship module: This will take around 160~200 common samples, and 100~120 rare samples with either 5 or 10 Super samples to boot- dependant on which you chose to upgrade. If you want this quickest do not do the Engineering Bay or Robotics Workshop as their Tier 2 upgrades take Super samples as well as the Tier 3 upgrades. Unless you are swimming in super samples, any other choice is faster- I mean quicker.
Helldive
Complete an Extreme difficulty mission or higher with none dying: Choose an Eradication mission. (Thin enemy numbers) stay grouped and bring railcannons for big enemies, and turrets to keep the chaff at bay. These missions typically only take a number of minutes. Shield generator packs, and Shield generator relays can help keep people alive, outside of good positioning and not running into death. Do not bring mines, mortar turrets, napalm, or gas unless you can communicate to the idiots in your squad.
Kill it with fire!
Kill 100 enemies with fire in a single mission: Flamethrower, Eagle Napalm Strike, Incendiary grenades, and Breaker Incendiary will all get you this. Easily gotten on low level bug missions, don’t bother fighting bots. All but the most basic units resist fire damage greatly or are entirely immune to it.
Science is done by quantity
Extract with 15 common samples: Self explanatory, but try and do this on missions higher than 3. The lower the mission the lower the sample amount, thus requiring you to scrounge the map more and more. You do not need to be the person to extract with the samples. If one person gets 15+ onto the ship at extract, you all get it.
Samples are a diver’s best friend
Extract with 15 rare samples: Self explanatory, premise follows as the previous achievement. But try and stick to difficulty 7+ Scrounge every minor point of interest, and get onto the extract ship. Side objectives like spore spewers and things of the like tend to have several spawned at them.
That which does not kill you…
Have all your limbs broken and survive: First way, let a charge beat the snot out of you. If it launches you into a wall it may break all your bones and leave you at one HP.
Easier way is to equip armour with this passive.
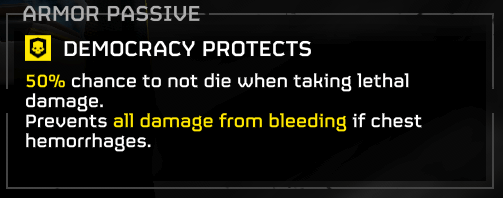
Load into any mission and try to kill yourself with a grenade. (G-16 impacts make this quickest.) you will have a 50% chance of surviving, and explosions that close obliterate all limbs so long as you sit on the nade.
Hold my libertea
Ragdoll yourself while using the Jetpack: Load into a missions with the jumpack, put it on, and have your friend melee you during your ascent. Takes a few tries but this is the easiest way. If solo jump before a charger attacks you, or explosion goes off.
The power of Democracy
Kill 25 enemies with one stratagem: Self explanatory, High difficulty missions often swarm you very quickly, especially defence missions. 380MM, mini-nukes, hellbombs, napalm, gas strikes, Gatling barrages. Anything that expends a singular massive explosion, or leaves and overtime field of damage can get you this quickly. Try and group enemies on top of their own drop points. Nests, dropships, outposts. Swarms + spawns + dragging scouting parties can get you this easily.
The Tough Ones
Let’s call it a draw
Shoot both arms off a hulk, then extract: Load into an Eradication mission on difficulty 4 or higher against bots. Bring a railgun (The weapon, not the railcannon stratagem) kill enemies until the mission objective has been reached, then wait until a hulk spawns. Fire rounds of the railgun into its arms until they both fall off, then extract. This one is honestly quite easy, the hardest part is not nuking the hulk while killing its comrades, or keeping your moron teammates from killing it without a second thought.
Caught them by supplies!
Kill a Charger with the resupply pod: Bring a railgun, and possibly an EMS strike if you really want to guarantee the kill. Fire two to three shots of your railgun into its front leg. Then call down your resupply (or toss and EMS and then the resupply) You may wish to toss the resupply next to a wall, then kite the charger around until you can get it to butt heads with the wall. This will stun it for a few seconds, and if timed correctly, get it flattened. Any weapon that penetrates heavy armour can bring it low enough, but three shots from a railgun leaves them low enough that the fourth typically kills.
Hold my primary, im going in!
Complete a full Hard difficulty mission or higher without anyone firing their primary or support weapon: Either do this solo, or communicated with teammates. You can kill with grenades, stratagems, and the environment. But ANY shot fired from a primary weapon or support weapon will disable this achievement. Load into an easy and quick mission type, Hatchery destruction, or Blitz. Ignore all side objectives if you want, and finish the main objective as quick as you can, then extract. Side arm type doesn’t matter, any will work.
It’s the only way to be sure…
Have 6 orbital barrage stratagems in the same place at the same time: Best done with 3-4 people, but can be done with only 2. Have everyone load up on Orbitals, which consists of…
- Precision Strike
- Gatling Barrage
- Airburst Strike
- 120MM HE Barrage
- 380MM HE Barrage
- Walking Barrage
- Orbital Laser
- Railcannon Strike
The latter two aren’t worth using since one finishes as quickly as its fired, and the other tends to wander off. Have your team basically dump every single orbital stratagem they have into a single area, and the achievement will pop up. (Doing this against a level 1 mission Brood Commander is really funny lmao.)
Gone in 360 Seconds!
Complete a full Extreme difficulty Blitz mission and extract in under 6 minutes: Equip light armour and the stamina booster. Jetpack or Personal shield generator for your back. And a grenade launcher for your support weapon. Precision strikes, 110MM rockets, 500kg bomb and anything quick that can take out nests (armour with the +2 grenades helps as well.).
Before you load in, look at the map and where you are going to drop. If you see blotches of red, especially large ones, you want to drop close to them. The goal is to get as close to these as possible that you can start busting them down the second you hit the ground, taking a few out with your very first hellpod can even be a viable extension to this strat.
This CAN be done solo, but requires some finesse, and a lot of RNG for nest spawns. Load into a bug mission. Doing this against bots is awful don’t even bother. Hives have a much more forgiving hitbox for destroying them. Once in, get your pack, and GL, rush down the nests as quickly as you can and the very second you are done, bolt for extract. You want to make a straight line from one side of the map, killing nests as you go to extract. If you get sidetracked or pulled to some odd corner, you may as well restart dependant on the time.
If you are with a team, have one person split off from the group and go straight for extract right from the get-go, the ship takes 2 minutes to arrive, so the total time you have to kill all nests is 4 minutes exactly. If you start extract at 4:01 into the run, its a wash. Bare in mind SOS beacons, resupply pods, and even team reinforcements can destroy nests. So if you run out of grenades, die, and get spawned back in to take one with you.
Extreme and Above Difficulty Tips and Suggestions
Once you unlock the personal shield pack, railgun, laser orbital and railgun orbital those bile titans are easy.
Easiest way to play is run a light armor stamina perk build then just out run everything and railgun every heavy armored thing and orbital titans and tanks. Still a challenge doing it solo though but gear helps.
Also keep moving if you can, even running in circles will help since you can prevent enemies from getting on all sides.
Avoid patrols and random enemies on the way to objectives, we clutched a lvl 7 mission with 2 remaining objectives and no more respawns just by sneaking as much as we could. It saves ammo and lives.
Ignore the bugs. Straight up, especially after todays update, Suicide+ just simply has too much armor. You’ll waste all your stratagems, and ammo, and still have 5 chargers and 2 titans to deal with.
So best option. Ignore the enemies, just do the objectives. For evacuation, just run in circles around the point. I wish I was joking, but too much armor comes at you, no way you can handle it all during extraction.
- Focus hunters always, practice diving while shooting against them.
- Do not ever stop moving on 9. Juke everything, dive often.
- Utilize terrain where it doesn’t put you at a disadvantage; most bugs can’t climb or jump.
- Have a bile titan killer stratagem, use your guns for everything else.
- You can also drop your hard found loot near the extraction point using the drop wheel (hold X) so if you die, you don’t need to go find them again.


Be the first to comment