

Divine Mountain Event Guide
Divine Mountain is a weekly event in which players compete to climb floors, earn points, and obtain Divine Shards. These shards are used to unlock Mythic girls, which are extremely powerful characters.
You need 100 Divine Shards to unlock one Mythic girl.
How to Earn Divine Shards
You can earn up to 20 Divine Shards per event:
- Premium Battle Pass: 10 shards.
- Free Battle Pass track: 4 shards instead of the 10 available from the premium track.
- First place in your group: 10 additional shards.
Free-to-play players can therefore earn up to 14 shards per event if they finish first in their group.
Maximizing your results in Divine Mountain requires more than simply spending hammers as soon as you obtain them. The key is to farm hammers efficiently, upgrade your Anvil, accumulate resources throughout most of the event, and then use those resources to push as many floors as possible near the end.
The Two-Phase Strategy
The most effective approach divides the event into two distinct phases:
- Hammer farming: Build a setup that generates as many hammers per hour as possible while remaining on a manageable floor.
- Floor pushing: Spend your accumulated hammers on high-rarity equipment and climb as many floors as possible before the event ends.
The goal is to maximize your hammer income per hour and save as many hammers as possible until the final part of the event.
A farming rate of approximately 1,044 hammers per hour can yield around 125,000 hammers by the end of an event. By comparison, players farming at 400 to 500 hammers per hour may accumulate only around 48,000 hammers.
This difference directly affects your final Anvil level, equipment quality, and ability to clear higher floors.
Phase 1: Hammer Farming
How the Farming Loop Works
The farming strategy relies on creating a situation in which regular enemies die in one basic attack, but the boss remains too strong for your character to defeat.
You will eventually reach a floor around floor 40 where you can quickly eliminate every wave of regular enemies but cannot defeat the boss. This allows you to farm hammers continuously without progressing to increasingly difficult floors.
The ideal setup has four requirements:
- Every regular enemy dies in one basic attack.
- Your Attack Speed is high enough to clear waves quickly.
- The boss kills you in two or three hits.
- You cannot kill the boss, even with a critical hit.
This balance lets you repeatedly clear regular enemy waves while preventing progression to harder floors.
Upgrade Your Anvil Early
As soon as the event begins, use diamonds to upgrade your Anvil until Legendary equipment becomes available.
Reaching Legendary gear is sufficient to establish the farming setup. You can upgrade the Anvil further if you wish, but Legendary equipment is enough to get started.
Anvil upgrades remain important throughout the event because higher levels unlock better equipment rarities.
The key Anvil levels to aim for are:
| Anvil Level |
|---|
| 15 |
| 19 |
| 23 |
| 27 |
How far you can upgrade the Anvil depends primarily on your available diamonds and the income generated by your village.
If reaching Anvil level 23 is realistic, go for it. The gear unlocked at that level provides a major advantage during the floor-pushing phase.
Continue upgrading the Anvil whenever an upgrade becomes available. Avoid wasting upgrade time, and set reminders if necessary so that you can begin the next upgrade promptly. Delaying upgrades may force you to spend additional diamonds to catch up.
Do Not Upgrade Your Class During the Initial Setup
Do not advance your class while establishing the initial farming build, and disable auto-cast for your skills.
The objective is to kill regular enemies using basic attacks only.
Automatically activated skills can deal enough damage to kill the boss unexpectedly. Once the boss dies, you advance to a harder floor, where regular enemies may no longer be easy to defeat in one hit.
That reduces your hammer farming efficiency.
For the initial farming setup, follow these rules:
- Do not take class upgrades during the initial setup.
- Disable auto-cast for your skills.
- Use basic attacks to eliminate regular enemies.
- Keep your damage low enough that the boss survives your attacks.
There is one specific exception involving the level 40 Archer class promotion, which can help you reach the desired Attack Speed without sacrificing too much damage. That adjustment is explained below.
Roll Equipment With Attack as the Main Priority
Once your Anvil is ready, begin rolling equipment.
Set your equipment filter to prioritize ATK and concentrate on the following four slots:
- Weapon
- Ring
- Necklace
- Gloves
Choose equipment that provides ATK without adding HP or DEF.
Avoid equipping items with HP or DEF because excessive durability can break the farming loop. If your character becomes too tanky, the boss may no longer be able to kill you reliably.
Your objective is to deal enough damage to eliminate regular enemies in one hit while remaining vulnerable enough to die to the boss.
Avoid Certain Secondary Stats
Secondary stats can interfere with the farming setup even when an item provides useful ATK.
Prioritize avoiding these stats, in the following order:
Crit Damage > Crit Chance > Evasion
Crit Damage: A random critical hit can kill the boss. The more Crit Damage you have, the greater the risk of accidentally defeating it. Your character already has a base 10% Crit Chance, so critical hits will occur even without additional Crit Chance. Keep critical damage low enough that these hits cannot kill the boss.
Crit Chance: Additional Crit Chance increases the likelihood of landing a critical hit that deals too much damage to the boss.
Evasion: If the boss misses too many attacks, you may survive long enough to kill it yourself. That would end the farming loop.
One or two items with Crit Chance or Evasion are not necessarily enough to ruin the build. However, avoiding these stats should generally take priority, even if doing so means sacrificing a small amount of ATK.
Reach the One-Shot Damage Threshold
Continue rolling equipment until every regular enemy dies from a single basic attack.
This is essential for maximizing hammer income.
If even one regular enemy requires two hits, your farming efficiency will decrease, making it much harder to reach approximately 1,000 hammers per hour.
Keep improving your ATK until you can reliably eliminate every regular enemy in one hit.
Increase Your Attack Speed
Once you can one-shot regular enemies, improve your Attack Speed (AS).
Without additional Attack Speed, your farming rate may remain around 800 hammers per hour. Increasing it can help you reach 900 to 1,000 or more hammers per hour.
Attack Speed can appear on:
- Gloves
- Weapon
Aim for a combined Attack Speed bonus of approximately 0.6.
However, equipping Attack Speed gear may reduce your ATK enough that you can no longer kill regular enemies in one hit.
If that happens, use the following class promotion adjustment.
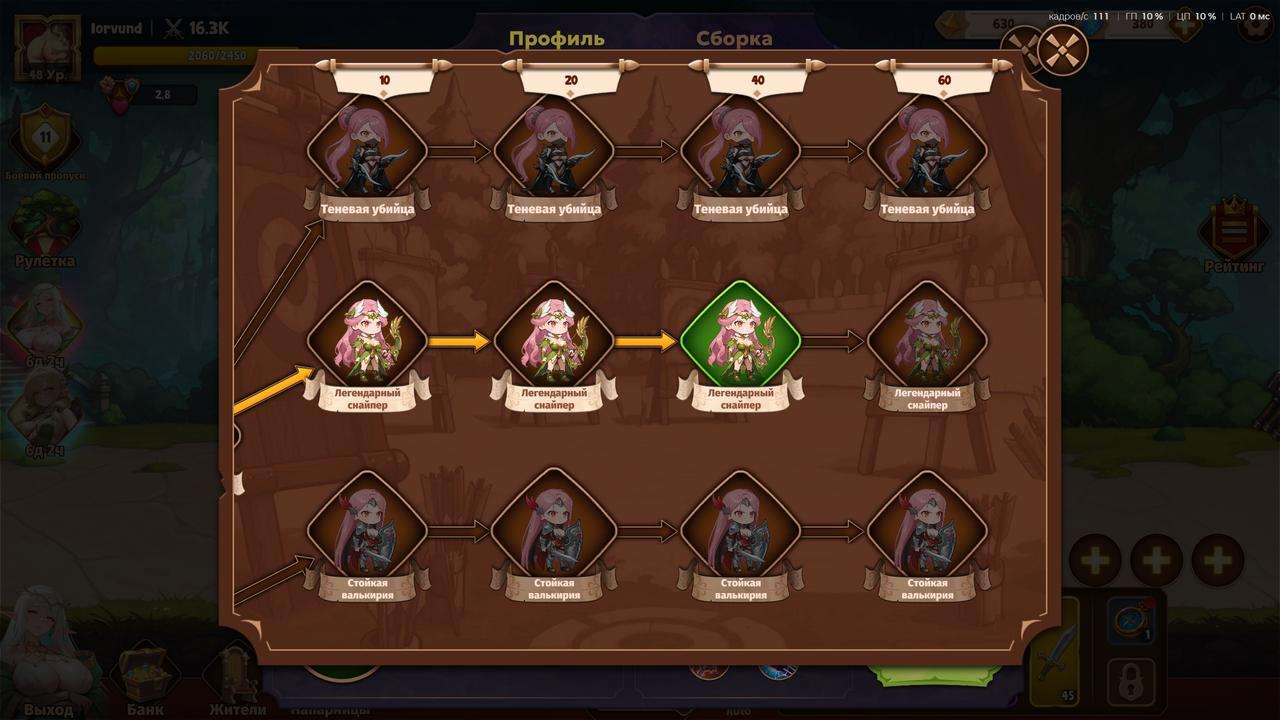
The Archer Promotion Adjustment
Take the level 40 Archer class promotion to improve your Attack Speed without sacrificing the damage needed to one-shot regular enemies.
Do not take the level 60 promotion for this farming setup.
This approach helps preserve the balance between Attack Speed and ATK required for efficient farming.
Verify Your Final Farming Setup
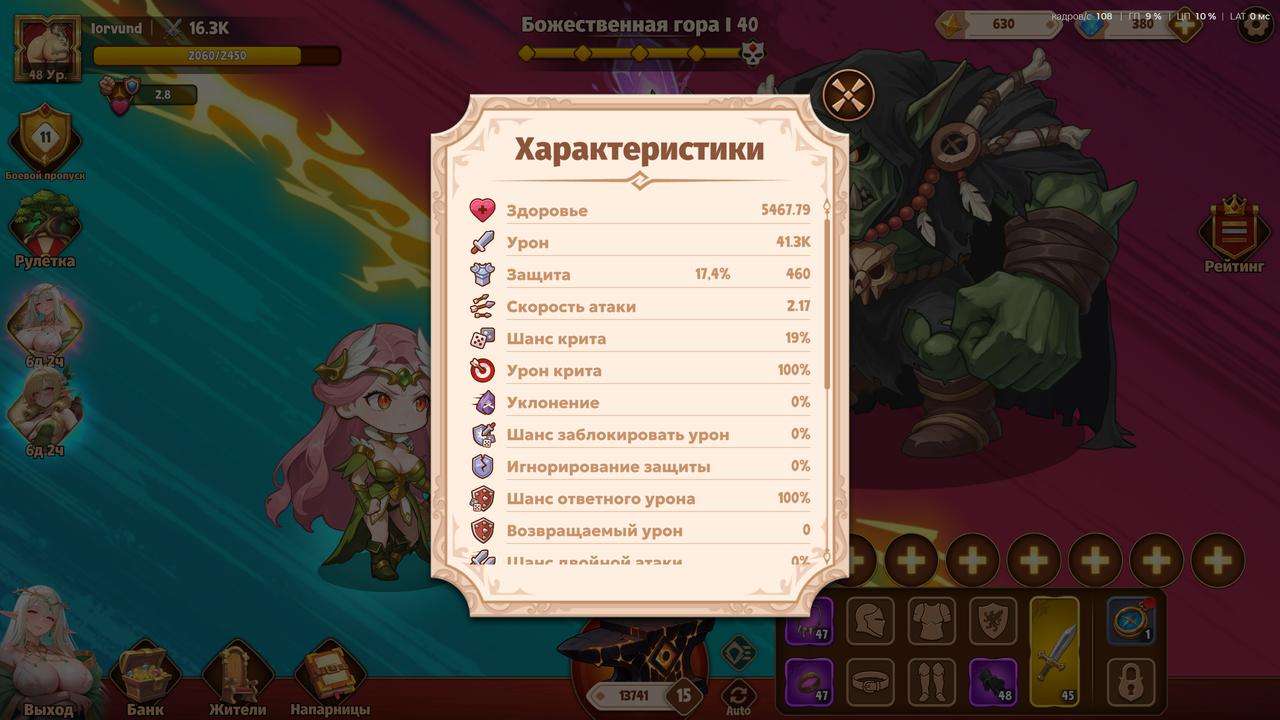
Before leaving your character to farm, confirm that all four conditions are met:
- Every regular enemy dies in one basic attack.
- Your Attack Speed is sufficiently high, ideally with a combined bonus around 0.6.
- The boss kills you in two or three hits.
- Your attacks cannot kill the boss, even with a critical hit.
If any of these conditions are not satisfied, continue rolling equipment until you achieve the correct balance.
An optimized Archer farming setup can reach approximately 1,044 hammers per hour.
Keep the Game Running
Once your farming setup is ready, leave your character farming and avoid pushing floors until approximately one day remains in the event.
However, you must continue upgrading the Anvil whenever an upgrade becomes available. Do not waste upgrade time.
There is also an important limitation: the offline or AFK system does not count hammer income from cleared waves correctly.
The offline system calculates hammers from passive income but does not properly account for the hammers earned by clearing enemy waves.
For example, a character earning 1,000 hammers per hour while the game is running may receive only 100 to 200 hammers per hour after the game is closed.
This behavior has been tested repeatedly. To maintain the higher farming rate, keep your computer running with the game open.
If your goal is to finish first in your group, this limitation is particularly important because closing the game can drastically reduce your hammer income.





Phase 2: Floor Pushing
When to Start Pushing
Begin pushing floors when approximately one day remains in the event and you have reached your target Anvil level.
At that point, switch from your farming setup to the class you intend to use for pushing floors.
Then set your equipment filter to the highest available rarity and start spending your accumulated hammers.
For example, if your Anvil is level 23, set the filter to Divine equipment.
Continue rolling equipment until you have spent all your saved hammers.
Allow Enough Time to Spend Your Hammers
Do not wait until the last few hours of the event to begin pushing.
Spending all your accumulated hammers can take two to three hours by itself. After that, you still need enough time to climb through 900 or more floors.
Valkyrie is particularly slow at pushing floors, which makes an early start especially important.
Starting approximately one day before the event ends provides nearly a full day for your character to climb as high as possible after the equipment-rerolling phase.

Choosing the Best Class for Floor Pushing
The most effective class depends on the current stage of the Steam version and the equipment and girls available to your account.
At the current stage of the Steam version, Valkyrie is the recommended choice for Divine Mountain. There are two main reasons:
- Valkyrie is relatively easy to build.
- Her passive Reflect Damage allows her to push approximately 50 to 100 floors higher than other classes.
These results have been consistent across four different Divine Mountain events.
Mage and Archer have potential, but their strongest builds depend on reaching stat thresholds that are not currently practical for most players in the Steam version.
Valkyrie Build
Valkyrie is currently a strong choice because she relies on passive Reflect Damage to eliminate enemies.
Main Stat Priority
Prioritize Valkyrie’s main stats in the following order:
DEF > HP > ATK
Defense is the most important stat because the more DEF you have, the more damage you reflect back to enemies.
HP comes next because Valkyrie must survive enemy attacks long enough for Reflect Damage to kill them. ATK is much less important, although it is not completely useless.
The fundamental difference between Mage and Valkyrie is how they deal damage and survive:
- Mage: Pushes floors using skills and survives mainly through Evasion.
- Valkyrie: Pushes floors primarily through Reflect Damage rather than skills, survives through HP and DEF, and lets enemies kill themselves by attacking her.
Do not neglect HP in favor of DEF alone. If your HP is too low, Valkyrie may die before enemies take enough reflected damage to be defeated.
Secondary Stat Priority
Prioritize Valkyrie’s secondary stats in this order:
Cooldown Reduction (CDR) > Skill Damage > Evasion
All other secondary stats are basically useless for this particular build.
Cooldown Reduction: Lower cooldowns allow Valkyrie to activate buffs and healing skills more frequently.
Skill Damage: Improves the effectiveness of relevant skills.
Evasion: Helps Valkyrie survive additional waves of enemies until her next healing skill becomes available.
Do Not Stack Too Much Evasion
Although Evasion can improve survivability, excessive Evasion can reduce Valkyrie’s damage output.
When Valkyrie dodges an attack, Reflect Damage does not trigger. If enemies repeatedly miss their attacks, they take less reflected damage.
Because Reflect Damage is the primary damage source for this build, too much Evasion can make Valkyrie less effective at clearing floors.
Aim for enough Evasion to improve survivability without preventing enemies from hitting you regularly.
Best Girls for Valkyrie
Valkyrie does not need direct-damage skills as much as classes that rely on active abilities to kill enemies.
Instead, prioritize girls that provide healing, defensive buffs, and additional area-of-effect (AoE) damage.
The general priority is:
Healing > Useful Buffs, especially DEF > AoE Damage
Avoid Slow effects. Slowing enemies makes Valkyrie less effective because she relies on enemies attacking her to trigger Reflect Damage.
Recommended Girls
Viscosa, Destiny 3 (D3)
Provides healing and a Max HP buff. She is one of the strongest options for this setup.
Mirabella, Destiny 3 (D3)
Provides healing. Do not use her for this build without D3.
Maddie
Provides healing and a DEF buff.
Beatrice
Provides a DEF buff and healing.
Jessie
Applies a DEF debuff to enemies, increasing the damage they take from Reflect Damage. This interaction has been tested and works.
For the remaining slots, use girls with AoE damage skills.
Situational Single-Target Damage
On certain floors, you may benefit from replacing one or two weaker AoE damage girls with stronger single-target damage dealers.
This can help when you encounter a boss that you cannot defeat within the 30-second time limit. Additional single-target damage may allow you to clear a few more floors.
A Legendary Doll might work for this purpose, although this particular strategy has not been fully tested.
Mage Build
Mage is a potential alternative to Valkyrie, but its effectiveness depends heavily on reaching high Evasion while maintaining sufficient damage.
In the current Steam version, the necessary girls and sufficiently high Anvil levels are not yet available to reach 80% or more Evasion with a properly optimized build.
If you can already reach more than 80% Evasion, Mage would be the preferred choice. Mage is easier to gear properly than Archer.
Realistically, expect around 55% Evasion, give or take, with the current Steam version’s available options. That is not enough to avoid being killed by bosses.
Main Stat Priority
Prioritize the following stats:
- High ATK
- High Evasion
Secondary Stat Priority
Prioritize:
Cooldown Reduction (CDR) > Skill Damage
For this Mage build, Attack Speed, Crit Chance, and Crit Damage are practically useless.
Compare Actual Damage When Equipping Gear
Do not automatically equip an item simply because the game marks it as an upgrade.
If a new piece of equipment gives you less actual damage than your current item, do not equip it, even if the game displays a green upgrade indicator.
The gear score system can be misleading because it considers Attack Speed, Crit Chance, and Crit Damage valuable. Those stats do not align with the priorities of this Mage build.
Compare the actual stats and damage implications of each item before replacing your equipment.
Best Girls for Mage
Prioritize girls in the following order:
- Alberta S. Kammer at D3, with Slow
- Girls who deal AoE damage
- Evasion girls, particularly Tara and Lily
Alberta S. Kammer is especially valuable at Destiny 3 because of her Slow effect.
After Alberta, prioritize girls who deal AoE damage. Fill the remaining slots with girls who provide Evasion bonuses, such as Tara and Lily.
Girls who provide buffs other than Evasion, as well as girls focused on healing, are generally not useful for this Mage build.
The lineup may change as stronger girls become available, so follow the build’s stat and skill priorities when evaluating new options.
Archer Build and Other Classes
Archer is another class with serious potential, but building an effective Archer for Divine Mountain is currently difficult.
A strong endgame Archer would need a combination of:
- Approximately 80% Crit Chance
- Very high Crit Damage
- Approximately 80% Evasion
- As much ATK as possible
Obtaining all these stats simultaneously is extremely difficult. The current Steam version also lacks enough girls providing the necessary bonuses to make this build practical for most players.
Archer may eventually become very powerful, but it is not a realistic option for most players at the current stage.
The other classes are generally not competitive for this specific event under current conditions.
Future Class Progression and Mythic Girl Investments
Valkyrie is strong at the current stage of the Steam version, but she may not remain the best class indefinitely.
As you climb higher, Valkyrie becomes weaker relative to other classes. Future equipment tiers and stronger girls can also change the most effective strategy.
Do not invest all your Mythic girl choices into a Valkyrie-specific build simply because Valkyrie is currently the strongest option.
Her current strength reflects the available equipment, girls, and progression level in the Steam version.
Mage as a Future Option
Mage is expected to become the strongest option once better gear and more powerful girls become available.
Mythic girls that provide Evasion, such as the Mythic Fox, could be particularly valuable.
Once Mage can reliably reach 80% or more Evasion while maintaining high damage, it will become much more effective for floor pushing.
Archer in the Late Endgame
Further into the game’s progression, Archer is expected to take the lead.
A properly optimized Archer with high Crit Chance, Crit Damage, Evasion, and raw ATK should be able to outperform other classes through pure damage.
This is a prospective endgame direction rather than a guaranteed outcome. The most effective class will depend on future equipment availability, character progression, and the girls accessible in the game.
Consider these long-term possibilities before committing valuable Mythic girl choices to a build that may become less competitive as the game develops.

Expected Results From the Strategy
The strategy allows you to remain around floor 40 throughout the farming phase, accumulate a large supply of hammers, and then make a concentrated push near the end of the event.
It has produced first-place finishes in every Divine Mountain event released on Steam at the time, including a result that finished 5,000 points ahead of the runner-up. These results were achieved while purchasing only the in-game Battle Passes.



Be the first to comment