
I Give You the Stars Easy Guide
How Hard Mode Differs аrom Normal Mode
The three biggest differences between normal and hard are:
- Less workers and more freeloaders
- About 20% less power production from solar
- About double the alloy consumption on hull maintenance (hard cap of 24 alloys per cycle)
There are a number of other smaller factors, such as accidents being more deadly but for the most part these are going to be the issues.
In the beginning of the game, workers are going to be the biggest constraint. It won’t be until chapter 2 that you will likely be in optimal working conditions
Early to mid-game the alloy consumption is going to be challenging to keep up with. To combat this you will want to limit your sector expansion and expand alloy production with multiple smelters, transport ships, and using all of your recycling to keep up with production
Mid to late game power is going to be the largest issue. You will want to take a number of power reducing steps from techs to using cell housing, and avoiding power using stability structures. After unlocking and constructing the hydrogen power generator the game is no longer challenging.
Stability Stages
In hard mode, you want to use stability as a resource. There are 4 stages to stability:
- Happy: large amount of trust per cycle gained
- Neutral: small amount of trust per cycle gained
- Negative: small amount of trust per cycle lost, small change of lethal accidents and riots
- Angry: medium-large amount of trust lost per cycle, medium-large chance of lethal accidents and riots (depending on how negative it goes)
Stability Penalties
There are a few negative penalties per chapter. Without naming them they are:
Chapter 1:
- Event 1: -1 stability
Chapter 2:
- Event 2: -1 stability
- Event 3: -1 stability
Chapter 3:
- Event 4: -1 stability
Chapter 4:
- Event 5: -2 stability
Outside of chapters there are 2 ways (that I know of) you can permanently decrease stability
- Lose too many people (somewhere over 100): -1 stability
- Lose an experienced science vessel: -1 stability
Some locations in game keeping the Tiqquin at them will give all sectors a temporary -1 stability
So all and all by the end of the game without any changes in laws you will need to come up with
6-9 stability.
Policies
Beyond this we need to consider Policies:
Propaganda
- Stability
- 0 | 1 | 2 (tech)
- Increases the cool down of policies
- Super good policy, must take
- Food
- -1 | 0 | 1
- Increase (1 food feeds 7 people) or decrease (1 food feeds 16 people) the amount of food consumed
- Food – Restricted is exceptionally good. Not only do you have to produce less food, you need fewer buildings consuming power, and most importantly it reduces the drag on your logistics network
- Working Hours
- -1 | 0 | 1
- Increase of decrease the amount of workers needed by 25%
- Working Hours – Intense is by far the best policy or anything for that matter in hard mode, especially early game. After about chapter 2 you will start to have enough workers to ease off and switch to Working Hours – Supported starting in your EVA airlock sector.
- Death
- -1 | 0
- Recycle corpses
- Honestly pretty useless. You wont have thousands dying so this really isn’t worth it at all
- Waste
- -1 | 0
- Enact recycling
- As soon as you have some free stability this has to be enabled
- Starving Population
- -1 | 0
- Starving people work or don’t work
- Useless. You shouldn’t have starving people. If you do they won’t be alive for long.
- Infirmaries
- -1 | 0
- Increase infirmary capacity by 25%
- Situational, but without a hospital can be necessary in the industrial sector.
- Cryopod Awakening
- -3 | 0
- Wake up workers first or everyone
- Really bad. -3 is very hard to remedy, and you’ll be waking everyone up eventually.
Stability Structures Ranked
Now this is my own personal opinion, and is also not reflective of the easier modes, as in normal and easy power is not as much of a problem and the issue is usually around creating well designed layouts.
As a reminder, you are looking for 6-9 stability at minimum. If you want recycling, reduced food, and intense working hours that is 9-11 stability. In hard mode you also do not get a bonus for being above 25% hull integrity. You also do not need all the structures, just enough to keep your population at neutral.
S:
Event: A particular buddy you find in space in Chapter 3 (+1 stability)
Trains (+1 stability)
Trains are so OP. 3 electronics, 50 alloys and no power cost at all, and no footprint. By far the best stability structure out there.
DLS center (+1 stability | +2 stability)
When you are done, you can keep these un-powered and they still provide policy effects. Critical for a hard play-through
A:
Memorials (+1 stability | +1 extra stability per sector specialization for industry, population, and food)
Great! Low on the tech tree, low resource cost, and no power cost. They can also increase your stability anywhere from 1-4
Hull temple (+1 stability | +2 stability)
With upgrades this can bring the power cost down to 1. Also increases the max hull health by +10.
It is quite good. Adds a nice extra bit of richness to the ship and for 1 power is worth it for 2 stability.
B:
Exo-fighting dome (+2 stability for all sectors | +3 stability for all sectors at a population 3000 | +4 stability for all sectors at a population of 5000 | + 1 extra with population specialization 2? Can someone confirm if this stacks with other sectors? )
The 40 power draw is rough. I am giving this a B rank, only because I think it is just so cool, and no one deserves to live without a fighting dome. It costs 450 alloys and 9 electronics. Footprint-wise it is better than the alternative life center and legislative strength facility (considering it works across sectors) but if you are trying to play without hydrogen generators probably skip this one.
Observatory (+1 stability | +2 stability when orbiting planet | +3 stability when orbiting planet)
What is really nice about this is the fact this has no power draw at all, however there is a steep initial resource cost, and the +2 extra is conditional and not in affect when flying. Also there is a -25 max hull health penalty, and this takes a wall building spot which could be used for cell housing. Overall it is really worth it only because of the fact this consumes no power.
C:
Legislative Strength Facility (+2 stability up to neutral | +3 stability up to neutral | +4 stability up to neutral)
Better than alternative life. Same power draw but effectively can get 1 additional stability without any of the population requirements.
Alternative life center (+1 stability | +2 stability with a population of 400 | +3 stability with a population of 800)
This building is… not ideal. The 6 power draw makes this a challenge to work with. In all 6 sectors that ends up being 36 power. The worker cost is a challenge early game, but is more manageable when you are considering this late game
D:
Crew quarters (+1 stability | +2 stability | +3 stability)
Much worse than cell housing. You get 56 residents per 1 power vs 200 residents per 1 power (max upgrades). That is more than 3 times as inefficient, and you also have a larger footprint per resident. The bonus here is you get stability. At 3 cell housing + legislative strength you are breaking even if you just built crew quarters in terms of power.
So, to get to 11 stability I recommend you build:
- Do the event
- Trains
- DLS
- Memorial
- Observatory
- Hull temple
- Exo-fighting dome
This should get you above the needed requirements, and if you can avoid the 2 possible negative penalties and switch to supported working hours that should replace the need for a fighting dome
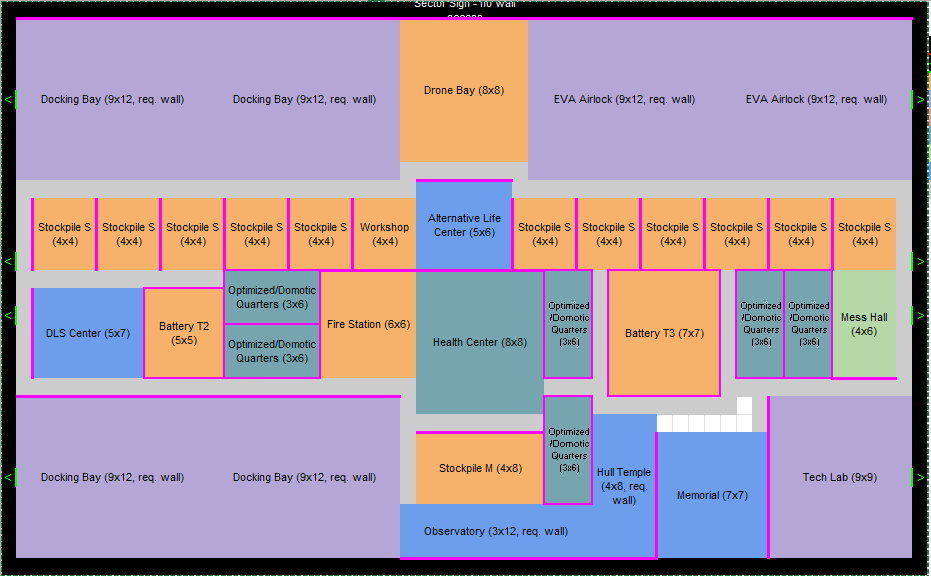
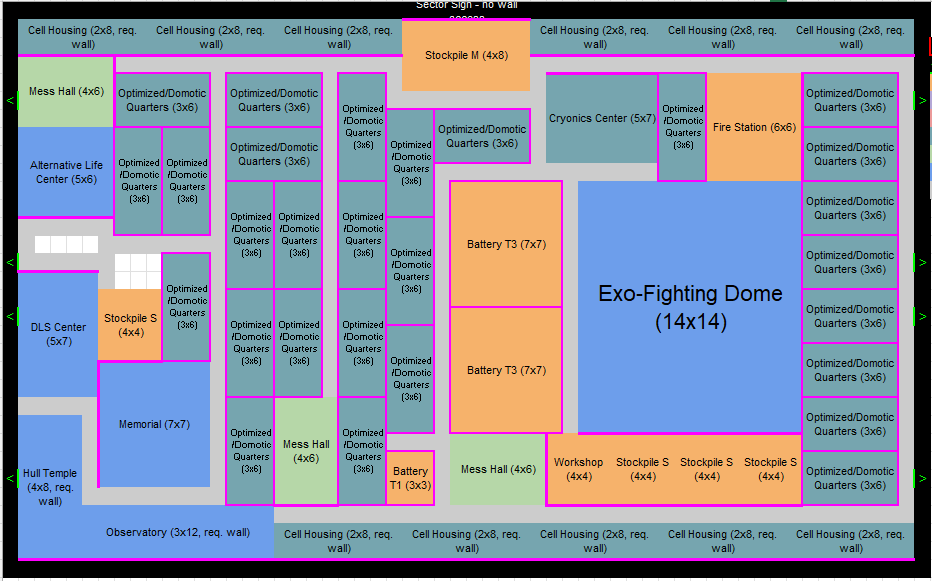
Layouts by Sector
It wasn’t until I started this run until I realized how great cell housing is, however, any real build optimization is not necessary once you unlock hydrogen power and the difficultly of the game falls off a cliff once you have it operational. As you can see I built a few structures for achievements such as 6 observatories and 6 hull temples so feel free to modify these in your design.
Sector 1
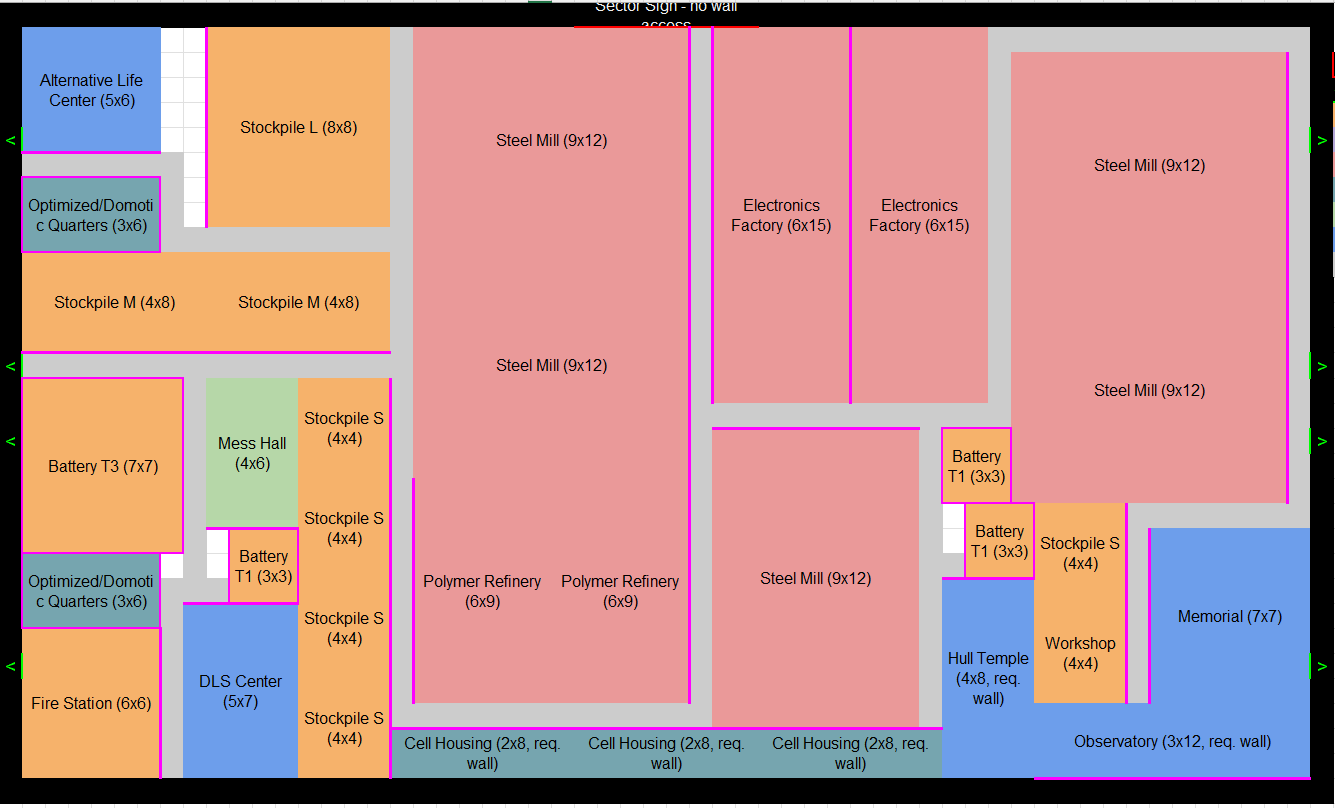
Sector 2
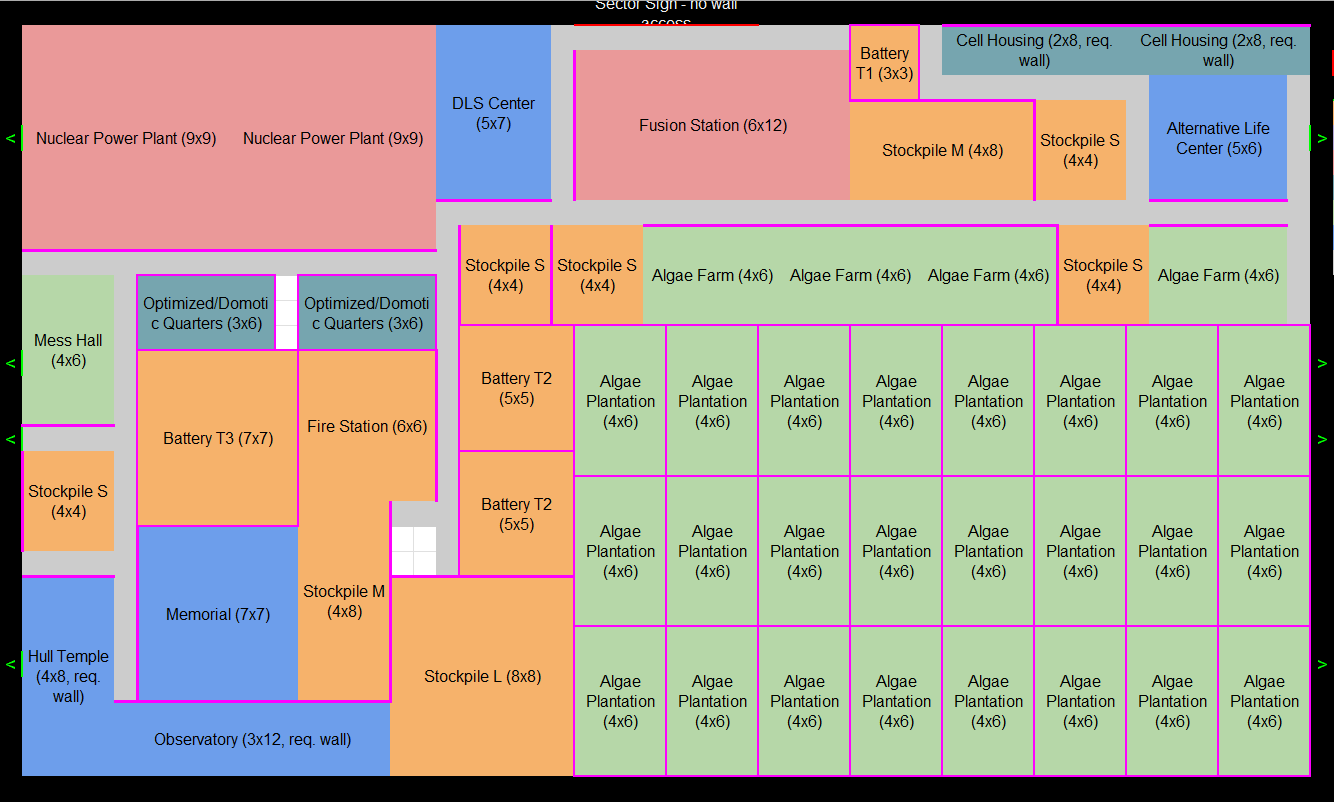
Sector 3
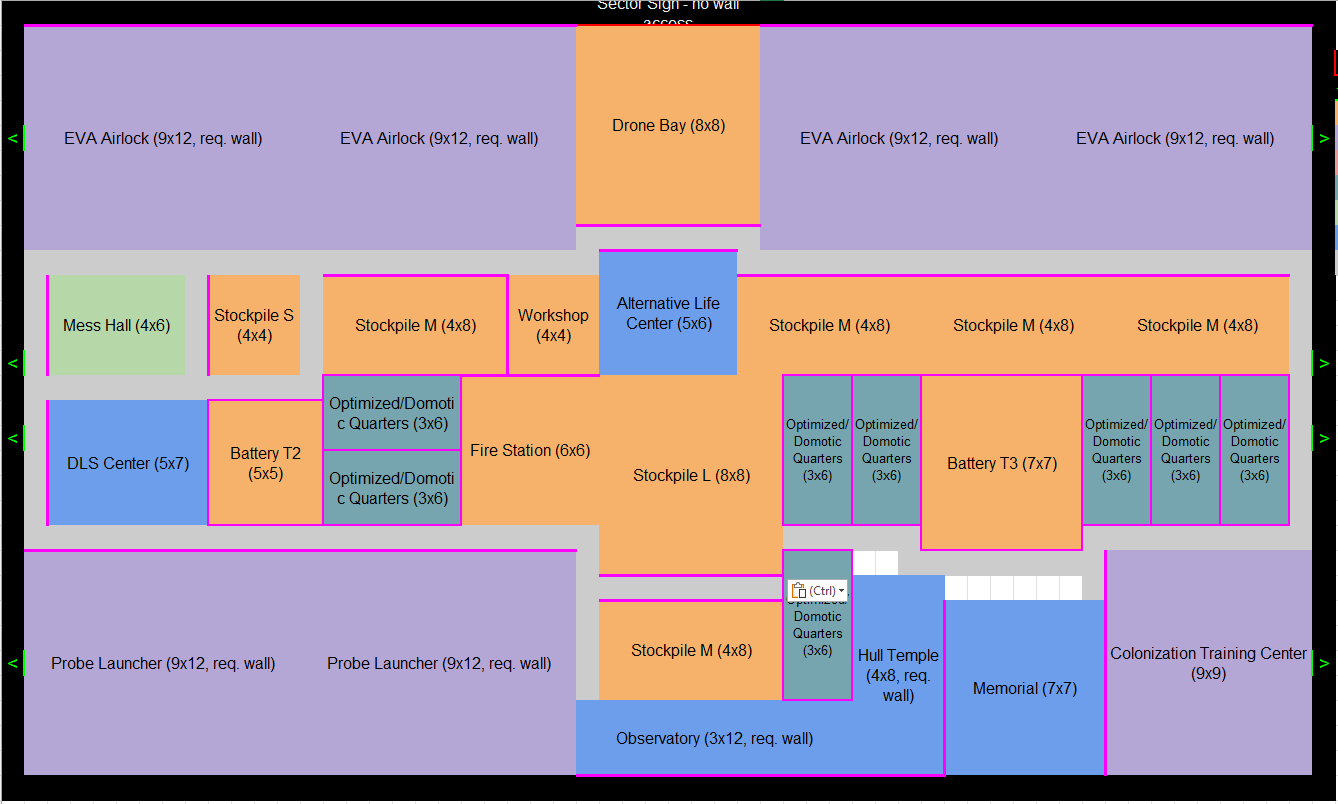
Sector 4
Sector 5
Sector 6
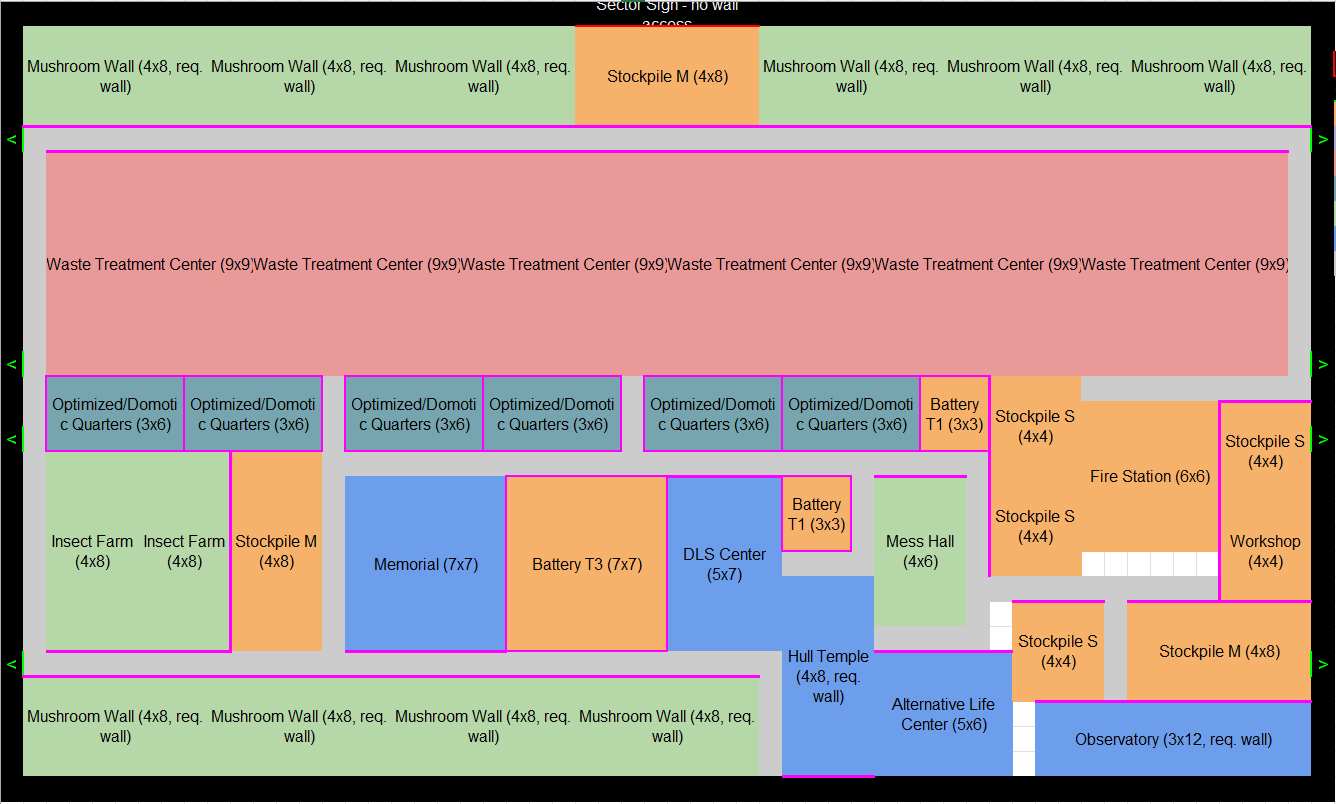
I opened my sectors in the following order:
- Sector 1 (default)
- Sector 2 (Chapter 1)
- Sector 6 (Chapter 1)
- Sector 5 (Chapter 2)
- Sector 4 (Chapter 2)
- Sector 3 (Chapter 3)
Sector 3 is kinda a dump sector and you can put really anything here. Also feel free to modify these designs, the challenge mode of this game really isn’t all that hard once you pass the first 2 chapters and later game is really the only time you can start thinking about designs as early game you just need to place things wherever you can.
Tech Tree Build Order
- All Tier 2 Techs – Needed for the good stuff
- DLS center – This is the most game changing tech. You need intense work hours asap and remedy this with stability buildings, or break since the DLS center gives +1 by default. You will also want restricted food access as soon as possible too
- Assistant Promotion – Saves you long term
- Mushroom Wall – Food is critical, and insect farms wont cut it. Crops need a fusion center researched so not an ideal first pick
- All Tier 3 Techs
- Intelligent Lab – Saves you long term
- Alloy Development – More alloys to save your skin
- Panel Purification – Same
- Optimized Quarter – Better housing which is needed, try to hold off on this one until you have all Tier 3’s
- Neil Quarter Protocol – Adds a lot more trash for food production
- Endoscopic Drilling – 10% more resources mined. Aka more alloys, polymers, and electronics
- Leech Mining – Same as above
- Improved Filters – Same as above
You’ll also want to look into getting photosensitive lamination around the time you start seeing close to 100 polymers on that first or second medium solar panel
After this you can go on your own but keep a number of things in mind:
- Keep in mind how many ‘dead’ technologies you need to research to get the thing you want. A good tech like computing optimization is actually not a good tech. This is because it takes a lot of time and a ton of worthless technologies to get. Research speed is only valuable in chapter 4 and 5 when you are speeding through the game with 3 research ships and your ship is fully built and everything you want is researched. If you do the ROI for the 4 prior required techs plus this and then see where the break even is, id have to guess it is probably something like 1000 cycles.
- Early game, if you can build the solution, don’t research it. Research is so valuable early game. It is better to build structures that can facilitate your need over researching the solution. This means making more solar panels for power, or increasing the number of food producing buildings over an efficiency tech
- Resource increasing and power decreasing techs are great to haves when you don’t know what you need. I’m saying Bio-Electricity, Thermal Regulation, Recycled Materials, etc
- Rush trains and then rush hydrogen power. Trains are cheap, provide plus 1 stability, and have a few other benefits with other structures. Hydrogen really negates the need for power and will provide so much garbage you actually wont be able to get rid of it all, even with 6+ recycles and lots of mushroom walls. I don’t think any other building in the game produces this much garbage. On top of that, they can provide up to +200 power which is more than 4 large solar panels. Extremely power efficient.
General Tips
- You will need a minimum of 3 EVA airlocks by the end of the game with technologies, and 4 if you don’t want the hull to degrade while flying
- Cell housing is too good to not use. If your walls aren’t being used for something else, cell housing all the way. That is because with upgrades they are almost 4x as power efficient and they are almost 2x as space efficient in terms of housing capacity.
- Propaganda intense, Food Restricted, Working Hours Intense, and Waste Recycling should be how all of your sectors look.
- Tier 3 batteries have 17.14 power per cell, tier 2 batteries have 14.4, and tier 1 batteries have 13.3
- Drone bays are needed late game to deal with the logistical needs. It is recommended to space them evenly apart to distribute the load more effectively. Ex; Having one in sector 1 and one in sector 4, or having one in sector 5 and one in sector 2, etc. 1 is insufficient, 2 is good in most situations, and 3 will have you covered for everything.
- The alt key when viewing the exterior of the Tiqqun’s will show all the sector information and where they are


Be the first to comment