
After finishing the main campaign and doing maps I’ve always been lost and didn’t know where to go next in PoE. But now, I have finally finished killing every end-game boss in the game and decided to create a very beginner’s friendly guide, to guide you where to go next! I wish I could have had something like this while I was lost in the end-game and I hope this guide will help you out!
This guide does not include tips of how to beat the bosses, there’s hundreds of those kind of guides on youtube. This guide will teach you how to get to every boss in the game and it will also include a video for each boss with the full fight from the start to the end.
Contents
- Some Extra Info before We Start
- 1) The Infinite Hunger and The Eater of Worlds
- 2) The Black Star and The Searing Exarch
- 3) The Elder
- 4) The Shaper
- 5) The Uber Elder
- 6) Sirus, Awakener of Worlds
- 7) The Maven
- 8) Maven Invitations
- 9) Atziri and Uber Atziri
- 10) Catarina (Immortal Syndicate)
- 11) The Vaal Omnitect (Incursion)
- 12) Chayula and the Breach Bosses
- 13) Kurgal the Blackblooded (Delve)
- 14) Ulaman and Amanamu (Abyssal Depth)
- 15) Contract Bosses
- 16) Venarius, Cortex and Synthesised Maps
- 17) Uber Labyrinth Izaro
- 18) Uber Bosses
Some Extra Info before We Start
Сrеdit gоеs to Xiuhayuteotl !
To fight bosses you will need maps and map fragments. You can farm yourself any map or map fragment, I will tell you in the guide how to get them.
Chapters 1-7 contain the main bosses of PoE. You might have difficulties when fighting them for the first time since they have a lot of mechanics, but once you get the fight down, it will be easy to defeat them (if you have a decent character). The hardest boss in the game is the Maven, nothing comes close to her. Other difficult bosses are Uber Elder, Sirius and the Shaper. The Searing Exarch rolling boulder phase is also hard. The rest of the bosses are quite easy if you do the mechanics correctly.
Chapters 8+ contain optional bosses. Those bosses were the main attraction in older patches of the game. You will see that the content is a little outdated and most of them are really easy to kill. Feel free to attempt the optional bosses before the main ones, since it might prove easier to defeat them.
1) The Infinite Hunger and The Eater of Worlds
The Infinite Hunger resides in the Seething Chyme map.
You will first fight him by following the main questline after you finish the campaign. The first time you fight him (during the quest) he’ll be a weaker, lower version.
To fight him again you will need to complete 14 tier 14+ maps with the Eater of Worlds influence:

The 14th map you complete under the influence of the Eater of Worlds will grant you the Writhing Invitation. Place this invitation into the Atlas device to fight him.
This version of The Infinite Hunger will be stronger and higher level.
The Infinite Hunger (Writhing Invitation) fight:
After fighting The Infinite Hunger and following the questline further you will reach The Eater of Worlds which resides in the Absence of Symmetry and Harmony map.
Just like the Infinite Hunger, the questline fight with this boss is lower level and weaker than the invitation.
To fight The Eater of Worlds again you will need to complete 28 tier 14+ maps with the Eater of Worlds influence:

The 28th map you complete under the influence of the Eater of Worlds will grant you the Screaming Invitation. Place this invitation into the Atlas device to fight him.
This version of The Eater of Worlds will be stronger and higher level.
The Eater of Worlds (Screaming Invitation) fight:
In short, when you do random maps, select the blue option from the map device and you will fight The Infinite Hunger and The Eater of Worlds.
2) The Black Star and The Searing Exarch
The Black Star resides in the Polaric Void map.
You will first fight him by following the main questline after you finish the campaign. The first time you fight him (during the quest) he’ll be a weaker, lower version.
To fight him again you will need to complete 14 tier 14+ maps with the Searing Exarch influence:

The 14th map you complete under the influence of the Searing Exarch will grant you the Polaric Invitation. Place this invitation into the Atlas device to fight him.
This version of The Black Star will be stronger and higher level.
The Black Star (Polaric Invitation) fight:
After fighting The Black Star and following the questline further you will reach The Searing Exarch which resides in the Absence of Patience and Wisdom map.
Just like the The Black Star, the questline fight with this boss is lower level and weaker than the invitation.
To fight The Searing Exarch again you will need to complete 28 tier 14+ maps with the Searing Exarch influence:

The 28th map you complete under the influence of the Searing Exarch will grant you the Incandescent Invitation. Place this invitation into the Atlas device to fight him.
This version of The Searing Exarch will be stronger and higher level.
The Searing Exarch (Incandescent Invitation) fight:
In short, when you do random maps, select the red option from the map device and you will fight The Black Star and The Searing Exarch.
3) The Elder
The Elder resides in the Absence of Value and Meaning map.
To get to this map you will need to place into your map device 4 different fragments:

- Fragment of Purification
- Fragment of Constriction
- Fragment of Enslavement
- Fragment of Eradication
Each fragment is dropped when you kill one of the Elder’s Guardians:
- The Purifier
- The Constrictor
- The Enslaver
- The Eradicator
The 4 Elder Guardians fights:
You will find the guardians on maps that have the following modifier specified e.g. “Map is occupied by the Purifier”
Those “occupied” maps have a chance to drop from killing any T14+ map bosses, you can get “occupied” maps from Captain Kirac’s daily mission and you can also buy them from PoE trade.
You can boost the number of Elder guardian maps dropping by allocating this Atlas tree node:

Once you get all 4 fragments, you can put them in your map device to visit the Absence of Value and Meaning map where you will fight the Elder.
The Elder fight:
4) The Shaper
The Shaper resides in the The Shaper’s Realm map.
To get to this map you will need to place into your map device 4 different fragments:

- Fragment of the Hydra
- Fragment of the Chimera
- Fragment of the Phoenix
- Fragment of the Minotaur
Each fragment is dropped when you kill one of the Shaper’s Guardians:
- Guardian of the Hydra
- Guardian of the Chimera
- Guardian of the Phoenix Map
- Guardian of the Minotaur
The 4 Shaper Guardians fights:
You will find the guardians on the following maps:
- Lair of the Hydra Map
- Pit of the Chimera Map
- Forge of the Phoenix Map
- Maze of the Minotaur Map
Those maps have a chance to drop from killing any T14+ map bosses, you can get those maps from Captain Kirac’s daily mission and you can also buy them from PoE trade.
You can boost the number of Shaper guardian maps dropping by allocating this Atlas tree node:

Once you get all 4 fragments, you can use them to visit the The Shaper’s Realm map where you will fight the Shaper.
The Shaper fight:
5) The Uber Elder
First look at the chapter 3 and 4 of this guide.
The Uber Elder is a fight where you will fight both the Elder and the Shaper at the same time. Good luck.
When you defeat the Shaper in The Shaper’s Realm, he will drop one of the following fragments:
- Fragment of Knowledge
- Fragment of Shape
When you defeat the Elder in Absence of Value and Meaning, he will drop one of the following fragments:
- Fragment of Terror
- Fragment of Emptiness
Once you have 1 of each of those fragments, you can put them together into your map device and you will be able to do the Uber Elder fight.

The Uber Elder fight:
6) Sirus, Awakener of Worlds
Sirus, Awakener of Worlds resides in the Eye of the Storm map.
To get to this map you will need to place into your map device 4 different fragments:

- Al-Hezmin’s Crest
- Baran’s Crest
- Drox’s Crest
- Veritania’s Crest
Each fragment is dropped when you kill one of the Sirus’s Conquerors:
- Al-Hezmin, the Hunter
- Baran, the Crusader
- Drox, the Warlord
- Veritania, the Redeemer
The 4 Conquerors fights:
You will find the conquerors on maps that have the following modifier specified e.g. “Map contains Al-Hezmin’s Citadel”
Those “citadel” maps have a chance to drop from killing any T14+ map bosses, you can get “citadel” maps from Captain Kirac’s daily mission and you can also buy them from PoE trade.
You can boost the number of Shaper guardian maps dropping by allocating this Atlas tree node:

Once you get all 4 fragments, you can use them to visit the Eye of the Storm map where you will fight Sirus.
Sirus, Awakener of Worlds fight:
7) The Maven
The Maven resides in the Absence of Mercy and Empathy map. This is the hardest boss in the game. Pure pain and agony.
To get to this map you will need to place into your map device an item called The Maven’s Writ.

The Maven’s Writ is created by combining 10 Crescent Splinters.
To get Crescent Splinter you will need to successfully do Maven’s Invitations.
There are a bunch of different Maven Invitations, each offering different amounts of Crescent Splinters if you do them successfully.
In the next chapter I will explain how to do every type of Maven Invitation, but for now we will go with the simplest kind of Invitation.
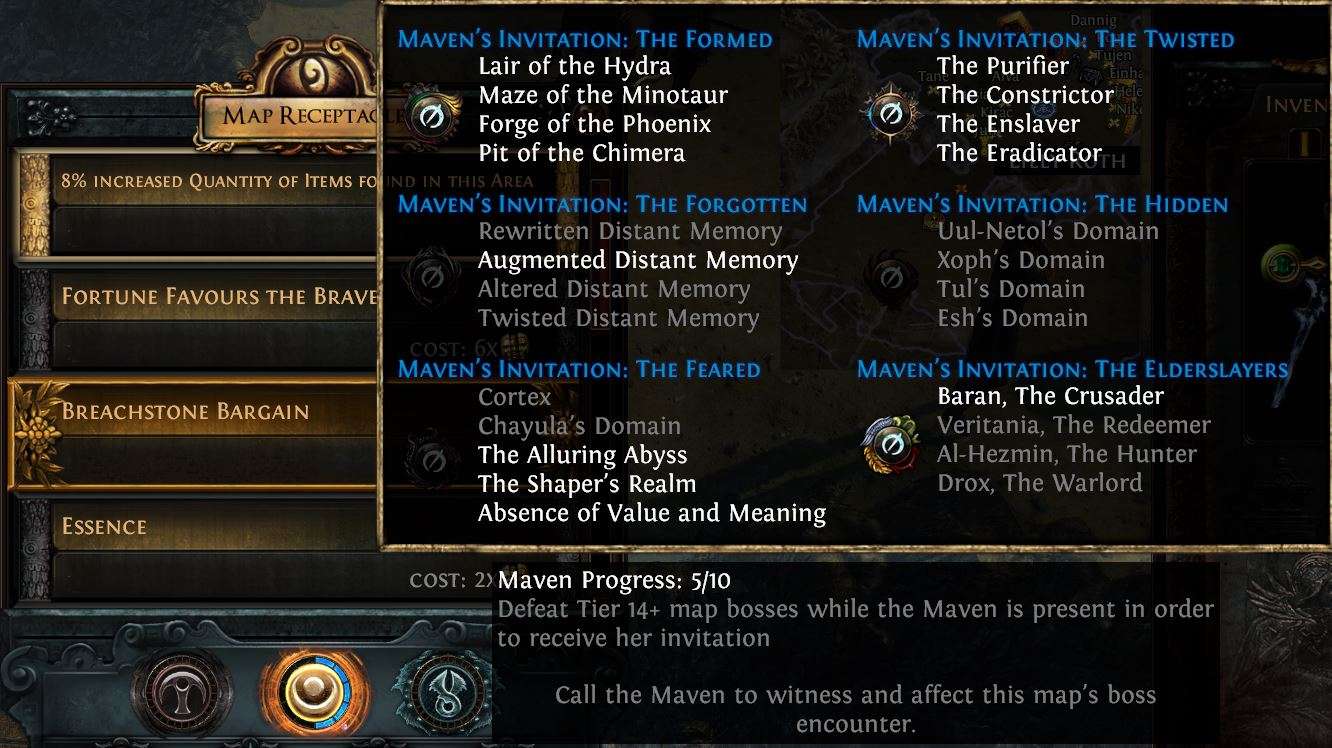
When you do random T14+ maps, if you select the Maven button in your map device, the middle one, between the red and the blue button, the Maven will witness you fighting the final boss of the map. The Maven will put traps, regenerate the boss and do other annoying stuff, but if you defeat the boss you will get potentially two important things:
1)You will guaranteed get a +1 counter towards a Maven fight (the small blue bars around the Maven button in the image above). With specific Atlas Tree nodes, if you allocate them, you have a chance to get +2 counters per kill. Once you have 10/10 counter you will be able to do a Maven’s Invitation: The Atlas.
2)The boss will have a chance to drop an Maven’s Invitation. There are 7 different kinds of Invitations, but the most common one is the Maven’s Invitation: The Atlas.
When you get 10/10 Maven counter, you can put the Maven’s Invitation: The Atlas into the map device to open portals to Maven’s arena. Here you will fight the 10 bosses the Maven witnessed you while you did maps, but at the same time.
You can reach the 10/10 counter faster by allocating this Atlas tree node:

Maven’s Invitation: The Atlas fight:
Once you kill all the bosses in the arena they will drop some Crescent Splinters.
Only the Maven’s Invitation: The Atlas requires 10/10 counters. The other kind of Maven’s Invitations don’t require Maven counters, but are more difficult to do and acquire. More details about those invitation in Chapter 8.
When you get 10 Crescent Splinters they transform into The Maven’s Writ. When you put the Writ in your map device, it will open portals to the Absence of Mercy and Empathy map, where you fight the Maven.
Hardest boss in the game, the Maven:
8) Maven Invitations
Along the Maven’s Invitation: The Atlas, there are 6 additional types of Maven’s Invitations:

- Maven’s Invitation: The Elderslayers
- Maven’s Invitation: The Feared
- Maven’s Invitation: The Forgotten
- Maven’s Invitation: The Formed
- Maven’s Invitation: The Hidden
- Maven’s Invitation: The Twisted
Random tier 14+ bosses witnessed by the Maven have a small chance to drop one of those invitations. If you are unlucky, you’ll have to buy one from PoE trade from other players.
To be able to do any of the above Invitations, Maven will have to witness the bosses required for each kind of invitation. In the image above you will see that the Maven has witnessed me fighting all the bosses required for Maven’s Invitation: The Formed (and the Twisted). This means that if I put the Maven’s Invitation: The Formed in the map device, portals will open to the arena and I will be able to fight all those bosses at the same time.
Killing the Hydra, Minotaur, Phoenix or Chimera (the bosses corresponding to the Formed invitation) while witnessed by the Maven has a higher chance to drop the Maven’s Invitation: The Formed than killing random tier 14+ bosses. This concept applies to all six kinds of invitations.
Make sure to have the Maven’s button selected before you do any of those bosses, and when you defeat them, they will turn from gray to white like in the image above.
1) Maven’s Invitation: The Elderslayers
The Maven must Witness:
- Al-Hezmin, the Hunter
- Baran, the Crusader
- Drox, the Warlord
- Veritania, the Redeemer
Put in your map device maps containing Sirius’ Guardians and kill them while witnessed by Maven.
Maven’s Invitation: The Elderslayers fight:
2) Maven’s Invitation: The Formed
The Maven must Witness:
- Lair of the Hydra
- Maze of the Minotaur
- Forge of the Phoenix
- Pit of the Chimera
Put in your map device maps containing the Shaper’s Guardians and kill them while witnessed by Maven.
Maven’s Invitation: The Formed fight:
3) Maven’s Invitation: The Twisted
The Maven must Witness:
- The Purifier
- The Constrictor
- The Enslaver
- The Eradicator
Put in your map device maps containing the Elder’s Guardians and kill them while witnessed by Maven.
Maven’s Invitation: The Twisted fight:
4) Maven’s Invitation: The Forgotten
The Maven must Witness:
- Rewritten Distant Memory
- Augmented Distant Memory
- Altered Distant Memory
- Twisted Distant Memory
For this invitation, the Maven will have to witness you killing the bosses of the unique synthesised maps. See more about those maps in chapter 16.
Maven’s Invitation: The Forgotten fight:
5) Maven’s Invitation: The Hidden
The Maven must Witness:
- Uul-Netol’s Domain
- Xoph’s Domain
- Tul’s Domain
- Esh’s Domain
For this invitation, the Maven will have to witness you killing the bosses of the unique breach maps. See more about those maps in chapter 12.
Maven’s Invitation: The Hidden fight:
6) Maven’s Invitation: The Feared
The Maven must Witness:
- Cortex
- Chayula’s Domain
- The Alluring Abyss
- The Shaper’s Realm
- Absence of Value and Meaning
This fight is the only fight in the game that is as hard as the Maven or possibly even harder than the Maven. In this fight you will fight really hard bosses all at the same time. Pain and suffering.
Maven has to witness you fighting first each of the above bosses.
- For Cortex see chapter 16.
- For Chayula see chapter 12.
- For The Alluring Abyss see chapter 9.
- For The Shaper’s Realm see chapter 4.
- For Absence of Value and Meaning see chapter 3.
Maven’s Invitation: The Feared successful attempt:
Bonus: the Feared failed attempt (maybe you learn something from my mistakes; my curses got reflected back to me by Uber Atziri resulting in me dying a bunch of times):
9) Atziri and Uber Atziri
Atziri is one of the easier bosses that you can visit early.
She resides in the Apex of Sacrifice map.
To get to this map you need to place the four sacrifice fragments into your atlas device:

- Sacrifice at Dusk
- Sacrifice at Noon
- Sacrifice at Midnight
- Sacrifice at Dawn
You can get those fragments from almost everywhere, but the highest chance of getting a fragment is from completing a Vaal Side area, which can appear during any campaign map or atlas map:

Full Apex map and Atziri fight:
After you defeat Atziri she has a chance to drop a Mortal Fragment.
Using four of those fragments will get you to the The Alluring Abyss map, where Uber Atziri resides. The entire area is higher level and if you get hit by any of Atziri’s skills you’ll probably die.
Use the four mortal fragments into your atlas device to get to this map:

- Mortal Grief
- Mortal Ignorance
- Mortal Rage
- Mortal Hope
Uber Atziri fight:
10) Catarina (Immortal Syndicate)
Catarina is the leader of the Immortal Syndicate. She resides in the Mastermind’s Lair.

To get to Catarina, you simply have to do Immortal Syndicate content. More details:
Interrogating, Bargaining and choosing other actions after you defeat a Syndicate Member, will grant you Intelligence points towards Transportation, Fortification, Research and Intervention safehouses.
You will see a progress bar under each of the 4 safehouses that tracks the Intelligence. Once you gather enough Intelligence the bar becomes full and transforms into a ‘Safehouse’ button.
Talk to Jun to attack this safehouse and once you defeat the leaders of the safehouse, the progress bar under the big ‘?’ card in the middle(which is the Mastermind’s Lair) will increase.
Once you defeat a bunch of safehouses, the progress bar of the Mastermind’s Lair will be filled up and you will be able to visit the Mastermind’s Lair by talking to Jun. Here you will fight Catarina.
Note that there are a lot of Immortal Syndicate nodes in the Atlas Tree, that will increase the spawn and reward rate of the Immortal Syndicate mechanic. This will help you get faster to Catarina.
Full Mastermind’s Lair and Catarina fight:
11) The Vaal Omnitect (Incursion)
The Vaal Omnitect is the final boss of The Temple of Atzoatl.

The Omnitect resides at the top of the pyramid, inside the apex of Atzoatl room.
To visit the Temple of Atzoatl, you will need to finish 12 Incursions with Alva the Master Explorer.
When Alva is present in your map, she will open 3 different portals(incursions) to the past, where you will fight a bunch of Vaal creatures. Each portal will bring you to a random room of the Temple.
Killing monsters inside this room will have a chance to drop a key, a Stone of Passage. Pick up this key and run quickly to one of the red gates. Click on the red gate and this will open it and will consume the Stone of Passage. The gate will become green and the room will become linked to an adjacent room.
This is how you link rooms together and how you will be able to reach the final room and fight the Vaal boss once you finally visit The Temple of Atzoatl.
The Vaal Omnitect fight:
12) Chayula and the Breach Bosses
Doing breaches (the purple hand event that appears on your maps) will reward you with splinters:

There are 5 types of splinters:
- Splinter of Chayula – Combine 100 splinters to create Chayula’s Breachstone.
- Splinter of Esh – Combine 100 Splinters to create Esh’s Breachstone.
- Splinter of Tul – Combine 100 Splinters to create Tul’s Breachstone.
- Splinter of Uul-Netol – Combine 100 Splinters to create Uul-Netol’s Breachstone.
- Splinter of Xoph – Combine 100 Splinters to create Xoph’s Breachstone.
Using 100 splinters to create a Breachstone and putting this Breachstone in your map device will open portals to each breachlord’s domain.
In the breachlord’s domain you will do a huge breach event, until you reach the final boss of the map.
I had no desire to farm splinters so I just bought each breachstone from PoE trade.
They are pretty cheap, except the Chayula’s Breachstone, which is needed for the The Feared Maven’s Invitation.
The bosses are easy, except Chayula which can be slightly harder.
Videos with each domain and boss:
13) Kurgal the Blackblooded (Delve)
Kurgal, the Blackblooded resides in The Lich’s Tomb nodes within the Abyssal City biome, inside The Azurite Mine in Delve.

To reach this boss, do the Delve mechanic and keep going down inside the mine.
You need to be on depth 90+ to encounter him. Once you see on your Delve map a node called The Lich’s Tomb (Abyssal City), head there and there you will fight the Lich.
Kurgal, the Blackblooded fight:
14) Ulaman and Amanamu (Abyssal Depth)
Doing the Abyss mechanic(the green moving dot on your map) in your maps will grant you an Abyssal Trove(a treasure chest) if you succeed and it has a low chance to open a side area to the Abyssal Depths.

Allocating specific nodes in your Atlas Tree will give you a higher chance to spawn the Abyssal Depth.
There are also tree nodes that increase the spawn rate of the Abyss mechanic and you can also use an Abyssal Scarab with your maps for a guaranteed extra Abyss spawn in your map.
Once you finally get an Abyssal Depth portal instead of an Abyssal Trove, you will enter the Abyssal Depths map in which one of the Abyssal bosses reside, Ulaman or Amanamu.
15) Contract Bosses
To do contract bosses you have to do and focus on The Rogue Harbor mechanics.
Opening Smuggler’s Caches that spawn randomly on your maps, will sometimes grant you Green Contracts, that are questline contracts for the Rogues residing in the Rogue Harbor.
The final contract of the questline will be a boss battle.
Here’s the list of contract bosses:
- Contract: Breaking the Unbreakable
- Client: Isla
- Heist Target: Destroy “The Unbreakable”
- Contract: Death to Darnaw
- Client: Faustus
- Heist Target: Kill Admiral Darnaw
- Contract: Heart of Glory
- Client: Adiyah
- Heist Target: Confront Nashta
- Contract: The Slaver King
- Client: Whakano
- Heist Target: Defeat Friedrich Tarollo
- Contract: The Twins
- Client: Kurai
- Heist Target: Defeat the Vox Twins
16) Venarius, Cortex and Synthesised Maps
Synthesised bosses are found on unique Synthesised Maps. They can only be acquired from map bosses of Tier 11 or greater maps (or Tier 14 or greater for Cortex) or from divination cards.
Since the drop is random and has a really low chance, you will very rarely stumble upon one of those maps.
Your best bet is to buy them from PoE trade. That’s what I did. Their prices are ok, except the Cortex map which is expensive, 1+ div, because it’s needed for The Feared Maven’s Invitation.
There is one Atlas tree node that will boost slightly your chance of getting a Synthesised map:

The Synthesised maps are:
- Altered Distant Memory
- Augmented Distant Memory
- Rewritten Distant Memory
- Twisted Distant Memory
- Cortex
The bosses of Distant Memory maps are easy, but the Cortex boss, Venarius, can be deadly if you are not careful.
Synthesised map and boss fight:
Cortex and Venarius fight:
17) Uber Labyrinth Izaro
Izaro is the boss of The Lord’s Labyrinth. You have to beat him three times while exploring the Labyrinth.
You fight Izaro 4 times to get your ascendancy points:
- The Labyrinth Area Level 33
- The Cruel Labyrinth Area Level 55
- The Merciless Labyrinth Area Level 68
- The Eternal Labyrinth Area Level 75
But there is a 5th Izaro (Uber Izaro) in:
- The Eternal Labyrinth (of Potential, of Fortune or of Opportunity) Area Level 83
To get to this level 83 Labyrinth, also called Uber Lab, you need to allocate the following Atlas tree node:

Then you will have a 20% chance to get an improved Offering to the Goddess:
- Dedication to the Goddess
- Gift to the Goddess
- Tribute to the Goddess

Go to the Aspirants’ Plaza with one of those improved offerings and you will enter the Uber Lab.
Uber Lab and Uber Izaro:
18) Uber Bosses
Nope. If you don’t have a thousand hours in PoE or if you are not on meth, don’t even think about the Uber bosses.
If you killed all the bosses from chapter 1 – 17, congrats, you have beaten the game.
But just fyi there are 6 Uber versions of the hardest bosses in the game: Uber Exarch, Uber Eater of Worlds, Uber Maven, Uber Venarius, Uber Sirius, Uber Maven and Uber Uber Elder.
If you are insane and wish to attempt them then you need to allocate the corresponding node in the Atlas tree:

You can see the 6 big highlighted nodes in the image or simply search for “is level 85”. Those nodes will give you Uber Bosses.

Be the first to comment