
Here’s an attempted guide on how to get through this nightmare.
Contents
Starting Items
Сrеdit gоеs to Pakkue !
For stage one I’d recommend Guardian’s Heart. It’s by far the most valuable item in this entire run until we hit a certain point where it’s going to not matter as much. It’s protects you from taking a chunk of permanent damage from 1 hit. If it runs out, run like a little…
Stage 1
I’d recommend for the stage strategy to first of all group all the lemurians up and try to take em out on the top platform, if the missile elites happen to fall of the stage when they spawn in, even better.
Once they’re taken care of use the rope to your advantage, jump down only when you got
De-Escalate. Use it and jump back on the rope. Repeat till jellyfish arrive.
When they do arrive kill them ASAP. They can and will destroy the poor boi.
Repeat the rope thing till everything is dead to finish stage one.
Stage 2: Items
For stage 2, trust me with this one. We’re taking ancient scepter. I know I know, you’re telling me hey guide guy, why are we taking something that doesn’t help us at all what so ever?
You may be right for now but hold onto it for now and take these other items.
Hopoo Feather. This is absolutely a must grab because we’re going to be jumping over enemies 24/7 and this lets us avoid unwanted damage.
Gasoline is the best option to grab on the top right. Helps with crowds.
And the last one in the bottom right is up for personal preference, I chose the Prison Shackles
Stage 2
Ok, stage 2. This one is tough but if you can get past it, it’s only easier from here.
First of all IMMEDIATELY prioritize killing the frenzied crabs, they are an absolute nightmare to deal with if left unchecked. Utilize the top of the arena to stay away from the majority of the enemies, eventually the dumb missile lemurians will spawn in, this is ok. if you can get them up to where the crabs are you can utilize the piercing of DE-ESCALATE. Once again if your shield goes down, run like the wind to the other side of the arena until it comes back.
Now this stage has so many ♥ jellyfish it’s not even funny. Running back and forth, try and group all of them up into one big ball and when you make laps around the arena, try and time your piercing shot on all of them. If you miss, that’s ok. Just keep running back and forth till they are all dead.
At this point the magma worm has probably spawned or is about to spawn soon, I’d recommend clearing the enemies by doing the same strategy as I listed above for the ground mobs. Just keep running from side to side using piercing.
Once you kill the mobs it should be easy enough to take care of the big boi himself.
Stage 3: Items
Now, for stage 3. If you’re struggling to live or do well under the pressure, I’d heavily recommend the stop watch. It can save your life if you get caught in a pinch, personally though I chose the sawmerang for it’s huge damage output.
Backup Mags are your main damage outside your equipment.
Rusty knife is fairly handy to have for a bit extra damage but you can also choose crit if you’d prefer
And for the last item I’d recommend beating embryo. The embryo can and will shred enemies and also have a different use later!
Stage 3
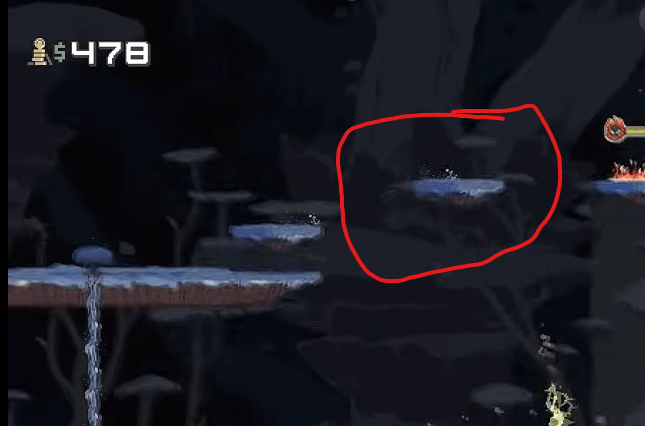
For stage 3 it’s relatively easy. I’d recommend staying up top and standing up top on these mushrooms. If imps start to spawn in jump to the one in the red circle. Afaik they cant teleport on top of it. If the enemies with the projectiles are troubling you take them out first before going there.
When the lynx totem spawns, any of her minions she summons can not shoot at you if you stand on the mushroom I mentioned above. So use that to your advantage by dropping down when you have your equipment slot ready. And when you do that run back.
Repeat until all enemies are taken care of!
Stage 4: Items
For the boss item I recommend taking Ifrit’s Horn. It can help in a pinch.
Take another rusty knife for extra bleed chance
Another backup mag for extra shots
And for the last one take the ukulele. The aoe is very handy.
Stage 4
This one is a bit trickier with all the mobs around so prioritize the healing bugger on the top right and the missile parent when they spawn in asap. When they’re dead try and group up all the little orphans around the map and make them climb the rope on the left side up. when they all come up, spam DE-ESCALATE and jump to the other side of the stage. repeat until they are all dead.
The ancient wisp isn’t too much of a threat. Should be an easy stage with your items.
Stage 5: Items
The Last Stage till godhood. I’d recommend taking the ukulele for even more aoe
I’d take the crit for the next item.
100% take the atg missile, great damage.
And for the last item before godhood, take predatory instincts
Final Stage before Godhood
Rush the boss ASAP. As soon as he dies it’s basically over. The enemies are straightforward enough.
The God Item
Stage 6
Ya did it, remember when I asked you to take the scepter? Yeah now we gaming. Take the Captains brooch equipment and start spawning as many chests as you can.
The scepter gives you a 20% chance to double any item in a chest you open. And the beating embryo has a 20% chance to spawn 2 chests.
You’ve basically won the game now if you keep spawning them. Put on a youtube video to celebrate victory while you wait out that timer for a easy win


Be the first to comment