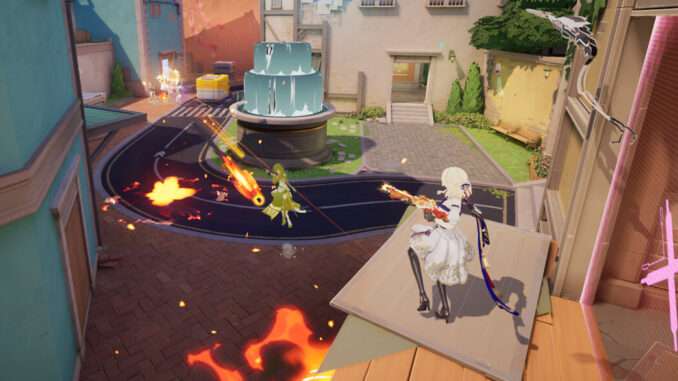
This guide aims to give a general idea on how to play the game in its main gamemode, demolition. It is not a deep and detailed guide but a way to get new players to find their grip and immediately start learning and understanding the game.
Newbies Guide to Rapidfire
By Panmesser
General Tips & Tricks
Some of these are going to be obvious if you already have a background from other shooters but you might still get some new information if you read them.
Work with your team – This is the most important tip I want to give you. Communicate and use pings. Winning a 1v5 situation is impossible in this game due to the high TTK (Time To Kill) and fast pace of each round. Even winning a 1v2 situation is hard to win unless you have the jump on them or have a better angle, that is why you should always have at least one person with you unless you’re playing as a lurker. On the attack side, focus on attacking a single site as having the numbers advantage is the biggest factor in winning a round. PUSH AS A TEAM.
Form crossfire angles and cover your teammate – It is best to hold different spots to form an intersecting sightline with a teammate instead of parallel sightlines so your opponents will have a harder time trying to shoot more than one person. When a teammate is getting lit up, you should cover them or hold a crossfire from a different angle and shoot the opponents they’re fighting because it’s very likely that your opponents are going to push your teammate that they think is very vulnerable (alone, reloading, cracked armor, low hp, etc.) to make your opponents think twice of pushing your teammate.
Map awareness and spacing – The minimap is key to know the current situation of the round and an important element of your decision making that leads to a winning round. Looking at the map while pushing will let you know if your teammates are coming along with you, this is essential as you might die alone without your teammates capitalizing on it. It is also very important to be aware of the spacing between each team member as team collision is a mechanic and it’s very possible to block each other’s movement and will make your entire group easy to hit and throw a grenade at.
Weave all 3 modes of aiming together – This game has three different aim modes: hipfire, shoulder aim, and ADS (Aim Down Sights). The spread of the bullets in hipfire is very big then smaller spread on shoulder aim and has no spread at all with ADS, the downside is that your mobility gets less and less as you go through each mode. Change your mode of aiming depending on the range and situation of the fight.
Keep moving – Being mobile is key to staying alive in this game, use the double jump to instantly change the direction of your movement. Double jumping will preserve your momentum so you can stay mobile while shoulder aiming and ADS’ing. You still have pin-point accuracy in ADS even when jumping.
Papermode is your best friend – Papermode (Stringify) is THE mechanic of the game, it makes you really hard to hit as well as making you take less damage while in papermode and allows you to reload somewhat safely without taking cover. Gliding also gives you better mobility while being hard to hit and combined with the double jump, you can stay alive for a really long time and make a counterplay.
You can also do this things with semi-automatic weapons.
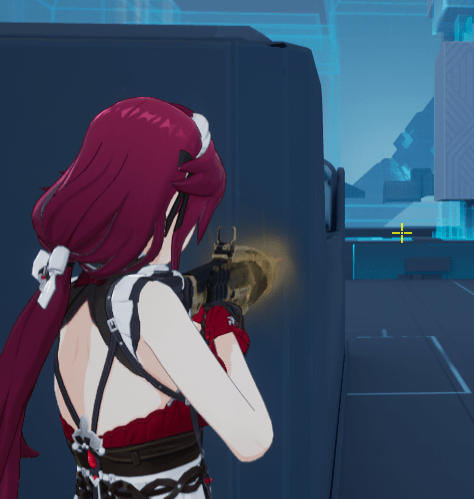
Cover is ALSO your best friend – Because this game is a third-person shooter and you cannot switch shoulder cameras, you should always take the left-side cover when possible since it gives you a sight and peek advantage. Playing with covers properly gives you a better chance to turn a bad situation around.
Left-side cover, less exposed
Right-side cover, more exposed
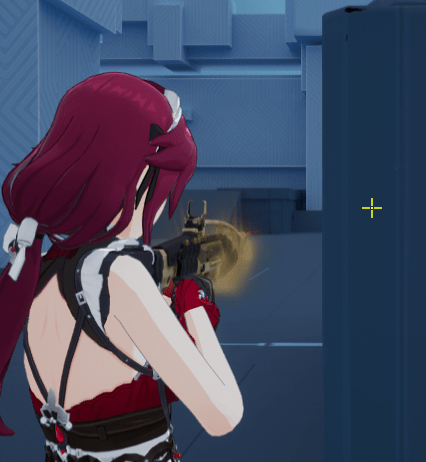
You can reduce the right-side cover disadvantage by ADS’ing but at the cost of mobility.
Finish downed enemies – When you or your teammate gets a knock (or down), if it’s within your reach by simply shooting at them or using a frag grenade, you should finish them off to guarantee a numbers advantage over the enemy team. Finishing enemies also gives you a portion of armor back and gives you their throwables if they have them.
Buy armor at round 2 – Regardless whether your team wins or loses round 1, you should buy light armor by default. You can buy heavy armor if your character can regen armor, however this forces you to play the game differently. Experiment with what works for you. You will immediately die if you don’t buy armor when round 2 starts. In a ranked scenario, if you cannot afford the armor you should sell your first bought upgrade by pressing the arrow icon.

Characters and Team Compositions
The game has three character factions P.U.S, Urbino, and Scissors. P.U.S characters are only available to the defense-side while Scissors are only available to the attack-side with Urbino being available on both sides. This game being a hero-shooter, assigns roles to each character, these roles are:
- Duelist
- Duelists have kits designed to take fights, can sustain themselves and their goal is to take space for their team. They are usually the ones that are on the frontline of the team formation or so-called “Entry Frag”.
- Sentinel
- Sentinels have kits that allow them to fortify a location, and their goal is to defend the space they are holding.
- Support
- Supports have kits that revolve around helping your team with buffs.
- Initiator
- Initiators have kits to gather information for your team, revealing the positions of the opponents.
- Controller
- Controllers have kits that are all about hindering the enemy team through debilitating debuffs or blocking sightlines.
Next, I want to cover each character and rate them from ★☆☆☆☆ to ★★★★★ (1 – Very Easy | 5 – Very Hard) based on their difficulty for a new player to pick up and perform well with, this is considering their main weapon and how their kit is used. The following terms (A1, A2, A3) mentioned are called “Awakens” that enhance the character’s kit, these can be found at the bottom of your buy menu.
P.U.S
Flavia (Duelist) – ★★★★☆

- Uses the KRISS Vector (SMG)
- Her kit is all about defying death to buy time for her team
Flavia’s gun being an SMG, is really good at close range and really easy to control. Her gun can completely shred someone in a blink of an eye. Whenever she is in the fight, the enemy team has to deal with her or they’ll be picked off one by one.
She is really strong, however you should be careful with your own positioning and timing as she can be easily caught without her active skill. You want to jump people that are out of position then escaping using her active skill or continuing to fight. If you have ult, you can avoid death four times if performed properly with this sequence:
- Q-Invincible > Ult-Invincible 1 > Ult-Invincible 2 > Q-Invincible
You generally want to start fights where and when your team can help you as you stall for time.
Michelle (Sentinel) – ★☆☆☆☆

- Uses the M4 Carbine (Assault Rifle)
- Her kit is all about fighting with her sentries that harass enemies
Has the most consistent gun in P.U.S that performs in any situation with pretty much zero-recoil. I wholly recommend her for beginners as she’s really strong in any map and her abilities don’t need a lot of skill to perform well.
She will win a lot of fights in locations where her sentries are. Michelle’s opponents are forced to make a decision, whether to ignore the sentry then get slowed and take considerable damage overtime, or destroy the sentry but risk looking away. Your game plan with her should be to place a sentry where you want to fight, not at random locations where you shouldn’t/can’t fight them because your sentries will not do much if you’re not there to take advantage of the slow and extra damage. Her ult is really strong when placed in high ground because it has a huge range, will be able to soak bullets, and buy time.
Nobunaga (Sentinel) – ★★☆☆☆

- Uses the G3SG1 (DMR)
- His kit is all about placing down gadgets to enhance his performance
Honestly, I think Nobunaga’s kit is overloaded. A good Nobunaga can be easily the biggest threat in the defense team. With his gadgets, it’s an uphill battle for the attack team to push a site. His gun is also incredibly strong with the lowest recoil among the DMRs in the game, the gun also has a low spread so feel free to hip fire with it, and his gun can disrupt enemy ADS. Oh and his A1 is that he gets a shield whenever he is supposed to be downed, giving him a second chance.
You may choose to take A2 or A3, both are good but his A2, which reveals enemies who are within the gadget’s area so you can just place it in an entry point and the attack team can’t even use smokes to their advantage. If you choose A3, you can use it as a quick escape when the enemy is able to push towards you or you can use it to instantly be present in the other site, no need to rotate. His ult is a big counter to smokes and fog of war, a reversal for site retake.
Kokona (Support) – ★★★★☆

- Uses the CheyTac “Intervention” M200 (Sniper Rifle)
- Her kit is all about keeping the team’s HP healthy, and picking off enemies with her sniper rifle.
I do NOT recommend using her if your aim isn’t good, straight up. Her impact on the game is whether she can hit shots or not, her skills do not help much with her performance, she NEEDS to hit shots to be useful. If your aim is bad but you want to play a support, just play Celestia instead.
She might be a backliner but that doesn’t mean you should always stay from the very back, because of the paper mechanic, you can push with your teammates and still be hard to hit while in papermode. Her being in the enemy’s vision is already exerting pressure because of her sniper rifle threat. She is a battle medic that instantly picks up downed teammates hence why you want to stick with your teammates even as a backliner. In a Kokona vs Kanami situation, it is a viable strategy to buy heavy armor to avoid getting one-shotted by a bodyshot, added with using A3 on herself to tank a headshot from Kanami.
Yvette (Controller) – ★★★☆☆

- Uses the MP5 (SMG)
- Her kit is all about summoning Fei (Bear) and placing down ice fields to debuff enemies
Yvette’s impact on the game depends if she places down ice fields on the right places for her and her teammates to capitalize on. The ice field applies the “Fragile” status on enemies that will take +35% damage taken while inside the field. She can deny an entire push with a single good ice field placement. Her gun is good, but it is a monster when she shoots enemies with the “Fragile” status.
Don’t summon Fei before the attack team has even entered the site because they will just rotate or kill Fei. Plan where you’ll be placing down the ice fields on spaces you don’t want the enemy team to be taking and force them into unfavorable fights. You can go back to Yvette at any-time while having Fei summoned by just pressing Q, this allows you to put down ice fields while fighting. You and your team can shoot through Fei but the enemy team can’t, this makes Fei a bullet sponge and a moving cover.
Scissors
Ming (Duelist) – ★★☆☆☆

- Uses the AKM (Assault Rifle)
- Her kit is all about being tanky, draw aggro, and claim space
With her strong but hard to control rifle and armor steal passive, she can easily push and be a constant threat for the defense team. Her orb can be used to clear and flush out space while destroying deployables such as Michelle’s turrets, Nobunaga’s gadgets, and even the intervention grenade within range.
What makes Ming really scary is how fast she can push a space and contest it then continue fighting, you generally want to throw her orb where enemies are hiding behind cover and that is typically right on the other side of the choke point. She can also use the orb to catch out of position enemies and run at them with her team. You always want to be the first one pushing because of her strong sustain and firepower. Do NOT be afraid to go in. You should take her A2 as it will keep her pressure up while immediately gaining shield to keep fighting. She is simple to play with a highly effective kit which makes her a very potent character.
Aika (Duelist) – ★★★★☆

- Uses the AA-12 (Shotgun)
- Her kit is all about unrelenting force once she gets in close range
With everyone’s “beloved” AA-12, she is a threat at close range. Her ult being so strong and having 3 charges means that the moment she has ult up, the enemy team needs to respect her.
By having a shotgun, Aika needs to go from cover to cover, or flank. Unfortunately, since her shotgun has a really wide spread, this makes her shotgun really weak until point-blank range. Once an enemy gets close to your range, you can force them to make a decision using your fire cage whether to give up the space or fight you in a field where you have a slight advantage. The firenado is a big threat because you can throw it in the general location of your enemy and they’ll get caught in it then you can switch back to your shotgun and blast them while they are in the air not being able to do anything, this is especially strong indoors. The difference between her A2 and A3 is if you want to be more aggressive or defensive, with A2 asserting more pressure on the opponent that is inside the cage while A3 giving you more sustain to keep fighting.
Lawine (Initiator) – ★☆☆☆☆

- Uses the XM8 (Assault Rifle)
- Her kit is all about offensive gathering information for the team
Has the most consistent gun in Scissors that performs in any situation with pretty much zero-recoil. I wholly recommend her for beginners as she’s really strong in any map and her abilities don’t need a lot of skill to perform well.
Lawine can hold by herself well in fights but she isn’t as durable as a duelist so if you’re not alone, you want to be going second after the entry. Make sure to throw her knife in places where the enemy can’t easily shoot it. Her knife disappears shortly after if it does not detect anyone inside, A3 fixes this but her A2 gives you more value as it will slow anyone who tries to escape the range and gives you the opportunity to catch them. Typically, your teammates will want your knife scan after they’ve put down their smokes, or Reiichi’s wall so you might want to hold onto it.
Kanami (Initiator) – ★★★★☆

- Uses the Barrett .50 BMG (Sniper Rifle)
- Her kit is all about supporting teammates through buffs or debuffing enemies and gathering information while picking off enemies with her sniper rifle.
I do NOT recommend using her if your aim isn’t good, straight up. While her sniper rifle is very powerful, she doesn’t do much if she can’t hit shots. She has her scan but it’s not powerful and can be destroyed easily.
Kanami’s scans are best used when the enemy team is occupied with your teammates, giving it more time to be active or even last the entire duration if the enemy team doesn’t notice it in the heat of the moment. You may pick A2 or A3 depending on how the enemy team reacts to your scan. If your scan gets shot down immediately, you might want to go for A3 to instantly buff your teammates within the area. If the enemy is ignoring your scans, consider going A2 so they will get stunned. Use your ult to supplement your team pushing. She might be a backliner but that doesn’t mean you should always stay from the very back, because of the paper mechanic, you can push with your teammates and still be hard to hit while in papermode. Her being in the enemy’s vision is already exerting pressure because of her sniper rifle threat.
Meredith (Controller) – ★★★★★

- Uses the AUG A2 (Assault Rifle)
- Her kit is all about deploying sand fields to debuff enemies or block their vision
This sand cat is pretty weak in the early rounds but gets really strong later. Meredith’s gun is quite good, especially when you hit headshots. Her sand fields are strong because it applies debuffs on enemies within it where they’ll slowly get their hp drained until they leave and their reload speed takes a nosedive.
Using her aim-glide passive, she can fight from high angles and be annoying from the air. You do not want her to be the entry because you will get shot down quite quickly in the air. You can use papermode to glide while using her passive to avoid getting shot at just like on the ground and you can also double jump while using her passive. Most teams want her for her A3, which turns her sand fields into smokes. You want to be careful though as improperly deploying sand fields can be a detriment to your team instead of helping them. Her ult provides a “safe” area for your team to hide inside, a problem with this is that it’s very vulnerable to enemy scans, so watch out for scans after you’ve deployed your ult. You can also use her ult to block enemy vision so your team can take the site easier.
Reiichi (Controller) – ★★★★★

- Uses the SVD (DMR)
- His kit is all about blocking sightlines for the team to safely take space while picking off enemies with his DMR
I do NOT recommend using him if your aim isn’t good, straight up. Reiichi wields the strongest DMR in the game which can one tap someone in the head at round 1 then two taps after the initial round. He can be a detriment to the team if the person using him does not know what they are doing. He is strong in the early rounds but falls off later.
His main value is being able to deploy his umbrella with his active skill to make a massive wall that blocks vision but bullets can still go through, this skill alone can make or break a round for your team. Your goal when deploying his wall should be to give a lot of space for your team and little space for the enemy team, or just enough that your team can take cover behind the wall and push safely. The problem with his wall is that it will blind anyone who passes through the wall, this includes your teammates and yourself. Another problem is your team can be scanned through the wall which can leave your team vulnerable unless you have your ult up that blocks bullets. You’re mostly going to want to use his A3 along with his ult to be able to see through the wall when in near proximity while being protected.
Urbino
Fuschia (Duelist) – ★★☆☆☆

- Uses the SCAR-H (Assault Rifle)
- Her kit is all about making favorable situations to take 1v1 duels
The duelist that plays at her own pace. Despite having a really easy to understand kit, she plays differently than others in a way that she’s very slow. She excels at looking at the presented information before deciding to take the shot.
Fuschia most of the time will be standing back and observing the situation. You should ONLY be using her scan to gather information that you are lacking to take the next action. Play angles, move slowly, wait for an opportunity and strike. Pop your ult when you decide to go all-in. On defense, you should be getting A3 as soon as you can to allow yourself to do two things: To slow down an incoming push for your team to respond, and catch the attack team off-guard. A3’s slow debuff is really crippling and leaves them open to get shot at for a short duration. On attack, it’s up to preference whether you take A2 or A3 but A3 is great for catching someone on the defense team out of position, while A2 is good for forcing the opponent in a 50/50 situation if you are pushing with a teammate.
The 50/50 situation is when you are downed, the opponent has to either finish you and risk getting shot down by your teammate, or they shoot your teammate and risk you reviving yourself.
Baimo (Duelist) – ★★★☆☆
- Uses the M1014 (Shotgun)
- His kit is all about catching opponents off-guard while being hard to catch
The man. He is capable of completely steamrolling an entire lobby if he’s in capable hands and also the opposite with having no presence if the player is incompetent. He has earned the ire of many players because of how obnoxious his kit and shotgun can be.
Mostly played as a lurker on both sides, he waits for the moment the enemy’s back is turned and uses his high mobility to close the gap immediately to get the surprise attack. Baimo is the character that takes full advantage of the movement that’s available in the game. You should be careful of brighter players that will try to play around your game plan and catch you instead. Don’t force a fight where at least 2 players are fully paying attention to you.
Audrey (Sentinel) – ★★★★☆

- Uses the MG42 (LMG)
- Her kit is all about overwhelming firepower down range
Packs the biggest and most consistent firepower among the roster. Most new players might think that her mounted turret is all there is to her, but they’ll fail to realize that she has a really strong dueling potential and it’s all thanks to her royal shield.
Usually, you’ll use Audrey to mount up and use her turret to cover an entire sightline which is definitely effective in itself, but you’ll realize when you come across a coordinated team that a mounted Audrey is easier to fight than the one that takes advantage of the movement in the game. When dueling with her, you should be using ADS most of the time because the spread of her gun is atrocious. The royal shield is a different bar than your entire hp, making you free to peek at a DMR, and a sniper without getting punished heavily. You also have access to A1 which allows you to keep firing until you overheat or run out of ammo, you’ll be able to win most duels with it. Avoid mounting up in front of the enemy as you are stationary and they will gun you down before you finish the animation. Mounting in a good off-angle is also a valid strategy.
Celestia (Support) – ★☆☆☆☆

- Uses the FAMAS (Assault Rifle)
- Her kit is all about recovering armor for her team to keep them fighting
The easiest character to use and also the most powerful character in the game. With her current state, she can constantly give armor to her teammates to immediately get them right back to the fight. She also has an incredibly obnoxious flash with her A2. A lot of new people might underestimate her gun but it packs quite a punch and it is very consistent.
Most new Celestia players will most likely play her like a passive support, only pressing her skills and not doing anything else but that would be using the least of her potential. She shines when she helps in fights by taking another angle or swinging together with someone. You should be with the entry pushing, not at the back. You benefit the entry the most because you can keep restoring their armor, keeping them alive. You can take duels yourself because of her passive armor regeneration. You can also make cheeky plays by lurking or pushing someone then teleporting away with her ult when in danger. Remember to keep using her active skill off-cooldown as it increases the maximum limit of their armor including yourself.
Galatea (Initiator) – ★★★★★

- Uses the AKM (Assault Rifle)
- Her kit is all about sending clones and teleporting around to get better angles and confuse the enemy while gathering information
Currently the weakest initiator when it comes to gathering information because she’s also a lurker. The hardest character to set up properly as she’s really easy to mess up and easily punished. Even her gun is hard to manipulate as a beginner. Her power comes from being hard to catch with teleportation and a strong gun.
Best played with constantly changing strategies and not allowing the enemy team to adapt to your plays. Try to appear at unexpected places to keep catching your opponents off-guard. Don’t play too far from your team so they can capitalize on your plays. You only need to get a single pick, maybe more if they aren’t paying attention to you. Use ult on places you really have to fight and have your cards as spread out as possible. You can use your cards to present your opponent with a mix-up, have them think whether you’ll teleport to your decoy or not and catch them when you see an opening. If being too elusive and away from your team isn’t working, you can just play near your team and rely on her gun’s firepower.
Maddelena (Controller) – ★★☆☆☆

- Uses the HK G28 (DMR)
- Her kit is all about slowing enemies down and blocking them from accessing papermode
A very strong crowd control character. Maddelena can completely stop a push by firing her paint gun at choke points, her ult being able to activate an entire field that slows and not allow any enemy from using papermode which lets her team shoot at their enemies easily and a gun that is nothing to laugh at.
She is quite simple, apply paint anywhere you see an enemy then shoot them while they’re slowed and can’t go papermode. You can also use her paint right outside of the choke point to deny them from pushing or force them in a bad situation. On defense, save her ult for when the enemy team has committed to the push that they can’t easily escape. On attack, use her ult in site to force the enemy team to leave site and wait for retake while making preparations to defend.
Team Comp
If you want your team to have the advantage over other team comps, I advise you to follow the staple team compositions.
Defense
Michele – She is the go-to Sentinel for the defense side because of how powerful her sentries can be in hindering pushes. Her consistency also raises her value even more.
Celestia – A must-have on every team. The value she brings from just existing and pressing Q is already so massive and because maintaining your armor is really important, Celestia allows her teammates to be continuously active in fights.
Yvette/Maddelena – Depending on the map and preference, these two controllers are interchangeable. They make things easier for the team as they are really good at area denial. It’s also possible for the third slot to be a flex pick and skip having controllers if your team can handle without one.
Attack
Ming – Her being the only one in the game that flushes out corners and clears space with a single ability by force accompanied by strong firepower and sustain makes her irreplaceable for the attack side.
Celestia – A must-have on every team. The value she brings from just existing and pressing Q is already so massive and because maintaining your armor is really important, Celestia allows her teammates to be continuously active in fights.
Lawine – To the attack side, gathering information is very important and not as easy as the defense side, thus someone with a really strong scan and a consistent performance makes Lawine the prime candidate to be the team’s primary initiator.
Meredith/Reiichi – Attacking sites are unsafe and contain risks, having at least one person dedicated to making it much safer by blocking sightlines is essential to the team’s chance of success. These two are interchangeable based on the map and preference.
Throwable Utilities
The game has different utilities you can use outside of the character’s kit that you should pay attention to, especially at the character select screen as this greatly affects the outcome of each round. Make sure to have a good balance of throwable utilities between each player in your team.

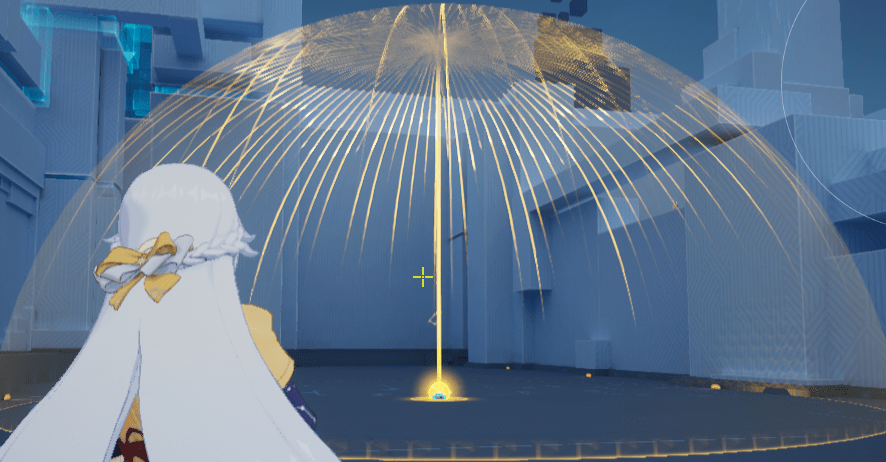
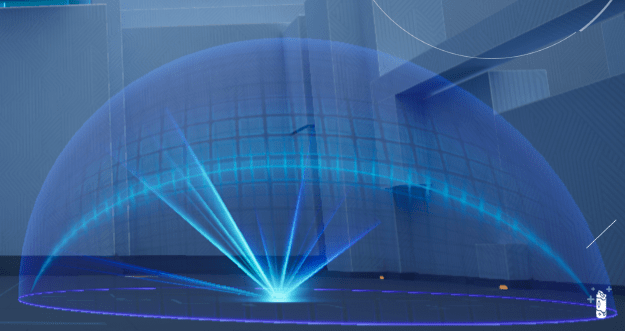
Interceptor – As the name implies, it’s a deployable that intercepts ANY utility thrown at it, it will block them if they hit its dome. The dome will be hard to see if it’s an enemy interceptor. If you’re inside the dome, you can throw utilities inside as long as it does not hit the dome. It has a time limit and can be destroyed. It’s really powerful when used correctly. Best to have at least 2 of them in your team but even having just 1 works.

Frag Grenade – It’s simple, powerful, and effective. Great for flushing out cover and clearing corners but it’s best used to finish off downed enemies. Every lurker should take them as they can be a way to guarantee a kill after knocking someone down.
Paint Grenade – Explodes on the ground immediately after bouncing once and spreads an area that slows and blocks enemies from using papermode. Great for catching enemies hiding behind cover slowing down pushes as they set up for an easy kill.


Wind Grenade – When it hits the ground, it creates a tornado after a short fuse that will force anyone within its range to fly upwards. Useful in flushing out cover and clearing corners but it’s used to completely stop a push in a choke point especially indoors to great effect.

Heal Grenade – Explodes on impact then gives a “Regeneration” status to any teammate inside its small field that lingers for a short time. The “Regeneration” status has a different duration time so as long as you touch the lingering field at any point in time, you will start healing for the set amount of duration.

Flashbang – Blinds anyone who looks at it after a duration. This does not take the character’s line of sight but instead, the player’s screen into account. Do not use this if your team is uncoordinated.

Smoke Grenade – Explodes on the ground immediately after bouncing once. Great for blocking sightlines to rotate, blocking vision when planting/defusing, or reviving downed teammates. Especially powerful when combined with a scan.

Tattletale Grenade – A niche deployable that sticks to any surface that notifies the user the amount of enemies that are within its area. It can be seen in the minimap and turns yellow when it detects something, and can also be seen by teammates. It emits a loud beeping sound so opponents can destroy it if they find it.


Be the first to comment