
The Basics
By Mebius.
This section should cover all the basic information regarding Aya and why it is profitable.
What is Aya?
Aya is considered the prime destination for farming relics and trading for platinum, offering Warframe players a lucrative opportunity with minimal effort. In this comprehensive guide, we’ll unveil the secrets to maximize your gains and ensure a steady stream of platinum income.
Understanding Aya’s Potential
Aya, a bustling hub in the Warframe universe, is known for its high value for all players, both newbies and veterans. It attracts numerous players looking to bolster their prime gear collection or acquire platinum through trading. Recognizing its potential is the first step toward optimizing your farming strategy.
Relic Farming
One of the primary reasons for someone to farm aya. For those who didn’t know, Prime Vault no longer exists within Warframe, which means the only way to obtain relics for vaulted Warframes is through the Prime Resurgence event. Which comes in different rotations that have new packs of prime sets of both warframes and weapons.
Where to Farm Aya?
Aya farming is not a new thing within Warframe but it has developed throughout the years. There are many ways to farm aya, which are:
- Opening relics packs (Syndicate, Open Worlds vendors, Teshin)
- Missions (aya can be found anywhere you can get a relic as a mission reward)
- Bounties in Open Worlds (Mostly high tier ones)
- Rerolling bounties (which is what this guide is about)
Syndicates and Open World vendors could be used for daily hand-ins for extra packs. But you can grind nothing since you have a limit.
Missions are not optimal either since the drop chance of Aya is too low.
We are now left with two choices: bounties and rerolling a bounty. Doing bounties could yield some profit, but the problem is the vast amount of time it will take to complete the bounties. Even if Aya’s drop chance is good in the end, it won’t be profitable.
Now, I’ve saved the best for the last, which is what we call bounty rerolling. It means we will reroll a certain bounty (Queing up a certain bounty) until we get the desired stages (which you will get to know later in the guide). The idea behind it is that you get super easy-to-do and fast stages so that completing the entire bounty won’t take more than 2 minutes for the average player.
In this Aya farming strat, we will do Tier-5 Cetus bounties. We are going to focus on 2 main bounties, these bounties can be found in two places, which are the huts in the Plains of Eidolons and from Konzu in Cetus, and they are:
- Capture the Grineer Agent (Not Capture Their Leader)
- Find the Hidden Artifact (Not Reclaim the Stolen Artifact)
Make sure to pay extra attention to the name and icon of the bounty because if you choose the incorrect one you will be rolling for ages and never find the perfect stages we are looking for. We want these stages in particular because they can have the following objectives in the same bounty, and all of these can be done super fast.
- Capture the target
- Find caches (that are on the surface and not in the cave)
- Assassinate
- Rescue
- Drone
Any other bounty will have at least one slow objective in it hence why we will not be rolling it.
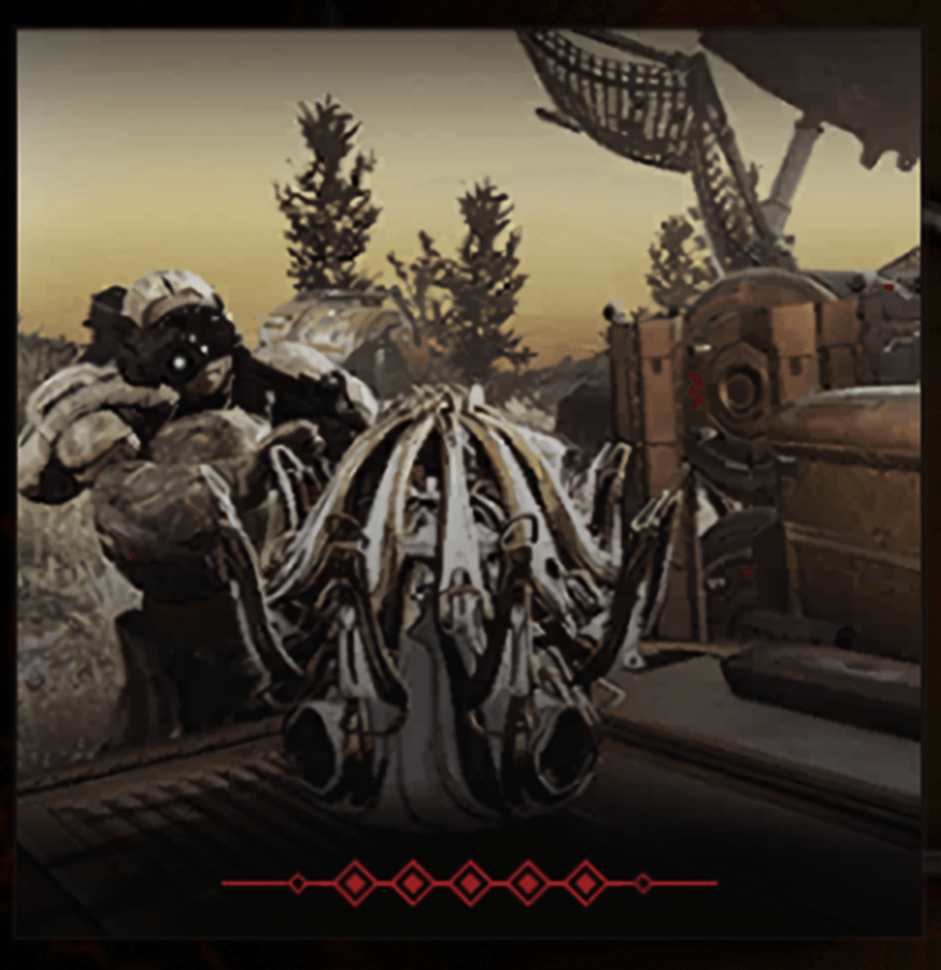
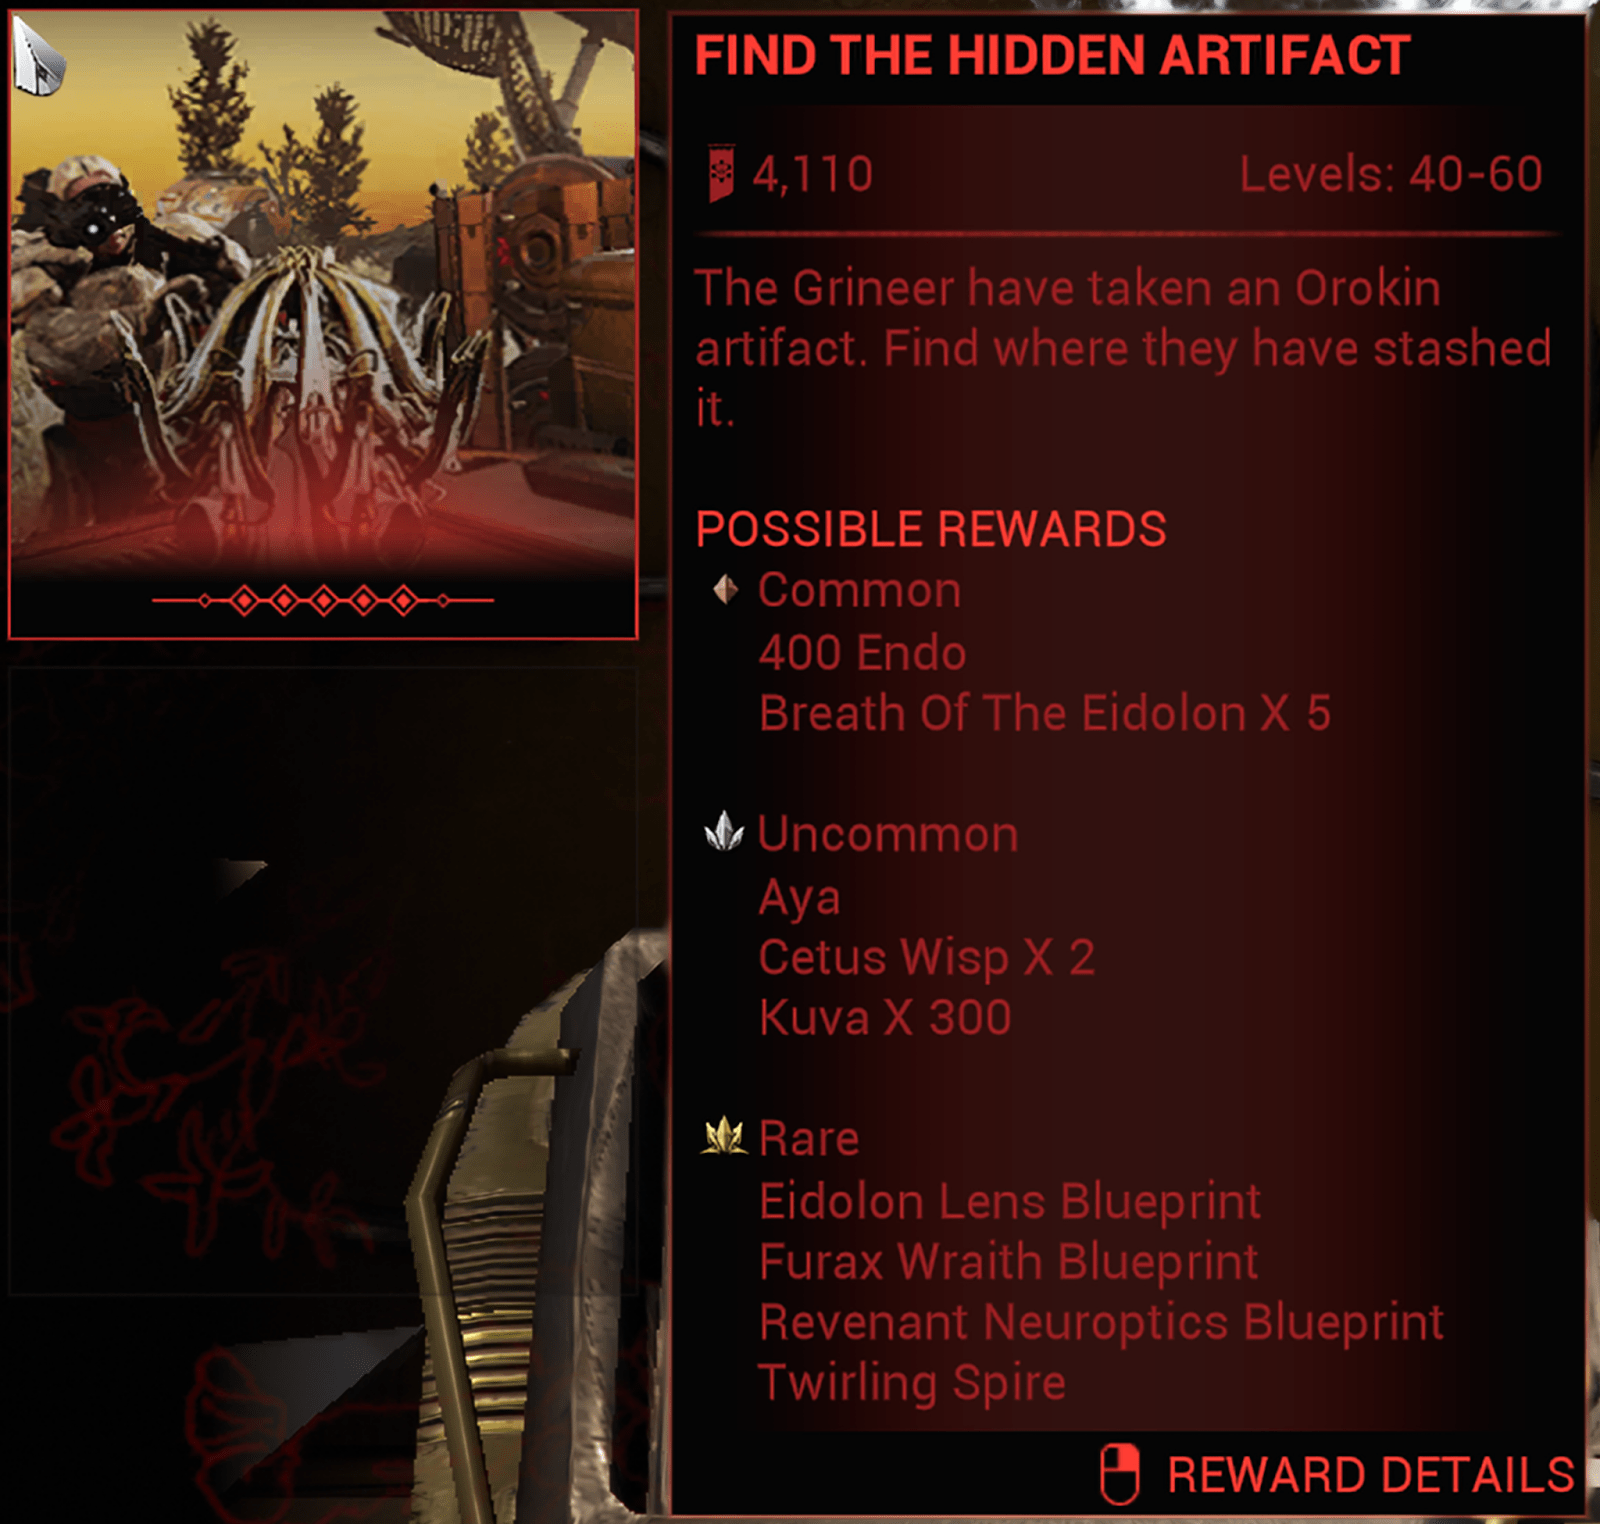
That’s the exact image you need to be looking for when looking for the bounty. If you see any other image in the huts in the Plains of Eidolon don’t queue up that bounty.
Builds
This section should cover builds.
Frames
Volt Strength
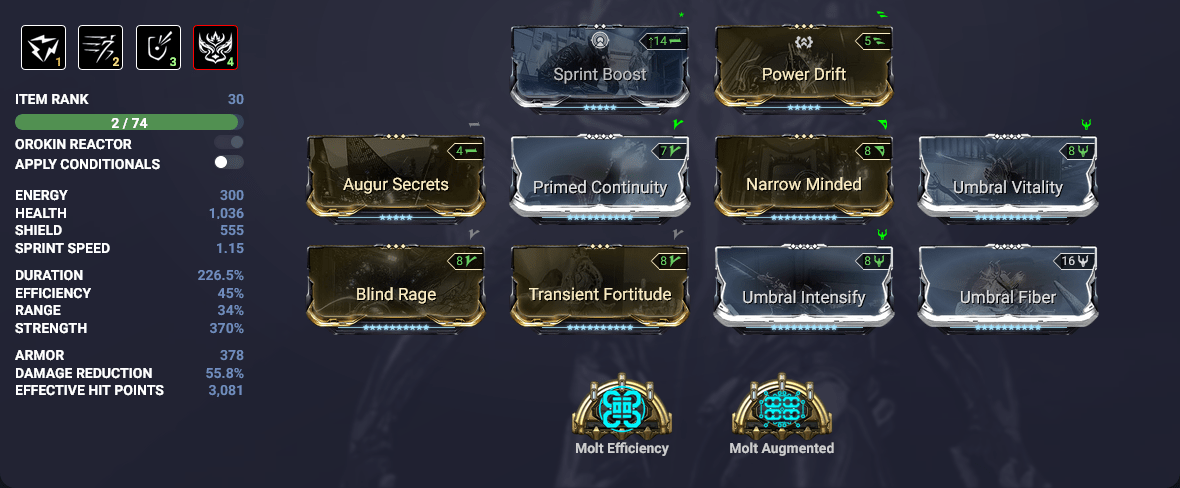
Duration
Duration is a personal preference. You can adjust your duration based on how fast you run.
Efficiency
NO effect on the build.
Range
NO effect on the build.
Strength
Extremely high power strength is required to allow you to kill any enemy, at any level, at any stage.
Other mods
Tri-Umbral mods for extra strength. Please note that the only mod that needs to be maxed is the “Umbral Intensify.” If you can’t fit them in your build, use Streamline for more efficiency.
Aura + Exilus
Growing Power gives you more strength, so you can do more damage with Shock Trooper and speed up the drones faster. You can also use Sprint Boost for extra flight speed. Power drift is used for slightly more strength. However, you may use Primed Sure Footed if you prefer.
Other Aura options:
- Power Donation
- Loot Detector
- Enemy Radar
Helminth
Nourish is nice to have for extra weapon damage. You can also use Empower and then speedbuff the drone after you get linked to Nidus. (If you are doing it solo, Nourish is better)
Archwing
We will use Amesha because “Warding Grace” (Amesha’s third ability) gives status immunity to Volt and allies nearby.
Volt Duration
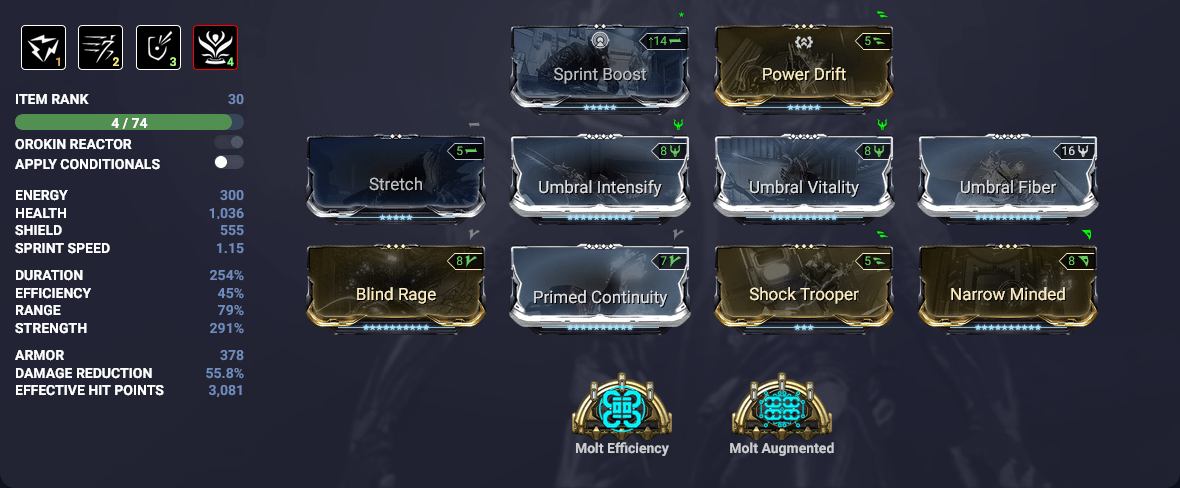
Duration
A big value of Ability Duration is used in order to support ourselves and also our squad members with Speed Ability Buffs lasting at least one whole Bounty Mission Stage.
Efficiency
NO effect on the build.
Range
We use Stretch so we have a bigger consistency to buff our squad mates with Speed Ability.
Strength
Helps with providing bigger Buffs values via Speed Ability and Shock Trooper, but helps as well by a small amount by providing a chance for extra drops via Dispensary.
Other mods
Tri-Umbral mods for extra strength and survivability. Please note that the extra survivability gained from them matters rarely in actual gameplay. Therefore, the only mod that you really need to max is the Umbral Intensify.
Shock Trooper is used to make us and also make the squad members able to kill faster enemies using Shedu, also it’s very good because the Electricity from it combines with the Toxin Mod from Shedu, creating Corrosive on direct hit as well.
Aura + Exilus
Sprint Boost provides a slight boost for Sprint Speed (which also affects Archwing Speed). Power drift is used for slightly more strength. However, you may use Primed Sure Footed if you prefer.
Helminth
We use the Dispensary here because it makes us use fewer Ammo Pads and it can make us even use no ammo pads, if we are using Akarius, depending on how much we are using it; it makes us use fewer Energy Pads.
Keep in mind that the drops generated from the Dispensary are individual, meaning each squad member benefits from the same amount.
Archwing
We use Amesha because “Warding Grace” (Amesha’s 3rd ability) gives status immunity to Volt and allies nearby and also because “Watchful Swarm” (Amesha’s 1st ability) is a very good defensive tool as well that can hinder enemies from disabling your Archwing. You can have “Watchful Swarm” active on yourself and also on an Ally at the same time.
Currently, despite what the wiki states about blocking all instances of damage, including area-of-effect explosive abilities, this doesn’t always apply. Enemies can still sometimes disable your Archwing even if there are charges left, indicating that the ability is still active.
Nidus
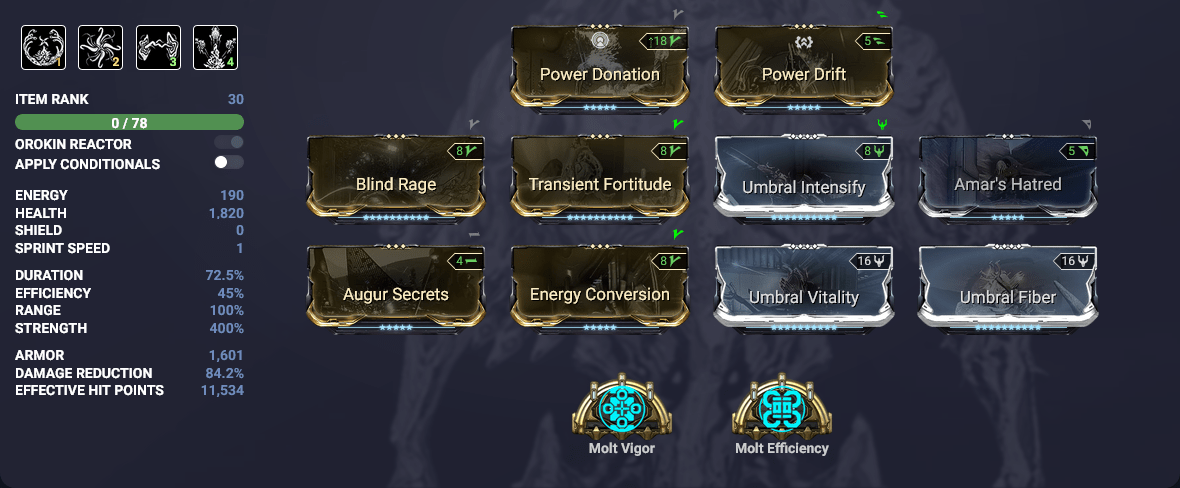
Nidus is purely for buffing, so put as much strength as you can. When it comes to the umbral mods, you only need to intensify to be maxed; the other two mods (umbral fiber & umbral vitality) are only there to give set bonuses so they can be unranked in order to save yourself capacity.
Duration
No effect on the build.
Efficiency
No effect on the build.
Range
No effect on the build.
Strength
Extremely high power strength is required to buff Volt, boosting the drone as much as possible.
Aura+Exilus
Power Donation is needed for the whole squad to get more strength.
Helminth
Empower for more strength.
Nova
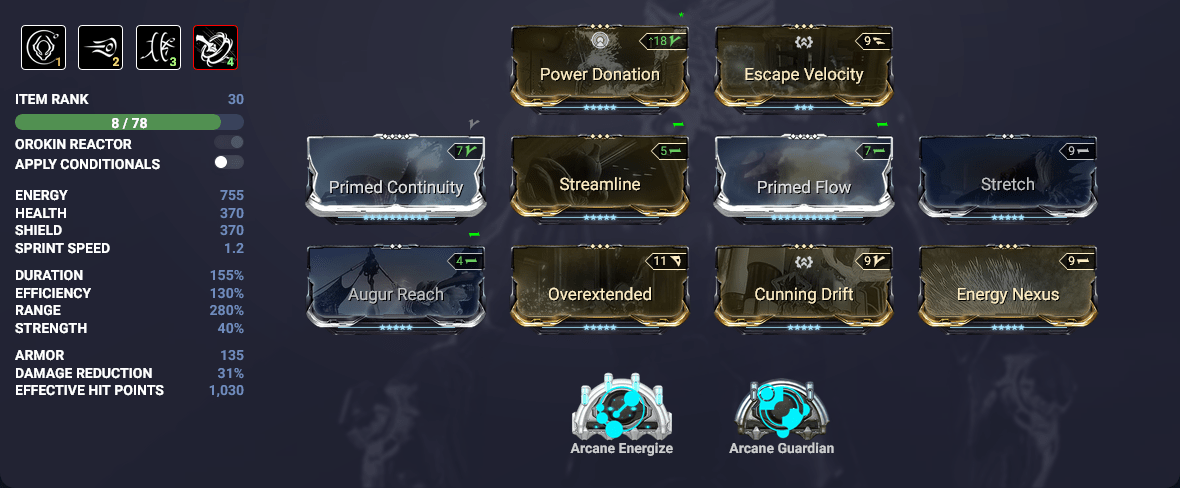
Duration
You want to have at least 100% duration, if you go negative duration your nova portals will disappear fast. so make sure to be close to 100%.
Efficiency
QOL for nova when placing portals.
Range
As much range as you can possibly get 280% is the preferred value.
Strength
No effect on the build.
Aura+Exilus
Sprint Boost to have extra flight speed. Power drift is used for slightly more strength. However, you may use Primed Sure Footed if you prefer. Cunning drift is a good option as well.
Other options:
- Power Donation
- Loot Detector
- Enemy Radar
Helminth
Wrathful’s Advanced is used to make you sometimes be able to re-positionate yourself very fast to put a portal/portals in a better place that you couldn’t do that fast if you didn’t have this ability.
Wisp Build
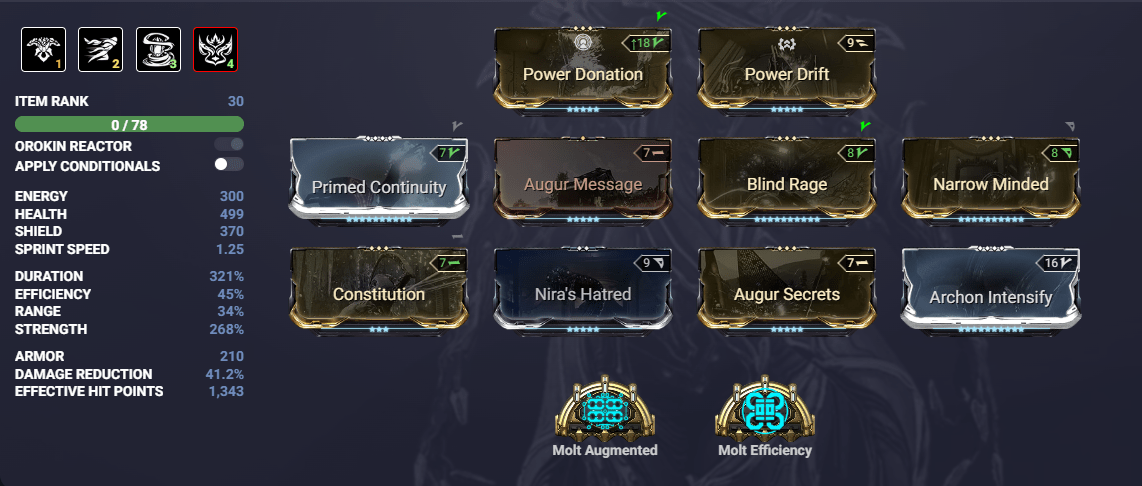
Duration
You would want max duration.
Efficiency
No effect on the build.
Range
No effect on the build.
Helminth
Empowered for more strength. Nourish for energy regen and viral damage. Eclipse for more damage.
Weapons
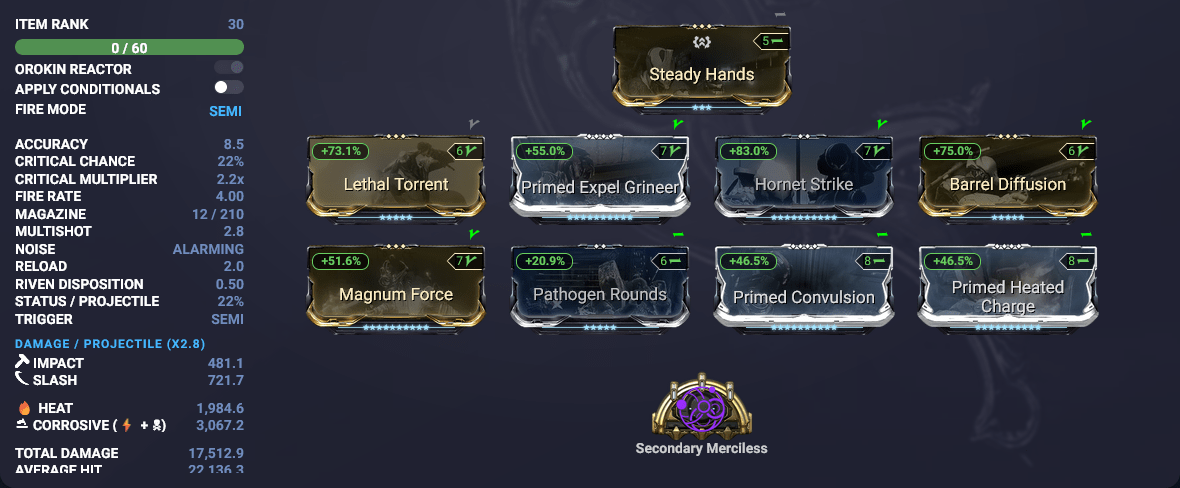
Shedu
Shedu is your primary DPS weapon for quickly clearing mobs.
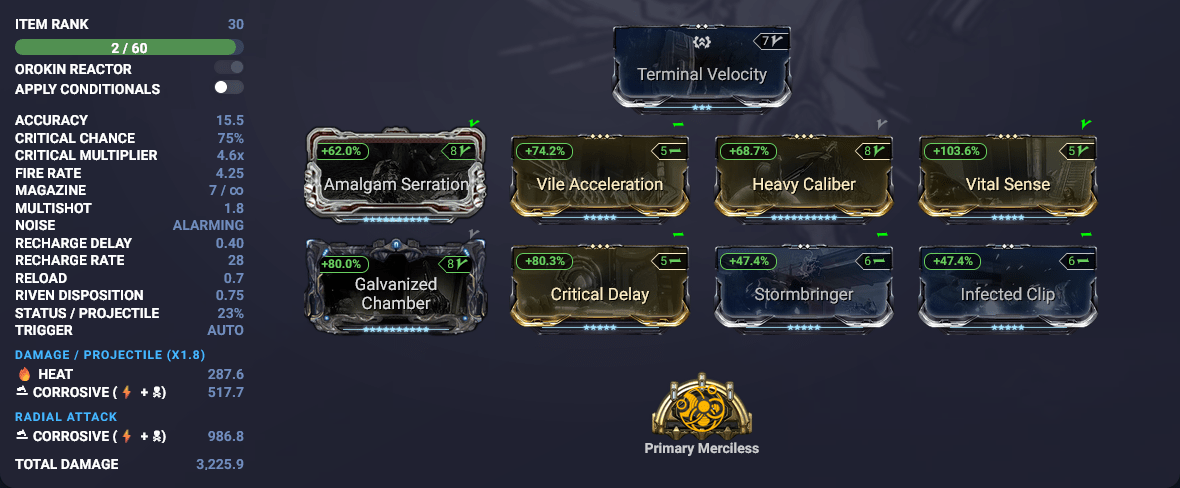
Laetum
Any single target secondary weapon works. Laetum works very well thanks to its incarnon option.
Melee
Sprint Speed Bonuses from Incarnon Weapons have no effect on Archwing. Hence, the only thing you need from a melee weapon would be attack speed, which saves you from slow slam attack animation speed.
However, different weapon type has different slam animation speeds, and dagger has one of the fastest slam animation speeds. You may choose to use any melee you want, but having a dagger is definitely a good QoL, considering most people can’t perfectly cancel slam animation from rolling.
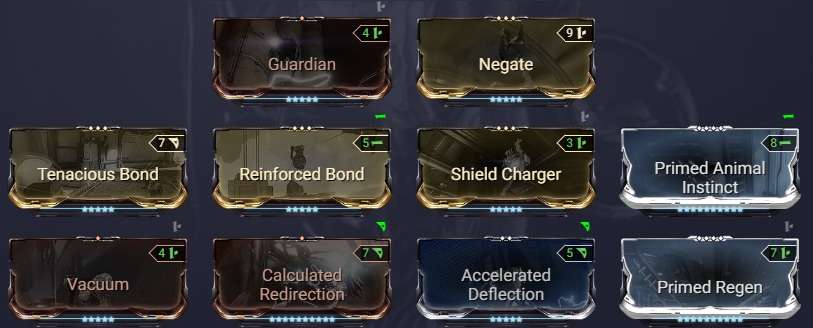
Wyrm Prime
Any sentinel works. But [Negate] gives you status immunity, so it is the most ideal sentinel for this run.
Shedu vs. Kuva Tonkor + Akarius
Shedu has infinite ammo, unlike the others. Shedu has a much higher base projectile speed than the others but lower damage per projectile. Shedu can’t kill Grineer’s normal enemies and turret types with one trigger pull. However, due to its high fire rate, Shedu can still kill enemies quickly despite its lower damage per projectile. The others can kill with one trigger pull, assuming all projectiles hit without any buffs.
Shedu has a slightly smaller base AOE damage radius than the others. Although you can equip a mod to increase Shedu’s base AOE damage radius, it doesn’t actually increase it. In contrast, mods for Kuva Tonkor and Akarius significantly increase their AOE damage radius.
Akarius is the most optimal for time and rewards due to its larger AOE damage radius and ability to kill with one trigger pull, provided you don’t miss due to enemy movement or distance. In situations where precise aiming is difficult, Shedu is more optimal since it can kill enemies without needing to move closer. This is especially true for killing Grineer enemies on Tusk Bolkor or Tusk Firbolg. Even though Akarius has homing projectiles, you can still miss them if your aim isn’t perfect.
Run Procedure
Gathering Your Squad for 4 Man Squad
Before you start, you need to decide on the team composition you want to run. You can choose between two compositions for your squad, depending on how you want to handle the drone phase (which is the stage that slows down the run the most).
First Composition
You will use two different Volts: one for duration and one for strength, Nidus and Loki. Why this composition, you might ask yourself? The idea is for Nidus to buff the strength Volt to speed up the drone phase. The strength Volt will run low duration just to have enough duration for the Volt speed buff to last long enough for the drone to reach the destination.
The second Volt, which is called Volt Duration, refers to the Volt whose job is just to speed buff the rest of the squad (Nidus and Loki). Loki’s job is simple; their main role is to help when the drone gets stuck due to weird in-game geometry using his third ability.
Everyone in the squad has their main role as described above. Once everyone has done their role, they don’t just AFK for the rest of the bounty; they have to help the Volts. Please note that the more people who contribute to the run, the faster you will finish the bounty and the higher the chances for the squad to earn more Aya. Using this composition, you can cut down the drone phase to 30 seconds for average players.
Second Composition
You will have 1 Volt, 1 Nova, 1 Wisp, and 1 Loki. The reason behind this composition is that Volt and Wisp will ensure that the entire team has an insanely high flight speed to speed up the missions, while Nova will have the main role of teleporting the drone to its destination. Loki can also assist Nova in teleporting the drone, especially in spots where it may be challenging for Nova to do so. Please note that it can be somewhat challenging for Loki to teleport the drone if he experiences desync issues with the host.
Also, note that the more people who contribute to the run, the faster you will finish the bounty, increasing the chances for the squad to earn more Aya. Using this composition, you can cut down the drone phase to 10 seconds for players who are cracked with Nova. However, be aware that running this composition, especially with Nova, can be challenging. If the nova player is not good however it can be slower than using the first composition.
Third Composition (Advanced)
Here you will duo the whole run, the best composition to have for a duo currently is Volt and Nova. Volt needs to make sure that Nova is always buffed for giga flight speed and Nova will take care of the drone. Depending on how good the Nova player the drone can either be given the Volt speed buff or not.
On the last stage the host should be in the tent waiting for the other player to finish the stage, even if its a cache stage. Honestly if you are confident enough to run a duo you should be already aware of how the bounty work
Important: As long as the host is not the Nova or the Loki, you can change your composition during the bounty cycle. So, don’t be afraid to try out the more challenging composition, and if it doesn’t work, you can always change the compositions whenever you finish the current bounty.
Please note that the host can’t change their role, which is why it is preferred for anyone rolling to be the Volt (duration), but it is not a must, so do whatever you like.
Getting the Correct Missions
Anyone in the squad can perform the following steps to reduce the time it takes to find the perfect stages. Since anyone can be a host, you can pick any role, look for the bounty, and start rolling the stages.
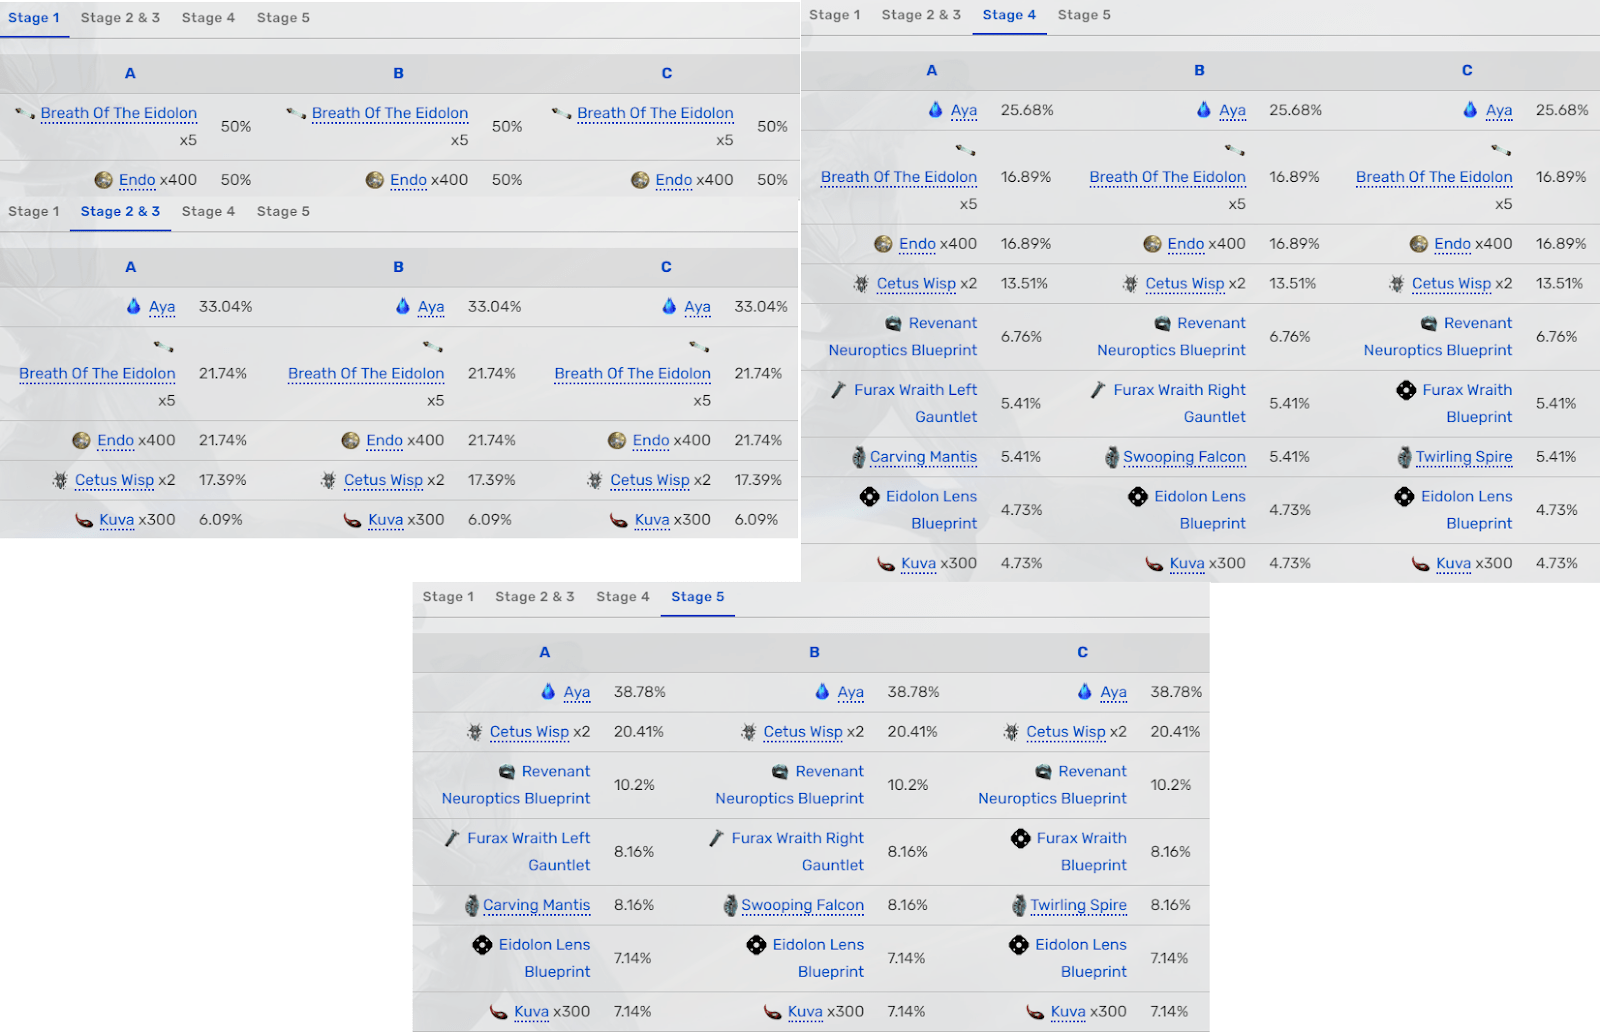
- Start a tier 5 bounty from Konzu in Cetus and enter the Plains of Eidolon to force all bounties in the Plains to be tier 5. The reason for this is the insanely high chance to get aya as a reward at each stage. The picture below is up to date with the bounty rewards.
- Once you load into the Plains of Eidolon, skip the dialogue with either Nightwave (or a random voice message in your mailbox if there is no Nightwave). Please note that this is very important, and only the host can do it. Every time you skip the dialog, you are not only getting more quiet time but also saving yourself, on average, 10 seconds each time.
- Fail the mission by going to the mission location and flying away from it thereafter, make sure to to be close to the ground after you fly away from it because otherwise it might not trigger the abandon bounty timer.
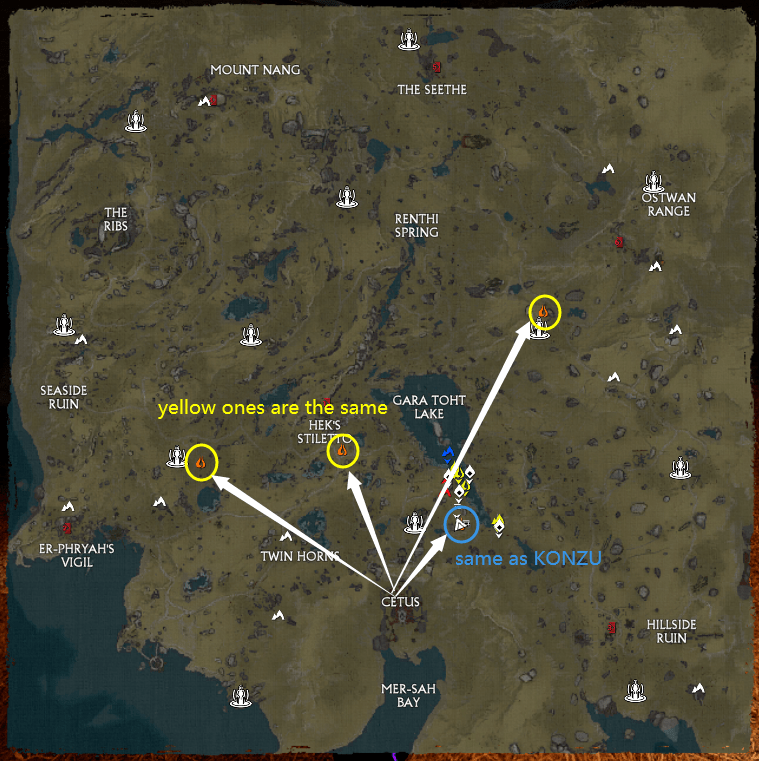
- Now, go to the tent marked as blue in the image below. If you see Capture the Grineer Agent or Find the Hidden Artifact, then proceed to step #5. If you cannot find it, go to the tents marked in yellow and look for them. The Yellow tents have different bounties than the one from Konzu (blue tent), make sure to check them all. If no tents have the correct bounty, you will have to go do something else and wait for the next bounty cycle.
- Since we abandoned a tier 5 bounty earlier, all the bounties in the tent should be tier 5. Tier 5 has the highest Aya drop rate. After you get Capture the Grineer Agent or Find the Hidden Artifact, check for the stages listed below (they don’t have to be in a particular order).
Capture the target:
- Find cache (preferably not in a cave; cave cache is doable but requires more effort)
- Assassinate
- Rescue
- Drone
If you did not get all of them, fail the mission and check other tents to see if there are any other Capture the Grineer Agent or Find the Hidden Artifact bounties. If there are not, go back to Cetus and restart from the first step.
- After you have gotten all of the correct stages, complete the bounty and go back to the tent where you accepted the bounty, then proceed to invite your squadmates. The tent will have the same stages in the exact same order, and it will never change unless you pick up a different bounty
Procedure
Full-run demonstration video:
As you can see, you can run the whole bounty on your own, and you don’t need a squad to finish it off, the perks of having others with you doing the bounty are the following:
- Faster cache stages (more people looking for it)
- Faster drone stage (since you can either use a Nova or a Volt & Nidus to speed the drone)
- Faster stages in general since others can start doing the stages without having to be slowed down by dialog-skipping
- More chill and can be fun if you guys are in a voice channel.
The videos above show how to pick up the bounty and how to run it even for solo players. When it comes to the squad, it is a little bit different. Basically, in the squad, everyone has two roles: the first is their main role, depending on what frame they pick, and the second is helping with the bounty stages.
The main roles are the following:
Duration Volt
Your main role is to make sure everyone has your second ability at all times in order to fly around faster. The best time to do so is before the bounty starts, whenever you finish the rescue target stage as well since everyone will be close to each other in the circle.
Important: Do not speed the drone, as this will overwrite the strength volt duration and cause it to overshoot its target. You can buff the drone, but only if the nova in your squad (if you have one) agrees to it because giving the drone speed can make it very difficult for the nova to place teleports.
Strength Volt
Your main role is to use the ability called Empower and then speedbuff the drone after you get linked to nidus. Make sure to not extend your buff duration for the drone by refreshing it. Your second role is basically to help with bounty.
Nidus
As a Nidus your main job and role is to link to the strength volt for the drone phase, make sure to immediately rush to the drone spot as fast as you possible can, then you will dash to proc madurai “Sling Strength” which will give you 40% extra power strength for your link, then you use empower ability, then you proc the arcane called “Molt Vigor” and lastly you link to volt. This should give volt around 120% link strength. Your second role is basically to help with bounty.
Nova
If you choose nova, good luck, you need to be comfortable with using teleport because it is your most important alone. You alone can speed up the bounty time to an average of 1m30s but only if you are good with your teleports. It is also up to you whether you decide if you want the drone to be getting speed buff or not since you are the one who is gonna teleport the drone. Your second role is basically to help with bounty.
Wisp
Your main role is to make sure the whole team gets your mote buffs.
Note
As a host, you can and should skip voice lines from Konzu or Lotus whenever you start a stage or the bounty itself. By doing this, you will be saving yourself a great amount of time and even headaches. You can skip these dialogs by either hitting the nighwave tab in the menu or playing any sound message in your inbox.
Useful Tips
Enemy Highlights
Enabling the enemy highlights option will help you detect enemies around you.
Highly Recommended
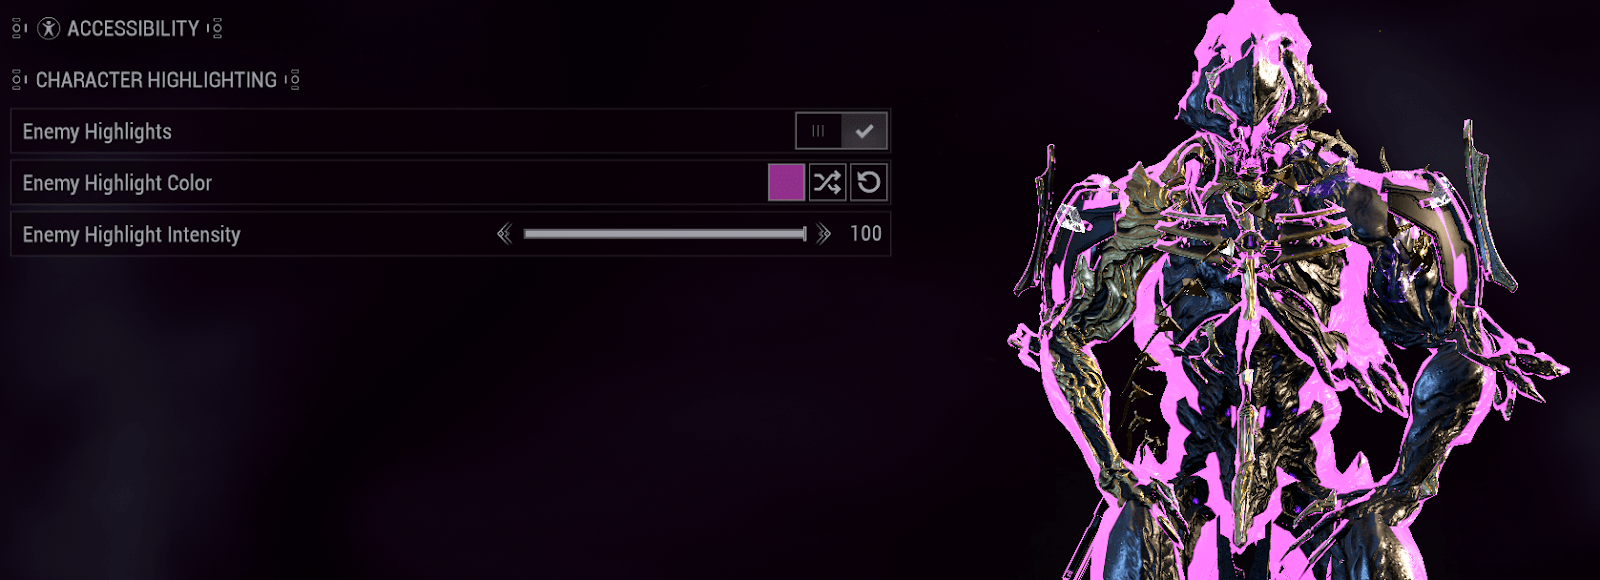
Enabling Enemy Highlights Settings Option, choosing Pink or Purple Color, making Enemy Highlight Intensity Settings Option 100 value, makes you detect enemies easy.
Enabling Ally Highlights Settings Option makes you see the Rescue Target, the Active Drone, the problem is, it doesn’t make you see the Fallen Drone which sometimes even that it always spawns inside in the middle of the yellow circle, it might take a quantity of time to find it due to environment POV.. This is why enabling this Settings Option won’t help you.
Rain
Sometimes in Plains of Eidolon rain can appear. During the rain you might have lag, because this makes the game consume more resources than when isn’t raining. With this being said, if you have a very good/good PC. then you should not have lag, but if you don’t then you will highly have lag.
Sadly, you can’t disable rain from Settings.
Gameplay-Related
General
Don’t kill the enemies that spawn on drone phase, one of the squad members, usually Nidus, can stay behind with these enemies so that they don’t despawn, once the assassination mission counter starts you can then proceed to kill these enemies. This will save you a lot of time and cut down on bounty completion time.
You can cast Speed Ability mean while you are in the air. A good method to do this is to use your Archwing, fly at a decent distance from the ground to you, use one Melee Attack, cast Speed Ability, activate Archwing.
You can’t capture the Capture Target in Archwing, but you can press Capture Target Option when you are in Archwing, this will remove you from Archwing then capture the Capture Target.
One Squad Member should capture the target (at Capture The Target Bounty Mission Stage) meanwhile another Squad Member should be in Archwing protecting him via Watchful Swarm then via Warding Grace.
Excluding some exceptions that appear in specific situations, all Squad Members except the Host must go to do the last Stage of the Bounty Mission, meanwhile Host must be in the tent with the desired bounty mission before the last bounty mission stage ends, to start as soon as possible the next same bounty mission.
Sometimes, one cache can be inside a cave, near the entrance of it (if you are playing the desired Bounty Mission). To be the most optimal, only if you are in a squad of 3 players/a squad of 4 players, I recommend you to talk with your squad members, then nominate together a player to go (until the Current Bounty Mission Rotation ends) to search near the entrance of a cave, when is a cave inside the Caches Stage’s circle, to find then open a Potential Spawned Cache.
If the Cache spawned inside a cave, it will always be near the entrance of it. Though, be careful, some caves have multiple entrances. Therefore, the Cache can spawn near any of them.
There are some caves in which a Cache can’t spawn.
To be the most optimal, nominate together the players that do the Caches Bounty Mission Stage, to split and take each one a part of the Bounty Mission Stage’s yellow circle to find then open a Potential Spawned Cache/multiple Potential Spawned Caches.
Nominate together a player to go (until the Current Bounty Mission Rotation ends) to capture the Capture Target.
Nominate together a player to go (until the Current Bounty Mission Rotation ends) to protect the player (via Watchful Swarm then via Warding Grace) that captures the Capture Target.
In these cases, both nominated players that go to capture the Capture Target, to protect the player that captures the Capture Target, are also going to deplete the Capture Target’s health bar, together.
Nova:
If the drone has a volt speed you would want to be like 50m ahead of the drone and then start placing your portals, otherwise it will be very difficult to catch up to the drone.
Make sure to place a portal or two facing the ground at the end destination mark so that the drone doesn’t overshoot its destination.
When placing portals you can aim glide to chain the portals, make sure to place ports at the ground and not too high above the ground.
Volt:
Make sure to use your second ability at the end of the drone stage and rescue one, as well as the start the bounty to make sure everyone has flight speed at all times (This applies to both volt strength and duration one).
For the volt duration make sure to use your speed every time you get linked from nidus since then everyone in the squad will have giga speed with giga duration.
Nidus:
You can link to the volt whenever you want, but you should link at the end of the rescue stage, start of the bounty and once the drone stage finishes.
Known Bugs
1: Drunk Drone Bug
During the drone stage, sometimes, the drone speeds past the marked area and travels around the mark, not going for stage completion.
There is a reason for this: Speed. Yes. Speed. We want to speed the drone so it will arrive at the mark faster, but too much speed also makes the drone miss the mark, speed past it, and AI then tries to resets the drone’s position, makes it go to a certain spot, hover there for a few seconds, then sends it towards the mark again. This may go on for a few times until the drone hits the mark and completes the stage.
What can you do? Time your Speed buff. Cast your speed early and time it so it will end right before the drone arrives at the marked location. This way, the drone will slow down, and it won’t miss the mark.
2: 2H Bounty No Reward Bug
There is currently a bug that makes the clients no longer receive bounty rewards. They get the reward completion screen show up, but instead of the reward it just says stage completed.
When does it happen? It depends on the Host. The moment the host enters the plains, around 2 hours after that, the clients stop getting rewards.
How to fix it? You need to leave the squad, and the host needs to invite you again to the squad. This way you will start getting rewards again.
How to rejoin? ESC > Hover your cursor on your profile > Leave squad (do not abandon the mission, only leave squad) > Leave the plains from gate > go back to orbiter > Rejoin with the new invite from host.
Alternatively, you can rejoin by directly ALT+F4 and reopening the game as well. You will be asked to reconnect to the squad after your login. But this sometimes doesn’t fix the no reward bug, so the other method is suggested.
Note: You will lose all rewards if you abandon the mission. But if you leave the squad, or ALT+F4, you will keep all rewards until the last stage is completed.
3: Tridolon Can’t Rejoin Bug
If, during the aya run, clients kill all 3 eidolons, they won’t be able to rejoin the squad after the bounty bug.
What to do? Don’t kill the 3 eidolons before the bounty bug. You can kill them after rejoining though.
4: ESC Menu Locked Bug
Sometimes, if you interact with the tent console, prisoner or drone too fast, for some reason it locks your ESC menu. You won’t be able to open your escape menu, thus you won’t be able to force start bounties or do nightwave skips.
How to fix it? You can try dying and reviving to fix this. Wait for the down timer to end before reviving though. Even then, sometimes this doesn’t get fixed. At that point, there is no point continuing the run so you can consider ending the run early. Sad but it is what it is.
How to avoid it? You can still interact with them fast, but just don’t use macros or be super fast while doing it, or don’t spam X or Y near a tent, drone or prisoner.
5: Can’t Interact with Prisoner or Drone Bug
Same as the #4 bug, if you do it too fast, a prisoner sometimes gets teleported to around 50m away, and you can’t interact with it to do hacking.
The solution is the same as #4.
6: Wisp Motes Duration Bug
We need as much duration for Wisp buffs as we can. This way volt won’t need to come back more often to renew the buffs.
But sometimes, the motes get bugged. From 100+ seconds of buffs, it starts giving 40 seconds buffs instead.
How to avoid it? As wisp, do not try to get buffs from the motes IN THE ARCHWING. If you get the buffs while you are in the archwing, your archwing’s duration is applied on the motes, and it gets down from 100s to 40s.
How to fix it? Get out of archwing, wait for the buff to end or fall to water to lose the buff, go to the motes in your warframe, not your archwing. This fixes the motes to have your warframe’s duration again.
7: Drone Teleports to Random Places
Same as #1 bug, if the drone moves too fast, it may fall into the water. This sends the drone to random locations on the map. It even teleports to caves sometimes.
How to avoid or fix it? Just pray to god it doesn’t happen. No fix.
8: Falling Off the Map after Hacking
During the hacking process, the animations correct your position. You are positioned right in front of the console, prisoner, or drone. Sometimes, at this position, your feet stay under the ground. After the hacking is complete, you start falling because you’re technically not touching the ground.
How to fix it? Enter your archwing immediately if you see yourself falling. You can pass through the layer in your archwing and go back to the surface again.
9: Drone Gets Stuck Bug.
We have a Nova in the squad to free the drone if this happens, but sometimes, we can also fix it ourselves.
How to fix it? Distance yourself from the drone around 100-150m, and the drone starts moving again and gets out of that spot.
But! This isn’t a certain fix. In some places, the drone is stuck so badly, that only Loki/Nova can unstuck it. This is just an option you can try before calling for Loki/Nova to help.




Be the first to comment