

Koumei Build Guide with Tips (2026)
Passive
Every 60 seconds, one of Koumei’s weapons, Primary, Secondary, or Melee, gains an extra random Status Effect on hit.
- Weapon rolls follow a predetermined rotation selected when first loading into the mission.
- The rotation cannot be manipulated by unequipping weapons to skip rolls.
- The effect can trigger only once per shot and is not affected by Multishot or Punch Through.
The Five Fates
Casting an ability rolls Koumei’s Five Fates, represented by five six-sided dice above her ability icons. The numbers are added together to determine the effectiveness of her abilities, with a possible total from 1 to 30.
Shadow’s Trinity
Rolling at least three 6s triggers Shadow’s Trinity, which amplifies Koumei’s abilities with an additional effect.
The chance of triggering Shadow’s Trinity increases from 3.55% to 10%.
- Kumihimo: Applies one stack of every Primary and Secondary elemental Status Effect while dealing increased damage.
- Omikuji: Immediately rewards a Decree.
- Omamori: Grants Invulnerability until all charms are consumed. Recasting while at five or fewer charms also removes the Invulnerability.
- Bunraku: Applies the maximum possible number of Status Effects, up to 30, and causes Koumei to cast the ability behind herself as well.
Kumihimo
Koumei creates a Weaver Star that travels toward her reticle while placing elemental threads. The Weaver Star and its threads can apply either a Primary element, such as Heat, Cold, Toxin, or Electricity, or a Secondary element, such as Gas, Corrosive, or Viral, when they contact enemies.
Kumihimo cannot inflict:
- Impact, Puncture, or Slash
- Void
- Tau
- Non-elemental Status Effects such as Microwave or Lifted
When the Weaver Star collides with a surface or enemy, it creates a 3-meter area of effect that deals a random elemental damage type and applies a random number of Status Effect stacks between 3 and 5.
Damage dealt by the Weaver Star and its threads is equal to 25x the total rolled by the Five Fates. Shadow’s Trinity increases this multiplier from 25x to approximately 2750x.
The damage multiplier increases with Ability Strength.
Kumihimo can create a maximum of 30 threads. At maximum rank, this corresponds to 200% Ability Range. Creating additional threads removes the oldest thread.
A Range value of approximately 145-190% is recommended to avoid missing enemies close to Koumei.
Tip: Aiming down sights causes all threads to become invisible to Koumei, reducing visual clutter and making it easier to see the surrounding area.
Omikuji
Koumei draws an Omikuji that creates a random challenge during the mission. Challenges require killing a certain number of enemies while following a specific condition.
When Koumei hits an enemy while fulfilling the challenge’s conditions, there is a 2-second window during which kills made by teammates count toward the Omikuji challenge.
Each cast from the first through the eighth increases the ability’s cooldown duration. This increase remains even if the challenge is declined.
The number of required kills scales inversely with the Five Fates roll. Higher rolls require fewer kills.
The scaling cooldown is not affected by Ability Duration or Ability Efficiency.
Koumei can decline a challenge by holding the ability cast, which immediately puts Omikuji into cooldown.
Challenges appear as bonus side objectives below the minimap.
If the Five Fates roll has a total below 12, Koumei receives a random penalty that remains active until the challenge is completed or declined.
Tip: Operators can benefit from Decrees and can also help complete Omikuji challenges.
Decrees
Completing an Omikuji challenge puts the ability into cooldown and rewards a random Decree that remains active for the rest of the mission.
Each reward has a 15% chance to be Rare. A Rare reward either provides a Rare Decree or grants two levels of a Common Decree.
Koumei does not have access to all Duviri Decrees when playing outside Duviri. When using Koumei in Duviri, her randomly awarded Decrees are converted to the Duviri format, allowing her to select one of three options.
Examples of Decrees available to Koumei include:
- Fearsome Bonanza
- All Loot Decrees
- All Spiteful Decrees
- Scornful Cast
- All Roll-related Decrees
- Close Contagion
- Baneful Harmony
- Bountiful Harvest
Challenge Conditions
Possible Omikuji challenge conditions include:
- Headshots
- Kills while sliding
- Kills while wall latching
- Kills while Aim Gliding
- Kills within 10 meters
- Kills from at least 20 meters away
- Kills while airborne
- Kills while affected by a specific Status Effect
Kills while Aim Gliding count when the glide was started by jumping from a wall.
Challenge Penalties
Possible penalties include:
- Heat
- Toxin
- Puncture
- Energy Drain
- Increased Shield Recharge Delay
Heat can hurt EHP/Persistence setups, Puncture reduces damage dealt, and Toxin can interfere with shield-gating setups.
Penalties are not applied to Operators, making them useful for completing challenges when necessary.
Energy Drain and increased Shield Recharge Delay scale inversely with the Five Fates roll. Lower rolls result in stronger penalties.
Omamori
Koumei surrounds herself with sacred charms equal to the total rolled by her Five Fates, from 1 to 30.
While Omamori is active, Koumei has a 50% chance to negate incoming damage, converting it into healing. The healing has a 3-second cooldown.
Omamori can be recast while active when Koumei has 5 or fewer charms.
The 3-second cooldown applies only to the healing effect. The 50% chance to negate damage remains active as long as Koumei has at least one charm.
If Koumei is already at full Health when the effect activates, she instead gains Shields, which can overflow into Overshields.
Bunraku
Koumei binds enemies in front of her within a 170-degree cone, dealing Puncture damage before entering a 3-second cooldown.
Enemies remain strung up for the duration of the ability and are inflicted with a randomized combination of Physical and Elemental Status Effects.
The total number of Status Effects applied depends on the Five Fates roll, ranging from 5 to 30.
Bunraku uses Line of Sight and affects enemies within the player’s camera view. The Line of Sight check is relatively lenient.
Despite the Wiki stating otherwise, Bunraku does not open enemies to Finishers.
Entangled enemies are not considered Lifted or Ragdolled for interactions with effects such as Pyrotechnics.
Bunraku can apply:
- Primary elements, such as Heat, Cold, Toxin, and Electricity
- Secondary elements, such as Gas, Corrosive, and Viral
- Physical elements, such as Impact, Puncture, and Slash
It cannot inflict:
- Void
- Tau
- Non-elemental Status Effects such as Microwave or Lifted
Status Effects inflicted by Bunraku do not decay until the ability ends or 30 seconds have passed, whichever comes first. With its base duration of 20 seconds, Archon Continuity or Primed Continuity is required for the ability to last beyond 30 seconds.
Bunraku’s entangled movement can cause enemies to repeatedly contact Kumihimo’s threads, reapplying damage and Status Effects. This interaction is inconsistent and is generally better suited to Subsumed abilities.
Tip: Bunraku’s hard crowd control is useful for distance-based challenges, although the movement of entangled enemies can make headshots more difficult.
Augments
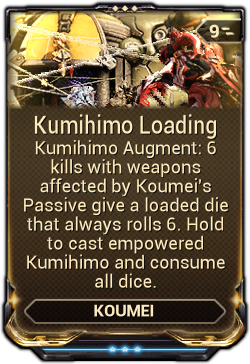
Kumihimo Loading
Kills made with weapons buffed by Koumei’s Passive store “loaded dice” that always roll a 6. Koumei can hold-cast Kumihimo to use the loaded dice on her next Five Fates roll. She needs 18 to 6 kills to guarantee Shadow’s Trinity, depending on the number of loaded dice.
This augment applies only to Kumihimo and does not affect any other ability. Inverting Kumihimo’s tap and hold functions can make its casting flow more smoothly.
Although the augment states that each loaded die requires 6 kills, the requirement scales inversely with Ability Efficiency. At maximum Efficiency, the requirement can be reduced to 2 kills per loaded die.
Omikuji’s Fortune
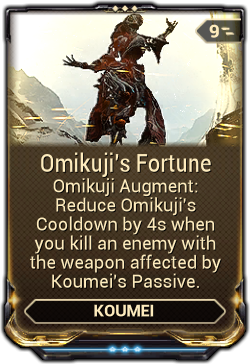
Kills made with weapons buffed by Koumei’s Passive reduce Omikuji’s cooldown by 4 seconds per kill. Cooldown reduction is unaffected by Ability stats. Kills from Damage over Time effects do not count toward this augment.
Recommended Stats
Ability Range
Use approximately 130-190% Range.
Kumihimo reaches its maximum thread count at 200% Range, and keeping Range around 145-190% helps prevent nearby enemies from being missed.
Ability Strength
Ability Strength increases the raw damage of Koumei’s abilities but does not directly increase their Damage over Time effects.
Ability Duration
Duration is not particularly important because it does not affect Omamori or Omikuji.
It has only a minimal effect on Bunraku because of its long base duration and on Kumihimo because the ability is frequently recast.
Arcanes
Weapon Platform
Useful weapon-focused Arcanes include:
- Arcane Avenger
- Arcane Hot Shot
- Arcane Strike
- Arcane Precision
- Arcane Tempo
- Arcane Velocity
- Arcane Acceleration
Koumei can technically replace some weapon Arcanes through her Decrees, but these Arcanes remain useful for weapons that need additional support or for freeing up other slots.
Koumei gains several Critical Damage Decrees but does not increase Critical Chance herself, leaving Arcane Hot Shot and Arcane Avenger as useful options. Arcane Avenger can also apply to some abilities.
Other Arcanes
- Molt Augmented / Arcane Impetus: Additional Ability Strength for Subsumed abilities. Kumihimo provides 10 Impetus stacks, while Bunraku provides 13. Impetus is also useful with Kumihimo Loading.
- Arcane Sculptor: Useful with maximum Efficiency. It is triggered by Kumihimo and can support Kumihimo Loading or builds using minimal energy economy with Blind Rage.
- Arcane Aegis / Arcane Circumvent: Additional survivability.
- Molt Efficiency / Arcane Concentration: Additional Duration.
- Arcane Consequence / Arcane Agility: Additional mobility.
- Arcane Persistence: Can be supported with Arcane Blessing.
Subsumes
Koumei will often choose between subsuming Kumihimo and Bunraku, as both abilities can fill similar roles.
Kumihimo is cheaper to cast and provides better gating. Keeping Kumihimo also allows the use of Precision Intensify because her other abilities have little need for Ability Strength.
Bunraku has a long casting time without Casting Speed and enters a 3-second cooldown after each cast, which can make it feel unwieldy. In exchange, it provides stronger overall crowd control across a wide area.
Omamori provides passive survivability and should generally be kept unless using a Huras Kubrow for an invisible Mecha Nuking setup.
Although Omikuji may seem less useful in non-endurance missions, most mission types other than Capture generally provide enough time to collect several Decrees.
Recommended Subsumed Abilities
Caster Builds
Useful options include:
- Sickening Pulse
- Breach Surge
- Jade Stars
- Neutron Star
Weapon-coded abilities can benefit from certain Decrees, allowing Koumei to deal respectable ability damage after collecting enough Decrees.
Jade Stars triggers only once per thread unless enemies are being ragdolled.
Sickening Pulse works particularly well with Bunraku because it can multiply the Status Effects applied by the ability, significantly improving its Status damage.
Roar
Roar can be used to buff weapons and then buff the Damage over Time effects from Kumihimo or Bunraku to feed into Mecha or Contagious Bond nuking setups.
Pillage
Pillage provides Armor Strip and Status cleansing. It is useful for active gating and can free up slots otherwise dedicated to passive or “lazy” gating.
Weapon Platforms
Useful options include:
- Nourish
- Xata’s Whispers
- Wrathful Advance
- Shock Trooper
- Eclipse
Xata’s Whispers can interact with the additional hits generated by Decrees, giving it significant potential value.
Kumihimo-Focused Builds
Useful grouping abilities include:
- Pull
- Air Burst
- Larva
Ragdoll and grouping abilities work well with Kumihimo by forcing enemies into contact with multiple threads.
Elemental Ward
Cold Ward is particularly useful because its reflected damage becomes Miscellaneous damage and can trigger several of Koumei’s Decrees.
It can also be useful for EHP/Persistence setups.
Archon Shards
Recommended options include:
- 1-2 Amber Shards for Casting Speed: Bunraku has a very long casting time without Casting Speed, while Koumei’s other abilities flow more smoothly with it.
- 1-2 Amber Shards for Parkour Velocity
- 1-3 additional Shards of preference
- Violet Shards: Useful for the Equilibrium effect or for buffing Primary and Melee weapons.
- Azure Shards: Maximum Energy, allowing Flow to be removed.
- Emerald Shards: +2-4 Corrosive stacks. This is less desirable following the Armor changes.
General Tips
Each of Koumei’s Five Fates unlocks at the following levels:
- Level 1
- Level 2
- Level 6
- Level 12
- Level 15
Any Forma used on Koumei keeps all five dice permanently unlocked.
Omamori’s passive damage negation works well with passive gating, allowing for a low-maintenance playstyle.
A full “lazy gate” setup uses:
- Vigilante Vigor
- Fast Deflection
- Arcane Aegis
Among Koumei’s 44 Decrees:
- 9 directly buff Melee weapons.
- 7 directly buff guns.
- 7 provide general buffs to all weapon types.
- 3 provide utility for guns.
- 5 provide Energy Economy.
- 4 provide defensive or Tank effects.
- 2 provide healing effects.
Because of the available Energy Economy Decrees, Koumei rarely needs to dedicate an entire mod slot to Equilibrium.
The Tank and Healing Decrees can make Koumei highly durable, with additional support from Adaptation, Vitality, Mecha Pulse, or flat Health and Armor sources.
Mods for Omikuji Challenges
Because Omikuji can force Koumei into unusual playstyles, utility mods can help complete specific challenges.
Sliding
Useful mods include:
- Cunning Drift
- Maglev
- Streamlined Form
Slide and friction effects allow Koumei to slide for longer while also taking advantage of natural terrain.
Melee slide attacks are also an efficient way to accumulate slide kills when using Melee Influence.
Wall Latching and Airborne Challenges
Useful mods include:
- Aerodynamic
- Mobilize and similar variants
- Nira’s Anguish
- Boreal’s Anguish
Mods that support either challenge type generally overlap and can help with both.
For airborne challenges:
- Aero Vantage
- Tractor Beam
- Kavat’s Grace
Gravity-related mods can help Koumei remain airborne. Tractor Beam requires a Moa.
Because Koumei spends significant time in the air, Kavat’s Grace can be particularly useful.
Rerolling Omamori
Koumei can reroll Omamori until she gets a triple-6 roll by using special units that disable the ability, allowing her to cast it again.
These units include:
- Nullifiers
- Demolysts
- Acolytes
- Scrambus
Koumei can also jump off the map or die and revive through the Operator to attempt another roll.
Decree Interactions
Koumei can trigger Miscellaneous Damage effects frequently because several Decrees create unusual interactions.
Examples include:
- Bombastine’s Malice
- Blazing Bombardment
- Critical Frost
- Salted Wound
- Wyrmling’s Aid
Secondary Fortifier can trigger from abilities and other weapons and can be offloaded to an Archgun.
Primary Debilitate can trigger from other weapons and can also be offloaded to an Archgun.
Using Archguns additionally allows Secondary Encumber to provide free Priming.
Melee Influence spreads additional hits generated by Decrees, creating “Corrofluence” on any weapon. The effect must already be active beforehand.
Primary Debilitate can further synergize with this interaction by spreading Corrosive, Electricity, and Toxin.
These interactions allow Koumei to use specialized setups such as:
- Sobek Acid Shells
- Hate’s Burning Hate
- Venato Prime’s passive
There are other possible interactions, but these are among the more commonly useful ones.
Archon Mod Interactions
Archon Vitality adds only one additional Heat proc to Bunraku, regardless of how many Heat stacks are rolled.
Archon Continuity similarly adds only one additional Toxin proc to Bunraku.
Companion Recommendations
Huras Kubrow
A strong general companion for Mecha Nuking because Stalk provides invisibility.
Nautilus Prime
A strong general Sentinel for Contagious Bond Nuking because Cordon provides enemy grouping.
Other Good Options
- Wyrm Prime
- Pharoah Predasite
- Adarza Kavat
- Panzer Vulpaphyla
These companions provide useful utility and versatility.
Weapon Recommendations
Koumei benefits from weapons capable of killing large groups of enemies because Omikuji’s Fortune relies on all weapons being able to accumulate kills, or at least assists.
Although Koumei can technically take any weapon to level cap, weapons that help complete Omikuji challenges are particularly useful.
Combo-Pause Melee Weapons
- Xoris
- Furax Wraith Incarnon
- Okina Prime Incarnon
- Tenet Livia
Because Koumei wants all of her weapons to remain viable damage dealers, Melee weapons that do not lose Combo when holstered are useful.
Okina Incarnon’s spectral daggers are useful for elemental challenges. With enough Decrees, they can also begin generating daggers by themselves.
Utility Weapons
- Cedo
- Epitaph
- Scourge
- Innodem
- Dual Toxocyst Incarnon
Cedo and Epitaph can provide elemental coverage if Koumei’s abilities are inconsistent at applying the required elements, particularly when not using Kumihimo Loading. Both can also contribute meaningful damage.
Scourge is useful for headshot challenges.
Dual Toxocyst’s Incarnon form fires ricocheting bullets that can headshot enemies.
Innodem is one of the few light-spam Melee weapons focused on aerial combat, making it useful for several challenges.
Multishot Weapons
Because Koumei can apply large amounts of Status Effects, she can get significant value from Multishot weapons.
Guns
Recommended guns include:
- Coda Bassocyst
- Coda Bubonico
- Exergis
- Coda Hema
- Secondary Tombfinger
- Catchmoon
- Cinta
- Nataruk
- Stahlta
Coda Hema is primarily useful for Persistence setups because of its consistent healing.
Incarnon Weapons
- Latron Prime
- Felarx
- Dread
- Miter
- Paris Prime
- Prisma Angstrum
- Ballistica Prime
Melee Weapons
- Syam
- Corufell
- Exodia Contagion
Large-Area Weapons
- Kuva Ogris
- Tenet Envoy
- Kuva Zarr
- Trumna Prime
- Kuva Tonkor
- Kuva Bramma
- Akarius Prime
Launchers that normally struggle with damage or ammunition can become effective after collecting enough Decrees.

Be the first to comment