
Beware, this guide has 100% Spoilers from Second Dream on. This is your first and only warning. Turn back now, if spoilers matter that much to you.
This guide will seek to inform you, yes, YOU, Tenno Skoom, how to slay a Sentient. There are many ways to kill one, but these ways listed below will seek to make them MUCH easier to handle.
Other Warframe Guides:
- Ways to Earn Platinum.
- All Warframe Parts and Where to Get Them.
- Quickest Way to Gain Mastery Rank and Get Lots of Loot.
- All Secret Lab Locations (Gas City).
- Hidden Sentient Labs (Gas City).
Sentient Oculysts
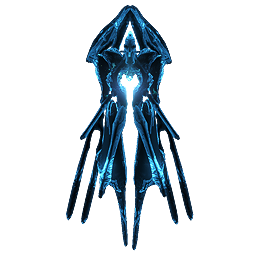
Ah, baby’s first Sentient! You will find these blue buggers floating around Grineer Sealabs in Uranus after being MR 3 or greater (not the one on Earth, ONLY Uranus) and on Lua. Good news and bad news, however.
Bad news: they cant be killed.
Good news: they cant hurt you. Instead, they scan you (you can scan them back, though, for codex) and leave. On Lua, however, they summon Sentient fighters shortly after they detect you. Either scanning you, you scanning them (which in turn, they scan back), or you shooting them.
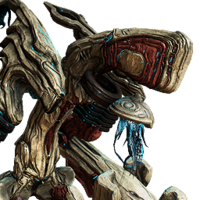
Sentient Battalyst
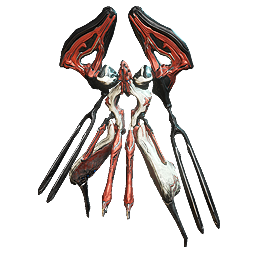
Ah, a real baddie to kill! The Battalyst has a few traits that make it a worthy foe. For instance, they can fire omnidirectional lasers (think Mirage’s disco ball of doom), as well as fire Tau “bullets” at range. In the event of their arms being blasted off, they tend to retreat back, but can pick up the arms that THEY lost, or arms other Sentient fighters lost in combat.
Battalysts have the ability to copy elemental properties of your weapons and attacks, so be careful when attacking them. You may find your heavy Impact shotgun may not work so well after a couple shots.
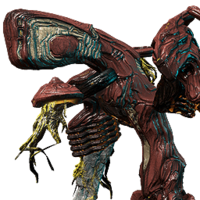
Sentient Conculyst
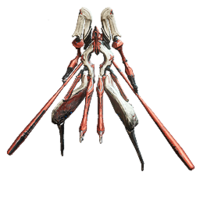
You know Battalysts? These boys dont attack at range. Spinning their toothpick bats around like Mayweather speeds, they dont shy away from getting bloody in the ring of honor. They also preform a spinning attack, so when they start to reel up, get ready! They can be quick!
Sentient Mimics
Mimics. Whoever named them, got it right on the nose. Found (currently) only during “The Sacrifice”, Mimics take the form of random items to hide from the player. However, they dont do a good job at making it LOOK good.
They tend to hide to catch you off guard, but if you pay attention to the map tiles like I try to, they dont really hide well. Those Orokin platform things that come up as you get near them? They can hide as one in a weird spot. Or as a resource crate, but not appear on the map.
Eidolon Vomvalyst

First night on the Plains of Eidolon, you see these boys floating about. Traveling in pairs, Vomvalysts tend to follow the Eidolon Teralyst on map, but are known to float aimlessly. Killing one requires, however, Operator mode.
Their first form, the one you see above, is the matter form, floating and shooting bolts of light at you. Killing THAT is easy as pie. Second form, Spectral Form, will preform dash-like attacks and are invulnerable to all BUT void damage. Certain Operator Amps can kill these guys with little effort, and in case of a few parts, can take multiple at once. Killing one always drops a Intact Sentient Core.
Eidolon Teralyst
Ah, “Terry”. Big, stompy, glow boy of the Plains. Generally harmless, at least at a distance, and a real majestic sight. Fighting them, however, requires a Operator Amp (Mote amp will do, but its imperative that you get a new one to use) to break its shields. When the shields are removed, you can attack their glowy joint bits for real damage. Break ONE, and it will flee unless you have Eidolon Lures trapping it. Be wary of the Magnetic blastwave it releases, as it can do some REAL damage, as well as remove all energy from Operator and Warframe.
Eidolon Gantulyst
Terry’s big brother, “Garry”. Stronger than Teralysts, and MUCH larger, these boys are summoned when Brilliant Eidolon Shards (1 gained after a capture of a Teralyst) are sacrificed at the Eidolon Shrine, in the middle of the Gara Toht Lake. They make large shockwaves with each step, create a large bubble shield around itself (protecting from long range attacks), and releases energy pillars occasionally to do real hurt to you.
Eidolon Hydrolyst
Harry, Terry and Garry’s older and MUCH bigger brother. Summoned at the shrine with Radiant Shards, Hydrolysts can be identified by watching the weather around the Plains. See massive rain storms? One was summoned.
Hydrolysts do massive damage with its gun arm, its shockwaves, stomps, melee attack, and can passively summon strikes of lightning to RUIN your life. Taking a Hydrolyst is a MAJOR pain solo, so I would recommend taking it with a friend, or a full party.
Like Teralysts and Gantulysts, you can kill Hydrolysts by shooting their glowy parts, however, with their bodies being reflective and glowier than the others, add the rain and lightning, it can be harder to spot. Locations arent far off though, so thats a thing.
Hurting the Sentients
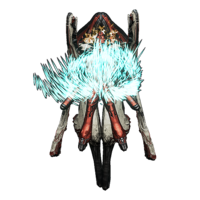
Hurting the Sentients is fairly easy: shoot them like you would a Grineer. But, unlike Grineer, they adapt to damage. When they adapt to damage, they resist 95% of the damage of that kind. In short, if its resistant to Heat, and you hit it hard with 100 fire damage, you only get 5 done. They adapt to last damage done after their heath gates are reached. In other words, when they are lose 20%, 35%, 50%, 65%, and 80% health, they adapt to something. Even if the health gate is met, full damage must be done FIRST before adaptation (Adaptation is a great mod, btw).
Each individual Sentient can adapt to 5 different elements, outside of transfered resistances from other Sentients.
Oh, and Sentients can transfer resistances with other sentients. Handy to know, so take them out before they can send it, OR take them out individually.
Sentient resistances CAN be removed by Void damage, alongside Shadow Stalker (which adapts as well as Sentients) resistances. Using Void Damage from Operator attacks strip resistances from Sentients, BUT they can still adapt afterward when health gates are met.
They also use Ferrite Armor, so they take +75% additional damage from Corrosive element attacks.
Excalibur Umbra, gained after “The Sacrifice”, can strip Sentient Resistances with his variant power, Radial Howl (2). Along with melee weapons modded with SACRIFICIAL STEEL and SACRIFICIAL PRESSURE, and Paracesis (obtained after Chimera Prologue) after its 5th Forma, make short work of Sentients.
Hurting Eidolons
Eidolons, unlike Sentients normally, dont adapt to damage. But outside of Vomvalysts, you need to be aware that hurting the larger Eidolons, Larry Garry and Harry, isnt as CLEAR.
For one, Eidolons are 100% immune to status procs of all forms. Killing Eidolons dont allow for much loot, but are easier to handle, assuming you can locate the Eidolon after teleportation.
Preventing teleportation requires 1 Lure at least, but you need 2 to capture Teralysts, 3 for Gantulysts and Hydrolysts. But that means you have to capture lures, charge them, and protect them while taking the Eidolon.
Taking the Eidolon should be done with weapons with high damage to ammo ratio. Sniper rifles and Shotguns, thusly, are the best choice. Explosive, however, is not ideal, because the explosion will hurt the invulnerable body, until final stage of the fight, after it gets back up from its fall.
Eidolons possess Alloy Armor, and thus, take 75% additional Radiation damage. Do with this what you will. Using Shwaak Prism Amps are ideal for taking the shields, with its innate punch through effect, and Arca Plasmor wave attacks hitting multiple parts of the Eidolon at once.


Be the first to comment