
A quick guide on how to effectively use support as a commander – and what to avoid.
Other Insurgency: Sandstorm Guides:
- Tips and Tricks for New Players.
- How to Master Recoil Control.
- How to Smoke (Effectively).
- Optimization (FPS Boost).
- Commander Tips & Info.
- How to Get All Taglines.
- Frenzy: Basics.
- Obscure Stuff.
- Co-op Tips.
Contents
General Stuff
All credit goes to lordblackgoat!
When using support, remember to ask yourself a few things:
- How would support help the team towards the current/future objective?
- How can I prevent it from hitting or blocking my team mates?
- How can I maximise its effects on the enemy/ground?
- Do I want something short or with lasting effects?
The following descriptions of supports, in non particular order, might help you decide.
Side notes:
Best advice if you start on the game and want to play commander: play observer, a lot, and pick up the good stuff from experienced commanders, then make your move.
Also, if your observer is a newbie that doesn’t stick with you, call him calmly on the coms, and stay with him, do what you can from there. He’ll probably learn that he’s more valuable like that, or move to another class.
And one last advice: if the commander spot is already taken, go as an observer, advise him as well as possible and protect him from danger. In the end, you might learn a thing or two about how to use support on this or that map.
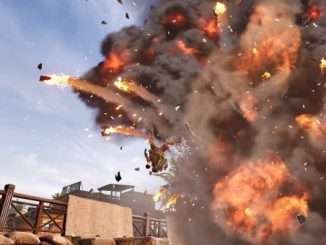
Airstrike
- Description: 30 metres linear strike, very destructive within about 5 metres on either side. Very effective through buildings.
- Speed to objective: pretty quick.
- Effect in time: none.
The A10 straffes perpendicularly to the line between you (when you call it) and the place you call it to. It makes it sometimes tricky to perfectly swipe a street, I mostly use the A10 for weapon cache destruction from afar (even through buldings), or cover fire on an enemy approach path upon a defensive position (especially known technical trucks approach) and more rarely to soften up an enemy stronghold – some people can’t stop from rushing even though you warn them…
Explosive Artillery / Mortars
- Description: violent shelling on about 20 x 20 metres, very destructive within about 10 metres around that, pretty ineffective against closed buildings.
- Speed to objective: quite long.
- Effect in time: great, it’ll stop anyone from coming this way for a while.
The explosive artillery I use for area denial, also mostly on enemy approach paths and crossroads where they spread out from.
While defending, if possible I call it early and even before being sure the point will have to be defended. It might be a bit of a waste in some cases, but it really breaks the tip of the enemy’s offensive if it starts arriving right as they attack. And if you don’t defend, just remind everyone to take a detour, it’s not a big deal.
While attacking, firing behind the point will isolate the enemy from reinforcement and stop them from flanking you, but remember it takes a while to arrive.
Rockets Barrage
- Description: area strike, at least 50 x 50 metres, very destructive and effective even on people hiding inside buildings too clos to outside walls.
- Speed to objective: pretty quick.
- Effect in time: very little.
Rockets barrage are best used as cover, right behind the attacked spot, it’s quick and violent, will probably destroy any incoming technical and give you the edge you need on the first few seconds of your attack. Works the same when you defend.
It is less effective than explosive arty for area denial as it is much shorter in effects.
Bomber Drone
- Description: dropping a few bombs on a 5 x 5 (or 5 x 10?) metres spot, deadly within 10 x 10.
- Speed to objective: quick.
- Effect in time: none.
The bomber drones seem to be a mix between the A10 strakkes and explosive artillery: apparently the attack angle is the same as A10 and it’s much quicker than waiting for the shells.
Great for a fast cover right before attacking a spot.
Explosive Drones
- Description: arrives on area, looks for enemy to attack and detonates, very destructive within about 15 metres around.
- Speed to objective: pretty quick.
- Effect in time: none.
Explosive drones I don’t use much, they always seem to get destroyed before detonation. Might give it a try against technicals.
Smoke Artillery / Mortars
- Description: smoke shelling on about 20 x 20 metres, unlike the real deal it’s not mixed with explosives and does not do any damage upon impact.
- Speed to objective: quite long.
- Effect in time: great.
Smoke artillery is great if used effectively, so never where you are, never where you are going.
When attacking: between your future path and where the enemy might come out of or snipe you from, that will give you support gunners and snipers the edge to protect you.
When defending: where the enemy might come out of, use support weapons or call for their own support (same desired effect for your gunners and snipers), but well away from you and your team’s position.
Helicopters
- Description: Minigun support arrives on designated site and fires 7,62×51 at any enemy in sight from both sides. Attack helicopter fires a salvo of 70mm Hydra rockets on the designated area, then circles and shoots its 30mm chain gun at any enemy in sight. Quite effective through buildings.
- Speed to objective: pretty quick.
- Effect in time: great, expecially the Minigun.
Both helicopters can be used with great effect while attacking, but are best used for the last (and longest) defence. Usually the Apache gets called first, in the general area where technical trucks are most likely to come from, then the Blackhawk (if possible just before the Apache leaves the area, for continuous support) Remember that they are still slow and vulnerable, so have your team watch out for any threat directed at them.
Also remember that the Apache’s attack starts with rockets, so direct your call far enough from your stronghold, whereas you can call for the Blackhawk wherever (just rememeber that little flame can be a pain in your line of sight!).
If the pressure’s not on top of you, and the enemy mostly comes from a single direction, you can call the helo over there to mow them down further away.
Gas Mortars
- Description: shelling on about 20 x 20 metres, disperses an irritant gas on the spot that makes you cough and kills you after a few seconds if you don’t put on a gas mask, pretty ineffective against closed buildings. As with the smoke, no impact or explosion effect, so safe to use on your spot.
- Speed to objective: quite long.
- Effect in time: great.
Last but not least, gas arty is fantastic for area denial, and I mostly use it as I use the helos. It has a bit of smoke screen effect that you have to keep in mind, so when defending, use it right ouotside a door rather than on you point – keep that as a last resort. It is also useful to neutralise technicals that your team may put to good use afterwards.

Be the first to comment