
Want to get late game equipment but co-op or invade at low levels? Or maybe challenge yourself to beat the game at level 1 with no weapon upgrades? Maybe you’ve seen some streamers who are insanely good at the game, playing all the way through naked and unarmed at level 1, slapping the Fire Giant’s ankles for eight consecutive hours but eventually winning without ever getting hit. I’m not one of those people. And you don’t have to be. This is a tactical guide, for the rest of us, to overcoming tough fights even as enemy HP and damage stack up overwhelmingly against you.
Guide to Low Level
Сrеdit gоеs to john darksoul!
Starting Off
At the beginning of the game, you choose your class. If you want the highest challenge the game can offer, choose Wretch, but unless you aim to remain level 1, there is not much reason to choose this class. For most character designs, Vagabond will be stat-optimal (even for magic users, unless you want to use arcane) and has arguably the best starting equipment. If you don’t want to stay level 1 but do want to play at low levels, Vagabond is an excellent choice for many reasons.
Why You Should (Probably) Choose Vagabond
- Best Armor – The vagabond starts with the vagabond knight armor set, which offers superlative damage negation and poise among starter kits.
- 100% Physical Block Shield – the heater shield, unlike the shields other classes start with, blocks 100% physical damage. While it can be quickly and rather easily replaced, it can still be hugely helpful.
- Two Weapons – The vagabond starts with two melee weapons, a longsword and a halberd. Both have their merits, and are serviceable weapons that can take you all the way to the heart of the Erdtree if you want! However, do remember to unequip one once you enter the Precipice of Anticipation, as you will heavy-roll otherwise.
- Square Off – The longsword that the vagabond starts with has the Square Off weapon skill, which trivializes a lot of bosses, including the Grafted Scion fight in the Precipice that you seem to be fated to lose.
- Optimal Stat Allocation – Using the Wretch as a baseline – at level 1 all attributes are at level 10 – the Vagabond is min-maxed far better than other classes. By having a -3 to arcane and -1 to both intelligence and faith, dedicated melee fighters are essentially getting 5 free levels compared to a wretch, because arcane is a near-useless attribute if your equipment does not require or scale with it. Even for magic users, investing an extra point in intelligence and/or faith will still often net a lower total level once all your points are where you need them to be, because Astrologer and Prophet have some ‘wasted’ levels and/or negative values in stats you need, like vigor and endurance. (Prisoner, however, is a solid choice for pure intelligence or especially intelligence / arcane builds, as it has an impressive -4 to faith. Prophet and Hero are also good for faith/arcane and strength/dexterity/arcane, respectively.)
Once you choose your class, you enter the character creator, where you choose starting gift.
Golden Seed is always a safe bet with a great early payoff in the form of an additional healing flask without any trouble. However, choosing Stonesword Key can let you get a Golden Seed and some other goodies like the Dragon Communion Seal and Erdtree’s Favor talisman – but you will go through quite some trouble to do so. If you’re brave, take the keys, otherwise take the seed and enter the Lands Between.
Grafted Scion
Believe it or not, you can kill the Grafted Scion in the cruel “tutorial”, and if you started Vagabond it’s not even terribly difficult. Remember, again, to unequip the halberd, and two-hand your longsword. When the Scion first enters the arena, you will get a chance to attack it. Hold L2 to enter Square Off and press R2 to do the thrust attack. Not only will it do the most impressive damage your character can do right now, it will do immense posture damage. If you get the chance to do that attack again quickly enough, the scion will drop and allow you to perform a Critical Hit. After doing so, you can hit it with Square Off again before it can attack. Repeat this cycle and you will emerge victorious.
Now that sounds simple, but you may not get it right your first time, and that’s okay. There’s a hard and fast rule to these games, but it’s especially true when you intend to stay low level — don’t be greedy. Only punish the attacks that you are 100% certain you can. For the Scion, the repeated shield slams are a slow and inaccurate attack that is easy to punish with Square Off. The shriek attack leaves him vulnerable for a long time, so go in right as the shockwaves end. His sword attacks are fast and with low recovery times – just stay away. Bait him into using a bad move and then attack.
If you win, congratulations, you get the Ornamental Straight Swords and Golden Beast Greatshield, as well as 3000 runes. Jump off the cliff to progress the game. If you lost, it’s no big deal, you’ll get your revenge soon enough.
Exploring the World
Once you enter the Lands Between, you have a near limitless number of options about how to proceed. Consider what kinds of weapons, armor, and spells you want your character to have. Most things can be acquired without (much) combat, so find a site of grace, meet Melina and Torrent, and begin your quest. Torrent not only makes roaming the Lands Between much faster, but also much safer; you can zip right past powerful knights and soldiers without them getting so much as a chance to attack you. Mark destinations on your map and don’t waste too much time fighting things you don’t need to.
Every character, regardless of build, wants flask upgrades. Co-op, invasion, and just solo gameplay all become much easier when you have lots of powerful healing flasks, and a Wondrous Physick that suits your playstyle. The good news is, some of the absolute best equipment in the game is available right in Limgrave, or not far from it.
The Flask of Wondrous Physick
The Third Church of Marika should be among your first target destinations, as the Physick is a game-altering essential item. You also find a Sacred Tear to upgrade your Flasks here.
When you first acquire the Physick flask, you simultaneously get one Crimson Cracked Tear you can add to the Physick, which makes the Physick recover half of your maximum HP. Certainly not bad to start, as it will heal much more HP than your Flask of Crimson Tears, but you will want to seek out other Tears to add to your Physick.
Just south of the Church is a Minor Erdtree with two additional Physick Tears: one which increases your maximum stamina, and one that increases the damage of charge attacks. Charge attack damage should be an immediate include, as it will help you fight bosses at low level. It also stacks with the Axe Talisman you can find in the ruins nearby, letting your charge attacks do much more damage. If you switch out the healing tear for the stamina one, you can drink the Physick before entering a boss fight and enjoy two potent boosts, or you can keep the healing tear for emergencies and also benefit from the charge attack damage for the remainder of the battle.
Sacred Tears and Golden Seeds
If you have done a playthrough or two before, you should pretty quickly remember where these crucial upgrades are hidden. There are more than enough Golden Seeds scattered throughout the world for you to fully upgrade your number of Flasks, but there are only exactly enough Sacred Tears to maximize their potency. Some Golden Seeds, like the one in the Fringefolk Hero’s Grave, will require you to kill a (Putrid) Tree Spirit, the big worm-like tree root monsters. Sacred Tears are enshrined in churches, so be sure to seek them out. There are three in the Weeping Peninsula south of Limgrave, so be sure to go there early on.
Gathering Equipment
There are some crucial items you can acquire right in Limgrave that will make your low-level journey much easier:
Beast Crest Heater Shield – this is a minor but essentially direct upgrade over the heater shield the vagabond starts with. It can be found in a chest in the Godrick Lordsworn’s camp east of the Warmaster’s Shack. If you didn’t start as a vagabond, obtaining this shield is highly recommended.
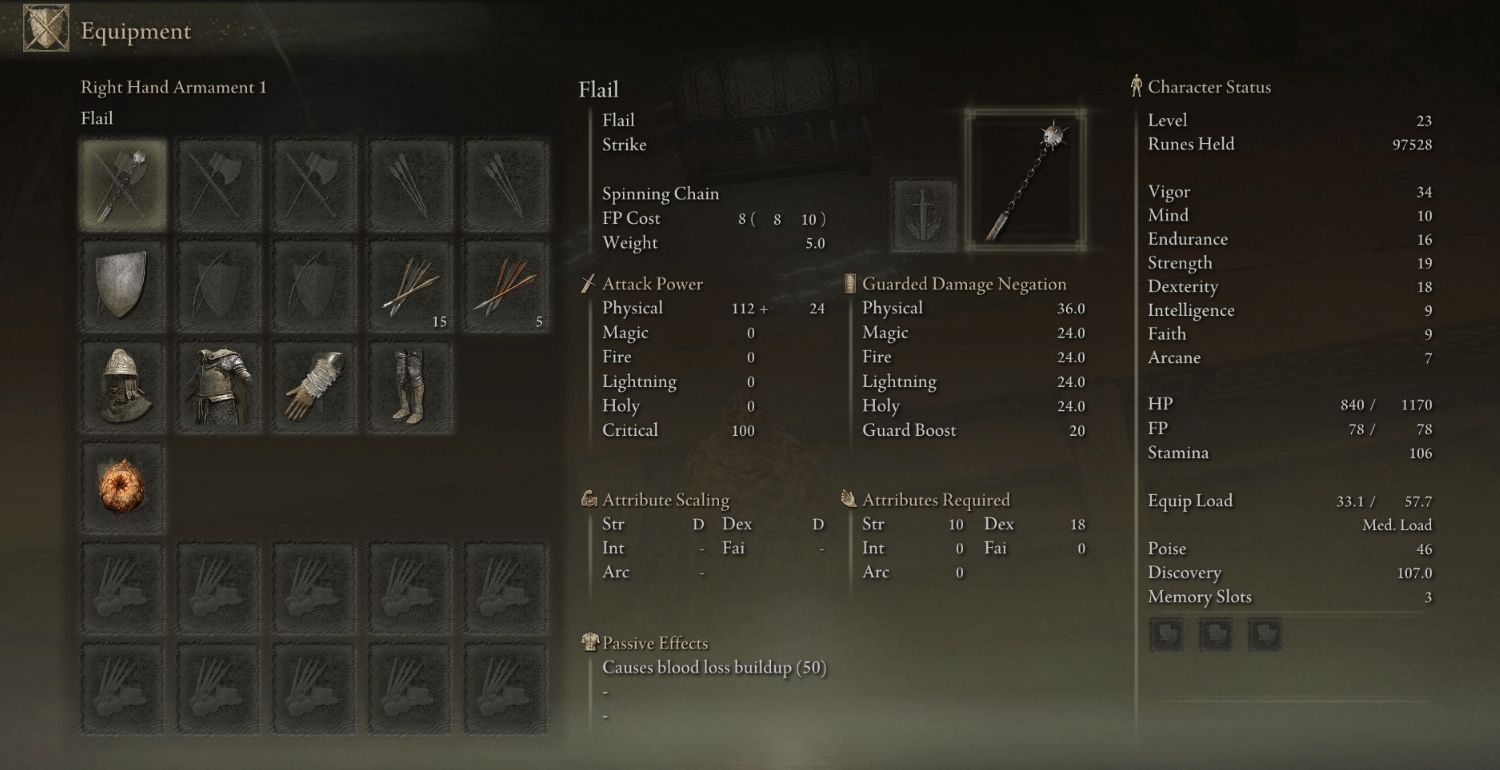
Flail – in the Godrick Lordsworn’s camp just north of the First Step, in one of the hearse chests. The flail combines the posture damage of a hammer with innate blood loss buildup, making it incredibly useful for low level boss fights. Alternatively you can try the Morningstar, which is found in a broken hearse on the road to the Weeping Peninsula. There are a number of enemies in the game highly resistant to all forms of damage except Strike, so having one of these weapons handy will always pay off.
Bloodhound’s Fang – this curved greatsword is obtained by killing Darriwil in the Forlorn Hound Evergaol, south of Agheel Lake in Limgrave, and it’s just unfair. It boasts incredible base damage, great scaling, a hidden buff to jump attack damage, and inherent blood loss buildup, with reasonably low requirements. I have used a +0 BHF to kill Morgott the Omen King before level 30! The curved greatsword weapon class has a great balance of speed and power, and the BHF will quickly break posture and drain health bars. However, its weapon skill is slow and risky.
Assassin’s Crimson Dagger – in the catacombs northeast of the Godrick camp with the beast shield. Defeat the boss to obtain it. This talisman gives you a sizeable heal every time you land a Critical Hit, and Critical Hits are one of the easiest mechanics to abuse in Elden Ring. It helps a lot early on, while your flasks are few in number and low in power, but remains useful later just to mitigate your flask use. It can be swapped on and off as needed, so there’s no reason to discard it entirely once your flasks are maxed out.
Talisman Pouch – Much like flask upgrades, everyone wants to get all the talisman pouches as early as possible. One is obtained for defeating Margit, the Fell Omen on the way to Stormveil Castle, but there is a way to get the other two rather early by doing the Leyndell Skip, which will be detailed later.
Radagon’s Soreseal – technically not in Limgrave, but may as well be. From the Third Church of Marika, go north into the water, and follow the river east until you find a sending gate somewhat hidden in the brush. This will take you to Gurranq’s Sanctum in the Dragonbarrow. Pop the grace, mount Torrent, steer well clear of the Black Blade Kindred, grab the Golden Seed as you go and make your way down to Fort Farroth. The enemies in here are daunting, so don’t fight them, just run through. Climb up the ladder, grab the Dectus Medallion half from the chest, then hop down onto the roof and drop into the hole on the far side. Ignore the rat, jump across the gap to another scaffold, past two more rats and down into the hole to claim Radagon’s Soreseal; from here the enemies should ‘de-aggro’ and allow you to teleport out. Much like Prisoner’s Chain in Dark Souls III, this is an absolutely unfair talisman that makes low level gameplay substantially easier, and is always worth the detour to get early. You will be able to wield better weapons, wear heavier armor, and you will have much more HP – don’t worry about the penalty to your damage negation, because all those extra levels are also adding to your defense, so you will in fact end up much tougher to kill.
Once you have gone to the Dragonbarrow, resting at grace will cause Melina to take you to Roundtable Hold, where you can kill Mad Tongue Albrech to get the Taunter’s Tongue, which not only can make co-op gameplay more exciting but is also necessary for the Leyndell Skip. If you wish to do the Leyndell Skip, make sure to also buy the White Cipher Ring from the Finger Reader Husks near Gideon’s office.
Fighting Basics
Elden Ring combat is richly varied, with many different options presented to the player. When playing as-intended, it can be fun to chain together light attacks, strong attacks, and weapon skills into a satisfying flow, but this kind of combat is dangerous when playing at low levels. The #1 most essential rule to low level combat is don’t be greedy, but a close second is to attack the enemy’s posture.
This can be difficult to do, because unlike in Sekiro, enemy posture is not visible. However, high-posture-damage attacks will not only stagger or stun enemies, it can quickly open them up for Critical Hits, letting you score big damage and more easily predict their behavior.
Basics of Posture Damage
If you followed this guide for the Grafted Scion fight, then you already know an easy way to deal huge posture damage and have seen the benefits firsthand. A fight you seemed destined to lose became actually quite easy! Square Off, which is strictly limited to the Straight Sword weapon class, does immense posture damage for its speed and is effective against most bosses. The good news is you have plenty of other good options, and the game does not by any means need to be you spamming Square Off from the first fight to the last.
L2 Is Your Friend – Most other L2s also do impressive posture damage.
R2 Is Your Friend – Dark Souls series veterans may be resistant to this, but in Elden Ring PvE, R2 is an excellent button. A fully charged R2, depending on the weapon, will either posture break immediately, or stun long enough for you to perform a second full charge R2 and inflict a posture break. With the Axe Talisman, Spiked Cracked Tear, and possibly War Cry and/or Roar Medallion, you can stack a lot of bonuses to your charged attack damage as well, and rather early on in the game at that.
Tough fights like Elemer of the Briar / Bell-Bearing Hunter can be reduced to a simple cycle of dodge, R2, dodge, R2, critical hit, lather rinse repeat. I have defeated the most difficult version of this encounter – the one in the Dragonbarrow – as a vagabond using a Blood Claymore +0 and without leveling up, using this strategy.
The Bloodborne Backstab- Uniquely, compared to From Software’s other staple games, Bloodborne did not allow you to perform a backstab on a backturned enemy. You had to first land a fully charged R2 on the victim’s back before you could perform a Visceral Attack. In Elden Ring, we can sneak up behind enemies and plunge our swords into their spines for easy Critical Hits, yes – but backstabs do less damage than posture break Critical Hits from the front. If we instead borrow the wisdom of the Bloodborne Backstab, we can sneak behind an enemy, land a fully charged R2, a second if needed, and posture break the enemy before they ever get to attack. Then, circle around to the front and inflict a more powerful “frontstab” than you could have if you simply backstabbed the enemy – plus the full-charged R2 for free! You can defeat a lot of powerful enemies this way, even at low level with weak weapons.
Guard Counters – While you should essentially never even attempt a guard counter attack in PvP, they are excellent in PvE, especially for boss fights. Remember that heater shield and beast crest shield I told you about? This is what really makes them good. Block the last hit of an enemy’s attack chain, and then bite back with a guard counter. Guard counters do gigantic posture damage, and will quickly knock an enemy down, while consuming (on average) less stamina than jump attacks and being much faster than charged R2s.
The image attached is my character after defeating the Godskin Apostle beneath Caelid Divine Tower, at level 23 with one talisman and an unupgraded Flail. No summons, no spirit ashes, no great runes, no gifts from friends. The chest you can see is the one with the Godslayer’s Greatsword in it. Although the boss could kill me in a single combo, the unassuming Heater Shield I started the game with allowed me to remain aggressive by punishing most of its attacks with a guard counter.
Jump Attacks – like Guard Counters, these are desirable for their speed when compared to a charged R2. Jump attacks deal additional posture damage as compensation for the extra stamina you must spend to execute them. Thanks to the low opportunity cost, they’re overall great choices especially against fast bosses like Morgott.
Parry – parrying can be a great way to defeat lesser enemies and even a few bosses, as it essentially inflicts an instant posture break, but is exceedingly dangerous and requires a lot of practice. While, say, Margit can be parried, the cost for flubbing is too high, so I can’t recommend it to anyone but a parry god. However I do swear by parrying for Crucible Knights. Their moveset is fairly easy to parry on sight and should not require too much practice.
Inflict Status!
Your weapon and spell damage scale up with your attributes and weapon refinement in Elden Ring, which justifies the gradual increase in enemy power levels. However, you are not leveling up and/or upgrading your equipment the way the game is balanced around. So, you need to look to damage output options that are just as good at level 1+0 as they are at level 150+25: status ailments.
Bleed is a common ailment which is popular with players. It comes free on the Flail and Bloodhound Fang I have already recommended in this guide. You can get the Ash of War Bloody Slash in Fort Haight, right in Limgrave, and use it to bestow the Blood affinity on any weapon that can accept it. Blood loss takes a few hits to trigger, but does massive damage proportional to the target’s maximum HP, meaning it scales up with your enemy’s power level, not your own! Bleed is an excellent choice for most fights, but beware enemies that cannot be bled, because a blood affinity weapon will just be worse than standard affinity in that case.
Poison is not especially strong in Elden Ring; it does not do much damage per tick. However, poison is easy to inflict, often only taking one or two hits, and the damage can really add up. Especially when doing low weapon level gameplay, poison damage will more than make up for the loss in attack power compared to a standard affinity weapon. You can apply a poison Ash of War to a weapon with innate blood loss build up to inflict both poison and bleed at the same time. Later, when you have the Black Whetknife, you can use a Poison Ash of War like Poison Moth Flight, but give the weapon Blood affinity, letting you do large blood loss build up with each attack, but still be able to inflict poison in just one or two presses of L2.
Frostbite is an excellent option as it can be easily combined with blood loss. Like blood loss it deals %HP damage on trigger, but then also leaves the victim’s defense weakened. Put a Cold Ash of War on a weapon with natural blood loss build up and watch boss health bars disintegrate.
Scarlet Rot is difficult to inflict in most circumstances, but is essentially a much more potent poison. A handful of weapons throughout the game naturally inflict Scarlet Rot, but there are no Ashes of War that let you enhance a weapon with Rot build up. Rot Grease is rare, but can be applied to a weapon like Bloodhound Fang to make short work of bosses weak to Rot. Antspur Rapier can be obtained from a fairly easy enemy outside Shaded Castle in Altus Plateau, which deals scarlet rot build up and can accept Ashes of War to also inflict poison and/or blood loss. Put Poisonous Mist with Blood affinity on Antspur Rapier to do three kinds of status at once! This can be hugely helpful for the most perilous of boss fights, like Mohg, where you simply do not get many opportunities to do charged R2s or guard counters.
Advanced Tips
While much easier said than done, everything outlined in the guide so far is technically sufficient to get you all the way to the end of the game. It will require execution on your part – learn enemy movesets and how best to respond. Should you dodge this move, or block it and guard counter? Does this predictable and punishable combo get a new move in phase 2? Can you avoid this attack by just sprinting away? Bear these kinds of questions in mind when you feel like you’ve run up into a brick wall.
The Best Defense is Not Getting Hit
Obviously. But I don’t mean “dodge roll everything” because some enemies, like Leonine Misbegotten, have horrible, fast combos that seem impossible to avoid entirely just by rolling. I mean hover at the edge of your opponent’s range and bait them into using attacks that won’t hit you. Once you see them start to attack, back off a bit, and wait for your chance to punish.
I did not beat the Caelid Divine Tower Godskin Apostle fight in one try, believe it or not. It took me quite a few tries. There is a Blackflame Monk outside the door, and I would fight him on occasion, hoping to possibly get some of his armor. Trying to do cool-guy parries or backstabs would just get me killed. Trying to weave dodge rolls between R1s would get me rollcaught and killed. My most dependable strategy against this blackflame monk – a formidable opponent in his own right, for my character and equipment – was to bait him to attack, walk backwards away from it, and then do a jumping R2. Over and over. It’s not fun, but it works. The impact would stagger it and let me safely retreat from the next attack it would do. Get a posture break, critical hit, blood loss, and the monk would die fairly quickly.
I eventually extended this same combat philosophy to the Godskin Apostle itself – not by jump attacking, but rather by baiting it into using predictable attacks and guard countering. Its jumping slam attacks would not drain all my stamina if I blocked them, and left the apostle wide open, letting me get a guard counter. That is how I eventually emerged victorious – guard counter moves I knew I could block, running R1 to punish the fireball, and focusing primarily on not getting hit, even though pressuring the blood loss accumulation and posture damage was all-too-tempting.
The Leyndell Skip and its Rewards
To do the Leyndell Skip you must first go to Roundtable Hold and jump off the balcony to fight and defeat Mad Tongue Albrech. You can start the fight with a dishonorable backstab while he bows at you, but be careful because if you do it too early on your first encounter, you will not learn the Reverential Bow emote. He is quite annoying, but good practice for parrying; buying a Dagger or Rapier from the Twin Maiden Husks might be a good idea. Alternatively, use a Battle Axe and hold L2 to Wild Strike him to death, as he does not seem to know how to beat it.
Once you have the Taunter’s Tongue from Albrech and the White Cipher Ring from the Twin Maiden Husks, go to the Tower of Return on the southwestern side of the Weeping Peninsula. Open the chest to be transported to Leyndell. Kill the golem by posture breaking its legs with repeated R2s and critical hits to the chest, and claim the Blessed Dew Talisman from the chest – very handy passive HP regeneration.
Now, turn on both the Cipher Ring and Taunter’s Tongue, and near the elevator behind where you were transported in. Eventually – unless your matchmaking parameters are off – an invader will come, and there is a chance the invader will spawn at the bottom of the elevator. If so, they will activate the lift to come up to you, and now the lift is fully functional and you can enter Leyndell, despite not having two Great Runes. If the invader spawns on the top side, try to survive until a blue spirit comes to rescue you – they may spawn at the bottom of the lift and activate it for you instead. Once the lift is functional you can go ahead and die, don’t sweat it, but resolve the invasion, turn off the matchmaking items (if you want) and run past the Iron Virgins and pull the lever to enter the corporeal Roundtable Hold (and pick up a Stormhawk Axe on the way if you can!)
Within Roundtable Hold you find the Sanctified Whetblade – this will enable Lightning infusion with Ashes of War, which has tremendous base damage and deals the overall most powerful damage type in the game. With some traversal and either dedicated avoidance or masterful combat, you can make your way to the Capital West Rampart site of grace, and with some bravery snatch a Golden Seed out from the watchful eye of a Valiant Gargoyle. From there, run under the tree roots up towards the Colosseum – fight or avoid the Gladiators – and on the steps to the arena you can grab the Ritual Shield Talisman. This is crucial for survival at low levels, as eventually bosses will be able to actually outright kill you in one hit from full HP. This talisman gives you immense defense, but only while you are at full HP – but it can be the difference between surviving and getting to drink a flask, or dying. Combined with a HP regeneration Physick tear, the talisman can make tough fights much more bearable.
Going up the tree roots will eventually take you to Godfrey, First Elden Lord, in his golden phantasmal form. Jump attacks for posture break are excellent here, the shockwaves from his stomp attacks can be jumped over. Drop the R2 on the way down, then get ready to roll around his greataxe attacks. Godfrey cannot bleed in this fight, so raw damage is the way to go. Defeat him and you will get a talisman pouch, which means you could already have three.
Godfrey isn’t so bad at low levels. The boss just a stone’s throw from there – Morgott the Omen King – is a menace. His moves range from very fast, to very slow and delayed specifically to roll-catch you. He attacks in relentless chains, so guarding and countering is not a very viable strategy here – your stamina will be exhausted and you will likely die. Dodging and jumping R2s are again your best bet. Don’t summon Melina, she only makes things more difficult by giving Morgott more HP and making his behavior harder to predict. Emerge victorious and you will be able to purchase the fourth talisman pouch from the Husks in Roundtable Hold for a few hundred runes. You can have all four talisman pouches before even fighting Godrick the Grafted! If you complete this fight before Margit the Fell Omen as well, you will get the pouch you normally get from that encounter, and the Omen won’t appear on your way to Stormveil.
Now you can proceed to the Mountaintop of the Giants, if you so choose; some potent items and upgrades are up there, but there’s plenty to want from Stormveil Castle, Caelid, and Liurnia, so consider going back at this point.
Don’t Talk to Rogier or Kill Edgar
This is only relevant if you intend to stay at very low / +0 weapon refinement for the whole game. Talking to Rogier in Roundtable Hold and telling him you killed Godrick will have him reward you with Rogier’s Rapier +8, permanently setting your max weapon refinement parameter for matchmaking to +8. Similarly, killing Edgar the Revenger when he invades you in western Liurnia will give you a Banished Knight’s Halberd +8. Simply do not tell Rogier you killed Godrick, and run away from Edgar if he invades you; get far enough away and he will return to his world.
Use Every Tool at Your Disposal
Aren’t those finger creeper enemies annoying? Those crawling hands all over Caria Manor. Hitting them with fire will do massive damage and stun them for a long time. Craft fire pots or have a weapon infused with Fire or Flame Art affinity at the ready. The same goes for other enemies, too. Some are massively weak to Strike damage, so keep a hammer or other Strike weapon on hand. Use arrows or bolts to ‘pick’ enemies and lure them away from large groups, or to safely inflict status conditions from afar.


Be the first to comment