
So there seem to be two camps when it comes to the assessment of the difficulty of Hero’s Hour. Camp 1 is the folks who are struggling. Bouncing hard off of it, getting to week 4 or 5 and then coming across a giant enemy stack that just kicks their teeth in. Camp 2 is the folks who exploit the game and win as Pillar on Hardcore+ by Day 4 of week 1. Most the rest of the guides here seem to fall into that second group but it doesn’t really feel like how the game is supposed to be played. Not a dig at the exploiters. It’s a thing of beauty to see 3000 Mercurials rolling around behind a talking panda, just not how I typically like playing games.
I’m taking a different approach with this guide. My goal is to present a simple, but effective strategy that works for numerous factions that will let you experience what the game has to offer as I believe the developers intend it to be. Most of the guide is centred around my playthrough as the Horde faction on YouTube but they are long videos and I’m a mediocre youtuber who says Ummm way too much so I have tried to summarize them in the text.
Introduction
So, fundamentally Hero’s Hour is a numbers game. You want to be increasing your numbers while expanding your territory. This is the basic principal, and any strategy that does not account for that is going to struggle. Before I go further though I need to be clear that this timeline is really only meant for Tiny and Small maps. Medium and larger will take more time, simply because the zones are larger.
With that in mind though, on a smaller map, if you just barely manage to scrape together an army that can break you out of your starting area on week 4 you are going to be in for a rough ride. The goal should be to leverage your starting hero and the limited assets that you have access to in order to clear most of your starting area over the course of week 1 and break out with the re-enforcements you get at the start of week 2.
With that in mind, the basis of the strategy revolves around using a might hero with a focus on buffing their faction’s tier 1 troops. Most factions have one and in my case I’m going to be playing as the Horde faction and using Tobruni. You can adapt this strategy for most factions though. Order has Lanzo, Pillar has Lionin, Arcane has Edzuran, Decay has Bonehead, and so on. You can explore the others yourself and I can’t claim to have played them all so as to vouch for their effectiveness. The only real exceptions are Pyre, Tide and Wild… But Wild doesn’t need the help (plus their tier 1’s are weird) and the consensus seems to be that the hero’s for Pyre and Tide are just kinda in a bad spot generally.
Anyhow this hero archtype all combine skills like Legion (this is key), Bloodlust, Offence, Swarming and Warding among others. The real key skill though is mastery of their faction’s tier one unit since this skill will buff them up, and give a significant number of freespawn.
Anyhow, this is Tobruni:
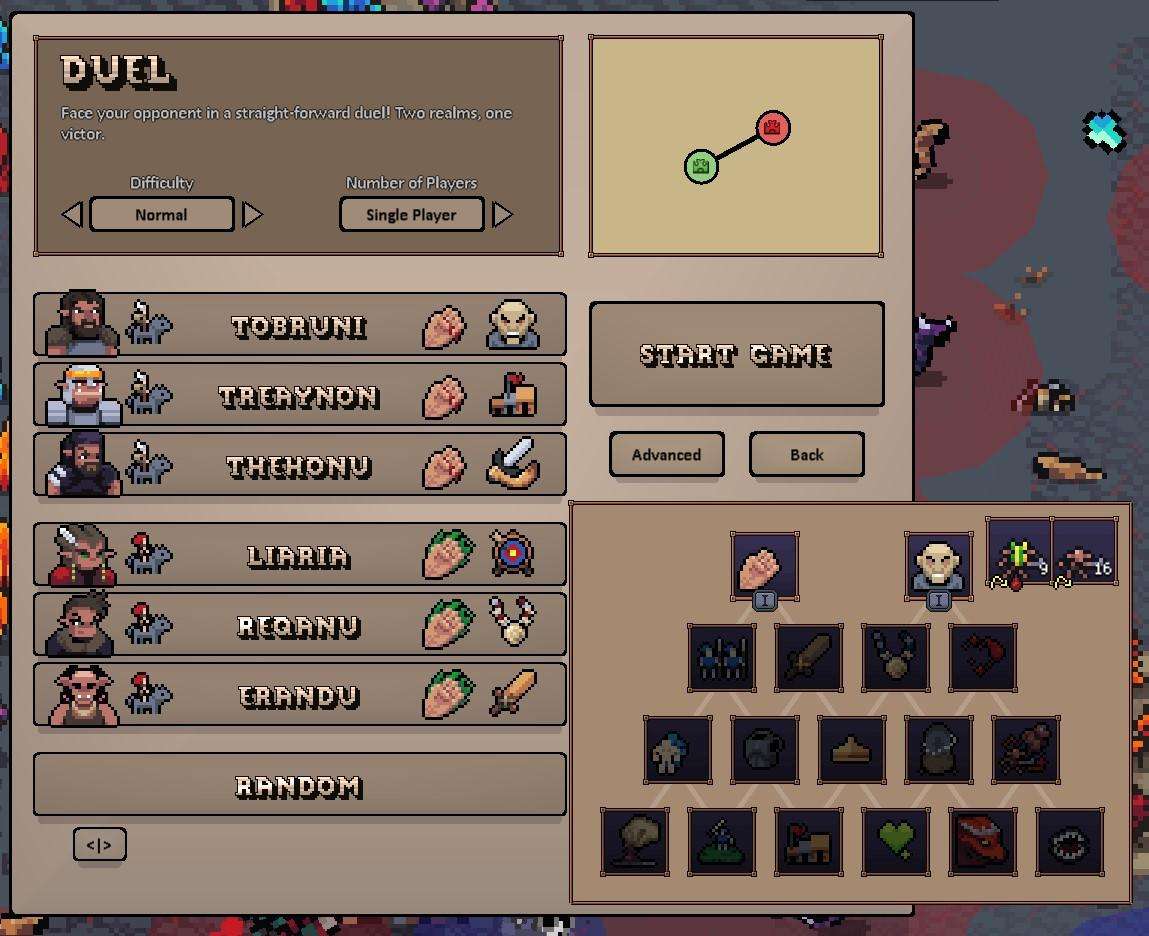
As you can see he has Legion as his Tier 1 skill with Goblin Mastery, and Bloodlust right below it. He also gets Offence, Armourer and Swarming, though the latter is locked behind Bodyguard which is useless for him. Furthermore he gets Bloodwarping, Healing and even Dragonking and Devour which can be very potent in a longer game. He lacks Warding, which is an extremely useful skill for this build, but that’s OK. For our purposes we’ll be focusing almost entirely on Legion and Goblin Mastery and relying very hard on the Goblins (or more specifically their upgrades) Voodoos. The goal will be to use his skills along with huge numbers of goblins to just overwhelm fights.
Now the effectiveness of this build does start to drop off in the mid to late game on big maps. Even by the end of this playthrough I start shifting away from Goblins and into high tier units like Bloodletters simply because they take fewer casualties and require less re-enforcement. Not a big deal on a little map, but when you are deep in enemy territory two zones away from your nearest infirmary, not needing to do a hero chain to get new troops to the front is certainly helpful. I still think it is worthwhile considering this hero archtype as your starting hero on a larger map, you’ll just need to make sure you pivot to a mage, or a hero with Champion and the Mastery skill for higher tier units at some point.
Episode 1: Week 1 Clearing Your Starting Zone
So clearing your starting zone is the first thing you are going to be doing in any playthrough and it is critical that you do it as quickly and with as few casualties as possible. You really want to be prioritizing troop numbers. One really key thing, especially when you are just learning is to not be afraid to savescum and/or just re-roll the map seed if you take a big loss early on. It’s going to take time to figure out what sort of fights you can take, and if you eat a big loss or a pyrrhic victory on like turn three in order to take your ore mine it’ll probably set you back enough that the game will be very difficult to succeed at going forward.
You’ll notice I recruit 2 hero’s on turn 1. I talk about this in the video but the TLDW version is that I think the boost in troops, scouting ability, and ability to pick up unguarded resources and save the movement points of your primary hero is very valuable. Even on larger maps they remain useful as troop ferries and mine boosters so I think it is worth the early game expense. This also means I delay the early building of the Champion Statue until Week 2. This is controversial and there are some good arguments to be made for waiting in order to get bodyguard up and running ASAP. I just think that being able to get those early fights under your belt is very valuable. You can also do this on turn 2 if your tavern is locked behind a creature dwelling or other structure. It isn’t ideal though.
As a general rule my week 1 build order is as follows: Tavern, T2 Dwelling, Infirmary, T3 Dwelling, For Day 5 and 6 pick between your faction building (like Banner of Champions or Soul Beacon), T1 Dwelling upgrade, Mages Guild, Architect or Town upgrade, before finishing up with making sure you get a Week 1 Fort.
On the over-world I prioritize getting anything that will get me more troops. Look for recruitment locations, the Palace structure (before the end of the week for that 20% recruit boost) and then items (prioritizing gold and treasure chests) and finally resources. That said, the Sawmill, Ore Mine and Obelisk typically have very weak guards so they are good targets for day 1 or day 2 in order to get XP on your hero. Taking out the neutral hero can be a significant boost in week 1 since they will usually net you some valuable artifacts, but it is a high risk fight since hero skills, attributes and spells can really swing a fight.
Assessing what fights you can take is a bit more nuanced. The Easy, Medium, Challenging, Near Impossible and Impossible ratings are a good guide, but remember the goal is to take as few casualties as possible, not just win fights. The first fight I took in this was listed as challenging and I think I took 3 or 4 casualties total because I knew that my harpies would be a hard counter to the otherwise quite threatening Cannoneers. Without the harpies to flank they would have shredded my gobbos with their big explosive boom sticks. On the flip side though, fighting a big horde of flying units is a great way to loose a bunch of goblins, even if it says the fight is easy since flyers can pick up models and drop them which will result in a 1 hit KO on low tier troops. Other high threat enemies are ones with the Wide Attack tag or AoE attacks. Over time you’ll learn to recognize the general strengths and weakness’ of different troops that you’ll commonly encounter but until then the reload button is your friend.
The other big tip is to not overlook the tactical combat end of things. Don’t just blob you troops up, hit start battle and hope for the best. I almost always default to using the defend order at the start of combat. Make use of terrain to force the enemy formation to break apart using choke points, use your hero as a distraction so they can keep part of the enemy army occupied while your troops take them down piecemeal, and use fast units to flank around and take out ranged units. Always remember, the goal is to minimize losses. Even an infirmary only recovers 50% and recovering 50% of 4 casualties hurts a lot less than 50% of 20.
Episode 2: Expanding into the Neutral Zone
So by the time week 2 rolls around you should try and make sure you clear up any remaining key structures in your starting zone and try to crack the guard post, portal, or passage into the underworld in order to start exploiting a neutral area. You might struggle with the fights you find there so feel free just to explore and pick up anything that isn’t guarded. On larger maps in particular you may want to send one of your secondaries out there (ideally a bodyguard secondary) in order to explore while your main hero continues to take the fights that get you the ‘nice to have’ structures in your starting zone since it will be basically impossible to clear everything you want during week 1 or 2.
One real key thing is to make sure to build a mage guild before you take your primary hero out of the starting zone. Being able to teleport back home is essential. You can only do it once every 7 days, but having an enemy hero roll in and capture your town is a real easy way to lose.
Other than that though there isn’t too much else to say in this video. If you are playing a faction other than Horde this is likely when you will want to start looking at upgrading your dwellings in town. Apply the same principals to picking your fights and start prioritizing getting higher tier troops. If you can assume solid control over a neutral territory while continuing to minimize losses then you should be well on your way to having an army that is fully capable of taking on an AI hero.
Episode 3: Go for the Eyes Boo! Go for the Eyeeees!
So over the course of this video I clean up the neutral zone and get myself into a position where I can take the fight to the enemy and reliably kill him. When you invade the AI it is really important to be as aggressive as possible. Remember, his infirmary is much closer to the front lines than yours will be so getting into his town is a big priority. It wasn’t necessary in this playthrough because the AI was so outclassed by the time we actually ran into each other, but on larger maps against more established opponents it is important to use your secondary hero’s to run around and snag resource and troop generating structures from within the enemy zone.
Be the first to comment