
This game does a very bad job of explaining Support and how strong it can be.Support is by far the most important member of a party, but it can be incredibly difficult to tell if you are actually doing your job correctly.
Support’s Real Job
If you come from other games you may see Supports as a role that is meant to primarily provide healing and shielding. That makes complete sense but it’s actually a bit different in this game. This is because Support is actually responsible for the highest percentage of party damage.
Heals, Shields, and Utility are great but if you miss this point you will be severely hurting your party, and creating a lot of unnecessary problems.
Here is a hypothetical, we have three 4 player teams, they are completely equally geared and have equal skill and do the exact same damage. One team has a Support and one is all DPS, the last has a poor performing Support.
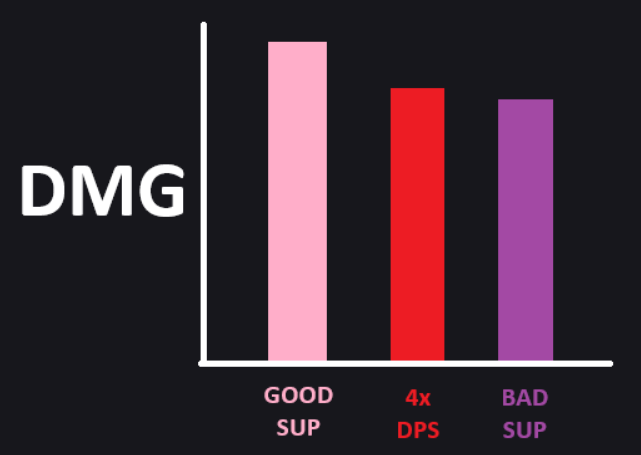
Now we see the party with a Bad Support is roughly the same as 4x DPS, however they get the benefit of all the bonus Utility that a Support can provide, not bad but when we look at a Good Support the difference is very obvious on how significant the impact is for a team.
But how is the Support team’s Damage so high, it’s literally 3 DPS vs 4 DPS?
This is because Support has a wide array of Damage Buffs and many are forgotten by players since the game does not emphasize their importance.
Active Damage Increases
- Branding – 10%
- Attack Power Buffs – 22%
- Identity Usage – 10%+
Passive Damage Increases
- Honing – ∞%
- Gear Set – 12%
- Cards – 3.5%
- Bracelets – 2%+
- Elixirs – 3-6%+
- Skins – .25%+
These will add up to roughly a 50% Damage Increase for every player in your party, that means Supports can actually provide 50% MORE DAMAGE than any lone DPS. This is also why it is usually an instant reset if a Support dies, on top of losing Utility you lose too much damage.
But this is only if you are playing properly.
Now let’s go for another hypothetical:
- Party A: Perfect Support player with 100% Uptime
- Party B: Support player who lacks fundamentals and has 50% Uptime
Party A will clear ~20%+ faster than Party B, causing them to have to Heal and Shield less and risk less wipes since they are in and out of the raid much faster. Many Supports make it their main priority to Heal and Shield but with telegraphed patterns and each DPS carrying their own set of Healing Potions we need to prioritize our Damage over everything and then bring Utility as a secondary bonus to the party.
Support’s Side Gig
Now once you finally understand that Support’s #1 Priority is to provide damage to the team, we can look at all sorts of Utility we can provide, let’s break it down.
Mana
(Paladin’s Heavenly Blessings, Artist’s Sun Well, or Bard’s Heavenly Tune)
This is one of the most underrated forms of Utility a Support provides. It is tied to one of your Attack Power buffs so if you are playing effectively this isn’t a concern, but when played poorly many classes will run Out of Mana and become practically unplayable, this can become extremely frustrating for DPS players since it not only severely hinders their DPS but also their enjoyment of their class.
Defense
(Heals, Shields, and Damage Reduction)
This is amazing for everyone, you can utilize Shields and Damage Reduction to reduce damage taken and allow DPS players to greed even more damage and have a more comfortable time raiding and then using Heals to help top them off if they get low. Even though Damage is your #1 priority, sometimes throwing down protection for large boss attacks is much more important because a dead DPS won’t be receiving your damage buffs.
Utility
(Counters, Weak Point, and Stagger)
This is actually everyone’s job in a party, if you cannot pass Stagger checks it is probably not your fault alone. However, since Support has less animation locks and more options for build diversity, skills can be used to focus on Counters, Staggering the boss, or helping with Weak Point. This often isn’t an option for DPS since their builds are generally static to optimize damage. So if your party struggles with any specific mechanic, help them by optimizing your build.
Bonus Buffs
(Attack Speed, Movement Speed, and Cleanse)
Only Artist and Paladin have a cleanse, but using them is really important for effective debuff management for certain raids. Additionally Supports have various skills that buff Attack and Movement Speed that make your DPS be able to fit more skills in windows and have more comfortable time DPSing, you also give 12% Attack and Movement Speed on your Yearning Set.
Branding
Other classes call this a Party Synergy, but this one is stronger.
Brands are incredibly simple, just use the skill off of cooldown, the only skills that should take priority over this is your Attack Power buffs. If you do that then you will have 100% uptime on a free 10% damage increase for the party, that’s more than your identity contributes. These animations can be interrupted so make sure you are in a safe position before casting.
Attack Power Buffs
Your biggest damage contribution to the team.
This is by far the most powerful skill combo in your kit. You have two Attack Power buffs that you need to juggle that give the largest damage buff of anything in your kit. Your goal is to use one, which will last for 8 seconds, then as it expires using the 2nd one. You can easily watch the Red Sword icon on your hotbar to know when to recast it, or just cycling them off of cooldown. You definitely don’t want to overlap these as it can hinder your uptime.
This will result in near 100% uptime depending on your build which is insanely good and beneficial to your team. One of these on each class also comes with a Mana boost which is significant to your team’s performance. Bard’s Sonic Vibration and Artist’s Sun Well requires people to be standing in them to be buffed so always be conscious of where you place it. This also applies to the Red Sword icon, you would not see it if outside the circle.
Identity
Overrated yet extremely powerful.
Each Support has a somewhat unique identity so we will break them down one by one. However the meter generation to use them is from landing your skills and some skills have significantly more generation. You can read the guides of each class to learn about those.
Paladin, incredibly straightforward, since it combines both Damage buffs and Heals you simply want to use this whenever you can actively hit the boss.
These next two have to decide on utilizing Damage or Healing. Remember if you are the only one taking damage, you should use a potion yourself. It is not right for your teammates to waste potential damage because you want to save a bit on pots. This also applies to your teammates.
Bard is a bit complex, she has 3 levels and you can use any level on either a Heal or Damage. In simple terms your heals should almost always be used at Level 1 due to an interaction with her class engraving making it the most effective. Since it is a large AOE heal, again you want to use this efficiently to heal the most people and not just spam it anytime someone takes a bit of damage. For the Damage buff you will mostly want to run this at Level 2, however Level 1 and 3 can be fine depending on the situation, and use this as much as possible.
Artist’s heal uses one orb and drops a bubble which can be eaten to heal a single person for 25% of her HP and then AOE heals everyone nearby for 15% of your HP. This means that it is ideal to use the Heal if people are below 80%, or a person is severely suffering, spamming these too much is just wasted damage for the party. The Damage buff uses two orbs and should be used as much as possible.
Bonus Damage
Now that we have covered the active damage increases, Branding, Attack Power Buffs, and Identity usage. Let’s talk about the bonus damage you can gain from gearing.
Remember not all of these are necessary, this is just showing you the potential of a Support.
| Honing | Increases your base stats of Weapon Power (from Weapon) and Main Stat (from Armor), these are what make up your Attack Power which is what scales up your Attack Power buff. Honing Armor additionally increases your health which impacts heals and shields. |
| Yearning | This is your Relic Set, the golden ring you carry around, this gives a free 12% damage increase to your party. |
| Cards | There are three card sets you can gain access to that can buff your team’s damage. You have a Plan: .5/1/1.5% Party Damage. Lostwind Cliff (LWC): 3.5% Damage when party members are using Light of Salvation. Master of Spears (MOS): 2.5% Damage when party members are using Kazeros’ Legion Commanders *LOS and KLC require max level to be effective. |
| Bracelet | There are a handful of rolls you will want, mainly your primary stats Swift and Spec. But there are a few nice rolls to get that can improve meter, or health to improve healing and shielding. There are however two godly rolls that are great for support. Dagger: 1.8-2.5% Defense Reduction to the Boss. Expose Weakness: 1.8-2.5% Crit Rate for the Raid. |
| Elixirs | Elixirs have many effects but the main ones for bonus damage are your primary Set of Luminary, Faith, or Advance, then an additional Ally Enhancement roll on pants. Additionally there is a general roll of Main Stat and Weapon Power. All of these combined will increase your Attack Power buffs and thus your total party damage of around ~3-6%. |
| Legendary Skins | You can also get Legendary Skins which increase your main stat, however these are really expensive, but Epic skins also increase your party damage and are practically free. An Epic skin will increase party damage by .25% and a Legendary skin will increase your party damage by .5%. |
*Honing Weapon Quality does nothing for Raids, however Armor will increase your health.
Consumables
It is not the Support’s job to use consumables, it is everyone’s job.
However if using Dark Grenades then people generally want it on the Support since they can perfectly time it with their big buffs. Everyone appreciates a nice burst window but don’t feel it is absolutely necessary for you to always utilize these. Also if you see your team utilizing any juicer Atrophine potions, you can bring a Stimulant to instantly charge your identity for an extra burst window for an even more juiced raid, you can also use these before you enter the gate if you do not have meter full generated.
Positioning
One of the most underrated concepts of Support.
Positioning is often forgotten about for Supports however it is important to keep in mind where you are standing. In general you want to stand towards the front of the boss so that the boss stays in position and you can easily land counters, this is great for all entropy users, as well as if the boss does any target projectile patterns. There are situations where you may want to position behind the boss like specific raids where the boss have very front focus attacks and times where you need to be up close to your members to make sure you apply DR.
Settings
Here are some settings to make Supporting easier.
Settings > Gameplay > Name Tags
- Here you can disable a ton of the titles/guildes/names people have to make it easier to keep track of specific people.
Settings > Gameplay > Combat Related Settings > Show HP Bar
- Here you can disable other opposite party members’ HP bar’s making it extremely easy to track your own team.
Settings > Gameplay > Combat Related Settings > Show Damage
- Here you can make your Damage font size very small or completely hide it altogether if you want to have the smallest amount of screen clutter.
Settings > Gameplay > Combat Related Settings > Show Combat / Pet
- Here you can do things like disable other peoples’ pets and combat effects to make the screen less cluttered for yourself.
Settings > Community > Notifications and Interactions > Emoticon Settings > Adjust emoticon bubble size > Minimize
- This setting can help with Emote usage overlapping onto your teammates names/health bar.
Settings > Community > Macro Text
- Here you can assign a message you want to commonly use for communication, these are unique to each of your characters. Generally only used for Identity and Awakenings due to how long their CD is.
(I suggest having them sent to your party to not spam other members)
Settings > Hotkeys > Skills > Select Dropdown next to Skill
- You can now use any of these premade macros on a specific skill.
Thank you for your time and I trust you found this little guide useful.


Be the first to comment