
In this guide, you will find useful information about the game interfaces in MIR 4.
Interfaces
Map
Tap the top right area of the screen to view the map.
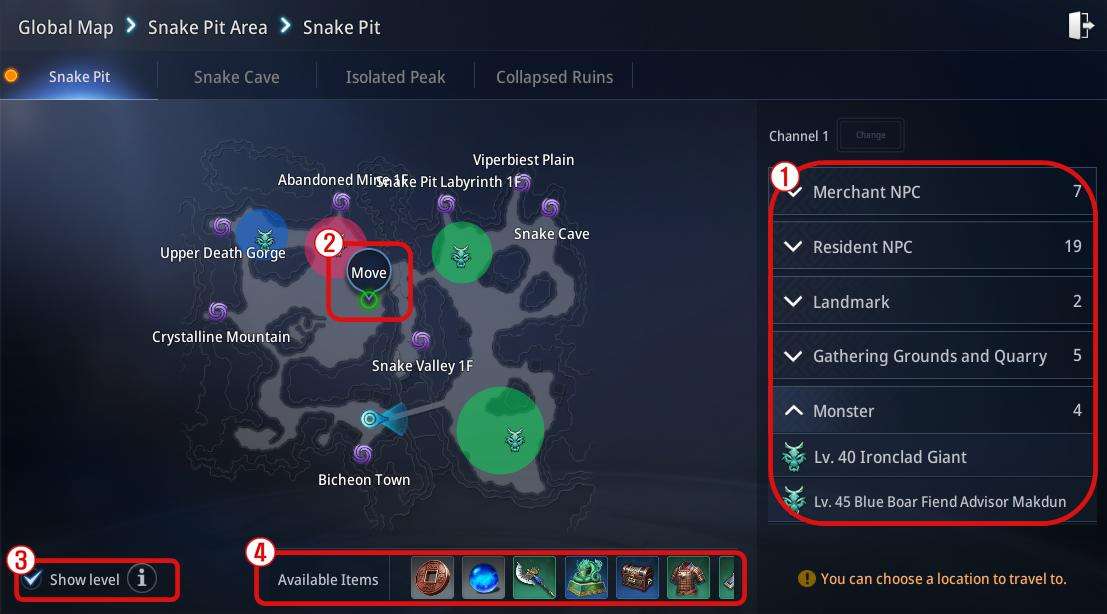
- You can check Merchant NPC, Resident NPC, landmark, gathering node, quarry, and monster information.
- You can choose a location on the map and travel there.
- You can enable or disable Show Level. (Show Level will show monster levels and where they spawn)
- You can view obtainable items.
Minimap
You can check the minimap on the left of the main screen.
- You can enable or disable the minimap display from Settings > Game > Convenience tab.
Chat
- You can view the chat window by tapping the Chat icon.
- You can use World Chat, Clan Chat, Party Chat, and Personal Chat.
- You can select and block specific users from chats, and view the Block List.
- You can chat with your clan or party members, or search and select other users to chat.
Character Status Info
You can view your character status information.
Alignment
1) You can check the notorious figures and propensity status.
- When you have low Alignment Points, you suffer a penalty to your Hunting EXP gain and there may be additional penalties when your character dies.
- You lose Alignment Points when you kill characters of Normal or higher Alignment.
- Recovering Alignment Points: When your Alignment Points fall below 5,000, you can recover the points by defeating monsters. However, the monsters you defeat must be within 5 levels of your character. (e.g. A Lv. 70 character can recover Alignment Points by defeating a Lv. 65 monster, but defeating a Lv. 64 monster doesn’t change the Alignment Points)
Death Penalty
- If your character dies at a location that is not a safe area, there may be a death penalty depending on the area.
- Death penalties include Internal Injury (stat reduction for a period of time)/EXP Loss/Item Loss.
PK Mode
- You can change your PK mode to Peaceful/Lawful/Hostile/Carnal.
- Players from warring clans or Most Wanted targets can be attacked regardless of the PK mode.
- When you join a Bicheon Siege, you enter the War state and can only attack users of the opposing side.
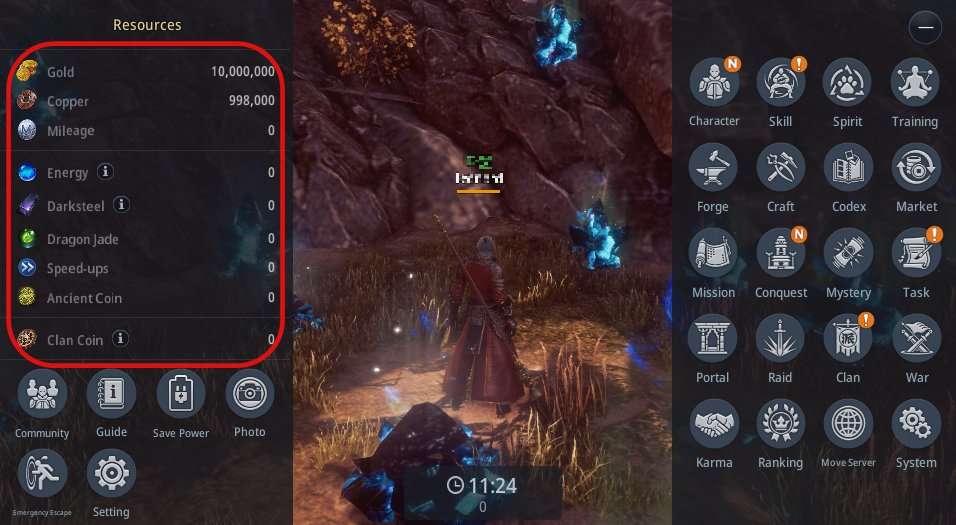
Menu
You can tap the Menu icon on the top right of the screen to view the features.
Tap to access a feature of your choice.
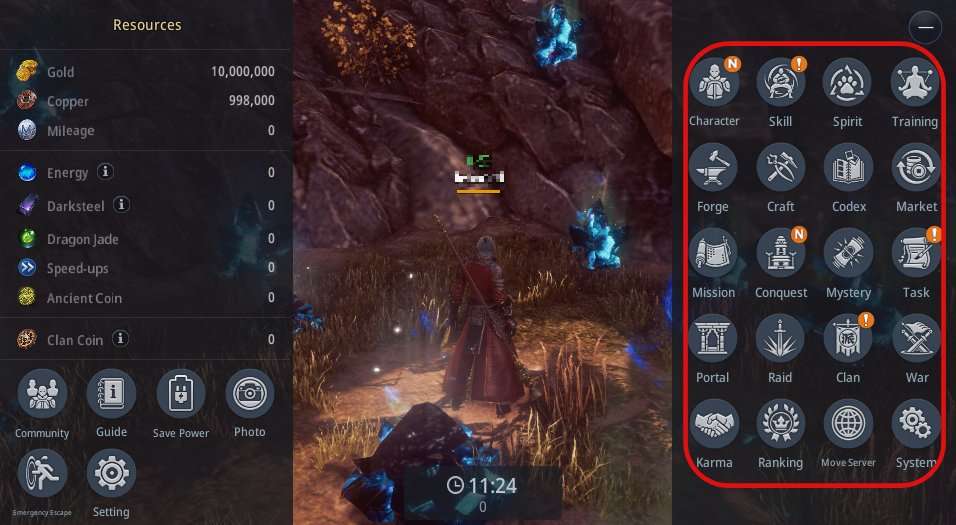
Information of all currencies you own is displayed on the left.
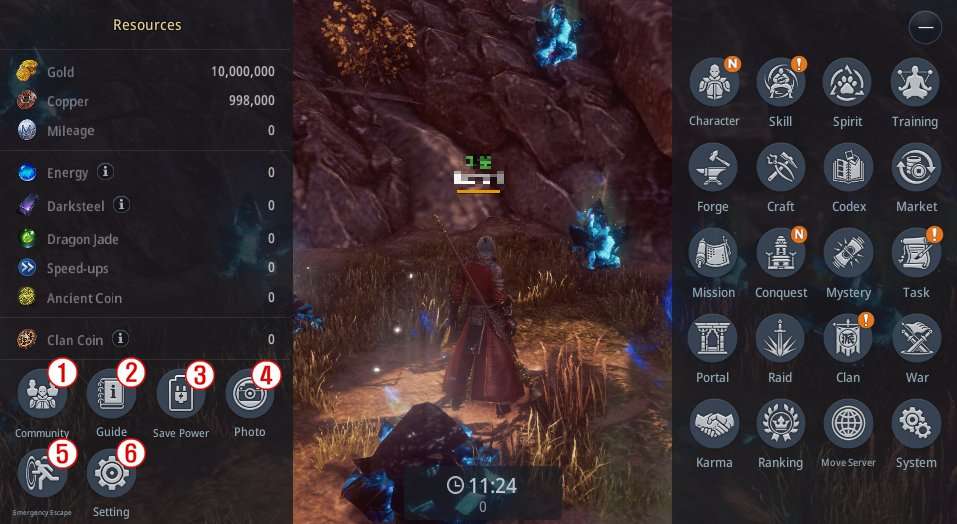
- 1) You can tap the Community button to open Mir 4’s official community.
- 2) You can view Mir 4 game guides.
- 3) Switches to the Save Power mode.
- 4) Switches to the Camera mode, and captured images are available at the path below.
PC – MirMobile/Saved/Screenshots/WindowsNoEditor
Mobile devices – [Gallery]
- 5) You can access Emergency Escape when your character is stuck.
- 6) You can adjust the graphics, name, and crest settings.
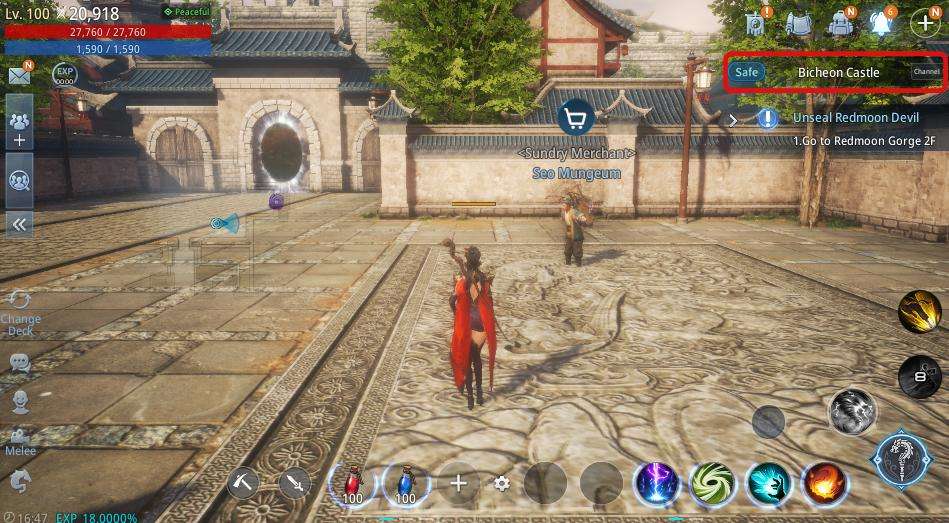
Default Interface
This guide introduces you to the default game screen layout and features you will see when you login to Mir 4 for the first time.
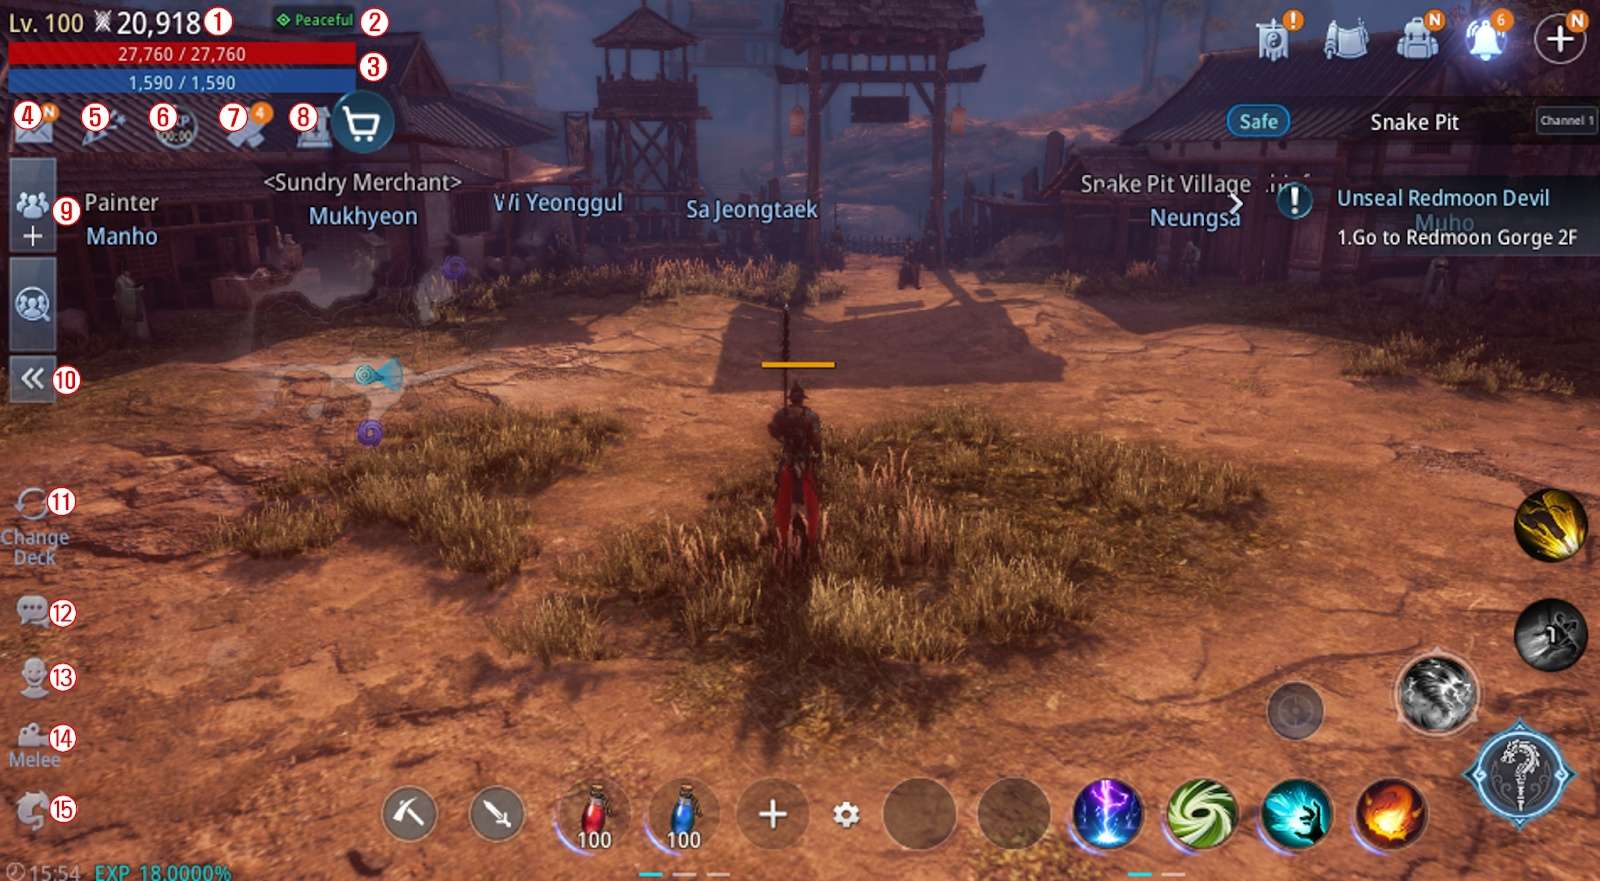
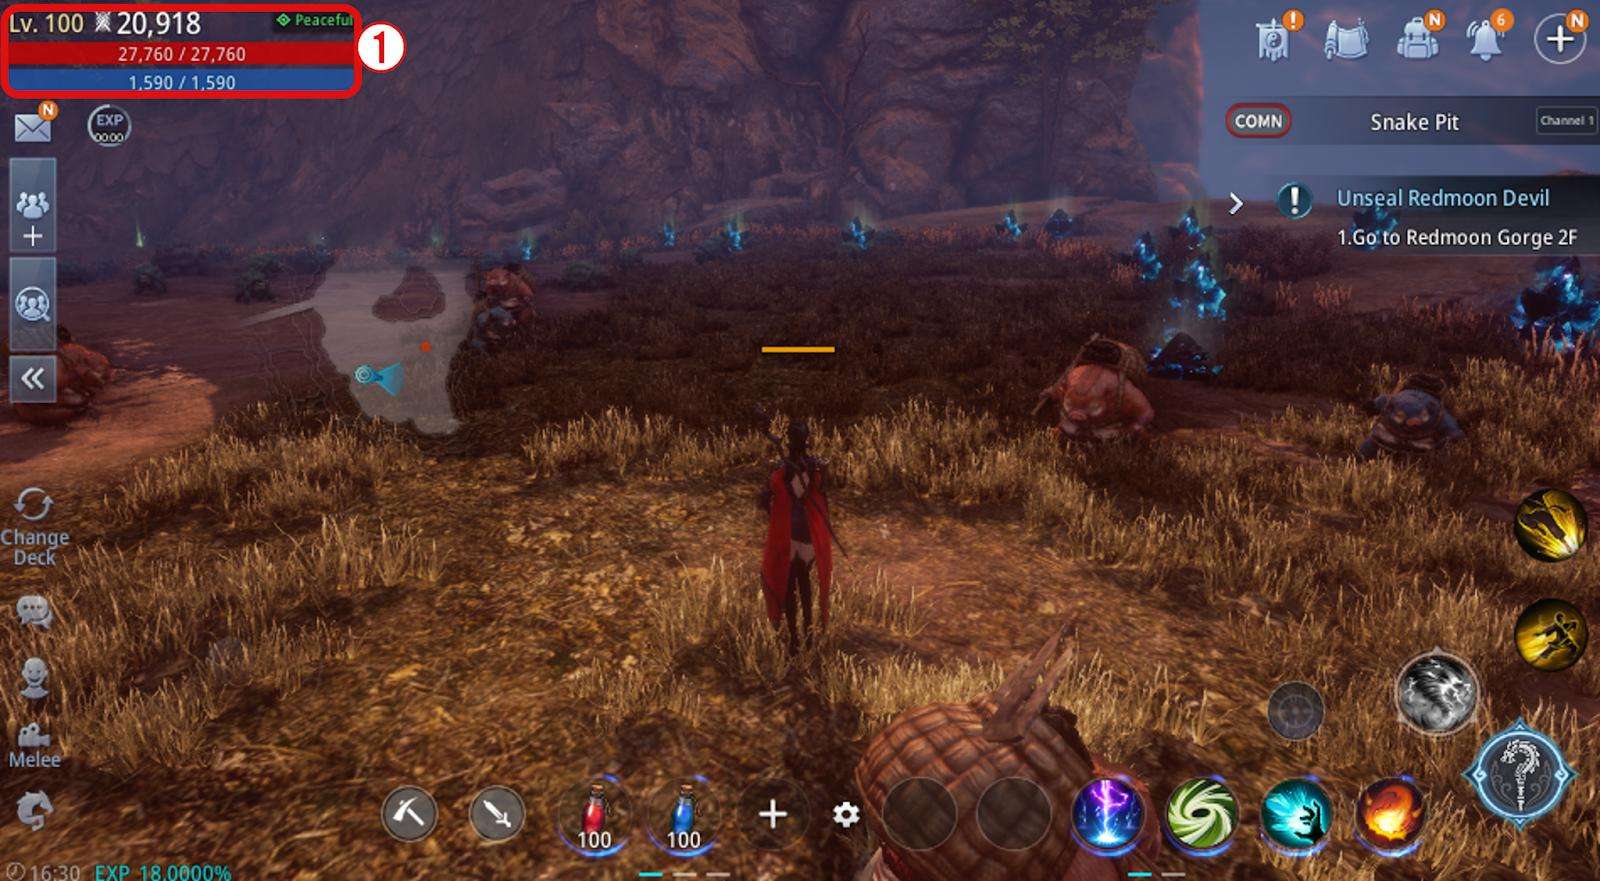
1) Character Level/Power Score
- You can view the level and Power Score of your logged in character.
2) Character status info & PK mode control icon
- You can change your alignment modes to Peaceful/Lawful/Hostile/Carnal and also enable/disable the ‘ATK users only’ feature.
3) Character HP/MP
- You can view the maximum/remaining HP and MP of your logged in character.
4) Mail icon
- You can receive news and rewards through the mail in Mir 4.
5) Event icon
- You can check the current events. (Login rewards/Special/Achievements/Mission Scrolls etc.)
6) Vigor effect icon
You can use the Vigor charging item to charge Vigor energy
7) Clan support icon
- Appears when a member of your clan requests support, and tapping the icon allows you to respond to all requests at once.
8) Internal injury, Restore EXP, Restore lost item icon
- You can remove the debuff or restore EXP/items lost due to the death penalty.
9) Create Party/Recruit Member icon
- You can create your party as Public/Private/Clan Party.
- You can join a Raid/Boss Raid/Party/Clan Party that other players have created.
10) Show/Hide Party Members icon
- You can show or hide the names and remaining HP of characters in your party.
11) Change Deck icon
- You can change the deck to one of the saved Spirit Stone or Magic Stone decks.
12) Chat icon
- You can use chat functions such as All/Clan/Party/Whisper.
13) Emote icon
- Actions include Greet/Bow/Bouquet/Dance, and tapping an icon gets the character to perform the corresponding action.
14) Camera mode
- Close/Distant/Manual modes are available, and can change automatically or manually.
15) Ride icon
- If you have set a mount for riding, tapping the icon enables you to ride the mount.
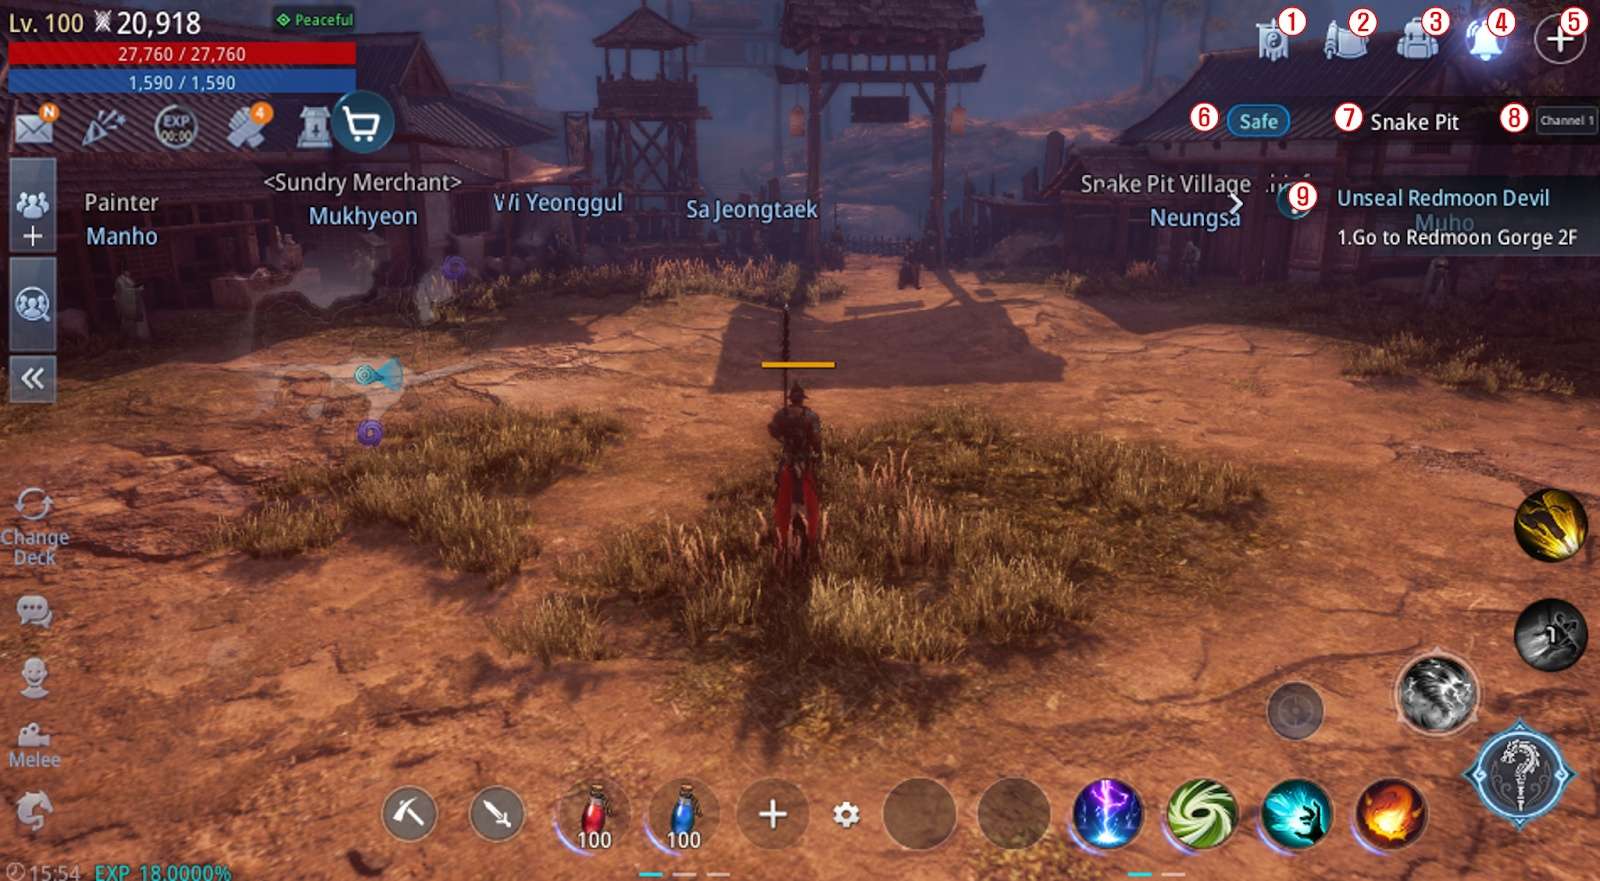
1) Clan
- Shows a basic description of your clan, or activates Join/Create functionality if you aren’t in a clan.
2) Mission
- You can view and accept missions and requests available in each area.
3) Equipment
- You can view the equipment and items you currently own, your character’s information, and equipped Magic Stones.
4) Notification
- You can check notifications on newly available activities.
5) Menu
- You can check the Main Menu.
6) Area Properties
- You can check the properties of your current area.
7) Area
- Displays the name of your current area, and tapping it shows the full map.
8) Channel
- You can check your character’s channel, and tap to change to another channel.
9) Mission List
- You can view your character’s ongoing main quest and missions/requests, and tap to auto-play them.

1) Auto-gather
- You can gather/mine/meditate at the nearest resource node from your character’s location.
2) Auto-combat
- You can get your character to fight the nearest target within the range set in Combat Settings.
3) Potion Quick Slots
- Pressing the icon uses a potion or a remedy, or use items automatically according to the settings in 4.
4) Quick Slot Combat Settings
- You can press the icon to assign potions or remedies to the slot, and check HP/potion auto-use settings and locations of potion merchants.
- You can also adjust the range for auto-combat and apply settings for Auto-return on resurrection, counterattack options, and the frequency of skill use.
5) Skill
- Displays the list of skills assigned to the character. Skills can be used by pressing the icon.
6) Target
- Tapping it displays targets near your character, and only designated targets can be attacked.
7) Default ATK
- Tapping it gets your character to perform the default attack motion.
8) Lethal Move
- Using skills or normal attacks fills up the Lethal Move gauge, and you can use the Lethal Move by pressing the icon when the gauge is full.
9) Evade
- You can evade during combat by tapping the icon, and there is a 10 sec cooldown.
10) Air Walk
- You can tap the icon to perform a double jump.


Be the first to comment