
Guide to Species War (PVP)
Drills
Drills allow for three things: 1) progression down the map by breaking blocks 2) collection of “Remains”, a resource necessary for advancing the Biozilla, and 3) occasionally additional resources are left behind, granting the entire club more cards, currency, and resources.
Each breakable block on the map has a drill cost to break, which is also the number displayed on each breakable block. The drill cost correlates to the tier of Remains material granted upon drilling the block:
| Drill Cost | Tier of Remains |
| 1 | 1 |
| 3 | 2 |
| 5 | 3 |
| 8 | 4 |
| 12 | 5 |
| 16 | 6 |
| 20 | 7 |
Drilling Patterns
Straight Down
The goal of drilling straight down is to get deeper in the map as efficiently as possible, balancing both near-term efficiency and long-term, map-clearing efficiency. This pattern enables strip mining (especially vertical strip mining) to occur with minimal additional drills.
- Drill only in columns 2, 5, and 8, unless there is no available path
- When an obstacle is encountered, go around it as minimally as possible, and then return to the closest available column 2, 5, or 8 using as direct a path as possible
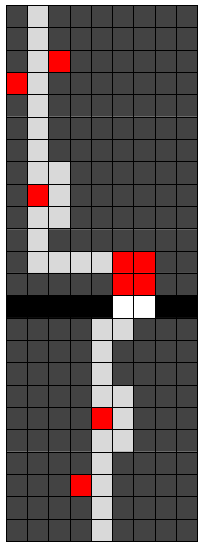
- Example route with 2 obstacles and an unskippable boss/area transition
Strip Mining
The goal of strip mining is to uncover all map incidents (gathering areas, club incidents, solo incidents, enemies, and bosses) as efficiently as possible. In order to find a map incident, an orthogonally adjacent (i.e. NOT diagonal) block must be drilled out — with the exception of gathering areas and enemies, which are automatically revealed for a given area when that area’s boss is killed.
There are two methods of strip mining, but vertical strip mining is preferred whenever feasible.
- Vertical strip mining
- Drill out columns 2, 5, and 8 completely
- Horizontal strip mining
- Drill out every 3rd row such that every block has as close to exactly 1 orthogonally adjacent block drilled out.
- When an obstacle is encountered, mine around it using the shortest path possible and continue clearing the column or row
- After columns and rows are cleared as neatly as possible, go back to drill out additional blocks as necessary to ensure all map incidents are revealed
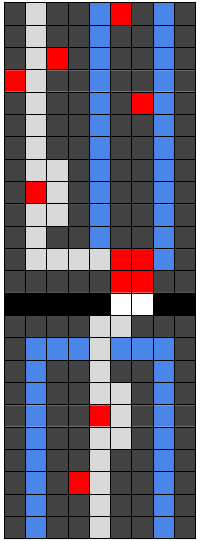
- Example pattern vertical strip mining the previous example route
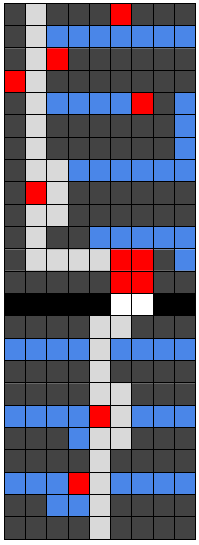
- Example pattern horizontal strip mining the previous example route.
Full Clearing
- The goal of full clearing is to ensure the maximum quantity of event points is gained from the use of drills.
- This pattern is rather self-explanatory and amounts to simply destroying all blocks which the game allows to be destroyed on the map.
Drill Use Priorities
- Drill to Area 10 boss following the straight down pattern.
- All bosses not blocking the path downward can be ignored.
- Area 9 boss typically takes a bit to kill, so you may temporarily move to the next priority OR just wait until it’s dead before continuing to use drills on this priority.
- Priority is complete when the Area 10 boss is found.
- Drill T5 blocks (those which cost 12 drills to destroy) in Areas 8, 9, and 10 using the strip mining pattern.
- Area 9 typically has the highest concentration of T5 blocks.
- Priority is complete when 6000 T5 Remains have been collected (see “How to review club resources” for how to check this)
- Drill Areas 1 through 10 using the strip mining pattern.
- Priority is complete when 3 club incidents have been found in each Area
- Drill Areas 1 through 10 using the full clearing pattern.
- There are more blocks than the drills the club will collectively receive can destroy, so it’s not expected all areas will be fully cleared before the end of the event.
- Priority is complete when all areas are cleared or event ends
Silver Tokens
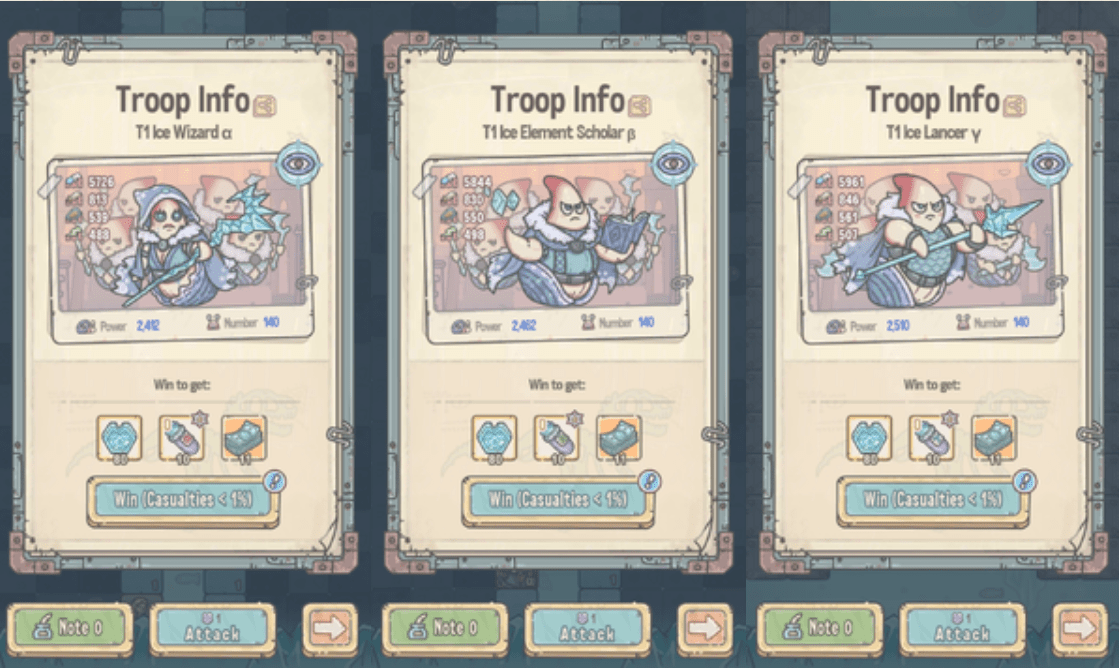
Each attack using a Silver Token gives a set number of Hormone materials to the club’s shared resources, matching the variety (α, β, or γ) of Enemy Troop attacked. Higher tier Enemy Troops grant increased quantities of Hormone materials.
When 1 α, 1 β, and 1 γ Hormone materials are available in the club’s shared resources, they are automatically converted (and removed from the club’s shared resources) to a single Biozilla Hormone matching the tier of Enemy Troop which granted the Hormone materials.
In addition to the club’s shared resources, attacking Enemy Troops grants individual rewards of Species Currency and Star Coins.
Silver Token Use Priorities
- Attack the 3 varieties (α, β, γ) of T5 Enemy Troops (located in Area 9) equally
- Each attack gives 125 Hormones
- A total of 6000 T5 Biozilla Hormone is required to level up the Biozilla at the end of the Species War
- Each of the 3 T5 Enemy Troops needs to be attacked/killed exactly 48 times, for a total of 144 Silver Tokens required to complete this priority
- The club is allowed 25 Vanguards, which should be the 25 players with the highest minion power
- Each Vanguard receives 4 Silver Tokens on the first day and 2 Silver Tokens each day thereafter
- By the end of the second day, the club receives sufficient Silver Tokens to complete this priority at no cost (even when excluding the contribution from Species Essence purchases)
- Priority is complete when 6000 T5 Biozilla Hormones have been collected.
- Attack the 3 varieties (α, β, γ) of T6 Enemy Troops (located in Area 11)
- These Enemy Troops may require T6 minions or high leadership, so many players may be unable to participate. However, T6 Enemy Troops give the most event points per Silver Token, and so should be prioritized where possible as soon as higher priorities are complete.
- Priority is complete when the Species War ends.
- Attack the 3 varieties (α, β, γ) of T5 Enemy Troops (located in Area 9)
- Players without sufficient minion power to defeat T6 Enemy Troops should continue to attack T5 Enemy Troops, with less importance placed on doing so equally across the 3 varieties (Event Points are given for the α, β, and γ Hormone materials, not the completed Biozilla Hormones).
- Priority is complete when the Species War ends.
- Attack the 3 varieties (α, β, γ) of T4 Enemy Troops (located in Area 7)
- Players without sufficient minion power to defeat T5 Enemy Troops should attack T4 Enemy Troops.
- Priority is complete when the Species War ends.
Gold Tokens
Gold Token Use Priorities
- Attack Area 11 boss
- Attack Area 12 boss
- Attack Area 7 boss
- Attack Area 13 boss
- Attack any other remaining bosses
Gathering Sites
Overview
- There are 9 Gathering Sites per Area — 3 each of the α, β, and γ varieties. These are used to generate Fossils, one of the 3 Resources necessary to upgrade the Biozilla. Each Gathering Site produces only a single type of Fossil material: α, β, or γ.
- When 1 α, 1 β, and 1 γ Fossil materials are available in the club’s shared resources, they are automatically converted (and removed from the club’s shared resources) to a single Biozilla Fossil matching the tier of Gathering Site which generated the Fossil materials.
- All Gathering Sites in an Area are revealed when that Area’s Boss is defeated.
- Each Gathering Site has a set number of Gathering Points based on tier/area.
- Each club member can gather from a single Gathering Point at a time, requiring only that they have enough minions of the Gathering Site’s tier (or higher) to fill out the Gathering Point.
- It takes the same amount of time (e.g. 9:02:59) to complete a T6 Gathering Point as it does to complete a T1 Gathering Point.
- Your Gathering Speed is calculated and locked in at the time you begin digging at a Gathering Point. If you acquire an upgrade to your Gathering Speed, you would need to withdraw and restart the Gathering Point in order to benefit from the increased Gathering Speed.
- When a Gathering Point is completed, if another Gathering Point is available in the same Gathering Site, the game will automatically begin digging at the next available Gathering Point.
- If you’re not frequently active in the game, select a Gathering Site that has no other club members active so that you can continue gathering even if you’re unable to check in every 9-10 hours.
- Similarly, all club members should endeavor to maximize both their own gathering and the gathering of their peers.
- If you notice that there are others at the same Gathering Site as you, which are nearing completion but with no empty Gathering Points, consider withdrawing and switching to a different Gathering Site.
- When selecting your Gathering Point and Site, choose one which has less than half the Gathering Points in use or completed.
- Gathering consistently throughout the entirety of the Species War is one of the most powerful ways club members can contribute to success in the Species War.
- The rewards granted are paramount to the club’s success in Species Wars as they grant access to Species Cards which allow the purchase of various permanent player buffs (as well as lots of chests and event-related resources).
- Further, Species Currency, most readily available from Gathering Sites — but only to the individual player who completes the Gathering Point — provides access to powerful minion skin upgrades and even more resources
Gathering Rewards
Each Area’s Gathering Sites has a different number of Gathering Points and grant different rewards (both for completing an individual Gathering Point and completing all Gathering Points within a given Gathering Site):
Click to enlarge…

Gathering Site Priorities
- Always be gathering:
- Prioritize from the ordering below based on which highest priority you’re able to complete while always gathering
- In other words, it would be better to gather for ~54 hours straight in an empty T2 Gathering Site than to start gathering in a full T5 Gathering Site, and then not restart your Gathering once your selected Gathering Point is complete
- Complete all T5 Gathering Sites in Areas 9 and 10
- Complete all T4 Gathering Sites in Areas 7 and 8
- Complete all T2 Gathering Sites in Areas 3 and 4
- Complete 2 T6 Gathering Sites in Areas 11 and 12
- Complete 2 T3 Gathering Sites in Areas 5 and 6
- Complete 2 T1 Gathering Sites in Areas 1 and 2
- Complete all remaining T6 Gathering Sites
- Complete all remaining T3 Gathering Sites
- Complete all remaining T1 Gathering Sites
Species Essence
Species Essences are a special currency used at a special “Extraction Device” solo incident typically found in Area 2. Each club member can acquire and use exactly 2 Species Essences per Species War. The first is free and available as soon as the “Extraction Device” solo incident is found. The second is purchased using 500 Species Currency at a separate “Species Traitor Shop” solo incident (also usually found in Area 2).
When Extracting a Species Essence, the player is given 50 Species Chests and 15 each of the Biozilla Remains, Fossil, and Hormone resources. Since this is static regardless of the Tier selected for extracting, only the highest Tier Extraction available should ever be used (typically this will be Tier 5 or Tier 6).
Instructions
- Wait until Area 9 is reached.
- Select T5 Biozilla Material.
- Extract x1.
- Repeat.


Be the first to comment