
Contents
The Sheer Basics
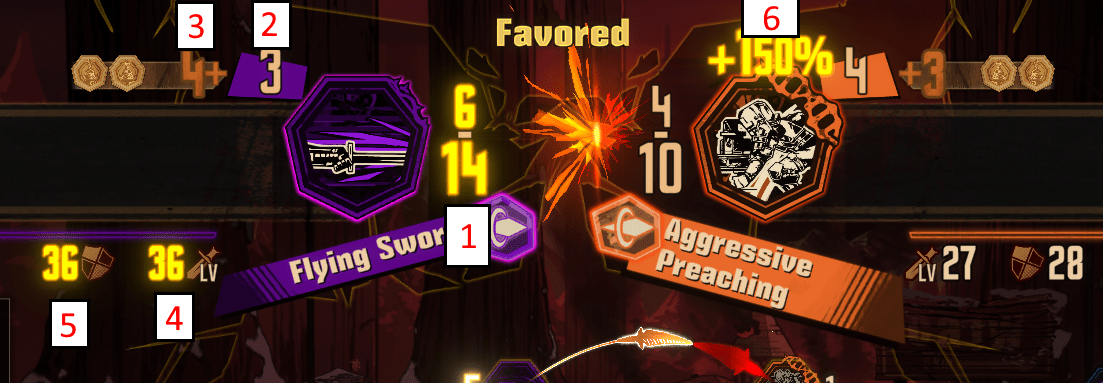
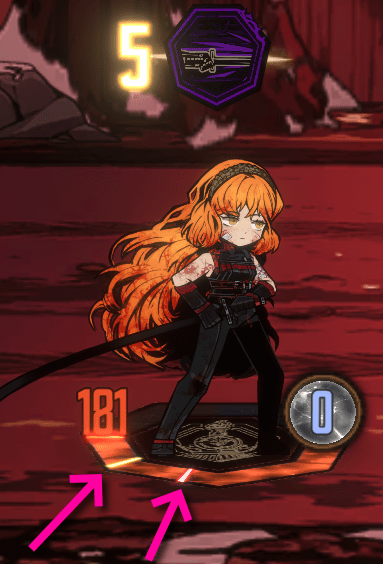
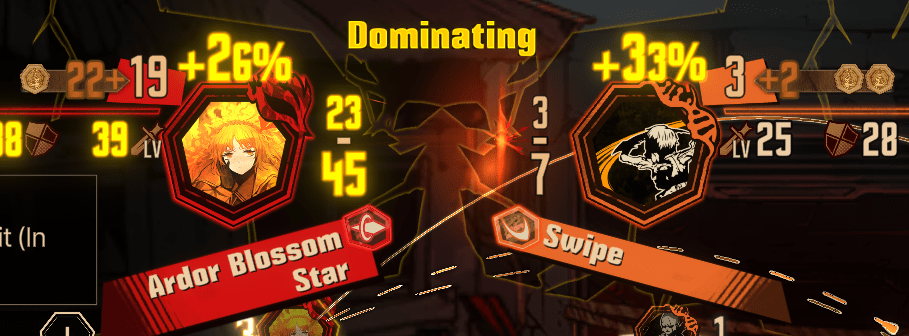
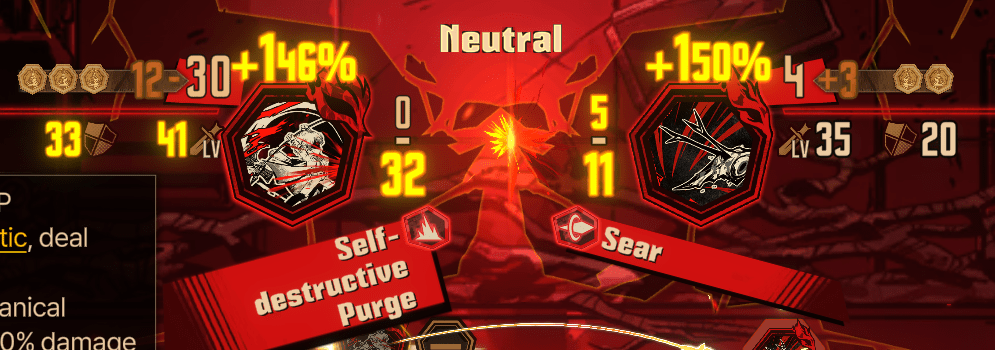
In combat, we’ve got a few variables. The only thing that matters to you right now is “final power” your unit, and the enemy unit they’re facing off against, both have one. Here’s a sample image of what the game’ll show you – with a few added indicators, to point out what each number means.
Also, that big Dominating at the top tells you how likely you are to win a clash with what you’ve selected. If you want to turn your brain off as to the specifics, but you don’t want to spam winrate, feel free to just use that.
Through this guide, I’ll be using Shi Ishmael to describe everything. Both because you have Shi Ishmael (it came free with your fucking Limbus Company) and because I like Ishmael.
The Mechanics of Clashing
In a clash, a number on your side and a number on your enemy’s side, called the Final Power, are compared against each other to see who wins. This happens as many times as there are coins – it rolls the final power with as many coins as each side has, and whoever wins loses a coin for that “phase” – then repeat. Once one side runs out of coins, the other gets to do damage with however many they have left.
Final Power
This is the final output of everything below this. Clashes are just a test of this final number on both your skill and the enemy’s skill. There’s a bunch of multipliers and additives that get factored in that change it a bit from what’s on the character page, so try to always check the fraction pointed out there – that fraction shows the minimum and maximum that could be rolled in your clash.
Base Power
This is the lowest your skill could possibly roll – it’s the power before anything happens to it, like coins.
Coins
The most integral part of Limbus’s combat is coins. They flip, resulting in either power getting added to a skill when they flip heads, or… that not happening on a tails. There are also units, both friendly and hostile, that have negative coins – this means that every Heads takes power away. Finally, this is important – They aren’t true coinflips. Units have “sanity”, expanded on below.
In combat, the power that gets added onto the base power is decided by the amount of coins the skill has, and each adds the coin power if it flips heads. The coin power can be seen directly below the 3 in the above image, and the coin count can be seen by, well, the count of coins beside it.
That skill has 2 coins, each with a coin power of 4, so if I were to flip 1 heads and 1 tails, I’d get a final power of 3 (base power) + 4, or 7.
Now, you may notice that the fraction (6 to 14) doesn’t line up with what the actual minimums and maximums of (3+0+0) and (3+4+4) are, and that’s because of offensive power – see below.
Note: As of the time of writing, the only negative-coin friendly units are “The One Who Grips Sinclair” and “Lobotomy EGO: Sunshower Heathcliff”, however there are many EGO (explained later) that that isn’t the case for.
Offense Level (You Can Safely Ignore Both This and Defensive Power)
Notice how the enemy has a number with the same symbol beside it in the same spot. This is each unit’s offensive power, and it decides how clashes scale and how much damage you do. This is also why unit levels are important.
Each skill’s offense level is decided by the unit’s level, plus a constant that varies per skill that you can view on the unit’s page if you hover over the offense level. For each difference of 3 between your offense level and theirs (or vice versa), you will gain +1 Clash Power (increases power during the clash only). Since Ish has 9 more than them, that means she’ll gain 3 Clash Power to any clashes she does. This also changes how much damage you do to an enemy, but the exact specifics are weird.
Note that Offense Level also applies to counters; it double dips, both multiplying damage and adding 1 Base Power per 3 Offense Level. One of many reasons Middle Don is much better than she seems.
Defense Level
Acts as both a multiplier to the incoming damage you take – the higher it is compared to the enemy’s offense level, a higher percentage gets removed, in a roughly 1 difference of off/def to 3% damage – but it also affects the final power of defensive skills, in a similar +1 per 3 difference.
Damage Multiplier
This is decided by… a whole load of things that I don’t want to get into, but mainly these.
On an enemy, the 🡩 shows skill types and colors that will do more damage to them, and the 🡫 shows stuff that’ll be worse – and vice versa on your side.
Do note that when an enemy is staggered (see below) every damage type resistance – so Pierce, Blunt, or Slash – changes to Fatal. You can view the damage multiplier that a sinner will take by clicking on them – their type resistances (Slash, Blunt, Pierce) are by ID, and sin resistances are decided by their Zayin EGO, and if you use a different EGO afterwards it becomes that EGO’s resistances.
Damage Type
You can see that the skill does Pierce damage (the small symbol beside the 7) and is Lust colored (the orange around the skill, and the DNA at the top right). These feed into Point 6, above.
Sanity
Sanity is shown by the circle on Ishy here:
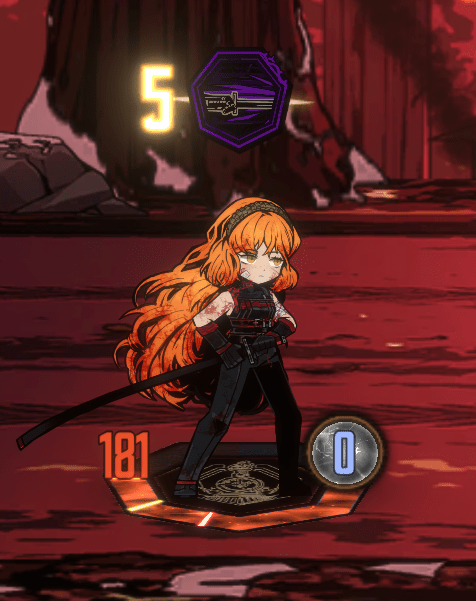
Sanity changes how coins flip. Each point of sanity is 1 percentage towards a heads flip – thusly, each negative point of sanity is 1 percentage towards a tails flip, both from 50% base. 40 sanity = 90% chance of heads. Sanity has a limit of 45 to -45. There are many ways to gain and lose it. The notable ones are:
- You gain some when winning a clash
- You and your team can gain some when killing an enemy whose level is higher than yours
- You can gain some based on certain skill/EGO effects
- You lose some when an ally dies
- You lose some based on certain debuffs, though these are rare
- You lose a bunch when using an EGO. Expanded on below.
However, there are probably many I’m missing, which you can view by clicking on “Sanity” when viewing a Sinner’s expanded page – and it will also have actual numbers, which I’m not putting here for deprecation’s sake.
Sanity listings and conditions can also vary based on unit – currently, this is limited to Sunshower Heathcliff, but it may change in future.
But How Do I Clash?
So, you get how those numbers matter and How It’s Made. But how do you correctly put them to use?
The General Fight Targeting Tips
As with most RPGs, this is all up to personal preference and playstyle, and doesn’t apply to everybody, yadda yadda… but I’ll attempt to give a general gist of good practices. This bit won’t be reviewing human battles (dragging the chain from left to right), cause, uh, there’s not exactly too much strategy to do there.
Speed
In the general combat phase, you’ll notice a little number beside / above every unit’s head.
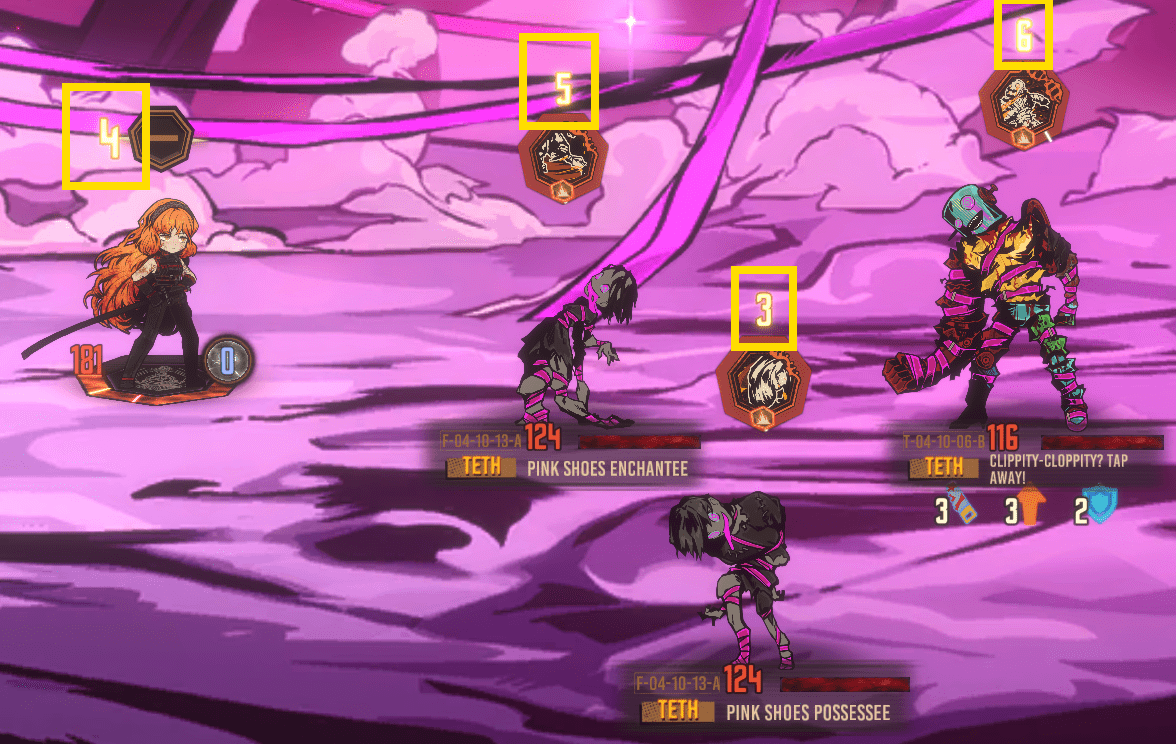
Your sinners roll a speed denoted at the bottom left of their page [2-5], enemies roll a speed on their own speed die, they choose their skills, and then you get to input what you’re doing.
Speed can also be increased by Haste (a status effect) and a bunch of other things.
There are two general rules to speed:
- Friendly units can only “redirect” skills from their original target, clashing with them, if their speed is greater than the enemy’s speed (not equal).
- However, if an ally is being targeted by an enemy, they can always respond to that enemy’s skill – speed doesn’t matter here. They can still clash it.
- Skills always go in the order of highest to lowest speed clashes – clashing an enemy skill of Speed 8 would go before an unopposed Speed 7 friendly skill, and then any ties go in order of the bottom bar – followed by left to right enemy slots. The game actually lies to you during combat – it shows their animations out of order – but if you watch buffs and health and such carefully, the game calculates it in the correct order. Don’t ask me why.
- The game lies a little when talking about Speed, as it’s a decimal that you can’t really see the actual value of. The only thing this has relevance for is evading – if you want to evade an abnormality’s multiple attacks, evade their rightmost part’s leftmost attack.
Clashing (For Real This Time)
So, how should you clash? Where should you put each skill?
This is individualistic and everyone will probably play somewhat differently, but here’s a few tips.
- When multiple skills are input onto the same enemy skill, the last one you input goes first. This is need-to-know if you’re using a tank. As well, there’s a trick to getting “free” skills in against enemies – use this if you’re confident you can stagger/break before that enemy skill’s Speed comes up.
- Input all the skills you want onto it
- Input any last skill that has the speed to redirect it
- Move it somewhere else afterwards
This results in both sides having unopposed attacks, and hopefully you staggering it before it gets to do anything – all without having to clash. This is also really helpful if you need to attack a slot that’s going to hit K Corp Hong Lu (or other tanks, though less so).
- Try to never clash with something that’s most likely going to lose [unless playing K Corp Hong Lu, expanded upon later].
- If you are going to get hit and you can’t really do anything otherwise [e.g. enemy clashes high, you don’t have any EGO available] check your ally resistances and see who’s gonna tank the least damage. Using an ally with double-Ineffective will take an eighth the damage an ally with Normal Sin + Fatal Type would. Worth watching out for.
Body Parts
This is entirely unique to Targeted fights. You may notice that, when you hover over skills, there’s things like Body, Head, Left Arm, Right Arm, Telepole…
These are the enemy’s Body Parts. There’s a few rules to these:
- They can be broken or staggered. A part will say “severable” when it can be severed, and if it is severed (by reaching 0 HP on that part):
- It will not be able to attack for the rest of the fight, it’s completely removed from play
- Likewise, you won’t be able to attack it
- Enemy behavior may change in other ways, you’ll have to either look at its passives or just get experience with it. A good example is how breaking Telepole on the Telepole Dog fight nullifies every skill for that turn & disables one of its passives.
- If a part cannot be severed, but it can be broken, it will instead reach 0 HP and stay there. This means that it has fatal resistances (takes double damage from all types) but Sin resistances stay the same. They can often still use skills if not staggered, however.
- If staggered before it can attack, every skill on the same body part will completely vanish from play. You can still attack it, but it can’t fight back. Fatal resistances apply as usual from stagger, so if a body part is staggered and you think you can kill it with that damage, go for it.
- Damage gets “mirrored” between the body part and the main abnormality. When you attack it, you deal any damage you would to the part – they can have different resistances per part – and then any damage done gets mirrored onto the main abnormality, even if the part has 0. This is why getting a part staggered and then bumrushing doing as much damage to it as possible is generally advisable if you have the output. Few exceptions.
Conditions
There’s… a load of these, but I’ll cover the most important ones. There are full conditions, like Stagger, Panic and Corrosion, and then more traditional debuffs like Burn and Sinking.
Stagger
When a unit goes below these funny little lines on their health bar, they get staggered.
This makes them unable to act for the rest of the current turn, and the next full turn, barring any specific passives or anything. While staggered, a unit’s resistances against Blunt, Slash and Pierce all get set to Fatal – so they take 2x damage. Once you go past the first line, they get staggered – each line past that done in the same turn is 0.5x extra, referred to as Stagger+ and Stagger++. Units can also have a different amount of these bars – Ish here has 2, but you can have up to 3 and some units can possibly have 0.
Many effects can play with these bars, notably Tremor and some units like N Meursault or Los Jefes Sinclair, but just know that anything describing Stagger Threshold is referring to moving those bars around.
Panic and Corrosion
When a unit reaches -45 Sanity, or SP, they’ll either Panic or Corrode. Pretty much only friendly units can corrode.
When Panicking, you lose every action you have until the next turn. Pretty basic, you get fatal Sin resistances for that turn (take double damage) and you can’t guard or clash or anything. Corrosion is more interesting.
When you corrode, you use either:
- A random EGO, if none have been used
- The last non-base ego that has been used that fight
(See below) out of the ones that unit has that can corrode (denoted by whether it has a Corrosion tab (the only ones that can’t, currently, are the ZAYIN that come with the sinner for free)). These EGO target any unit, even friendly ones, at complete random (unless denoted otherwise; Don Telepole does not target randomly, and can be controlled. Lifetime Stew Don always targets the highest HP unit.). Corroded EGO also use resources they would normally cost and can put you into the negatives the same way. Note that, while corroding, if a sinner has multiple slots, some can also at random be Panic ones – which don’t do anything.
ALSO, when an EGO gets used while Corroding, you can hover over each to see who it targets – and hopefully avoid hitting allies by picking the better one.
Footnote: Panicking or Corroding does not use up skills in the rotation; you will keep the same skills that you had lined up before hitting -45.
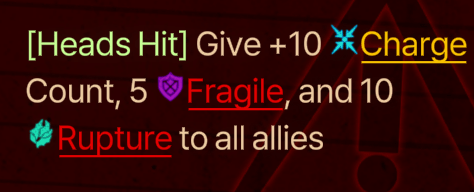
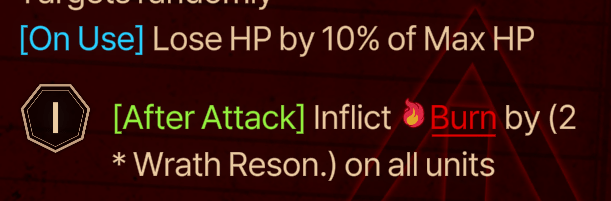
Debuffs and Buffs
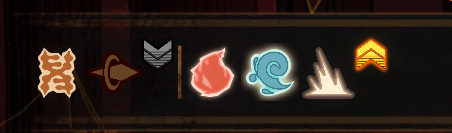
During combat, any number of debuffs and buffs can be applied to any unit on either side.
Just know that you can hover over any of these to see what they do, and that some can make skills better based on how many the enemy has:

Some can normally be debuffs but instead be buffs specifically because a unit does them to itself:


And some can be unit specific, both in the cases of identities that have their own.

And in the case of bosses that apply weird arcane conditions to your units, or themselves.

Defensive Skills and The Freudian Ego
Using either of these will “use up” the skill below it – removing it from the rotation. I would not advise using them “over” a Skill 3.
Defensive Skills
Too many people don’t know these exist, so I’m putting it here for my sanity’s sake.
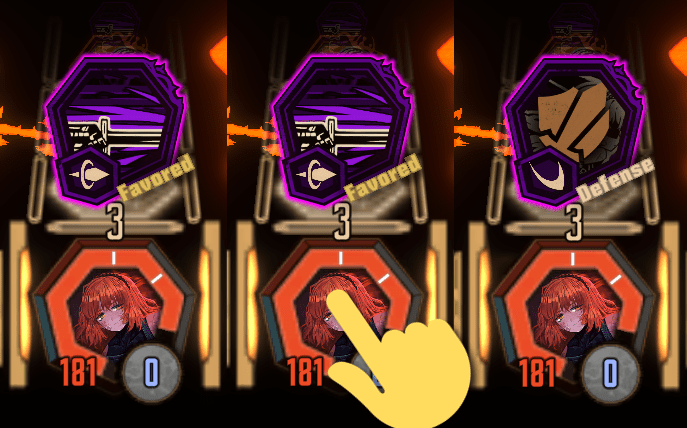
When you tap your sinner’s icon at the bottom, you may notice that the bottom skill of their slot turns into something entirely different. This is known as their “defensive skill”, and it can be viewed on their character page to the right of their Skill 3.
There are 3 kinds – Guards, Evades, and Counters.
First, however – Using a defensive skill may seem useless, but against harder content, they’re nigh on necessary. Also, many defensive skills do not adhere purely to the base ideas of these 3, and they can even have sin colors, useful for EGO resources. Some defense skills also have different defense levels from the actual unit’s, so they may reduce damage taken no matter what when used. I’d personally recommend using them or EGO pretty much whenever you’re going to lose a clash.
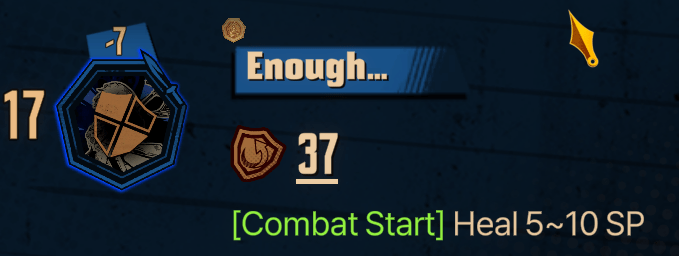
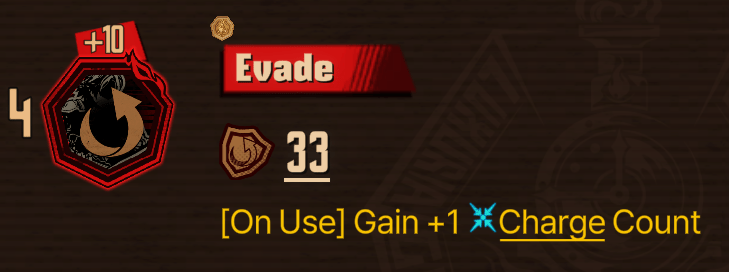
Guards are a mini-skill, where the enemy gets to do a one-sided attack (an unclashed skill where they just do damage for free) however the user gets a shield first – this shield blocks damage equal to the final power of that Guard. It also persists after guarding against that enemy skill for the rest of that turn – so if another enemy attacks you, it can still be used there.
Evades let you completely negate damage, within certain conditions.
An evade gets tested against each coin of an enemy’s attack, where if you roll equal or higher than their current power, that damage is completely negated. However, if you ever roll lower, the evade is gone. As with guards, evades work against any number of attacks until they get “broken”, which can be very useful in certain scenarios.
Counters are strange. Essentially, you get neither the shield from a guard nor an evade – you have to tank that damage – but if you’re not staggered, you retaliate afterwards, doing the skill denoted in the counter. The damage reduction still applies. These generally aren’t horribly damaging to the enemy, but they get free hits in and on some units they can be quite good.
The Ego and Its ID
So, EGOs. These are essentially “ultimate skills”, that have a bunch of stipulations on how they’re used, and ways they can be used – often with amazing clash values
And possibly stellar damage, some beating out any normal skill in the game. And sometimes being downright fucking comical.
They also give passives to that sinner for the rest of the fight when used – you can see this under the Passive section on the EGO.
To use one, instead of tapping the sinner’s icon, hold it to see a card view of each EGO you have equipped, their chance of corroding, their effects & costs, et cetera.
EGO, however, are equipped – each sinner automatically comes with a ZAYIN tier one, however you can get more and higher tier ones the same way you do IDs.
Many EGO are also AOE, meaning they hit multiple units (or multiple skill slots, more accurately).
(Also, sidenote – there are additional ZAYIN tier egos you can get to swap out the base ones).
EGO have a few stipulations for use, however:
- They cost EGO resources, which you can see on the right of your screen. You can earn more by using skills of that sin, i.e. using Wrath skills will give you 1 Wrath ego resource to be used for casting EGO.
- They have a specific sanity cost, which gets used up after clashing – so you can have 45 SP for the clash – but before the damage coin is rolled, so if you use a 35 SP cost EGO when at 45 SP you’ll have a 60% chance of hitting heads.
- Many EGO have negative coins, so rolling heads is a bad thing. Use them based on the Sinner’s sanity state accordingly, for best success. This is often positive for normal use and negative for corrosion, however that is not a rule [see Roseate Desire Ishmael]
- EGO, when used at low enough Sanity, can corrode on their own – possibly hitting your allies. I believe it’s “when below -23 sanity, there is a low chance of randomly Corroding”. They can only hit allies if the corroded version is AoE (multiple Attack Weight), however.
Also, EGO can be Overclocked.
Essentially, when you Corrode, you use a completely different version of the EGO. This can be manually done, however – if you tap and hold on the EGO’s icon, you Overclock it, which uses 1.5x the EGO Resources and Sanity. This can be either a Safe or Unsafe overclock.
- A Safe overclock means you have the resources to do it – it will almost always randomly target, so it cannot be manually directed, however it will not hit allies – only enemies. A wee few can be manually targeted (or the random targeting works different) however, like Don’s Telepole and Sinclair’s Lifetime Stew. This is viewable in the EGO’s description.
- An Unsafe overclock means you don’t have the resources – when used, you’ll go into debt, and the EGO can hit allies. However, it’s worth noting that you can see who it’s going to hit, so it’s not near as unsafe as it seems.
Finally, it’s worth noting that Overclocked EGO are not always better. As a trend, they’re usually much more dangerous and uncontrollable, and often have both positive and negative effects:
However, most of the time, their damage makes up for it – and before Uptie 4, they’re often most of the selection for AOE skills.
The Little Bit Weirder Stuff
Below is stuff that is still definitely useful to the average player, but isn’t by any means necessary to know for simply clearing normal content.
Skill Rotations and Grab Bags
So, you have a certain amount of each skill that you can have. This is denoted by the 3x, 2x, and 1x here:

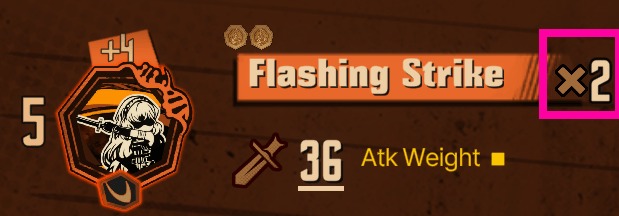
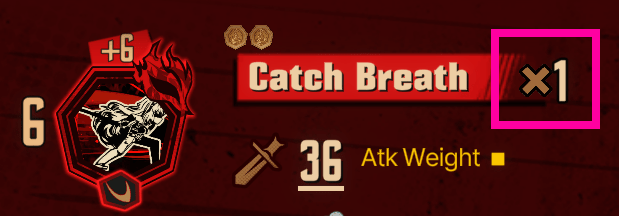
To explain this the simplest I can (this’ll be easy if you play Tetris) these amounts of each skill get thrown into a bag. The skills in this bag are then shuffled, but there are always 3 of S1, 2 of S2 and 1 of S1 in this bag. They’re then doled out to that sinner in a random order, and once that bag runs out, the same thing happens again – an infinite list of random skills, however random in such a way that you will always get a S3 in every set of 6 turns.
Now, if you are in combat, a sinner may gain bonus skill slots – in human fights (ones where you drag the chain from left to right) there’s a max of 12, and slots are gained by each sinner in the order you selected them before the fight. There’s a handy number on each one to show this.
In focused fights, bonus slots work differently – each one will have a max amount of units you can bring. If you take less than that, like 4, you will gain skill slots in the same way as above until you hit that max – either 5 or 7.
When a sinner has multiple skill slots, the bag essentially just gets doled out the same way – however, each slot pulls from it from left to right, so you rotate through them faster. Here’s a great that explains it better than I can in text.
Identities цith Odd Play Styles
I can’t promise this’ll be kept up to date, but I’ll try.
- K Corp Hong Lu
This dude’s odd. Generally, your playstyle will not be “win clashes”. His role in a squad is soak as many high-rolling skills as possible so your team can just shit out damage.
You essentially want to make as many attacks as possible hit him – don’t redirect any that already do, and if he has the speed, make more hit him. This is because his passive gives him, effectively, 5 health bars, or ~1000 HP. And for this reason, you usually don’t want to guard with him (unless you know he won’t die 3 times) – it gives him more damage on his S3, sure, but you lose 200 HP every time you guard. Guarding also has aggro whereas his S3 does, so use at your own discretion.
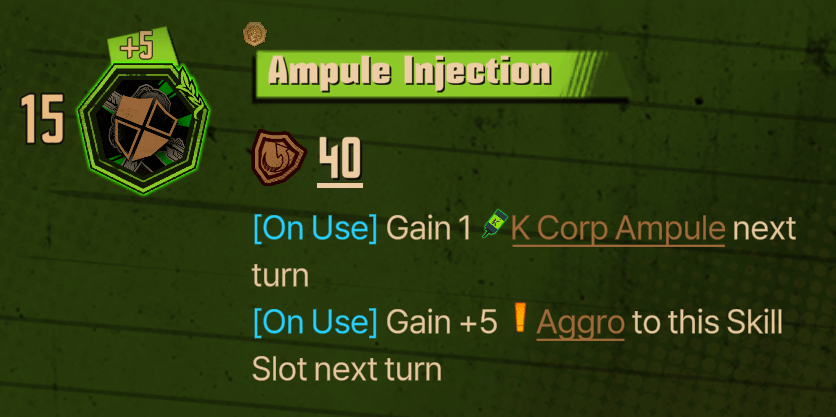
At Uptie 4, he becomes even better at this job – due to Aggro. When he uses S1 or S2, the next turn, abnormalities are MUCH more likely to target his slots – so now he can soak even more hits, making you get to do even less clashing and more damage.
- N Corp Sinclair
Weird unit. Due to his reliance on negative coins, the game kinda lies to you as to what his “minimum” rolls are. See, because you lose coins in clashes, his minimum rolls are not actually what the game says they are – even if he rolls all heads, he will always get (skill base power MINUS 1x coin power). Without any additives, this means 12 on S2 and 18 on S3. You can go for much riskier clashes accordingly, though he’ll get out less damage.
He literally can’t lose.
- Lobotomy EGO : Sunshower Heathcliff
Currently the strangest and most arcane unit in all of Limbus Company. Don’t take him unless you know what you’re doing, or desperately want to know what you’re doing in trial by fire. His combat performance, assuming optimal play, scales linearly with turn count – past turn ~5, he can compete with Rabbit Heathcliff and past 7 he solidly beats him due to lacking ammo and inherently being a good juggernaut with great damage. However, he sucks at low turn count content… which is most of it, due to his reliance on self-debuff that requires stacking.
However, this comes at high reward – if you get his setup going, assuming you’re playing right (and clashing what he can’t with other units) his DPS can rival that of any of the best units in the game, notably W Corp Don Quixote.
Worth a pick up, but only if you know where and when to use him – best put in something like Refraction Railway or other difficult high-turn stages, though he works pretty well in MD2 Hard with some EGO spam.
The above notes about Sinclair also apply, as they’re both negative-coin IDs.
Thank you for your time and I hope this little tutorial was helpful to you.

Be the first to comment