
This guide is a walkthrough on the quest called Baptism By Fire where you have to raid the bandit camp along with Sir Radzig and his garrision. If you follow the guide carefully, you might be able to finish the quest in one or two go’s at it
Other KC:D Guides:
- Ancient / Treasure Map Guide.
- Console Commands (Cheat Codes).
- Where to Find the Weapon and Armor Set of St. George.
- Belladonna Farm Location.
Contents
Beforehand Preperations, Tips And Notes
All credit goes to HRE Lord Thistlewick Flanders!
To be clear, this battle is a very challenging one if you have a low level character with awful gear. Dont excpet to beat this in one glourious go if you have low skills in weapons and essential perks, I’d also like to point out that you should buy or find a bow, some arrows and a melee weapon that has good blunt or armour piercing damage, as the bandits in the later stage of the quest have brigadine and chainmail armour if you so happen to attempt to fight them.
And the scouting and sabotage beforehand will probably not hinder the enemy force as much as you would expect if not at all. So try to avoid it or accept it with open arms if you really wanted to do it for whatever reason you’ve come up with.
And when Sir Radzig mentions how many men are there. Say that their are too many to count or the highest option. This will help you dearly in the longrun.
This quest at the time I am writing this has many bugs that may ruin the immersion or the will to play this game. So don’t come crying if things don’t go to plan, or this shouldn’t be their but it is or vice versa.
And I really hate this quest so much, but this does not hinder my love for the game itself. I really come to love Kingdom Come Deliverence and what is has to offer.
The Beginning / Bridge Skirmish
During the opening stages of the quest you are faced with the direct route on the bridge where a few archers are stationed on the other side of the bridge to harrase your forces. Don’t mind this as they retreat once you get across the bridge.
After the quick confrontation a formation of bandits will appear. None of this will really matter because the bandits in the formation are very great pushover but even if you dont help them. It may be wise to get a few hits so you help the men break them faster. After the conflict it is essential that you pick up their armour and wear it if you do not have great armour to begin with. Most of the corpses (Or soon to be) will be carrying chain mail and helmets. Keep in mind that most of the bandits you will be facing later on will have better equipment and especially the cumans that come up next.
Keep in mind that the parts that happen before the cuman camp are mostly not worth noting as they don’t really do much that might hinder you in the later parts.
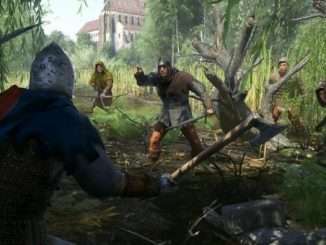
Open Field Battle
Immediatly after the brief attack on the bandits you face another formation with a mixture of cumans and more bandits. Some of the Talmburg men go right, do not go right as it is a waste of time and you hit a invisible wall half way through.
The cumans are well better equipped than the previous bandits as well as the bandits assisting them. Although it seems daunting. The Radzigs men can handle it. But just like last time, it is wise to help them by stabbing and slashing behind the enemies backs may help in the later conflict.
Again, you should loot the cumans for armour and weapons possibly. And be sure to pick up a shield if you do not own one.
Cuman Camp
After the bandits are cleared up a cutscene plays with soldiers moving the cuman cart, and entering their camp. Your task now is to deal with the archers and kill the cuman commander, don’t pay attention to the cuman commander, as radzigs men will take care of him. This part could play out two ways through my experiences with this part. There is only one way to do it in order to pass onto the next part without any tears or problems. I am saying this because if the archers are not killed or injured badly, the tide of the battle may turn drastically to the bandits favour.
Once you enter the camp you immedietly turn left and up the stair case, there you will find at least 7 archers shooting down upon the Sir Radzigs men. Once you climb up attempt to get the archers to pull out their swords. This can be completed by walking close enough that the archers AI would force them to bring out a melee weapon to face you. Once they do, trek down the stairs with a shield (If you have one) always facing the archers that still have their bows out. This will help you to protect yourself since arrows either wound or stagger you. While you walk down the stairs, make sure that the men that have their swords out follow you down, this is extremely important because once they make it down, they will either take out their bows again and shoot at Radzigs men up close, giving you a chance to stab them a few times, killing them. Or Radzigs men come to confront the archers and slaughter them. It is extremely important that you keep Henry at full health as every bit will count later in the quest.
Continue to do this to the remaining archers before the cuman commander is killed. If he is killed, this triggers the cuman looking archers on the staircases to go into the open ground outside the cuman camp and shoot either you or Radzigs men. This may prove to be a challenge if the full four or five cuman archers are sitting their as it makes it a challenge to kill them before they run away. But if you have listened to me and killed most of the cuman archers, one or two may prove to be a pushover rather than an actual fight.
Now with the cumans out of the way, two more archers may be still in the battlements, very quickly run up on the battlements and take them out with either a bow or close combat. Whatever suits your fancy. Be mindful of one of them, he has chainmail equipped and it might be a challenge to fight him in melee.
After the conflict, Radzigs men will cheer and along with the reasuring cheers, comes a objective complete sign. As soon as the threat is cleared in the camp. Attempt to loot again. Any bow and arrows you can find, and some better armour if you dont already have some supiriour armour. And heal up if needed.
Main Battlement Assault
Once the task of ridding the cumans is complete, Radzig will mention that the next fight will be the hardest. Which may or may not be true. It is important that you look over how many men you have remaining from the cuman camp assault, If you see over a dozen men, you have a chance at not losing the battle with the dreaded You Lost To Many Men sceen, and if you have less than that, don’t even bother, just load up the cuman camp save and pray to god that you’ll get more than 12 men assaulting the main Battlement.
Upon seeing the Battlement you are met with bandits in chainmail and plate armour with covered helmets. This may prove to be a task to rid of them. But if you followed my advice and had more than 12 men attacking this formation, it will soon crumble within two minutes. Once you’ve slayed a plate clad bandit or happen to stumble upon a body with quality gear, loot him the second you get the chance, this is the last moment you have to equip the best armour in this quest. Since it will prove to be a great use in the last stage of the quest. If you cannot equip or loot due to being in combat, try to move the corpse to the edge of the battlement or at least an okay distance away from the battle.
At this point this mission goes either two ways, you get a game over because you had lost too many men (3 to 5 soldiers left) Or you’ve survived long enough to see Radzig order his men to break down the churches doors with a log. Soon after Radzig issues the command bandit reinforcements arrive. The reinforcements are a step down to what you had fought with. (Some men having gambeson and a hand axe) But this could either mean misison fail, or a swift capture of the main battlements.
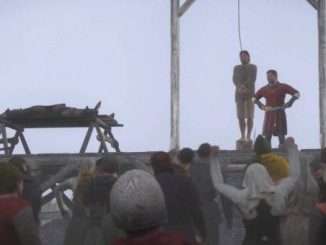
Beyond this point another cutscene is played where Radzigs men finally break down the door and fight more bandits, Henry quickly catches glimpse of Runt (The Boss) and follows him to the attic of the church.
The Final Duel (Runt)
Runt is a master swordsman, and has bested me a lot of times. Many already know this through basic knowledge of the human atonamy that Runt has one weak spot. And that is his head..
Once the cutscene ends with them getting ready to duel. You have to very quickly pull out your bow and walk back to the edge of the church wall. It takes Runt at least .75 of a second to react to you and charges you. So this segment must be very quick and precise. As soon as you knock an arrow. Runt should be basically a metre away from you. And if you aim at his head, 99/100 if you hit him in the head he will fall down and die. Which triggers another cutscence telling you that you’ve killed him.
The more complex way with dealing with him is the more harder (But honorable way) is to fight him in close combat with the armour and gear you had taken in the recent skirmishes. This will be challenging and daunting if you attempt to beat him with a sword. I’d advise to purchase an armour piercing weapon such as a mace or an axe before the quest starts. Since Runt will be wearing plate, brigadine and possibly gambeson. Use every tactic to your advantage and avoid his chain attacks. Which prove to be very devastating if left alone. Beyond these, I have never won a battle in close combat with Runt. But by knowledge and the grasp of the mechanics of this game. You should be able to at least get a hold of what to do when you are fighting Runt up close.
Congratulations, you have beaten the quest and can now move on to the next part of the story

Be the first to comment