
I do not recommend this guide if you just want to “enjoy the game”. If anything, doing what this guide shows you, you will likely lose interest in the game much faster than you would have if you just played through it normally. I’m sorry but that’s the real reason why I didn’t really want to post this guide up. It kinda ruins the game for you if you can progress so rapidly. I also admit that this is just how I play, so it’s not the “right way” to play the game, I’ve spent most if not all my time playing Kenshi just restarting the game and trying to get my characters up to 50-80 skill on everything as fast as I can and “teching up”.
Other Kenshi Guides:
- Beginner’s Guide and Some Tips.
- Starting Guide / Guy and His Dog.
- Early Money Making Method / Hashish Running.
- Suitable Outpost Locations.
- Skeleton Empire Start.
- Improve Performance.
- Weapons Guide.
Start: Nobodies / Hub
Start: There are many starts, personally I prefer Nobodies as it gives you 5 members to start with. 7 is the magic number of characters to have for fast progression so starting with 5 is excellent. (If you have less than 7 characters, you are easily party wiped, and if you have more than 7 members it takes a lot longer to train all your character’s combat skills). Keep in mind that you should have 2 shek, 1 Hive Warrior, and the other two is up to you. If it were up to me 2 Shek, 2 Hive Warrior, 1 Hive Prince.
Reasons for starting this way: You want to have enough Sheks as they are really good late game for being all around fighters. Hive Warriors are probably the strongest unit in the game right now with 100 hp on limbs and a whoopin 200 on head, they still have the racial combat speed bonus from being Hive, very SLOW bleed rate from being Hive, and has no real weakness from being Hive (which is usually low limb HP). 200 hp on head is really really good even though he can’t wear a helmet (think of it like this… he has twice the Hp so that’s like taking half damage to his head). Hive Prince is really good for stealth, lockpick, assassination type things, and gets bonuses to a LOT of skills. They are more fragile than the Hive Warrior but he’ll do just fine late game with some gear.
Location: Start at Hub, if you don’t start at Hub, make a NEW GAME repeatedly until you start at Hub. There are lots of locations that are impossible for you to survive if you start there.
I was originally going to make Youtube vids of this… I still might, but due to having real life stuff like work, I can’t make the time… WAS going to make a youtube channel with a whole gaming channel about min maxing for many many games… but eventually just decided I want to enjoy gaming and not turn it into work. Sorries.
Squin: Athletics, Basic Gear, Money
Now that you started at Hub, you run your 5 person group to Squin, make sure you avoid bandits along the way. At this point everything in the game can kill you. Just run run run run run and then RUN.
Squin:
Three things to do here at Squin before moving on.
Find the patch of Iron (3 worker slots) and Copper (2 worker slots) north of Squin. Work there to get both iron and copper and sell them in Squin for money (cats is the currency name) and buy ONLY Dried Meat (most money efficient food).
1: Athletics: In the beginning don’t take a full load… just some and go get that food so your characters don’t starve. Also since this way will eventually give you some savings, you will want to run your characters around so they get some decent Athletics (20+).
2: Basic Gear: Once you are able to do that, you can keep doing multiple full load trips to Squin with Iron and Copper and only buy Dried Meat… this should start accumulating money. Spend money buying these items for your crew:
- Samurai Clothpants (ONLY THE CLOTH), they do not slow you down, they do not lower any important stats like athletics, combat speed, dexterity, or dodge. DO NOT buy anything that lowers these stats!.
- One Shek should buy a Plank.
- Give your characters leather shirts (Hive characters can’t wear them). It’s ok to go shirtless on Hive characters for now… we will gear them soon.
- Don’t spend too much here… just get VERY BASIC protection so the characters aren’t taking full damage. Since you already have no toughness to start you’re actually taking additional damage per hit that you take, having SOME protection can help. You also don’t want anything heavy since at this stage your characters don’t have the strength to wear heavier armor without being encumbered. Being encumbered in fights can get you killed early on.
- I would get a trader’s backpack (wooden backpack that lets you stack items 9 per stack), and a Large Backpack (large enough to put long/heavy weapons like planks inside them). That’s all you need: 2 packs, one of each type. I would store food like dried meats inside the wooden pack, and extra weapons in the Large Backpack. For now put the Plank in there.
3: Money: I would save up money here in Squin until you have around 30,000 cats. This shouldn’t take too too long and trust me it will be worth it. Once you have 30,000 cats go to Hub again.
Optional: If you see groups of garrus or goats moving near Squin, I would attack them unprovoked, and then RUN like hell to the guards at the gate to kite them into the guards. The guards will kill the goats and Garrus and you can then harvest them for meat. Build a campfire far enough away from Squin and you can enjoy loads and loads and loads of meat.
Optional: Any Hungry Bandits and Dust Bandits could also be kited into the guards at the gate in Squin, and you may even choose to fight there as the fight will be in your favor with the guards there. Just make sure to save before so you don’t get accidentally party wiped. This can help speed up the process of gaining some toughness, but it’s again optional and not the main focus here at this stage.
Recommended: I would recruit Ruka here, she is literally free if you just talk to her about being cool she didn’t have horns and that she likes to fight and prove herself. A Free Shek! This will bring your party number up to 6.
Tip: To prevent being party wiped, here’s a nice tip… you should stealth (hide) one of your party members outside of the range of the fight. This “stealth” character should have medkits and be able to stealth rescue any downed members after the fight and for in case all your fighting members go down. Another option is to have the entire party be far from the enemy “camp” and have a fast (high athletics) character with no encumbrance run up to the enemy to pull aggro, and draw them to your party. This way if you do get “wiped” they won’t stand on top of your downed members and instead will eventually go back to their camp which allows your party to get back up and heal.
Hub Again: Shinobi Thieves = Lockpicking Skill + Katanas
At this point with 30,000 cats you can pay the fee of 10,000 cats to join the Shinobi Thieves. Do it, it is so worth it for what you’re getting out of it.
Here’s what you already have at this point:
- Decent running speed from Athletics 20+ (You want to stay unencumbered when you travel so you can run away from scary things… only carry some food and bandages)
- Your characters have some decent strength (around 20? don’t worry if it is not at 20, but you’ve definitely already built some strength previously) carrying iron and copper back and forth to Squin from the spot north of squin with 5 workslots in those veins. (You should also already have the two backpacks I mentioned for your party’s needs).
- You now have 20,000 cats to spend.
Here’s what you buy from Shinobi Thieves once you join them:
- You buy any and all katana class weapons you find here for your characters. Every character should get one. Does not matter what quality… if it is a Nodachi, Wakizashi, Ninja Blade, Katana, or whatever it is, it doesn’t matter, just get one for each in your party. If you have Ruka, you’ll need 6. I’d get 7 at this point. They won’t have enough in one go so you’ll have to go back to squin for food and more money and come back to Hub for more katana class weapons.
- You want to keep a close eye on Assassin’s Rags. Buy these for your Hive characters. You can also buy these for your other characters. The reason is this: Assassin’s Rags are lightweight, bonuses to stats that are amazing (Combat speed, Dodge, Dexterity, Melee attack bonus)… All of these stats are amazing to have on any item, and having all of them on one item??? BUY IT!!
- Eventually you will find those wooden sandals that also give more combat speed and athletics, BUY THOSE or loot them when you find them!
You may need to go back to Squin frequently to get more money and food… but in the meantime this is our next goal…
Train Lockpicking to 20 for all your characters or at least one character, and 10 for the rest. We will be needing this skill for the next part so it is very important to have lockpicking up.
IF your characters still don’t have 5 melee attack yet, train this here as well. AND also you may train one character for Assassination here (if you ever want to abduct enemies one by one to kill them separately from the group… it’s a cheesy way to play but it works… I recommend the Hive Prince for this role).
After we have 20 Lockpicking on at least one character (ideally everyone), AND we have assassin’s rags, AND we have katanas on everyone… we will be heading to the … FOG. Yup. Highly efficient place to train if you know what you are doing.
Cool Tip: One of the ways to make some fights easier, especially if you are fighting a camp of something that have high stats (and maybe low numbers), it’s nice to have a stealthy character with high Assassination be able to sneak up to a group and kidnap/assassinate some of their members one by one to bring them back to your party and deal with them one by one this way. This takes patience and slows down the ‘speed run’ but is a nice way to reduce the difficulty of a big group fight by killing off some of their members individually and thinning the herd.
Mongrel: Training in the Fog + Getting Geared
SO Mongrel is normally a “late game” or at least mid-late game place to go. BUT…. we’re going there NOW… because this IS the Rapid Progression Guide.
On your first attempt to reach Mongrel I recommend looking at this map and following my directions exactly:

From Hub, you want to get to the south of mongrel of the map, literally directly south of Mongrel you will see a mountain range?? Go along the eastern side of that range (that means right side if you’re looking at the map)… Hug that mountain range. You may run into some groups of fogmen, but you should be able to deal with them with the katanas and save scum your way up to Mongrel.
We are NOT here to fight the fogmen right away, but we will very very soon.
Once you reach Mongrel you get the option to recruit Beep, who is a Hive Worker. He is a fun character… and once again he is FREE. Your choice if you want him. I personally have no preference, and on some playthroughs I recruit him, and on others I skip him. There are 2 more free characters that I will mention soon that are worth recruiting.
Once in Mongrel you may do this next three steps:
Mine copper for Money: There’s a hill directly east of Mongrel… like right out the gates pretty much where there’s lot of copper to be mined from several piles of scrap from “old world tech” laying around. Copper is more expensive than Iron… I would mine here the same way you would in Squin except, now you’re doing pure copper. Make trips to Mongrel for food and for selling the copper off.
Buy these:
- Any Desert Sabers that are MK 2 or Mk 3.
- Falling Sun Mk 1,2, or 3
- Any Hacker weapon that does bonus damage to Robots that are Mk 2 or Mk 3.
- Optional if you want armor at this point… I wouldn’t bother with that yet.
OK training time… yup scary I know…
Fight the Fogmen near Mongrel by saving before, then use your Katanas and fight/kite them near the entrance to Mongrel. This place is ideal because Fogmen hits you with Sticks, which means you won’t be at risk for losing your limbs even if you take a lot of hits. I personally don’t like playing with prosthetics… the good prosthetics are hard to reach. Also in case you were wondering, the lock picking skill is useful for getting away from the poles the fogmen tie you to in order to eat you… so yeah it is kind of important to have lock picking before you come here in case bad things happen.
I’d grind here for toughness using Katanas until your Dexterity goes up to 30+.
Then… Give some of your characters the specialized weapons like the Hackers, or Desert Sabers or Falling Sun… and some of your characters switch to no weapons so they can train their Dodge, and Martial Arts. If Martial Arts isn’t a goal for you (one shotting someone by kicking them in the head???) then I would make the characters not using weapons to go on “dodge/Defend” mode and Taunt. This lets them train their dodge repeatedly while taking aggro and lets your weapon users hack/fallingsun/saber their way into having high weapon skills on those weapons. Rotate the role of who has to dodge, but don’t rotate the weapons… I would specialize the weapon types… everyone should know how to use Katanas. Then one other weapon they should become really really good at as well. Fogmen gives good repetition as there’s a LOT of them.
In this way your Toughness goes up… you get lots of weapon training, and you train your Dodge which is VERY important. This is also why you don’t want to buy armor and weigh yourself down too much, you need to be unencumbered to dodge better.
Eventually I would say when your toughness reaches 50 or so, and when you have dodge upwards of 30+ you can gear up a bit and buy the really good quality armor. I would only use the Specialist Grade or High Grade Stuff… dont’ waste your time with the bad quality stuff, when you do wear armor, you want the good stuff. Again, armor is a choice. I have some playthroughs where I don’t wear heavy armor even in late game and I rely on melee defense, dodge, and toughness to keep my characters up… the best way to train those? Yup, not wearing armor. (Just wearing some shirts, and jackets and pants is enough for me personally… not to mention Assassin Rags).
Ok done here? We are going to three cool places all at once… or at least you have a choice here…
Cool Tip: Strength is really hard to train as it goes up. SO while you are “Mining” for copper to make money, buy as many “Trader/Wooden Backpacks” as you can. Fill each character with Backpacks (one in backpack slot, 2 in inventory), fill up each backpack with copper and then swap with the empty backpacks in the inventory until all 3 packs are filled for that character. Do this for all your character during the “mining phase” to overload their carrying capacity between runs to and from the copper vein and the merchants to really level up their strength while being time efficient. Do not wear backpacks while fighting, and do not be encumbered while fighting. Since we are staying mobile, put one of the backpacks inside the other ones and then take off the backpack and put that one into Inventory and have all of them empty to not have any stat drops during combat. (backpacks while equipted really nerf your combat stats hard). Use Iron if you’re purely doing strength training for the late stages of the game when trying to go past 80 strength… (also carry party member who is also filled with iron, AND use a heavy weapon to fight easy enemies like hungry bandits… that way you can max strength by having like 2000 lbs of weight while carrying a person while fighting enemies using a heavy weapon).
Regarding Armor: Armor really mitigates damage… that’s nice… but if you want to train stats like Toughness you really really really don’t want armor on you because the bigger the hit that you take, the more experience you gain in Toughness. Since higher toughness is going to inherently give you natural damage resistance (above 50 toughness your toughness stat will reduce more and more damage), you want to train toughness by not using ANY armor. Armor slows down your rate at which you level Toughness. You also want to make your characters fight even when they are low hp or bleeding or wounded to gain even more toughness. Once you max out Toughness putting on Armor for really hard end game fights like Leviathans or for the Bug Master fight would make sense, but by then you don’t care about the “slow training” since you already maxed your stats… but training with Armor on is going to slow your training down. This is also why I recommend fighting things like Fogmen for most of your toughness training. They use sticks which is blunt damage and won’t chop off your limbs with big damage (plus they don’t hit that hard).
Choice 1: Burn’s Tower
If you like robots, mechanical limbs, and if you especially want to “tech up”…
I would equip those Hackers that do bonus damage to Robots to the characters that can use them and have been training with them… and head to Burn’s Tower to recruit Burn and also get some ancient books on the way.
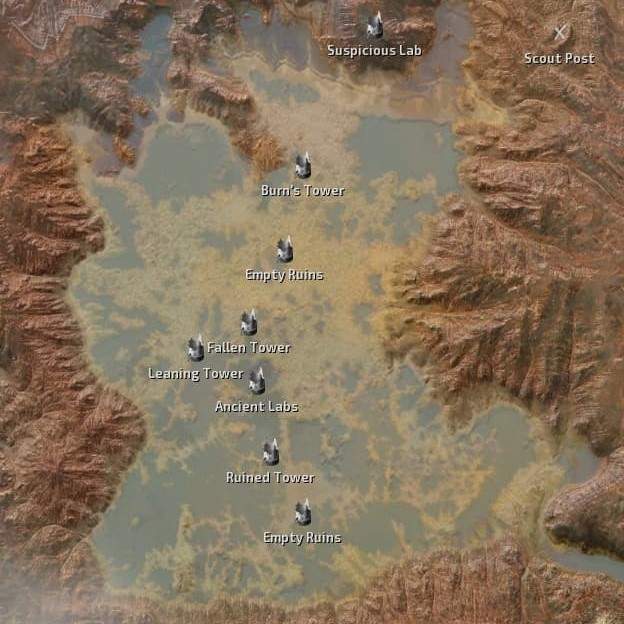
Burn is usually my favorite choice of 7th character/recruit. He is a Robot so he doesn’t need food, lowering your upkeep. It does mean that you are committing to settling soon though since you need a repair bed for him in the long run or he’s not going to be able to maintain 200 hp on all his limbs as maximum… you also need robotic repair kits. But for what it’s worth, once your Burn reaches high skills like your other characters, he’s going to be a god of war.
There will be lots of robots along the way… DO NOT fight them when you are in the water… get out of water.
There’s an Ancient labs there that has lots of stuff that you can loot… also lots of robots… so yeah, hacker weapons and falling suns all day, don’t use katanas… also that plank we had from before? Use it.
With these ancient books and Burn, your path will take you further toward teching up, even before you have a settlement… so I’d go on a quest for hunting down more ancient books at various locations… with this party the way it is, AND your robot? The only thing you need to worry about is food, and skeleton repair kits.
Sidenote: Burn is a Skeleton (robot) and that means he can endure the acid rain condition and go to a zone where there are Skeletons who sell the really high quality prosthetic limbs… this is why I said he is what you need for those.
Choice 2: Dust King
I would choose this choice if you want to go bounty hunting…
I would also choose this choice if you like scorched landers (black people???) There’s a guy here you can recruit for free called Cat. He’s legit one of the only FREE scorch landers you can recruit. I like free recruitment since it saves me time 🙂
To do this, I would head south from Mongrel and get to Hub and then from there go to the Dust King Tower:
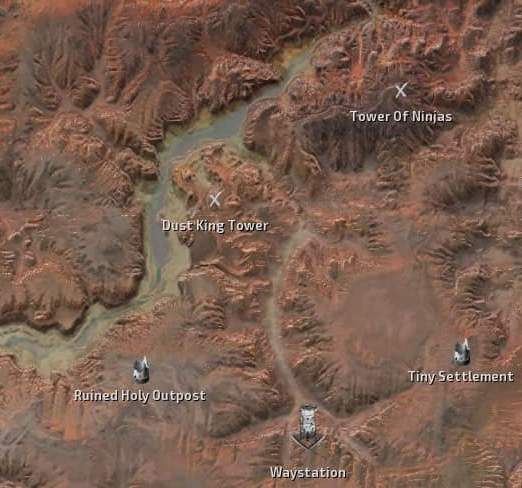
It’s really an easy fight for you at this point with 50+ toughness and 30+ dodge… and I dont’ even know how good your melee attack and defense is at this point, but likely in the high 40’s. Grab that bandit king, make sure you heal him after the fight so he doesn’t die. Pick him up. Go upstairs in the tower and check the cages there…Cat should be inside one of the cages and he should join you once you free him.
I’d turn this Dust King in to the Shek’s main base in Admag:
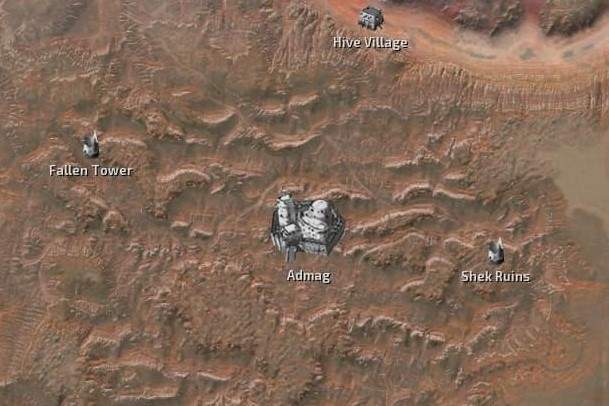
You will earn reputation with the Shek for doing so.
Choice 3: Cannibals? Eat this! Berserkers? I’m Naked, Come at Me
SO here’s a fun one… you’ve done fogmen, and they are now easy for you… just a bunch of idiots running around with sticks. You can go fight the Cannibals! The upgraded version of fogmen!
Nobody to rescue or recruit or anything but they do have some interesting loot. AND if I’m not mistaken if you capture their leader and turn him in for a bounty with the Shek you also get major respect and reputation with them… Can you tell I like the Shek?
Not much to say here except go northwest and smash everything that comes across your way… Don’t go further north though since you might run into things like Leviathans…
There’s actually some Sheks that are called Berserkers along the western coast south of the cannibals… If you want to train your toughness beyond 80 at a reasonable pace, I recommend going naked there and fighting those shek Berserkers who are using Heavy weapons… Each hit they hit will hurt like hell, but oooh baby that toughness will go up! (For your Hive characters, I recommend keeping on their Assassin Rags and Drifter pants or Samurai Clothpants…)
Midgame: Arach
I can hear you asking me “Are you nuts?” Yeah I am! I mean I did make this guide after spending hundreds of hours restarting a game repeatedly trying to figure out the fastest way to progress!!
SO I’m assuming you’ve done one or all of the three choices I gave you. You are probably ready to settle down.
The fastest way forward is to settle somewhere decently close to Arach. You want to bring with you some building materials, some iron plates, and as many BOOKS as you can buy before doing this… Oh and some electronic components (easily done when you just grab them off of robot spiders). You will need the corresponding food types that you want to farm… like bring enough wheat, and whatever other food/hemp/cotton you need to research and grow. Hemp is easier to grow than Cotton is in drier climates in this game. Obviously you want to bring your ancient books with the regular books you buy. It’s always a pain to go and shop for stuff you need once you settle so I tend to just bring EVERYTHING I need and just settle in one go, and go straight for tier 6 with everything I need. (Trader/wooden backpacks really really help).
Use the Prospect tool to look at resources available. I like to settle either west of Arach near the coast Or South West. Just make sure you don’t settle inside Shek or Empire owned territory so you don’t have to pay taxes or whatnot.
- I’d build stone extractor
- Build a refinery to make building materials
- Build a small shack
- Build a research bench in small shack (and get to researching asap, focus on teching UP to higher tiers).
- Build a metal refinery thing to make iron plates next to an iron node.
- Research storage…. build some for those building materials and iron plates.
- Upgrade to a larger building and make a level 2 research bench (which you will continuously level up to higher tech).
- Research and build your farm, and the stuff required for making bread. Use Bread to feed yourself until you can get a cooking station, batteries, windmills, and whatever recipe you’re going to use to change those bread into other things that are more nutritious.
- Once you have the good food being produced consistently (gohan, dustwich, or foodcube) (I still don’t know how to do meat wrap consistently… like I don’t bother raising animals for the meat… too much work) you can then set up the most important reason you get this settlement.
- Medical production!… Make medical bandages that you need to heal yourself! Keep producing this! This is the main reason you settle near Arach!
Once you have this being produced and set up, make a repair bed for Burn if you have him, if not, proceed to saving up lots of first aid related items AND store up lots of food. Right before you are ready to go, make 7 bedrolls and back everything up and get ready to really GRIND!
Bring food, medical first aid stuff, bedrolls and head into Arach to fight those endless amounts of spiders! Work on whatever stats you like at this point… this is just the PERFECT spot to grind stats. You also want to maybe get away from time to time and put down the bedrolls to heal from sleeping (sleeping heals you faster!). Keep in mind those Desert Sabres from earlier that we bought in Mongrel? Use them here, Desert Sabers do more damage to spiders.
This is where I grind my characters up to 80+ stats in everything. When you feel ready and when you can literally handle hordes of these spiders without breaking a sweat, you go to find the Bug Master.
The Bug Master has maxed out stats… he has 99 in everything. He is a GOD. And that makes him be best character you can ever Abduct. Yes… Abduct.
Because like in my first guide? You abduct an enemy and keep him in a cage and take him out for training time? The Bug Master is your level 99 maxed out training partner. DO IT! Get everything Maxed out for your 7 characters!
Then turn him in to Admag and the Stone Golem (The Queen of the Shek who sounds like she’s got a head on her shoulders according to her lore and what every shek says about her…) will give you her… wait for it… DAUGHTER! Yay! Now you get the Shek Princess 🙂
You’ll have to train her of course, but she’s your 8th member so, it shouldn’t be too hard at this point to fight spiders in Arach until she’s up to snuff.
At this point this guide kinda ends… I mean you can go up north to kill Leviathans just for fun or destroy the faction filled with racist pigs called The HOLY Nation if you want.. hell, take their leader and turn him in to Admag and see what happens? DO you get to marry the Stone Golem herself? Who knows… I never got that far because around the time I get the Bug Master, I bow to the Bug Master and say “thank you sensei” and I start a new game to see if I can do all this FASTER.
End Game
Do whatever you want! Explore the whole map! Remember those factions in the beginning who chased you at the bad start locations that aren’t HUB? Go to those and annihilate them! Yeet!
Sorry, again, I always start over before this point… I’ve not explored the WHOLE map… But hey maybe one day I will! I think the best way to do that is to make characters that look and feel interesting to me… I keep designing new characters and exporting them 🙂 I’ve made a Hive Warrior that looks like a hammerhead shark and I name him Sharky.
Oh and with the addition of the south east part of the map there is a LOT of end game content now… I haven’t explored there because of how often I restart, but yeah… I’m actually playing a long term “maybe permanent” playthrough since I’m probably not going to make another guide UNLESS I bump into something cool.


Be the first to comment