
This guide tells you how to use Weather Stations on worlds that have weather events. You’ll understand how Weather Stations work and how to connect them with logic devices to make a system that warns you about storms.
Comprehensive Guide to Weather Station
Getting Started
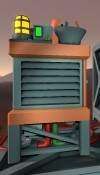
This is the Weather Station:

You can craft a Weather Station Kit at the Electronics Printer for the following materials:
- Iron – 8g
- Copper – 5g
- Gold – 3g
- Steel – 3g
You’ll also need a Welder and 3 Plastic Sheets to finish construction once the kit is placed, and some cables to hook it up to your power network and any logic devices you want to use it with (some examples are included later in this guide).
The Weather Station will consume 10W of power while activated. Don’t forget to turn it on! There is a power switch up top next to the status light.
Note: The Weather Station won’t detect weather events if it’s placed inside what the game considers a room. If you’re not sure, use an Atmos Analyzer Cartridge in a Tablet. Check while standing next to your Weather Station – if it shows “World” above the readings, then your Weather Station should work fine.
Weather Station States
There are three states the Weather Station transitions through as weather events happen, indicated by the color of the status light on top:
All Clear
- No storms incoming.
- The NextWeatherEventTime output is 0.

Incoming Storm
- A storm has been detected and will arrive soon.
- The NextWeatherEventTime output is the time (in seconds) remaining until the storm hits.
Active Storm
- A storm is currently happening (which you probably already noticed).
- The NextWeatherEventTime output is 0.

In addition to the status light changes, the turbine on top will spin during the incoming/active storm states. This is only a cosmetic effect, it does not generate any power.
Note: the Mode parameter on the Weather Station is not currently used to represent these states, and will always read as 0.
Logic Device Examples
While you can get by well enough on just the visual cues at first, adding a logic device system gives you some more detail to work with, and can help you know whats happening without having to constantly keep an eye on it. Here are some basic setups to get you started:
Countdown Timer
You’ll need the following materials for this section:
- Kit (Console) – x1
- Kit (Logic I/O) – x2
You’ll also need enough cabling to wire everything together (the exact amount will depend on how you arrange your devices). Make sure to make a connection over to the data port on the Weather Station

Use a screwdriver to program the chips as follows:
Logic Reader
- In = Weather Station
- Var = NextWeatherEventTime
Logic Writer
- In = Logic Reader
- Out = LED Display
- Out Var = Setting
Unless you finish this during the warning time right before a storm (if so, great timing!), you won’t be able to tell right away if it is working since the display will still show 0. So you have two options:
- Wait for a storm and hope you catch it working during the warning time before the storm hits (this can take several game-days before the game decides to trigger your next storm).
- Use the Incidents Menu to force a storm event (which you can choose to cancel after testing the circuit).
To open the Incidents Menu, hit Esc to open the main menu and click the button that says “Open Incidents”, then hit Esc again to return to the game. The Incidents Menu will remain open, and you can interact with it while holding the Alt key. (This way you can instantly see the results without having to pause/unpause the game).
These are the two relevant buttons for our testing:
- The first toggle option will trigger a storm event with a warning period (or reset the warning period to a new random time if there is already a pending storm), which is enough for testing our circuit.
- The instant toggle behaves a bit differently: if there is a incoming or active storm, it will cancel it (which you can do once you know the circuit is working). If there is no current storm event, it will jump straight to an active storm with no warning period.
Adding a Warning Alarm
You’ll need the following materials for this section:
- Kit (Speaker) – x1
- Kit (Logic I/O) – x1
- Kit (Logic Processor) – x1
- Kit (Logic Memory) – x1
You’ll also need more cables to wire everything together. Remember to connect it to the circuit from the previous section as we will be reusing the value from the Logic Reader in this part.
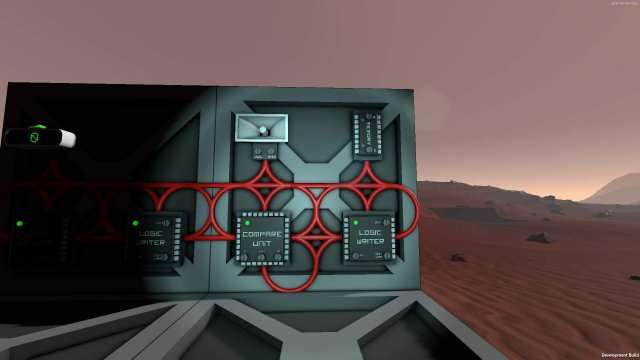
Use a screwdriver to program the chips as follows:
Logic Compare
- 1 = Logic Reader (from the previous section of the circuit)
- 2 = Logic Memory
- Out = NotEquals
Logic Writer
- In = Logic Compare
- Out = Klaxon Speaker
- Out Var = On
Logic Memory defaults to a value of 0, which is what we need in this case so no adjustment is needed
Now you have an alarm that will sound while an incoming storm is detected, so you’ll know when to prepare for a storm without having to constantly check things.
Speaker volume and alarm sound can be set according to personal preference. Keep in mind that with this circuit, the alarm will be active during the entire warning period before the storm hits. This time varies with each storm, and in my testing I’ve seen it range from 3 to 13 minutes.


Be the first to comment