This build prioritizes Forgive Me Please, to activate gasoline and ignite the whole map on fire at once. With this build I’ve even finished the teleporter event before it charged to 1%, and beat Mithrix without ever using a single ability or attack.
Guide to Overpowered Tank/Damage Build
Preview
The main focus of this build is to have fun, so feel free to mess around with it, and change it however you want. And if you want some more boss damage, or want some attack speed go ahead and build it.
The basics of this build are to use Gesture of the Drowned as well as Forgive Me Please, and stack as many on-kill effects as possible. Then use Fuel Cell’s to reduce Forgive Me Please’s cooldown so it’s always active.
The next part of the guide will be separated into 2 sections, necessary build, and optional build. Necessary build contains items you must build for this to work, and optional build contains items that somewhat work with this build, that you can get if you want.
Necessary Build

- Forgive Me Please will activate all on-kill effects, which is crucial for this build. Feel free to have any equipment you want until you get Gesture of the Drowned, then you need to switch to this.

- Gesture of the Drowned reduces equipment cooldown by 50% (15% per stack), but automatically activates it once it’s off cooldown. This means Forgive Me Please will automatically activate without you having to press your equipment button.

- Topaz Brooch gives shield on kill. Forgive Me Please automatically activates Topaz Brooch, giving you a full hp shield. It’s best to get around 10 20 of these, because for each one you have, the more shield you gain per tick of Forgive Me Please activating.

- Tougher Times will have a chance of blocking incoming damage, useful since you’ll be tanking a lot of damage.

- Gasoline ignites nearby enemies on-kill. Forgive Me Please automatically activates gasoline, meaning every monster near where you drop Forgive Me Please will be ignited. This is the best item in this build, it’s best to focus on stacking a lot of these whenever you get whites. But spare some room for some other stuff too.

- Fuel Cell reduces equipment cooldown by 15% per stack. Every time Forgive Me. Please activates, it throws a doll on the ground, repeatedly activating your on-kill effects for 8 secs. If you stack 7 Fuel Cell’s, then Forgive Me Please will have an 8 second cooldown, meaning it will always be active. If you get 11, you’ll have 2 Forgive Me Please active at one time, and 15 is 3.

- Will-o’-the-wisp spawns a giant lava pillar on kill, good for extra damage.

- Infusion gives 1 hp on-kill, up to 100. Forgive Me Please automatically fills Infusion for you. It’s good to get a lot of these for extra health.

- Ignition Tank increases the damage of ignite effects by 300% per stack. It’s really good to get a lot of these to increase the damage of Gasoline.

- Ceremonial Dagger sends out homing daggers on-kill, Forgive Me Please automatically sends them out.
Optional Build

- Delicate Watch increases your damage by 20%, but breaks if you ever fall below 25% health. Really good for extra damage because you’ll rarely get that low health.

- Roll of Pennies gives you money whenever you’re hit, money = good.

- Repulsion Armor Plate reduces damage taken by 5, good in early game.

- Medkit gives a delayed heal after taking damage, good in early game. Don’t get Medkits late game with this build.

- Personal Shield Generator gives you a shield based on your maximum health. Really good item because the shield from Topaz Brooch extends with Personal Shield Generator.

- Ghor’s Tome chance to drop gold on-kill. money = good.

- Ukelele strikes multiple enemies with electricity on hit, only get a few of these for AOE dmg.

- War Horn increases attack speed every time you activate Forgive Me Please. Only get one of these, the attack speed buff lasts for 8 seconds, and Forgive Me Please will have an 8 second cooldown if you get enough fuel cells, and War Horn increases duration per stack not attack speed, so stacking this is useless.

- Hunter’s Harpoon gives movement speed on-kill, which is really nice.

- Frost Relic surrounds you with an ice storm on-kill, but I’m not sure if Forgive Me Please activates this. Regardless, it’s a good item.

- Interstellar Desk Plant gives healing orbs on-kill, do not get this if you’re playing solo. It’s only good to help teammates.

- Titanic Knurl increases health and regeneration, good for extra max health.

- Little Disciple fires tracking wisps while sprinting, good for damage.

- Needletick has a chance of collapsing enemies, good for damage.

- Lost Seer’s Lenses have a small chance to instantly kill any non-boss enemy. Really good for damage, and corrupts critical strike so you’re not tempted by that demon.

- Plasma Shrimp gives shield and makes attacks do more damage while you have a shield, and you’ll always have a shield with this build.

- Stone Flux Pauldron double your health but halve your movement speed. This item is 100% up to you. I prefer not getting it because I like having movement speed, but your choice.
Side Notes
Here are some results I found from testing this build out myself.
First off, if you stack enough Fuel Cells, you can have 3 dolls be out at one time from Forgive Me Please. But I encountered what I believe to be a bug. The way it works is, Forgive Me Please lasts 8 seconds, so if you lower the cooldown of Forgive Me Please to around 3 seconds, then you throw one doll out, then after 3 seconds another, then after 3 seconds another. Then the first one will disappear, and it will keep repeating that cycle. But once I stacked enough Fuel Cells to do this, all 3 dolls came out at the same time, instead of 1 at a time at 3 second intervals.
The second thing I want to mention is that if you’re going to try this build, the first time you go to the Bazaar Between Time, make sure you get everything you want, because you won’t be able to go back once you have Gesture of the Drowned. You might end up accidentally attacking the shopkeeper because of Gesture of the Drowned activating Forgive Me Please, and be kicked out.
The third thing I want to talk about, is who to try this build on. Personally, I made this build for MUL-T, but it can really be done on anyone you’d like, the best probably being Acrid.
Results
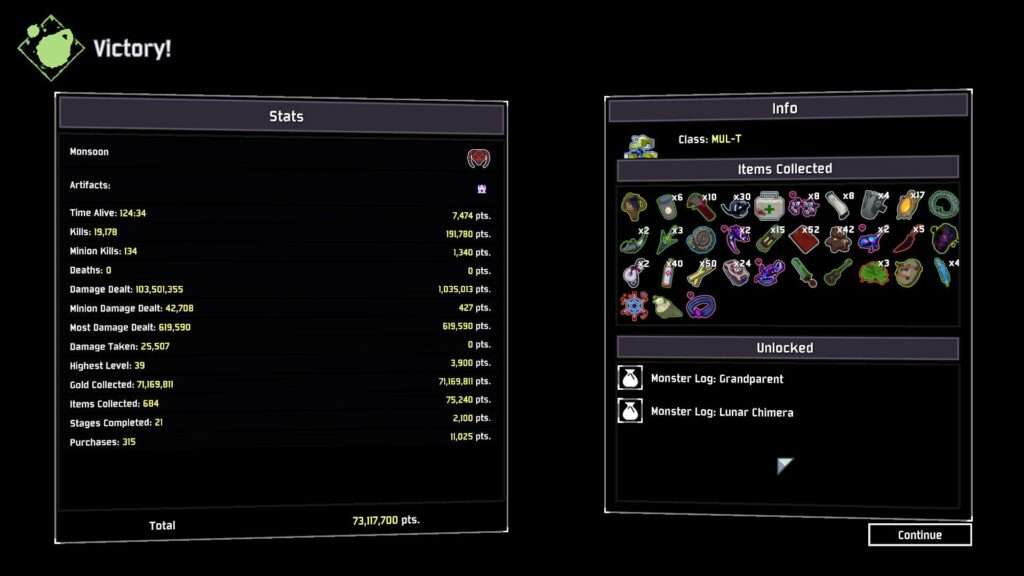
Here is a screenshot of me testing out this build earlier, going on a 2-hour run, and beating Mithrix with it.

And here is a YouTube video I published of me in the same run, defeating Mithrix without ever using my abilities. That means no left clicking, no right clicking, no shift, and no R.


Be the first to comment