Gameplay Tips and Tricks for New Players
General Advice: If you want something, focus on it! It’s better to split your time focusing on specific things than all your time doing everything poorly.
Core
For weapons/shields, each level increases the damage/shields linearly while exponentially increasing in cost. Milestones are every 10 levels except for the last two milestones which are every 15. For utilities, the milestones are every 20.
Weapons are physically located on the ship, so the turrets on top have slightly higher range.
You can swap core milestones to squeeze out damage. For example, all milestones on laser boost, laser boosting, then swapping to damage.
Tiers are a 250x damage/shields boost. It’s worth swapping unless you need a specific milestone.
Compute
Remember you can spend salvage!
Initially, 0.5*(8*levels+1)^(0.5) = effect. Compute challenge completions increases this exponent (from 0.5 to 0.52, etc)
If you cap both damage 1.1 and damage 1.25, the effect from damage 1.25 will be exactly 2.5x the effect from damage 1.1, despite investing 100x as much compute. So capping out previous tiers is always beneficial.
Here are the relative benefits from maxing out each tier, compared to the previous tiers–
| 1.1 | |
| 1.25 | (0.35)/0.1 = 3.5x damage/shields |
| 2 | (2.35)/0.35 = 6.72x damage/shields |
| 4 | (6.35)/2.35 = 2.70x damage/shields |
| 10 | (16.35)/(6.35) = 2.57x damage/shields |
Compute effects are additive. You can see compute contributions by hovering over damage in the core tab.
Compute Cap+ increases the cap of previous tiers. The net effect is that the exponent is doubled, and tripled for Cap++. In practice, this makes overnight computing and compute challenges much stronger.
Synth
I like crew scaling delay, base production, damage, synth, warp speed, module slots, salvage, and shields, in roughly that order.
- It’s worth buying crew delay, base production and damage a tier above.
- It’s never worth buying vp gen/max until lategame.
Special modules that work offline: Salvage Auto Collector (!)
Special modules that don’t: Energy Void Auto Collector, Void Beacon, Automators
V Device
If you click sector data, you can see the shards that drop in a sector, as well as what the shard looks like when maxed. You can also see the type of shard by its shape.
- Shard resonance increases the amount of shards that drop at a time.
- Flex shard II has a unique benefit! All other low-tier shards can be safely discarded.
You can swap damage shard location against hybrid waves. For example, against a hybrid boss, swapping from shields to armor/hull once the shields are down.
Ship Layouts
Weapon Advice: In general, you’re incentivized to focus on one weapon type (because of warp/synergies) but to have at least one of the other type (to have access to both laser boost and volley for bosses)
It’s also recommended to have a diversity of enemy counters (spam, ranged, phasing) so you can tackle warps as they shift in.
- For shields, max bulk generators -> bulk generators + 2 deflectors.
Some common late game layouts
Lasers:
- 2x gatling 1x beam 1x laser cannon-> 2x gatling, 1x beam, 1x laser cannon, 2x charge
- 100% boost uptime.
Kinetics:
- 4x kinetic -> 2x kinetic, 2-4x bomb -> 2x missile, 2x kinetic, 2x bomb
- Good against armor. Missiles and bombs really want upgrades though.
- Higher tier kinetic cannons, even if you can’t upgrade them, can bail you out of timewall sectors.
Hybrid:
- 1x “flex” 1x beam 2x laser cannon -> 2x missiles 1x beam 1x laser cannon 2x charge -> 2x disruption 1x beam 1x laser cannon 2x charge
- 100% boost uptime + anti armor spam.
Base
Base challenge completions are very good. Boosters are multiplicative, so having multiple boosters affect the same tile is very good.
The best layouts will alternate boosters and income. A good heuristic for finding the best layout is to fill all squares with boosters, then figure out where to place income so as many boosters overlap in those squares. Income that drains usually requires two drain reducers minimum.
The priority should be unlocking slots and improving base income. Upgrades improve income by 1.25x and boosters by 1.1x, while costs scale by 1.5x and boosters by 10x.
Challenges
Core Computing:
1x beam laser + rest laser cannons. Laser cannons on supportive routing + boosts + shield bonus, beam laser on mass focuser and damage.
(Remember to spend salvage/equip compute shard + battle shard/turn on reactor)
- Core 1: Immediately
- Core 2-3: Cruiser with lvl 95 beam laser (maxing 1.25 cap+), 2x lvl 80 laser cannon support
- Core 4: Heavy cruiser with lvl 110 beam laser (same as above, just wait more), 3x laser cannon support. (5 is possible with improved tracking farm)
- Core 5-6: Destroyer with lvl 110 beam laser, 5x laser cannon support
- Core 7-8: Destroyer with lvl 110 beam laser v2 (maxing 1.25 cap+ cap+), 5x laser cannon support, 2x deflector shields. (Needs a little extra for the boss: farm improved tracking/switch off laser boost module/quick-swap from rapid ramp)
- Core 9: Requires “Salvage Redirection” on Cyber Specialist crew, for 1E27 salvage/sec. Farm improved tracking and salvage for 75-90 minutes in sector 4. 4.26E30 salvage is required for beam laser v3 lvl 70, 5x laser cannon v2, 2x deflectors.
Synth Challenge:
Max gatlings, one beam laser (if necessary), continuous generators. Max damage/shield modules as far as reasonable, then materials. High level (infinite) sensors, alloys, processors are most bang for buck, in general.
Synth damage/shield upgrades bought with synth points work inside the challenge!
(Remember to put on synth + flex shard, turn on reactor)
- Synth 1: T2 infinite
- Synth 2: T3 infinite
- Synth 3: fourth synth slot
- Synth 4: 2E10 synth speed (without synth util)
- Synth 5: ~E20 synth speed, T7 infinite. Go sector 33B, make some combat enhancer module levels. Free halfway through T8/after mastery 2s
Power Hungry:
Remember you can spend salvage! Reactor utility in particular gives 10x max VP. Lvl 1 or 2 Gatlings -> Disruption. A max gatling setup is about 10x max VP in damage, compare damage to sector enemies. Utilize void energy boost to sustain through boss damage.
(Remember to equip modules, power + flex shards, reactor util)
- Power 1: Reactor utility unlocked
- Power 2: Warp VP max MK2 maxed, aim for e12 max VP
- Power 3: Warp VP max MK3 maxed, aim for e16-17 max VP
- Power 4: Warp VP max MK4 maxed, aim for e22 max VP
- Power 5: Aim for e37 max VP (free after first crew masteries)
Base Challenge:
Max gatlings (one beam laser for base carry 3), later disruption charges. Continuous generators.
Reactor
- Reactor scales logarithmically. (Exponential cost for linear increase in benefit).
- A reactor challenge completion is roughly a 1.5x multiplicative modifier on reactor benefits.
- A quick way to buy upgrades is to enter the power hungry challenge and die over and over.
- Another way is to spam prestiges, since each prestige starts with a full reactor.
Research
Pre-unbound research mostly comes from sector progression. You can unlock unbound research earlier than it becomes relevant– buyer beware.
The scaling on research R invested is as follows:
| Salvage: (R/1E22)^(0.255) | VP Max: (R/1E22)^(0.301) | Shard: (R/1E22)^(0.097) |
| Synth: (R/1E24)^(0.079) | VP Gen: (R/1E24)^(0.255) | Research: (R/1E24)^(0.255) |
You can use the exponents to estimate the impact of research modifiers. A 2x research multiplier corresponds to a 1.19x salvage, 1.056x synth multiplier, etc… However since research increases research the effect is actually slightly higher (1/(1-0.255) = R^1.342 as much, so actually 1.27x salvage, 1.076x synth when taken into account)
Warp Drive
Warp rewards increase by 1.1x each half-sector. Mathematically, to maximize total warp, you want to select lower difficulty warp locations before higher difficulty warp locations. Ideally, all warps should be roughly the same level. This is so you have a higher unique warp completions multiplier for the higher warp. (Repeating previously completed warp difficulties does not increase warp multiplier)
- For a warp, you have time to do 4 half-sectors. This means to maximize a warp, you want to be about 125x as strong as the first warp.
- For the enemy spam warps, make sure you bring a counter! Otherwise you can lose time trying to kill all the enemies. Ditto with the ranged warps.
- For the warp tree, the priorities are synth, salvage, damage, warp, base, and “warp compute sync”. However, you mostly want to spend in the same tier of upgrades.
Note that upgrade costs scale differently. Most costs scale exponentially (usually 1.05x, 1.1x, or 1.2x, depending on the number of upgrades)
The auto-warp AI upgrade ignores your current stats, allowing you to gain warp income even while too weak or while in challenges. This is only relevant much later on, though.
Crew
Masteries should be short and sweet– the strategy being to to spend all your starting biosleeves on one crew re-printing them over and over.
- For mastery upgrades, the recommendation is +3 starting biosleeves -> 30x prof -> 30x acumen -> 30x ingen -> 30x eng -> warp -> base -> +1 crew slot.
When pushing a new max, for primary stats, it’s optimal to bioprint 40 levels above your previous max, and for secondary stats, it’s optimal to bioprint 25 levels above. In practice, the maximum quickly softcaps so you don’t have to worry about this unless you’re pushing for the current acumen achievement.
For crew that have row 1 and row 2 upgrades that buff the same stat, it’s optimal to split points evenly between them.
The row 3 crew abilities want them to specialize in one stat and not the other. Read them carefully to see whether they check their stats or the entire crew’s.
AI Points
Recommended AI purchases: Research Auto Select -> Auto Merge -> Smartcraft. Later, Auto Warp becomes necessary. Base Auto Upgrade doesn’t work offline, but is still worth purchasing.
Miscellaneous Tips
- If you want to enter a different sector than what you’ve chosen, you can go backwards to the previous sector then go forwards, you’ll get the choice again.
- Check achievements. In particular, basic ship achievements are a good source of damage/shields.
Basic Guideline for R1 Completion
Crew Menu:
- Total rank 480
- 1x 3500 total ingenuity/acumen/proficiency/engineering bonus
Warp Upgrade:
- Level 30/100 Combined Battle Improvement (its the name)
Compute (Upgraded):
- 20 + 20 fighter damage + durabitlity
Research:
- E120 all research
Reactor (Upgraded):
- About 20-30 charges used in Capital overdrive
Notable Unlocks for R1+
- Defeat Sector 73 Boss: Base 5
- Base 5 Upgrade: Capital Research
- Defeat Sector 77A/B Boss: Massive Warp Drive, Warp Locations Keres and Limos
- Defeat Sector 81 Boss: Crew Quarters
- Defeat Sector 82 Boss: Reactor Overdrive
Notable Unlocks for R2+
- Defeat Sector 74 Boss and upgrade to Battle Cruiser: All S. Utility bonuses are now innate
- Defeat Sector 85 Boss: Agile Fighter Bay
- Defeat Sector 86B Boss: Warp Location Machai
Agile Fighter Nodes:
Best for overall farm is shown in first picture (top nodes) – the ships run fast and shoot 3 times.
For primary farm Pulverium, Fortifium or Adaptium better use the second picture setup (bottom nodes) – the ships are slower (your primary target can recover every round) and they shoot 4 times, what makes higher sector farm possible. Especially on warp Limos its easier to always destroy defensive in every round with this setup.


Order of How to Do Crew Masteries
- R0 – Starting sleeve, 4× crew exp, base, warp, link, crew slot, compute, sleeve gen. (Assumes M2 for all crew)
- R1 – Starting sleeve, 4× crew exp, warp, link, compute, crew slot, sleeve gen, reactor. (Assumes M2 for all crew)
- R2 – ×4 crew exp, warp, link, sleeve gen, crew slot, reactor, resource, module, starting sleeve, synth, compute, base, research. (Assumes M3 for all crew)
- R3 – ×4 crew exp, warp, link, crew slot, reactor, resource, module, synth, starting sleeve, compute, base, research, /(page 2) / base 5, overcharge, rank scaling delay, fixture speed, module (Assumes M4 for all crew)
Base mastery is worthwhile to focus before R1 as the scaling on warp from it is significant. Once R1 hits and your bases scale significantly faster and higher inantely, so the mastery falls off to be about 20% relative additional stats.
Warp is always good for rapid scaling, particularly as long as you get it prior to the big warp upgrade for the extra warp cores.
Similarly to base, Compute is extremely useful R0 and R1, but falls off in scaling fighters (what we care about) due to diminishing returns on compute and reinforce bonuses letting us push higher, faster. Reactor becomes important towards the tail end of R1 and holds its importance all the way to R3 and probably beyond.
Starting sleeve mastery falls off a bit as you get reinforcement bonuses and sleeve generation mastery takes over for scaling crew up. Crew exp masteries don’t really change in priority.
Additionally resource mastery becomes a bit better as you progress R’s as you can finish T10 synth and get solid void income to compound with crew skill bonuses.
As we get into the next page with M4’s I focused to maximizing base 5 and sleeve generation (via rank scaling delay), to make M4’s easier. Overcharge is just a significantly powerful pick up, so once the majority of the mastery gain speed is picked up, it becomes top priority. After that fixture speed and a extra module round out what is doable in M4. I don’t think M5 will make sense to shoot for prior to R4 when it comes out, but if it does, stat scaling might become more important.
Research Understanding
When you reach capship, to activate “Research Understanding” (the permanent MEO research from R4), you must first activate the Base 5 Capital Research node.

Cheese (?)
Idling offline ignores your damage/shields, so you can idle in sectors that are too strong, and skimp on damage/shields.
You can save and reload once a boss warning appears to remove the wave that appears before it.
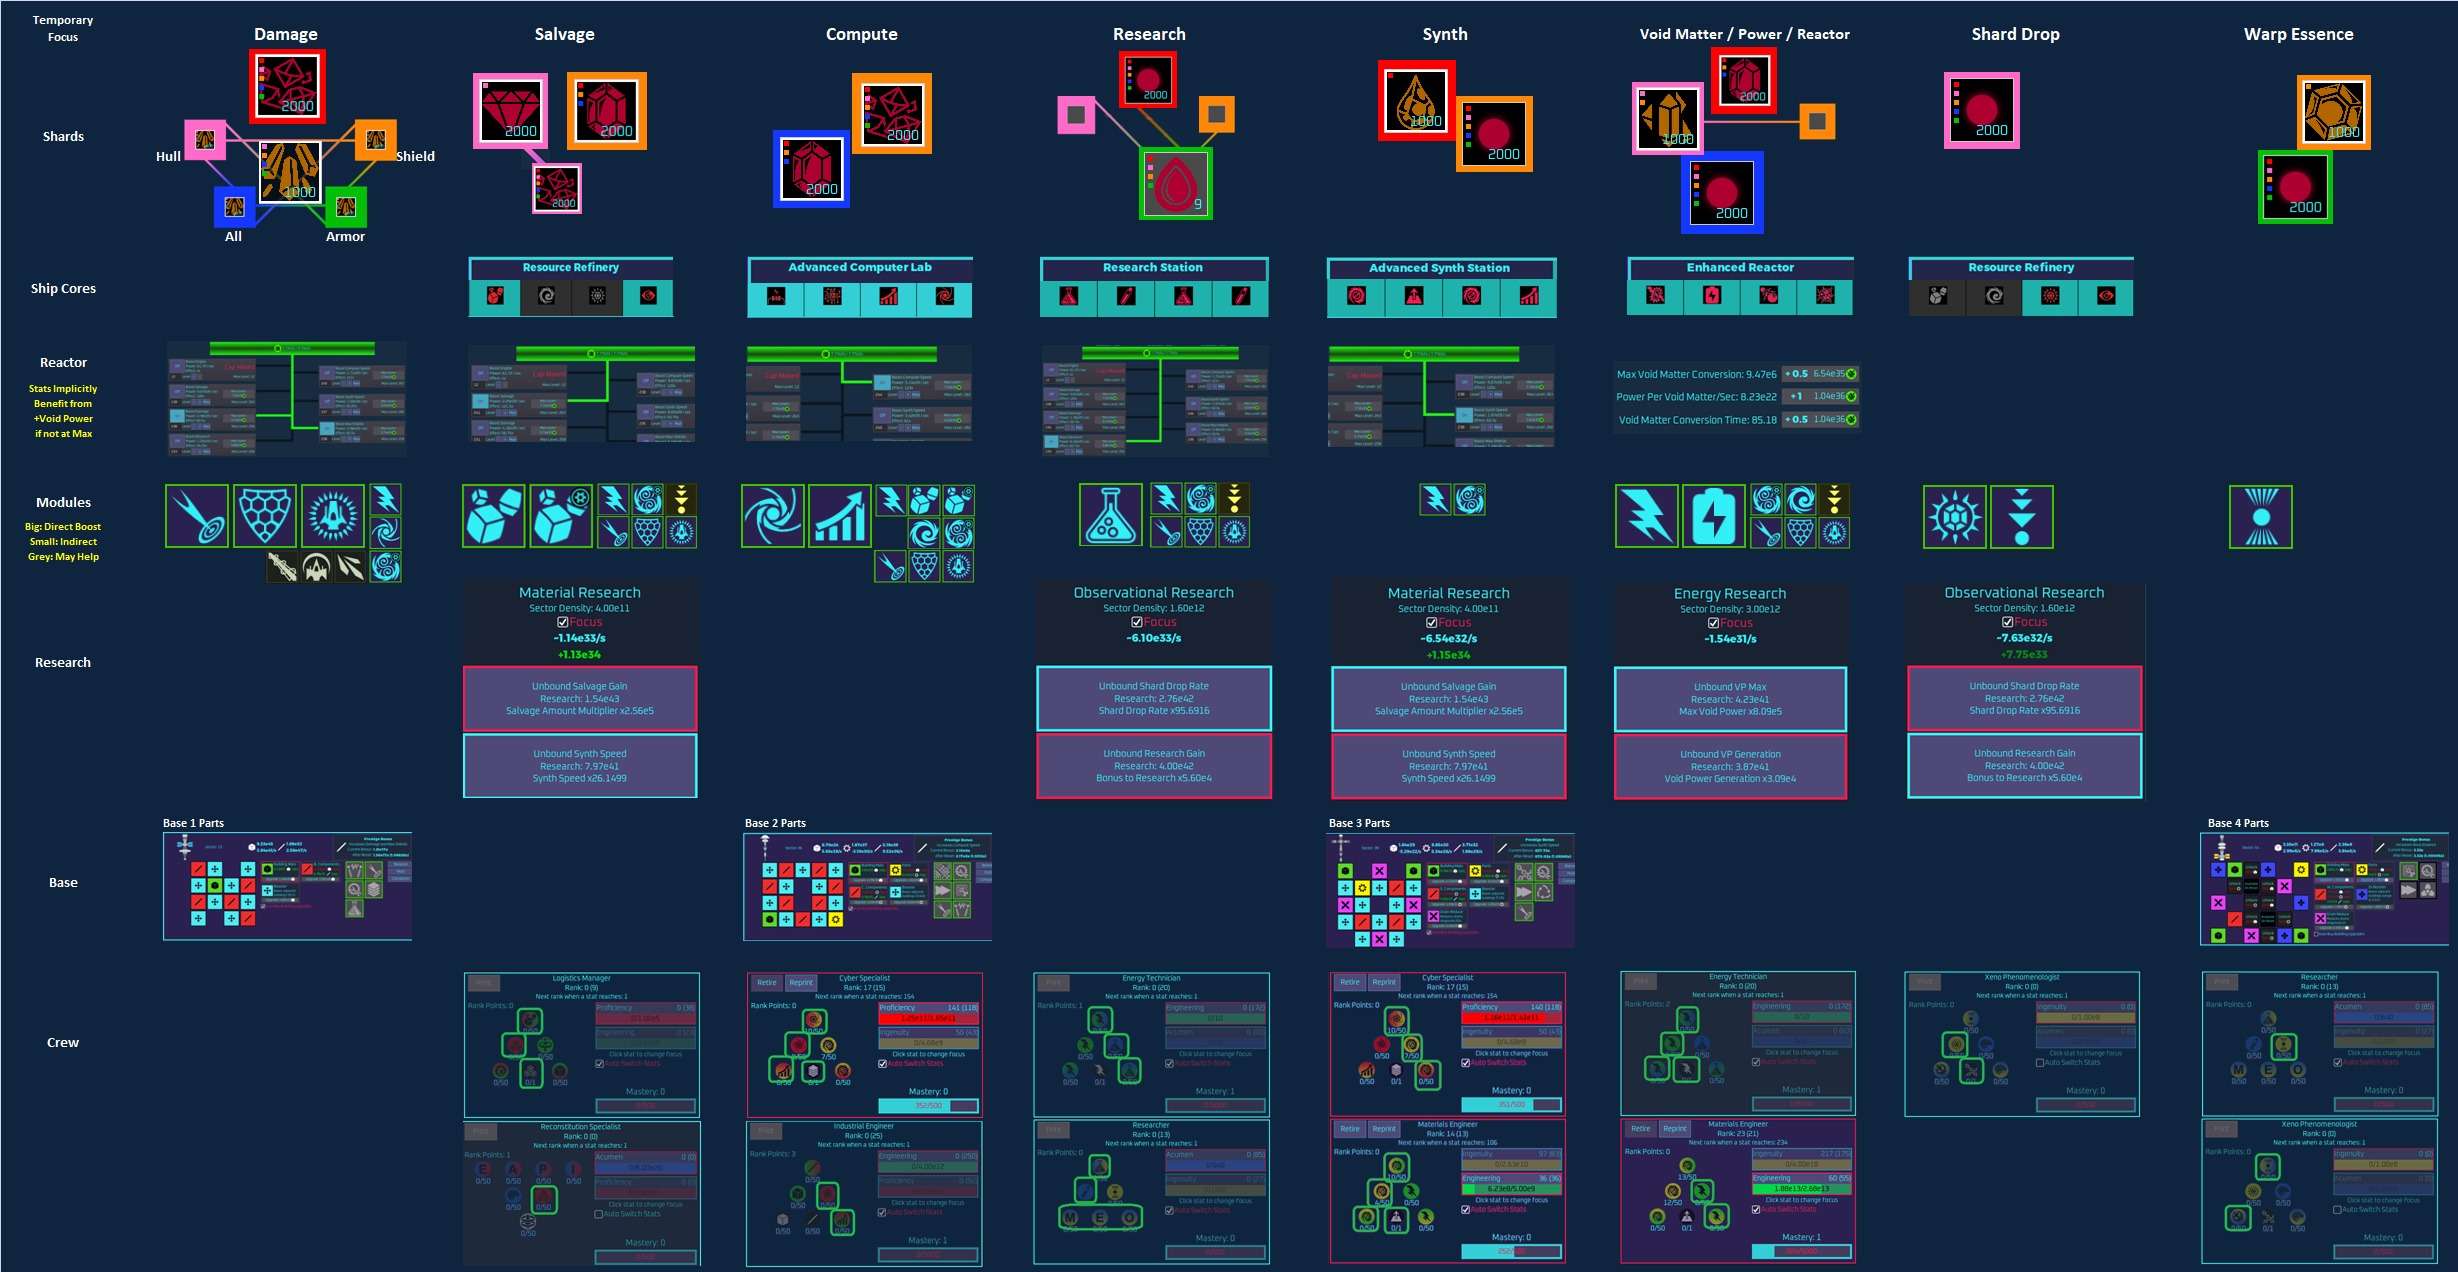
Cheat Sheet for Maximizing Specific Stats
Infographic which should help you remember the settings that you should be tweaking on each tab to focus on a specific stat.
Sometimes, it’s possible to completely maximize two or more stats simultaneously (Like Synth + Compute) – especially when more module slots and links are unlocked.
Spoiler Warning: If you haven’t reached Sector 51, maybe don’t zoom in on this first image too closely, check out the version below instead.
Click to enlarge…


Be the first to comment